All Sacred Seals Locations and Puzzle Guide
✉ Send your thoughts in our Genshin 6.4 Patch Survey!
★ Exclusive: Dive back in time with the Meta History
◆ Hot: Version 6.4, Luna 5 Codes
◆ Builds: Varka, Flins, Skirk, Escoffier
◆ Events: Travelers' Tales, He Who Caught the Wind
◆ Future: Linnea, Version 6.5 Luna VI

Sacred Seals are key items found in the Sumeru Desert. See all Sacred Seal locations and maps, and where to use it in this Genshin Impact guide!
| All Sacred Seal Guides | |
|---|---|
| 3.4 Sacred Seals | Wadi Al-Majuj Seals |
List of Contents
All Sumeru Sacred Seals
| Click to Jump to a Section | |
|---|---|
| Great Red Sand Desert | Desert of Hadramaveth |
There are 60 Sacred Seals found in the Great Red Sand Desert, while there are 48 Sacred Seals found in the Desert of Hadramaveth! These seals are used on Primal Obelisks, which are also found in Sumeru's Desert area.
All Types of Sacred Seal Symbols
| Sacred Seal Types in the Sumeru Desert | |||
|---|---|---|---|
 Ceremony Ceremony |
 Bird Head Bird Head |
 Danger Danger |
 Thunderstrike Thunderstrike |
 Crocodile Head Crocodile Head |
 Sunrise Sunrise |
 Giant Serpent Giant Serpent |
 Valley Valley |
 Sheep Head Sheep Head |
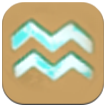 Dune Dune |
 Right to Rule Right to Rule |
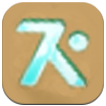 Labor Labor |
 Raised Arm Raised Arm |
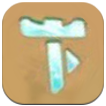 Chisel Hammer Chisel Hammer |
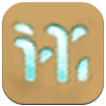 Forest Forest |
 Auricle Auricle |
 Sandstorm Sandstorm |
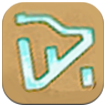 Precipice Precipice |
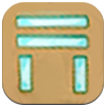 Grand Door Grand Door |
|
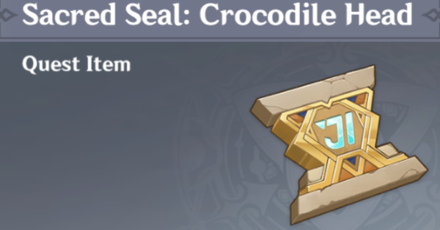
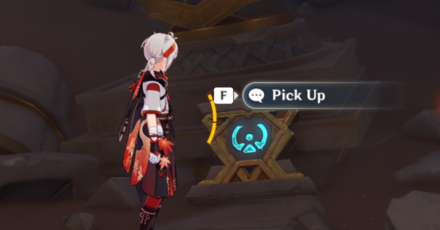
All Sacred Seals will have the same appearance, but what differs the most is the symbols inscribed on the center of the seals!
Inventory and In-Game Appearance
| Inside the Inventory | In the Open-World |
|---|---|
 |
 |
Sacred Seal Locations in the Desert of Hadramaveth
| Click to Jump to a Section | |
|---|---|
| Great Red Sand Desert | Desert of Hadramaveth |
| Locations | Number |
|---|---|
| The Sands of Three Canals | 1 - 12 |
| Debris of Panjvahe | 13 - 18 |
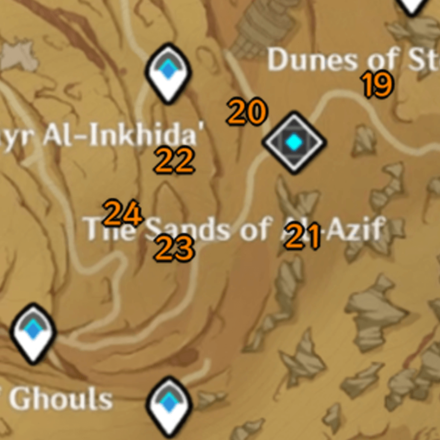
| The Sands of Al-Azif | 19 - 24 |
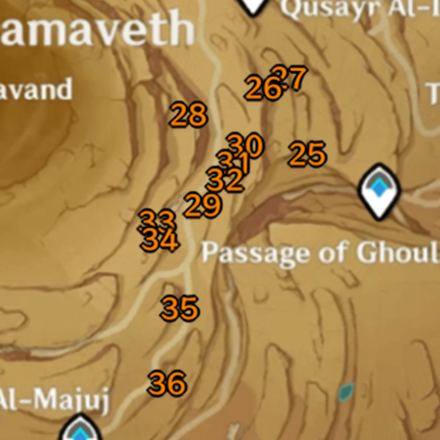
| Passage of Ghouls | 25 - 36 |
| The Temples Forsaken | 37 - 48 |
Sacred Seals in The Sands of Three Canals
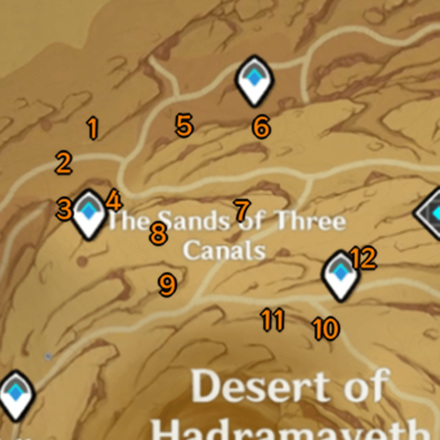 |
| Open image in new tab |
| No. | Seal and How to Get |
|---|---|
| 1 | 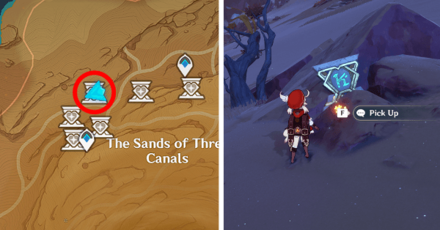 Sacred Seal: Right to Rule • Next to a small tree north of the Teleport Waypoint at the Sands of Three Canals, surrounded by fungi. |
| 2 | 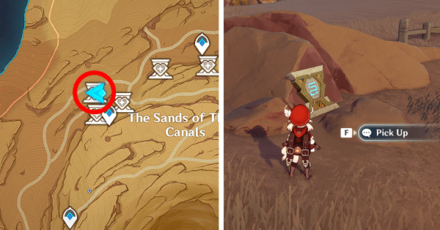 Sacred Seal: Giant Serpent • By the small rock north of the Teleport Waypoint at the Sands of Three Canals. |
| 3 | 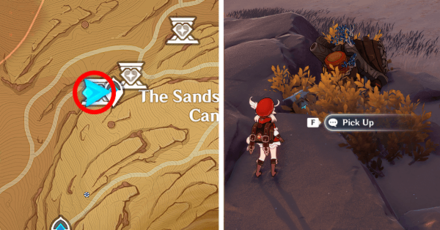 Sacred Seal: Crocodile Head • Located in some bushes beside the remains of a Ruin Guard, near the Sands of Three Canals Teleport Waypoint. |
| 4 | 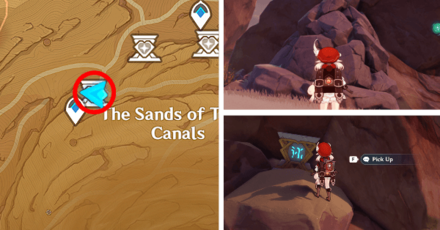 Sacred Seal: Forest • Below the Teleport Waypoint at the Sands of Three Canals, hidden behind a large rock pile. |
| 5 | 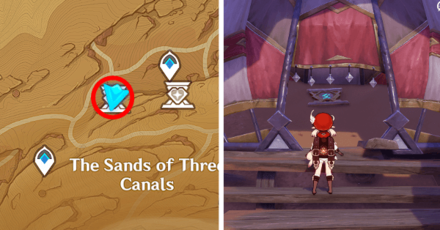 Sacred Seal: Thunderstrike • North of the Sands of Three Canals, inside an Eremite tent beneath the massive tree trunk. |
| 6 | 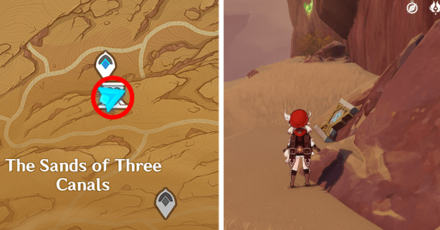 Sacred Seal: Thunderstrike • South of the topmost Teleport Waypoint at the Sands of Three Canals, by the cliff with a Dendroculus nearby. |
| 7 | 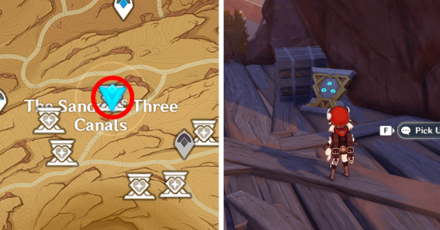 Sacred Seal: Ceremony • North of the primal obelisk, at the center of the Sands of Three Canals. You can find the seal on a wooden platform below the cliff. |
| 8 | 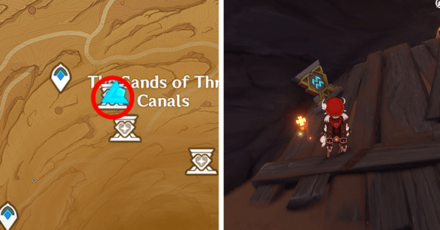 Sacred Seal: Dune • Inside a hollow tree trunk, next to a Blazing Axe Mitachurl. |
| 9 | 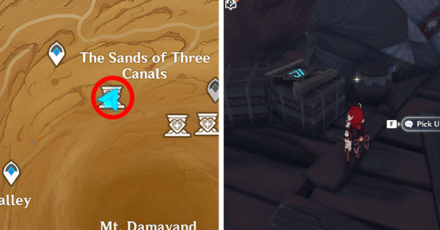 Sacred Seal: Crocodile Head • Located at an Eremite camp surrounded by massive tree bark. |
| 10 | 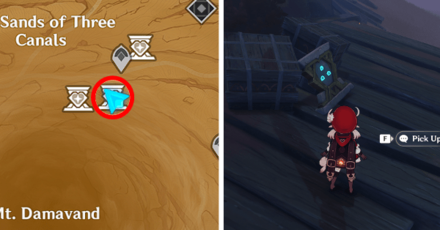 Sacred Seal: Ceremony • South of the Teleport Waypoint in the Sand of Three Canals, on a wooden platform near an area of Wenut attacks. |
| 11 | 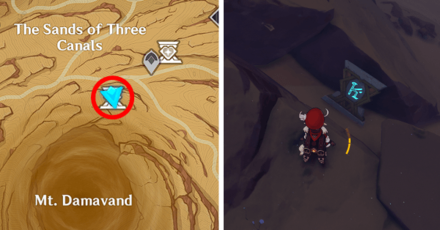 Sacred Seal: Right to Rule • On the cliffs bordering the north of Mt. Damavand, in between some rocks. |
| 12 |  Sacred Seal: Sheep Head • Near the southeast Teleport Waypoint in the Sand of Three Canals, next to a small tree. |
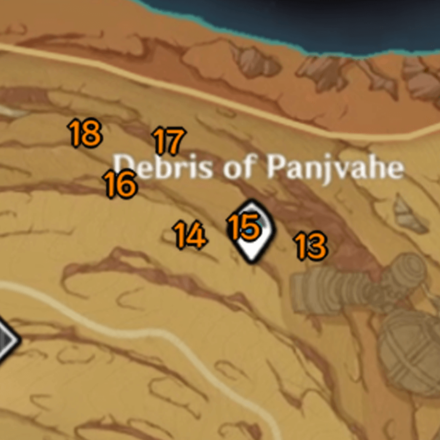
Sacred Seals in the Debris of Panjvahe
 |
| Open image in new tab |
| No. | Seal and How to Get |
|---|---|
| 13 |  Sacred Seal: Valley • Located in front of the ruin entrance in the Debris of Panjvahe. |
| 14 | 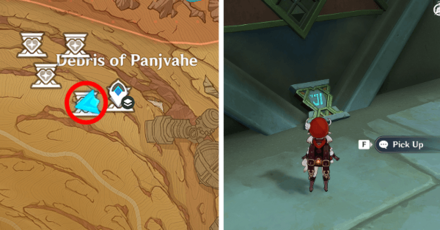 Sacred Seal: Crocodile Head • On the Debris of Panjvahe ruin's entrance roof, near the primal obelisk. |
| 15 | 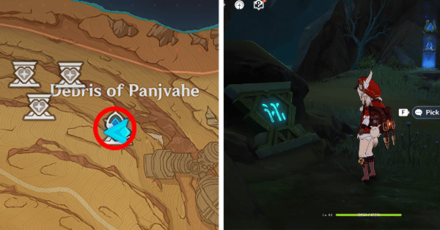 Sacred Seal: Forest • Located right beside the Underground Teleport Waypoint in the Debris of Panjvahe canyon. |
| 16 | 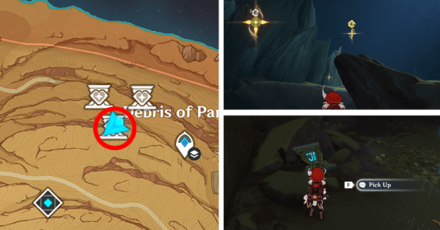 Sacred Seal: Crocodile Head • At the Consecrated Red Vulture nest inside the the Debris of Panjvahe canyon, just past the Fatui camp. Climb the nest using the four-leaf sigil. |
| 17 | 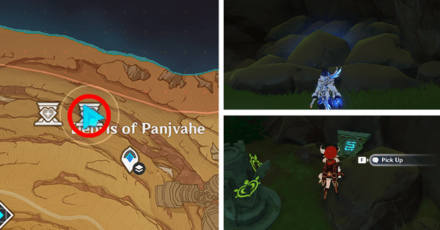 Sacred Seal: Giant Serpent • Hidden behind a large rock pile in the Debris of Panjvahe canyon, past a hilichurl enemy and a Dendro monument. |
| 18 | 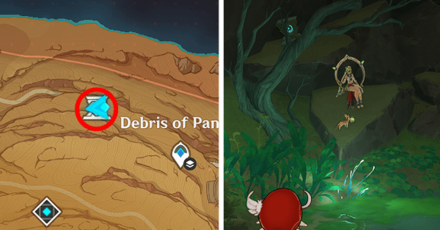 Sacred Seal: Sunrise • Bneath the Consecrated Red Vulture nest, next to a Floral Ring-Dancer enemy. |
Sacred Seals in The Sands of Al-Azif
 |
| Open image in new tab |
| No. | Seal and How to Get |
|---|---|
| 19 |  Sacred Seal: Valley • In a campsite by the road in the Dunes of Steel, south of the giant ruin machine. |
| 20 | 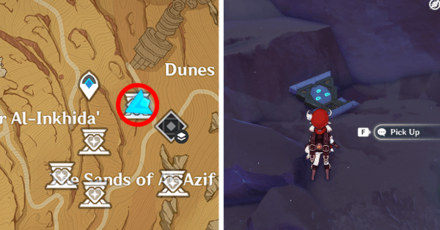 Sacred Seal: Ceremony • Near the forked road south of the giant ruin machine in the Dunes of Steel, near a weathered obelisk puzzle. |
| 21 | 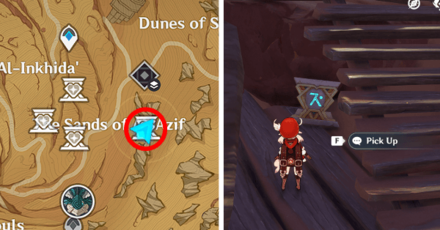 Sacred Seal: Labor • By the stairs of an Eremite camp, located at the Sands of Al-Azif. |
| 22 |  Sacred Seal: Valley • Beside a tent at another Eremite camp, this one located on cliff south of the Teleport Waypoint at the Sands of Al-Azif. |
| 23 | 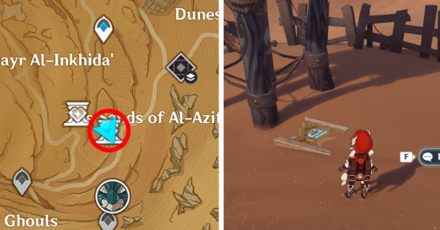 Sacred Seal: Crocodile Head • Located in a Hilichurl camp south of Sacred Seal #22, on the cliffs at the Sands of Al-Azif. |
| 24 | 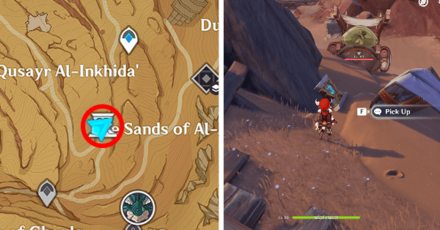 Sacred Seal: Crocodile Head • In an Eremite camp surrounded by giant tree bark, south of the Qusayr Al-Inkhida and in the Sands of Al-Azif area. To the left of Sacred Seal #23. |
Sacred Seals in the Passage of Ghouls
 |
| Open image in new tab |
To access the ruins and the underground areas in the Passage of Ghouls, you must progress through The Dirge of Bilqis world quest. Exploring certain ruins in the Desert of Hadramaveth is part of the quest.
The Dirge of Bilqis World Quest Chain Guide
| No. | Seal and How to Get |
|---|---|
| 25 | 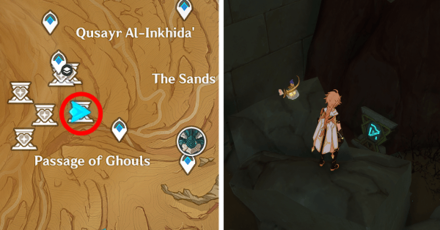 Sacred Seal: Precipice • Progress through The Dirge of Bilqis quest chain to access the area. The Sacred Seal is down the stairs from the Primal Obelisk. |
| 26 | 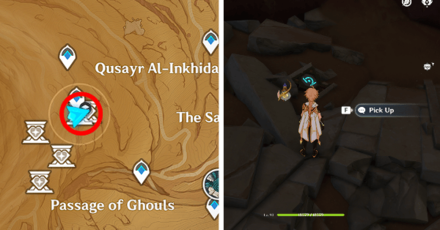 Sacred Seal: Auricle • South of the Underground Teleport Waypoint near Mt. Damavand, next to a Remarkable Chest. |
| 27 | 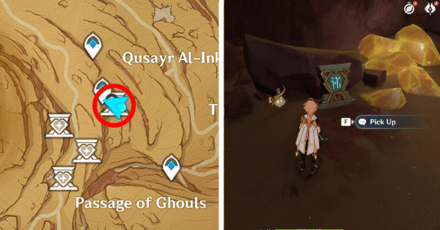 Sacred Seal: Forest • Next to the broken primal construct west of the Underground Teleport Waypoint. |
| 28 | 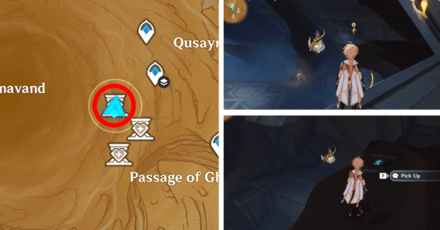 Sacred Seal: Thunderstrike • Progress through The Dirge of Bilqis quest chain to access the ruins. Get to the entrance of the central area. Use the four-leaf sigil to climb the top of the rock. |
| 29 | 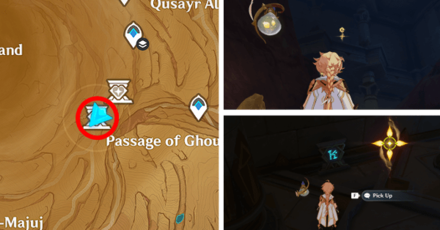 Sacred Seal: Right to Rule • On the wall of the room where a Consecrated Scorpion is located. Use the four-leaf sigil to climb the wall. |
| 30 | 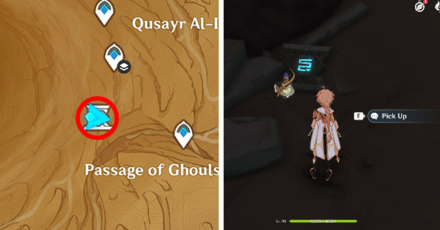 Sacred Seal: Giant Serpent • Behind the door to the central area in the Passage of Ghouls ruins. The seal can be found near the stairs. |
| 31 |  Sacred Seal: Valley • At the Eremite camp east of the Primal Obelisk found on the surface of the Passage of Ghouls. |
| 32 | 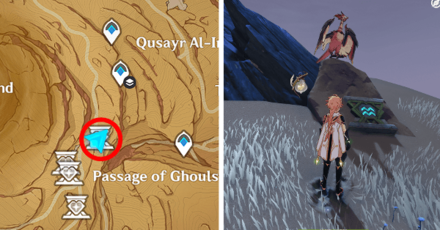 Sacred Seal: Dune • At the top of the cliff near the Passage of Ghouls, next to a red vulture. |
| 33 | 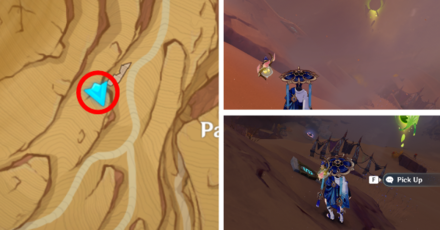 Sacred Seal: Giant Serpent • On a cliff surrounded by a Large Atmospheric Vortex that you need to dispel using the Liloupar gadget at ''2 Charges.'' |
| 34 | 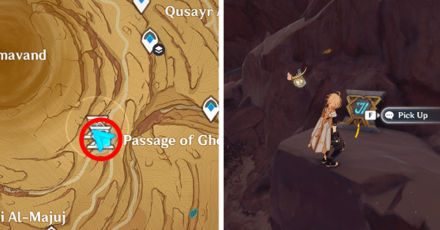 Sacred Seal: Crocodile Head • Located below the cliff where Sacred Seal #33 is, with a group of Fungi guarding it. |
| 35 |  Sacred Seal: Valley • Located at a camp with a Consecrated Scorpion and a Precious Chest. |
| 36 | 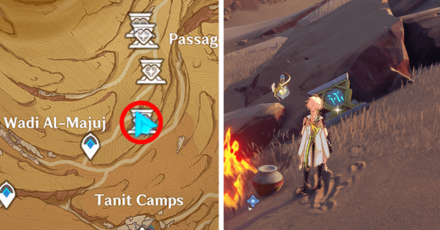 Sacred Seal: Forest • West of the Teleport Waypoint at the Wadi-Al Majuj, near a fatui camp. |
Sacred Seals in The Temples Forsaken
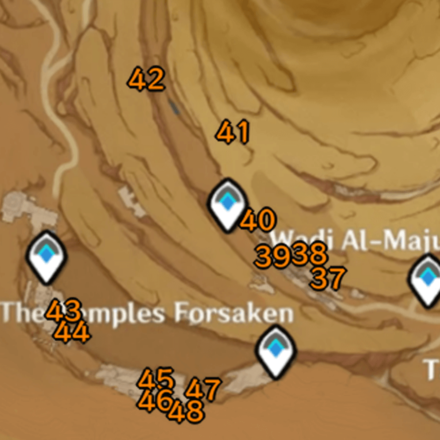 |
| Open image in new tab |
| No. | Seal and How to Get |
|---|---|
| 37 |  Sacred Seal: Valley • Situated upon a ledge near the Hidden Ruins entrance at the Wadi Al-Majuj. Use the four-leaf sigil to climb the ledge. |
| 38 | 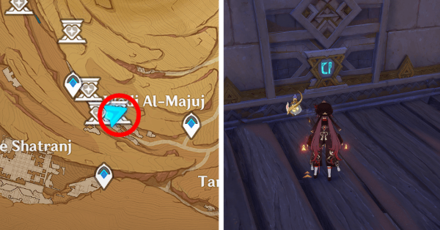 Sacred Seal: Raised Arm • Fitted inside the wall next to a primal construct in the Wadi Al-Majuj ruins. |
| 39 | 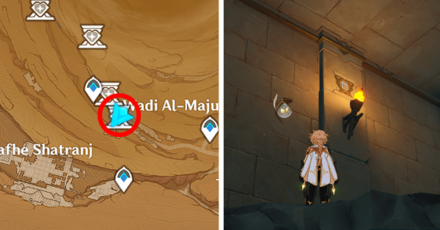 Sacred Seal: Grand Door • Fitted inside the wall and above a torch. Found in a room with a Remarkable Chest located in the ruins of the Wadi Al-Majuj. |
| 40 | 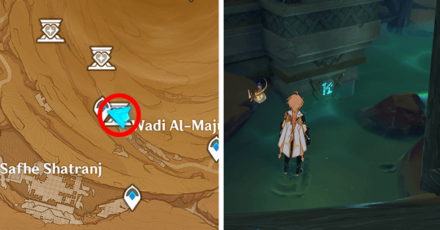 Sacred Seal: Right to Rule • Fitted inside the wall, half-submered. Located near the time trial mechanism, just below the Teleport Waypoint in the Wadi Al-Majuj. |
| 41 | 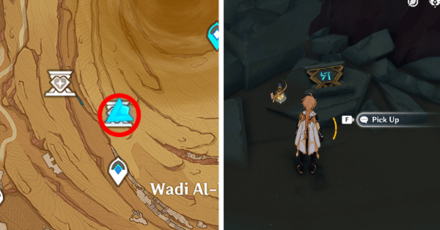 Sacred Seal: Danger • Located north of the Wadi Al-Majuj Teleport Waypoint, near a Primal Obelisk and some torches. |
| 42 | 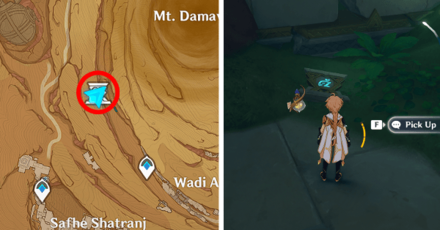 Sacred Seal: Bird Head • Past the torches near Sacred Seal #41, follow the river down the waterfall west of the Primal Obelisk. |
| 43 | 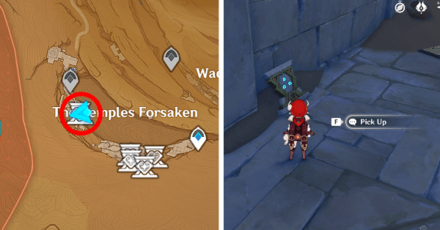 Sacred Seal: Ceremony • At an Eremite camp near the northwest Teleport Waypoint in The Temples Forsaken. |
| 44 | 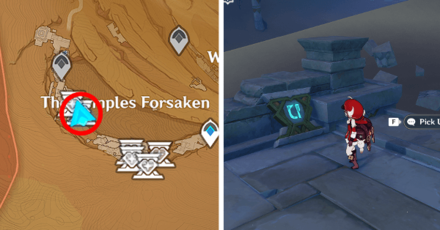 Sacred Seal: Raised Arm • On a bridge close to Sacred Seal #43, near the northwest Teleport Waypoint in The Temples Forsaken. |
| 45 | 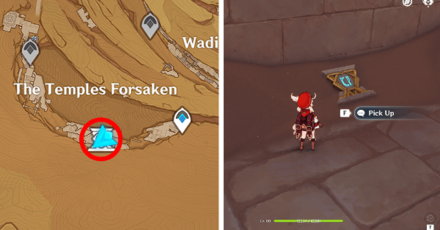 Sacred Seal: Raised Arm • In the middle of two broken primal constructs in front of The Temples Forsaken. |
| 46 | 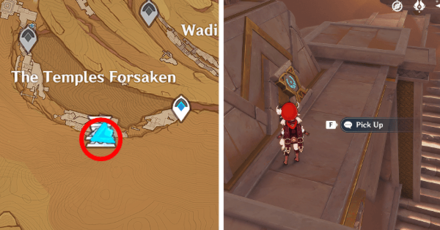 Sacred Seal: Sunrise • In front of the large statue in the ruins of The Temples Forsaken. |
| 47 | 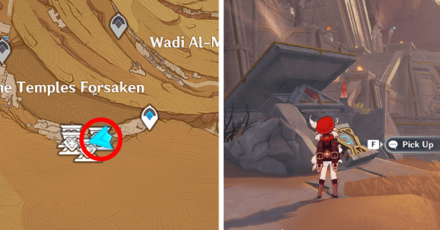 Sacred Seal: Crocodile Head • By a large broken torch in front of the ruins of The Temples Forsaken. |
| 48 |  Sacred Seal: Valley • By a broken wall near the ruins of The Temples Forsaken. |
Sacred Seal Locations in the Great Red Sand Desert
| Click to Jump to a Section | |
|---|---|
| Great Red Sand Desert | Desert of Hadramaveth |
| Great Red Sand Sacred Seal Locations | |
|---|---|
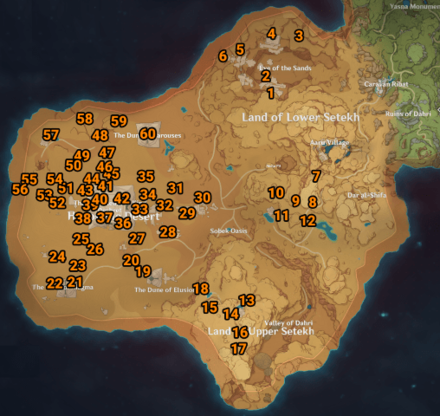 View Full Image |
|
| Locations | Number |
| Land of Lower Setekh | 1-12 |
| Land of Upper Setekh | 13-18 |
| Hypostyle Desert | 19-60 |
Sacred Seal Locations in Land of Lower Setekh
| Full Map | 1-12 | 13-18 | 19-60 |
| No. | Seal and How to Get |
|---|---|
| 1 |  Sacred Seal: Valley • Inside the south Khaj-Nisut ruins while doing the Dreams Beneath the Searing Sand World Quest. |
| 2 | 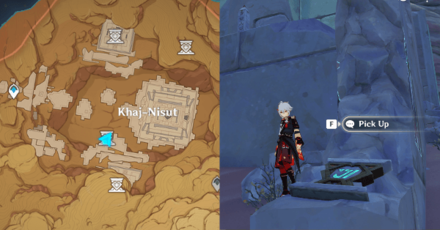 Sacred Seal: Crocodile Head • Near the Primal Obelisk in Khaj-Nisut. |
| 3 | 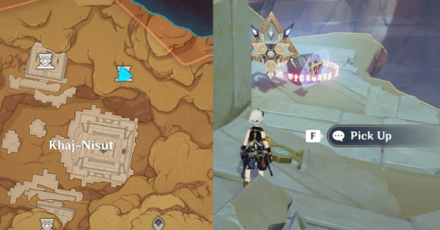 Sacred Seal: Thunderstrike • Near two Primal Constructs guarding an Exquisite Chest. |
| 4 | 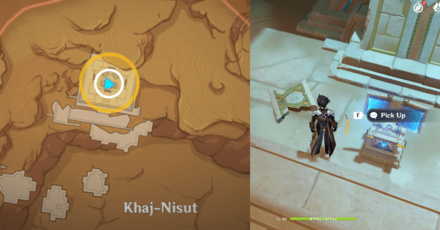 Sacred Seal: Ceremony • Find it inside the Ruins near Khaj-Nisut during the Dreams Beneath the Searing Sand World Quest. |
| 5 |  Sacred Seal: Valley • Found during the Dreams Beneath the Searing Sand quest, inside one of the three trials. |
| 6 | 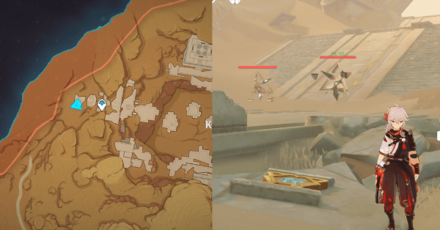 Sacred Seal: Right to Rule • Stairs near the Teleport Waypoint in Khaj-Nisut near 2 Primal Constructs. |
| 7 |  Sacred Seal: Sheep Head • Found within the Ruins near the Red Desert Threshold Domain during Part 1 of the Golden Slumber Quest Chain! |
| 8 | 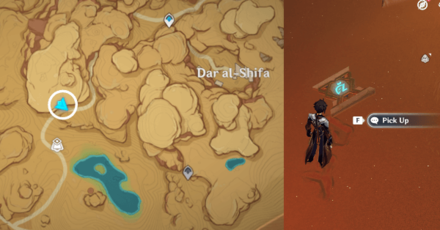 Sacred Seal: Bird Head • Found deep in Abdju Pit/Road after increasing your special clearance to 1! |
| 9 |  Sacred Seal: Valley • Found deep into the Abdju Pit, on the way to the Primal Obelisk. |
| 10 | 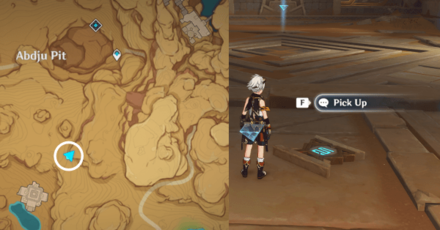 Sacred Seal: Giant Serpent • Complete the Replicator Puzzle during Part 1 of the Golden Slumber Quest Chain! Click to jump the guide here! |
| 11 | 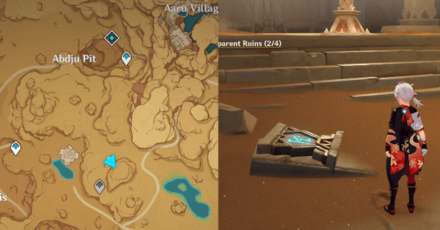 Sacred Seal: Right to Rule • In the Primal Obelisk Room in Abdju Pit. |
| 12 |  Sacred Seal: Valley • Complete the puzzles during the Lost in the Sands Quest, Part 1 of the Golden Slumber Quest Chain. Click to jump the guide here! |
Back to Great Red Sand Sacred Seal Map ▲
How to Get #10 Sacred Seal Giant Serpent
| Objectives | |
|---|---|
| 1 | 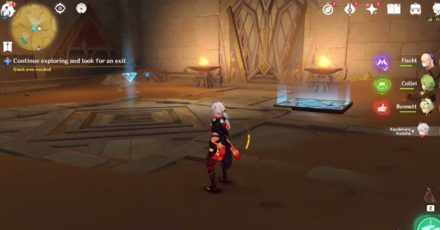 Unlock the Scarlet Sand Gadget by going through the Lost in the Sands Quest. Inside the ruins, head inside the room behind the looked book room during the quest. |
| 2 | 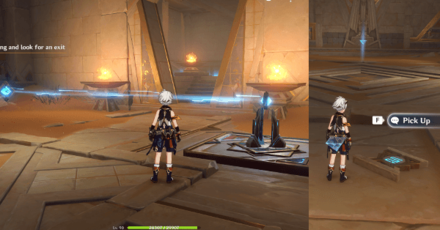 Head inside until you see the Replicator Keystone Puzzle. Open the door by transferring the Keystone to the pad. Head to the next room to see the Sacred Seal Giant Serpent! |
Return to Lower Setekh Sacred Seals ▲
How to Get #12 Sacred Seal Valley
| Objectives | |
|---|---|
| 1 |  The Ruins are in the same area as Sacred Seal: Sheep Head during the Lost in the Sands Quest. Inside the Ruins, check the platform with a Dendroculus on top of it, then "Activate" it to lead you down the area. |
| 2 |  Solve the Torch puzzle room by lighting up all torches. The last one is revealed by the Tri-Yana Seed. |
| 3 |  Activate the mechanism to open the doors, then follow the Seelie until you reach it's Seelie Court Statue. |
| 4 |  The Sacred Seal is right beside the Seelie. |
Return to Lower Setekh Sacred Seals ▲
Sacred Seal Locations in Land of Upper Setekh
| Full Map | 1-12 | 13-18 | 19-60 |
| 13 |  Sacred Seal: Valley • Right outside the temple doors, guarded by a group of Shroom-kin. |
|---|---|
| 14 | 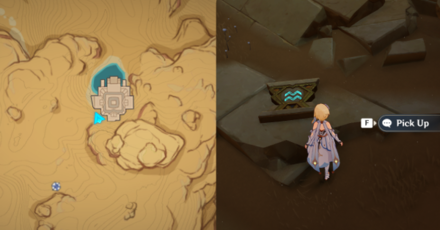 Sacred Seal: Dune • Deep inside the Eremite hideout ruins, past a large cavern of Eremites. Click here to jump to the unlock guide |
| 15 | 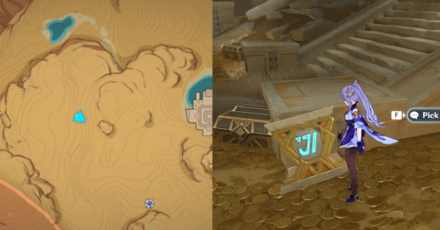 Sacred Seal: Crocodile Head • Inside the Treasure Room in the Eremite hideout ruins, by a Primal Obelisk. Click here to jump to the unlock guide |
| 16 |  Sacred Seal: Valley • In the large cavern full of Eremites and caged Seelies. You can find it by one of the camps. Click here to jump to the unlock guide |
| 17 | 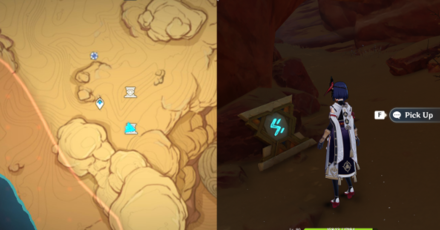 Sacred Seal: Thunderstrike • Behind a wall and a pile of exploding barrels, in the large cavern full of Eremites. Click here to jump to the unlock guide |
| 18 | 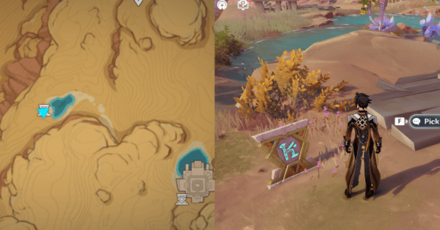 Sacred Seal: Right to Rule • By a tree and some wood on the far side of the oasis. |
Back to Great Red Sand Sacred Seal Map ▲
How to Sacred Seals #14-17 inside Lamb-Devourer Rock
| Objectives | |
|---|---|
| 1 | 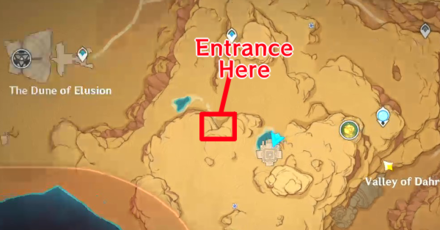 In the Land of Upper Setekh, south of the map, you will find a large entrance carved into the cliff in between the Valley of Dahri and The Dune of Elusion. This area is part of the Hidden Mercenaries quest, but you do not need to have the quest to explore it. |
| 2 | 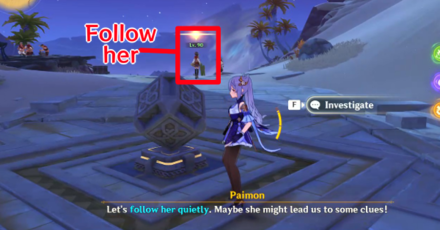 When you arrive at the locked entrance to the ruins, Paimon will prompt you to follow the female Eremite patrolling the road to find out how to get inside. You have to be careful not to get noticed by any Eremites until you trigger the Eremite's dialogue that mentions the password. |
| 3 | 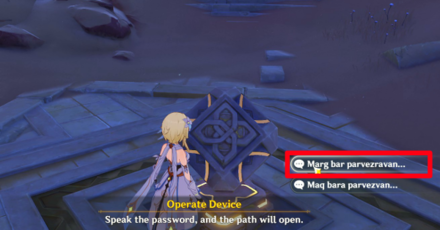 Once you got the password, go back to the mechanism in front of the entrance of the ruins and pick the "Marg bar parvezravan" line to open the door. |
| 4 | 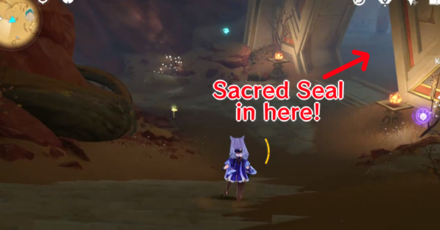 Head into the underground area until you find the Treasure Room to the right. In here is a Primal Obelisk, a Dendroculus, and the #15 Sacred Seal Crocodile Head! They are being guarded by an Eremite Stone Enchanter. |
| 5 |  Exit the Treasure Room and go further inside the ruins. You can follow a Seelie down the path until you come across the large cavern full of Eremites and caged Seelies. Sacred Seal: Valley #16 is located somewhere to the side, close to a caged Seelie. |
| 6 | 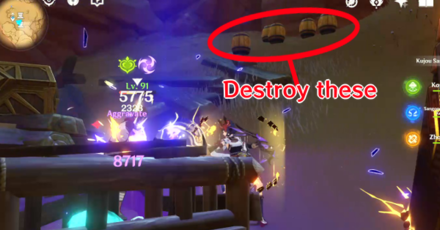 Sacred Seal: Thunderstrike #17 is further into the Eremite Hideout, next to a Remarkable Chest, another caged Seelie, and a pile of Exploding Barrels. Shoot the barrels from a safe distance to reveal both the Sacred Seal and an exit leading to the Valley of Dahri. |
| 7 | 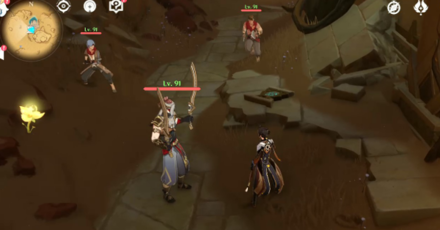 Explore deeper into the area until you find a hole guarded by two Eremites. Drop down and follow the path until you come across a group of Eremites guarding the Sacred Seal: Dune #14! |
Return to Upper Setekh Sacred Seals ▲
Sacred Seal Locations in Hypostyle Desert
| Full Map | 1-12 | 13-18 | 19-60 |
| 19 | 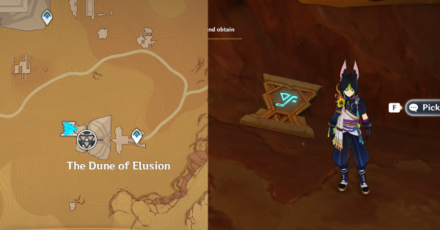 Sacred Seal: Sheep Head • Can be found during the Dual Evidence quest. Do the time trial nearby and make the explosive barrels destroy the rocks to get this sacred seal. In the same place as #20 and #27. |
|---|---|
| 20 | 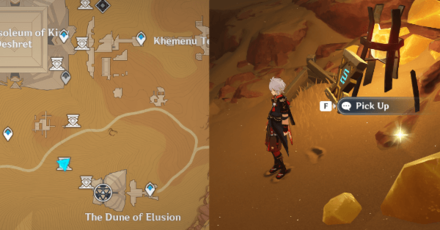 Sacred Seal: Giant Serpent • Sitting near a ledge inside Khemenu Temple underground cave. Can be found during the Dual Evidence quest. In the same place as #19 and #27. |
| 21 |  Sacred Seal: Valley • Entrance to the cave in Dune of Magma ruins. Sitting under a tree. |
| 22 | 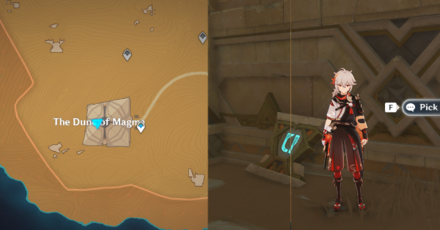 Sacred Seal: Raised Arm • Inside The Dune of Magma. Go up on the stairs on the right then jump down the hole to get it. |
| 23 |  Sacred Seal: Valley • Deeper into the Dune of Magma Ruin, near a Teleport Waypoint (hidden) and Primal Sandglass. |
| 24 | 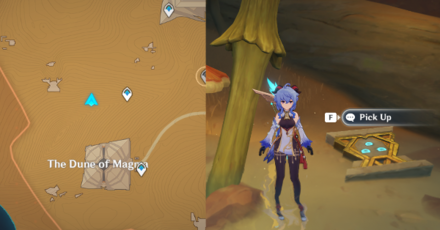 Sacred Seal: Ceremony • Behind the Teleport Waypoint (hidden) under Dune of Magma ruins, near a puddle of water. |
| 25 | 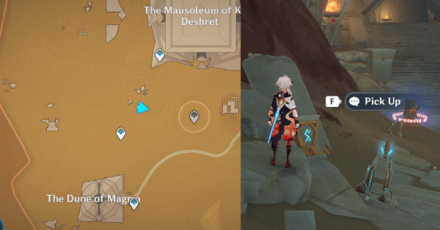 Sacred Seal: Thunderstrike • Deeper into the Dune of Magma Ruin, near an Everlight Cell. |
| 26 | 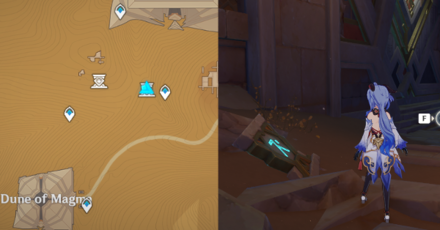 Sacred Seal: Labor • Under the Dune of Magma ruin, near a Teleport Waypoint. |
| 27 |  Sacred Seal: Valley • On a wooden platform in Khemenu Temple underground cave, the same location as #20 and #19. Can be found during the Dual Evidence quest. |
| 28 | 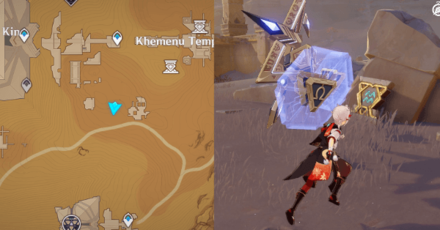 Sacred Seal: Dune • Near a transparent ruin, southeast of the Mausoleum of King Deshret. |
| 29 | 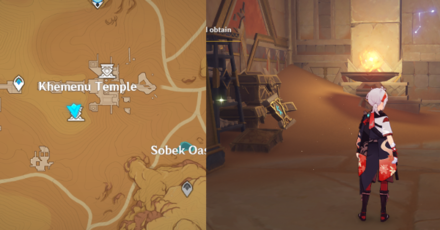 Sacred Seal: Thunderstrike • Inside the KhemenuTemple, on the left room from the entrance. It's recommended that you complete up to the Dual Evidence quest to get enough Clearance. |
| 30 | 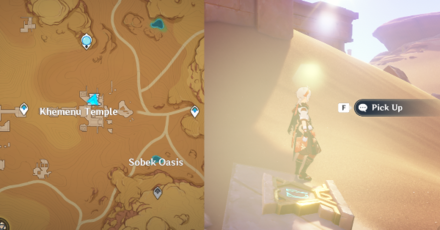 Sacred Seal: Raised Arm • Outside of Khemenu Temple at the right side from the entrance. |
| 31 |  Sacred Seal: Valley • It can be found to the right side of Waypoint then down the trap and into the corner of the next room during Golden Slumber Part 2 World Quest. |
| 32 | 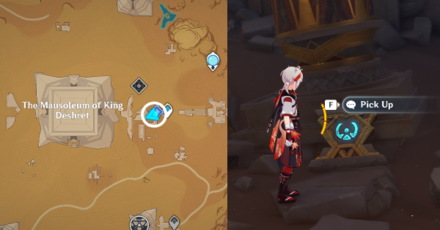 Sacred Seal: Sunrise • Play through the An Introduction to Indoor Archaeology World Quest, part of the Golden Slumber Chain Quest! Solve the quest puzzle there to get it in the room deep within. |
| 33 | 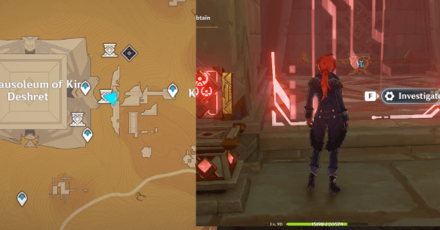 Sacred Seal: Forest • Can be found during the Dual Evidence quest, near the underground waypoint in the Mausoleum of King Deshret. You need at least Level 3 Clearance. |
| 34 | 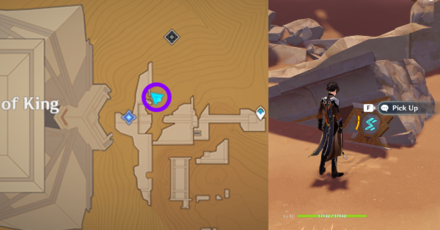 Sacred Seal: Thunderstrike • It can be found outside The Mausoleum of King Deshret, near the Teleport Waypoint. |
| 35 |  Sacred Seal: Valley • Can be found during the Dual Evidence quest. Go down into the hole and onto the small camp guarded by a fatui Geochanter Bracer and a shroom enemy. |
| 36 |  Sacred Seal: Raised Arm • Can be found during the Dual Evidence quest. You have to drain the water using two power cells. Move them parallel to the Hydro Statues to drain the water. Then go down and pick it up near the corner. |
| 37 | 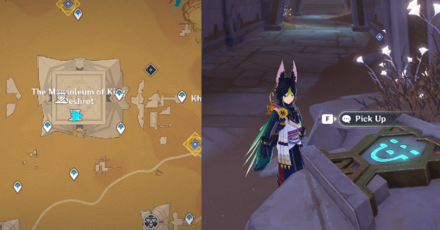 Sacred Seal: Valley • Finish Dual Evidence and return to the Coffin area. Go to the Large Fan Blade and turn it off, then go down the hole and walk until you reach this sacred seal. |
| 38 | 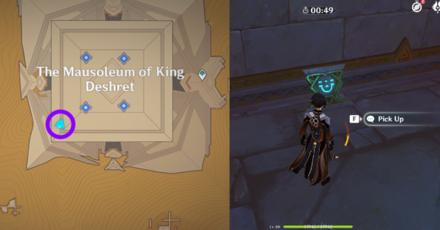 Sacred Seal: Valley • Found inside The Mausoleum of King Deshret during An Introduction to Indoor Archaeology World Quest! |
| 39 | 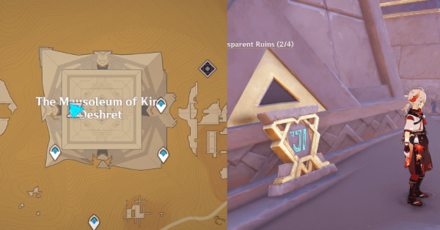 Sacred Seal: Crocodile Head • Located on top of the Inverted Pyramid. Get there by passing through the Great Hall of Truths in the Dual Evidence quest. |
| 40 | 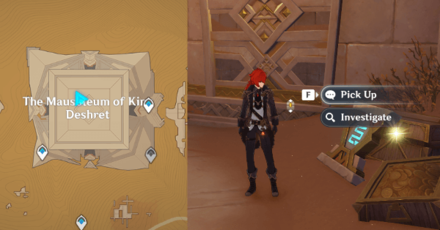 Sacred Seal: Giant Serpent • On the second floor behind a barrier near the elevator, after opening the coffin during Dreams Beneath the Searing Sand quest. |
| 41 | 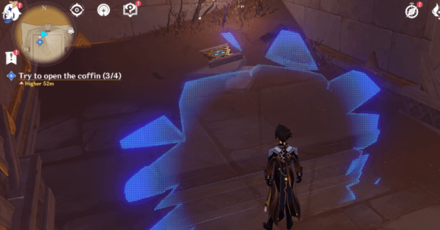 Sacred Seal: Ceremony • Found inside The Mausoleum of King Deshret locked behind an invisible wall. The wall disappears after you complete the Dual Evidence quest. |
| 42 | 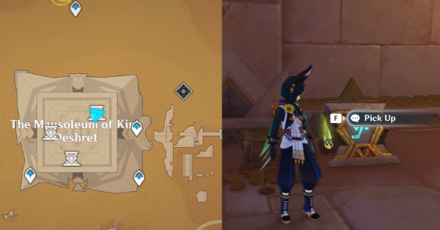 Sacred Seal: Sheep Head • Can be found in The Mausoleum of King Deshret during The Secret of Al-Ahmar quest. Head right from the entrance before reaching the room to the coffin, then look up and use the Four-Leaf Sigil to get to its location. |
| 43 | 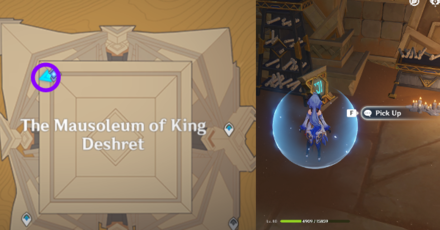 Sacred Seal: Crocodile Head • It can be found in one of the rooms in The Mausoleum of King Deshret during The Secret of Al-Ahmar World Quest! |
| 44 |  Sacred Seal: Valley • Found in The Mausoleum of King Deshret during The Secret of Al-Ahmar World Quest! |
| 45 | 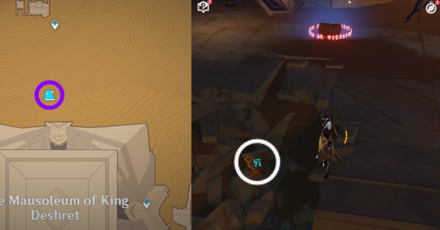 Sacred Seal: Danger • Can be found inside The Mausoleum of King Deshret near a locked chest. |
| 46 | 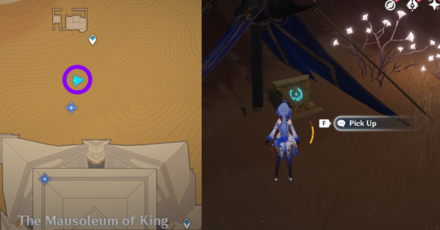 Sacred Seal: Sunrise • Located in the underground cave of The Mausoleum of King Deshret during The Secret of Al-Ahmar World Quest! |
| 47 |  Sacred Seal: Valley • Right around the Transparent Ruins north of Mausoleum of King Deshret. |
| 48 | 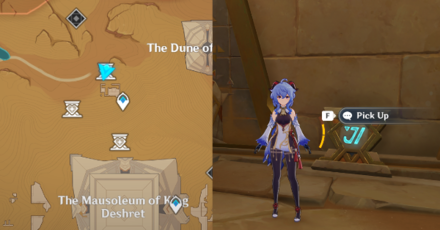 Sacred Seal: Crocodile Head • Available during the Secret of Al-Ahmar quest. At the end of a short path in a cave. |
| 49 | 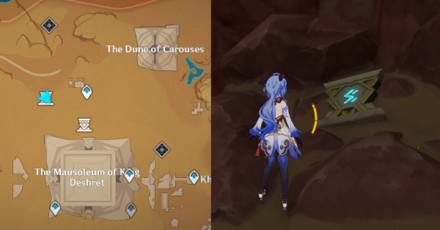 Sacred Seal: Thunderstrike • Available during the Secret of Al-Ahmar quest. It's just lying on the corner near an enemy camp. |
| 50 | 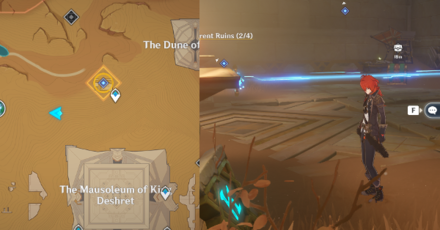 Sacred Seal: Right to Rule • Can be obtained during the Dreams Beneath the Searing Sand quest. Located in one of the rooms inside a partially flooded area. |
| 51 | 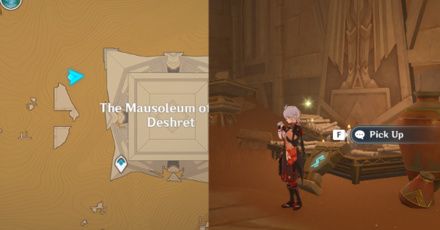 Sacred Seal: Thunderstrike • On a room guarded by a Primal Construct, located on the highest part of the cave. It's the location where you got separated from the group during The Secret of Al-Ahmar quest. |
| 52 | 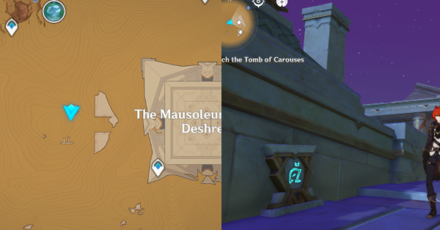 Sacred Seal: Bird Head • On some ruins behind The Mausoleum of King Deshret. |
| 53 | 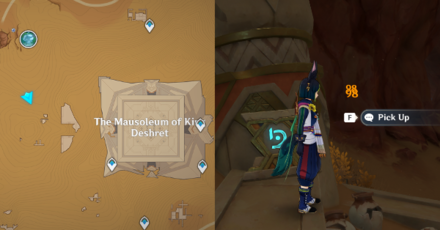 Sacred Seal: Auricle • In a cave near the underground withering in The Mausoleum of King Deshret. |
| 54 | 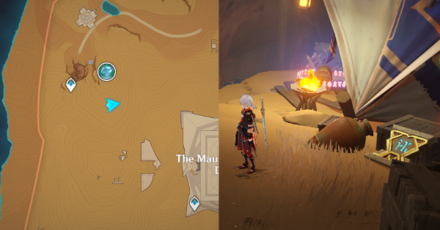 Sacred Seal: Forest • In a cave near the underground withering in The Mausoleum of King Deshret. Above the location of Sacred Seal #53, in a small Fatui camp. |
| 55 | 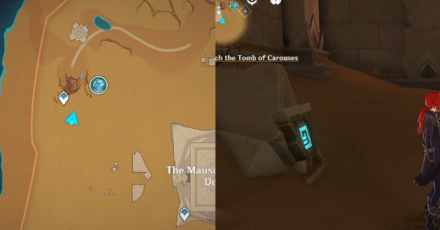 Sacred Seal: Sandstorm • In the cave, facing the Fatui camp from Sacred Seal #54, go left up to the door and pick it up on the ground. |
| 56 |  Sacred Seal: Valley • Can be found under a power cell puzzle in a cave, left of where the flooded room is during the Dreams Beneath the Searing Sand quest. |
| 57 | 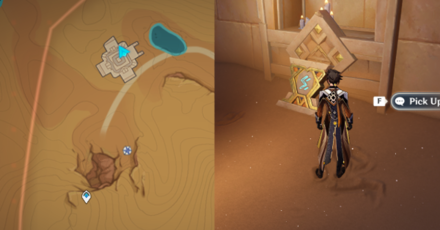 Sacred Seal: Thunderstrike • Solve puzzles to get to the ruins, and do a time trial challenge to get to the elevator that leads to the room with the sacred seal. click here for a full guide |
| 58 | 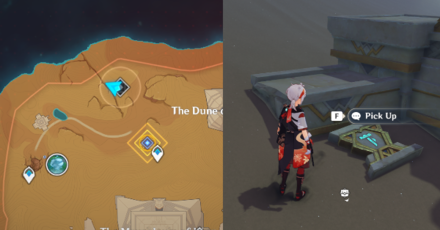 Sacred Seal: Chisel Hammer • Behind the Garden of Endless Pillars domain. |
| 59 |  Sacred Seal: Valley • Area between The Dune of Carouses and Garden of Endless Pillars domain, near a group of Eremites. |
| 60 | 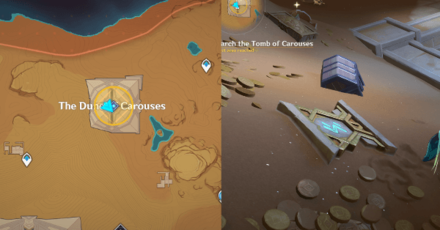 Sacred Seal: Thunderstrike • Highest floor of The Dune of Carouses ruins. You can get this during the Desert's Remembrance quest. |
Back to Great Red Sand Sacred Seal Map ▲
How to Get #57 Sacred Seal Thunderstrike
| Objectives | |
|---|---|
| 1 | 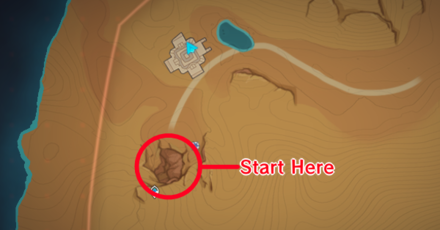 After going down the giant hole in the ground, head north until you come across a hallway with two Giant Fan Blades and a Giant Primal Torch at the end. |
| 2 | 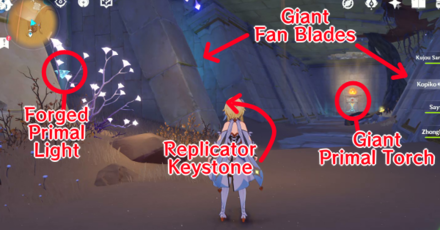 One of the giant fan blades will be with a Replicator Keystone. The Forged Primal Light needed should be in the alcove beside it. Create a Primal Torch with the Replicator Keystone. |
| 3 | Lead the Primal Ember to the second Primal Torch and then the Giant Primal Torch at the end of the hallway. Be careful of the giant fan blades that can blow the Primal Ember away and force you to start again. |
| 4 | 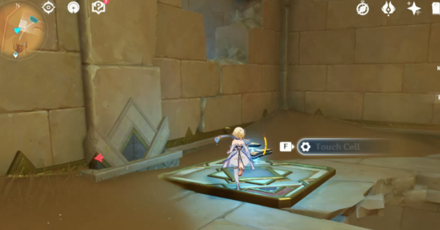 After activating the Giant Primal Torch, a wind current will be summoned. Ride the current up to a room with another Replicator Keystone and Forged Primal Light. Create an Obscuring Cell with the Replicator Keystone and activate to reveal a hole in the wall. Follow the trail of puzzles until you get to a Treasure Room beneath the ruins. |
| 5 | 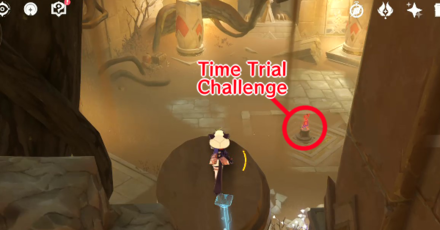 Complete the Time Trial Challenge in the room to get a Precious Chest! There will also be an elevator right where the Precious Chest is. |
| 6 | 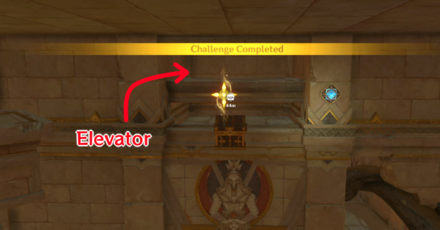 Activate the elevator and ride it up to the main room, where you can find the #57 Sacred Seal Thunderstrike propped up in a corner. |
Return to Hypostyle Desert Sacred Seals ▲
Sacred Seal Puzzle Information
Where to Use Sacred Seals
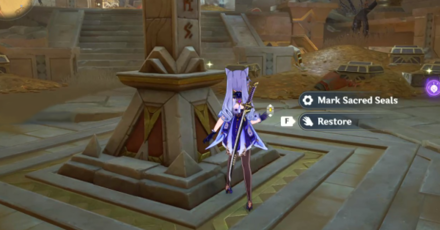
Use Primal Obelisk to Mark Sacred Seals
You can find Sacred Seals in the Desert Ruins of King Deshret. Use the Primal Obelisk's power to mark sacred seals on your map!
Restore Primal Obelisks for Rewards
Collect the seals and use them to restore the Primal Obelisk to get rewards.
Part of the Ruin Puzzles
| All Ruins of King Deshret Puzzles | |
|---|---|
| Primal Obelisk | Sacred Seal Locations |
| Plinth of the Secret Rites | Primal Ember & Torches |
| Beam Transmission | Verity Cell |
| Replicator Keystones | Forged Primal Lights |
| Primal Sandglass | Increasing Clearance |
| Obscuring Cell | |
The Sacred Seals are part of the Ruin puzzles in the Ruins of King Deshret. They include puzzles that will help you navigate around the ruins more efficiently!
Release Date in 3.1 and 3.4
| Genshin Impact Version 3.1 | |
|---|---|
 |
|
| Release Date | September 28, 2022 |
Sacred Seal and Primal Obelisk puzzles went live as soon as the Desert area of Sumeru became available in Version 3.1 on September 28, 2022!
Version 3.1 Release Date and Banners
Additional Sacred Seals in Version 3.4
More Sacred Seals and Primal Obelisks were released in Version 3.4, when the Desert of Hadramaveth was released on January 18, 2023!
Version 3.4 Release Date and Patch Notes
Genshin Impact Related Guides

Guides to Sumeru Areas
| Sumeru Area Guides | |
|---|---|
 Rainforest Area Rainforest Area |
 Desert Area Desert Area |
Guide to Desert Regions
| Sumeru Desert Guides | ||
|---|---|---|
 The Great Red Sand The Great Red Sand |
 Desert of Hadramaveth Desert of Hadramaveth |
 Girdle of the Sands Girdle of the Sands |
Guides to Important Sumeru Features
| Notable Sumeru Guides | |
|---|---|
| Dendroculus | Craftable Weapons |
| Tree of Dreams | Commission Unlock |
| Reputation | Shrine of Depths |
| Remarkable Chests | Chest Locations |
The Great Red Sand World Quests
| Desert Quest Chains | |
|---|---|
| Golden Slumber | Old Notes and New Friends |
| The Exile | A Gifted Rose |
| Golden Slumber Quest Guides | |
| Lost in the Sands | An Introduction to Indoor Archaeology |
| The Secret of Al-Ahmar | Dreams Beneath the Searing Sand |
| Old Notes and New Friends Quest Guides | |
| Dual Evidence | Soheil's Wish |
| Invisible Barrier | Hidden Mercenaries |
| Desert's Remembrance | |
| The Exile Quest Guides | |
| The Exile: Blooming | The Exile: Sprouting |
| A Gifted Rose Quest Guides | |
| A Gifted Rose: Prickly as Thorns | A Gifted Rose: Long Day Ahead |
| A Gifted Rose: Can Stones Bloom | A Gifted Rose: Ballad of Days Gone By |
| A Gifted Rose: Some People Never Fade Away | Golden Rose Seeds |
| Desert World Quests | |
| Afratu's Dilemma | Blooming Sands |
| Join the Eremites and Embrace a Wonderful New Life! | |
The Great Red Sand Puzzles and Features
Enemies in the The Great Red Sand
| Enemy and Boss Guides | |
|---|---|
 Algorithm of Semi-Intransient Matrix Algorithm of Semi-Intransient Matrix |
 Primal Constructs Primal Constructs |
 Eremite Stone Enchanter Eremite Stone Enchanter |
 Eremite Galehunter Eremite Galehunter |
Living Creatures in the The Great Red Sand
Wildlife in the The Great Red Sand
| Wildlife in the The Great Red Sand | ||
|---|---|---|
 Desert Sumpter Beast Desert Sumpter Beast |
 Scorpion Scorpion |
 Red Vulture Red Vulture |
 Scarab Scarab |
 Quicksand Unagi Quicksand Unagi |
 Desert Fox Desert Fox |
Items in the The Great Red Sand
| Items found in the The Great Red Sand | |
|---|---|
 Ajilenakh Nut Ajilenakh Nut |
 Henna Berry Henna Berry |
All Interactive Map Guides

Comment
Author
All Sacred Seals Locations and Puzzle Guide
improvement survey
03/2026
improving Game8's site?

Your answers will help us to improve our website.
Note: Please be sure not to enter any kind of personal information into your response.

We hope you continue to make use of Game8.
Rankings
- We could not find the message board you were looking for.
Gaming News
Popular Games

Genshin Impact Walkthrough & Guides Wiki

Honkai: Star Rail Walkthrough & Guides Wiki

Umamusume: Pretty Derby Walkthrough & Guides Wiki

Pokemon Pokopia Walkthrough & Guides Wiki

Resident Evil Requiem (RE9) Walkthrough & Guides Wiki

Monster Hunter Wilds Walkthrough & Guides Wiki

Wuthering Waves Walkthrough & Guides Wiki

Arknights: Endfield Walkthrough & Guides Wiki

Pokemon FireRed and LeafGreen (FRLG) Walkthrough & Guides Wiki

Pokemon TCG Pocket (PTCGP) Strategies & Guides Wiki
Recommended Games

Diablo 4: Vessel of Hatred Walkthrough & Guides Wiki

Fire Emblem Heroes (FEH) Walkthrough & Guides Wiki

Yu-Gi-Oh! Master Duel Walkthrough & Guides Wiki

Super Smash Bros. Ultimate Walkthrough & Guides Wiki

Pokemon Brilliant Diamond and Shining Pearl (BDSP) Walkthrough & Guides Wiki

Elden Ring Shadow of the Erdtree Walkthrough & Guides Wiki

Monster Hunter World Walkthrough & Guides Wiki

The Legend of Zelda: Tears of the Kingdom Walkthrough & Guides Wiki

Persona 3 Reload Walkthrough & Guides Wiki

Cyberpunk 2077: Ultimate Edition Walkthrough & Guides Wiki
All rights reserved
Copyright© 2012-2024 HoYoverse — COGNOSPHERE. All Rights Reserved.
The copyrights of videos of games used in our content and other intellectual property rights belong to the provider of the game.
The contents we provide on this site were created personally by members of the Game8 editorial department.
We refuse the right to reuse or repost content taken without our permission such as data or images to other sites.
 Desert Mirages
 Night Murals
 Invisible Walls
 How to Increase Clearance
 Primal Obelisks
 Replicator Keystones
 Forged Primal Lights
 Primal Embers and Torches
 Primal Beam Transmissions
 Plinth of the Secret Rites
 Verity Cells
 Primal Sandglass
 Obscuring Cell
 Large Fan Blade
 The Mausoleum of King Deshret
 The Dune of Magma
 The Dune of Elusion
 The Dune of Carouses
 Abdju Road
 Opet Hall
 Duat Hall
 Sekhem Hall
 Place of Rebirth
 Place of Breath
 Place of Swallowing
 Great Hall of Truths
 Aaru's Shut
 Khemenu Temple
 Shrine of Depths


