 Dendrograna and Dendrogranum
 The Withering Zones and Decay
 Mysterious Clipboard
 Aranara Locations
 Forest Adventure Journal Chapters
 Underwater Waypoint
 Tri-Yana Seeds
 Four-Leaf Sigils and Clusterleaves of Cultivation
 Seed Mirrors
 Stone Pillar Seals
 Strange Energy Extraction Device
 Eremite Camp Locations
 Floating Dendro Puzzle
 Arrow Rune Puzzle
 Trial of the Phantasmal Gate
 Nurseries in the Wild
 Strange Parchment
 Broken Dendro Monuments
 Drusus's Bulletin Board Riddle
 Lost Energy Blocks
 Vanarana Luxurious Chest
  Shrine of Depths
This survey will take about 1 minute.
Your answers will help us to improve our website.
Genshin Impact
Tri-Lakshana Creatures Locations in Sumeru
✉ Send your thoughts in our Genshin 6.4 Patch Survey!
★ Exclusive: Dive back in time with the Meta History
◆ Hot: Version 6.4, Luna 5 Codes
◆ Builds: Varka, Flins, Skirk, Escoffier
◆ Events: Travelers' Tales, He Who Caught the Wind
◆ Future: Linnea, Version 6.5 Luna VI

Tri-Lakshana Creatures are exploration features in Sumeru that can change its state from Normal into Activated or Scorched in Genshin Impact. See where to find all Tri-Lakshana Creature locations, states with Dendro, Electro, and Pyro, and how to use each of them here!
List of Contents
Normal, Activated, and Scorched States for Tri-Lakshana Creatures
Tri-Lakshana Creatures Normal State

When Dendro is applied to certain interactable plants, the creature will bud into its Normal state, which spawns Four-Leaf Sigils, revives dead plants, or solves puzzles around your environment.
Tri-Lakshana Creatures Activated State
When Electro is applied to these creatures, the being transforms into its Activated state. While in this state, the creature gains enhanced powers and usability.
Enemies affected by the Activated State also get increased attack speed and frequency of attacks.
List of All Electro Characters
Tri-Lakshana Creatures Scorched State
| Scorched State | |
|---|---|
 Applying Scorched |
 Reviving Scorched |
When Pyro is applied to these creatures, the being transforms into its Scorched state. While in this state, the creature's abilities are disabled. You can reverse this process by reviving it with Dendro abilities.
Enemies affected by this state will move slow, but yield greater damage on its attacks.
All Tri-Lakshana Creatures Guide
Bouncy Mushrooms

Bouncy Mushrooms are jumping pads that you can use to get to higher cliffs and mountains. To use it, simply jump or fall on the Bouncy Mushroom, and it should propel you upwards. A similar feature can be seen from The Chasm's Spoutrock.
Bouncy Mushroom States
| Normal | Activated | Scorched |
|---|---|---|
 |
 |
 |
When the mushroom is affected by Electro, the jumping height becomes higher. Using Pyro will instead render it unusable until you revive it into its Normal state with Dendro.
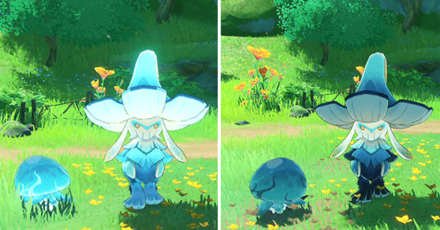
Dendro Pile

Rocks enveloped by roots are Dendro Piles. They often hide items or creatures underneath, like Dendroculus, Dendro Crystalflies, and even Fungi.
Dendro Pile States
| Normal | Activated | Scorched |
|---|---|---|
 |
 |
 |
A Dendro Pile sitting on the ground or scorched by Pyro is its normal state. To raise it up, you can use either Dendro or Electro to reveal what lies underneath.
Poison Cloud Mushrooms

Poisonous Mushrooms are dangerous plants that emit a damaging Dendro attack within its radius when it's approached by the player. The attack can also affect enemies.
Poison Cloud Mushroom States
| Normal | Activated | Scorched |
|---|---|---|
 |
 |
 |
Activating the Poison Mushrooms with Electro regularly damages any entities within its AoE with Dendro DMG, while scorching it with Pyro simply disables it.
Tri-Yana Seeds
Tri-Yana Seeds are floating seeds with three leaves on its head. They roam around a certain area, and can sometimes reveal hidden objects, simply referred in-game as the "The seen and the unseen."
Tri-Yana Seed States
| Normal | Activated | Scorched |
|---|---|---|
 |
 |
 |
When using Electro to the Tri-Yana Seed, it will burst a Truesense Pulse, which will reveal and display the location and true form of objects covered in blue fragments. Using Pyro stops its path.
Tri-Yana Seed Locations and Guide
Seed Mirrors

Seed Mirrors are telescopes that lets you find nascent Withering Zones in the area. These mini-Withering Zones appear in your mini-map with the Pyro-like symbol, and completing them gives you Treasure Chests.
Seed Mirror States
| Normal | Activated | Scorched |
|---|---|---|
 |
 |
 |
Activating a Seed Mirror with Electro lets you discover hiding Mischievous Aranara within its scope, which rewards you with items. Burning it with Pyro simply disables it.
How to Use Seed Mirrors in Sumeru
Starshrooms

Starshrooms are recovery food that you can find in The Chasm and Sumeru.
Starshroom States

The Starshroom's healing potency is increased when you apply Electro, which recovers 500 HP more health. However, scorching it with Pyro reduces its healing to only 1 HP, which makes it useless. It's recommended to only use Electro on these Mushrooms for maximum efficiency.
Clusterleaves of Cultivation

Clusterleaves of Cultivation are bulbed plants that spawn Four-Leaf Sigils when Dendro is applied to it. These sigils act as a tethering point so you can travel along areas like a vine swing. It is reminiscent to Inazuma's Thunder Spheres, but without the use of a Dendrograna.
Unlike other Tri-Lakshana Creatues, the Clusterleaves of Cultivation cannot be activated or scorched by Electro or Pyro.
Four-Leaf Sigils and Clusterleaves
Fungi Enemies
Fungi are new common enemies first introduced in The Chasm but later expanded in Version 3.0's Sumeru region.
Fungi States
The attack patterns of Fungi enemies change when affected by either Electro or Pyro. Its attack speed and strength varies depending on which state it currently has. Moreover, activating or scorching these Fungi rewards you with rare drops.
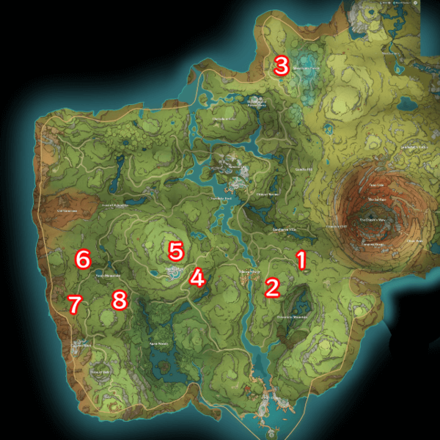
Tri-Lakshana Creatures Locations
| All Tri-Lakshana Creature Locations | |
|---|---|
 |
 |
 |
 |
 |
 |
 |
 |
Tri-Lakshana Creatures are found in Dharma Forest of the Sumeru Region. Some of these creatures can also be found deep within The Chasm's Underground Mines.
What are Tri-Lakshana Creatures?
Creatures for Exploration and Combat

These beings are found in the Sumeru region. They may help you traverse around the area, locate hidden objects, or solve puzzles. These were released in Version 3.0!
Changing States

Creatures in Sumeru transform when the player applies either the Dendro, Pyro, or Electro element. Each of these elements grant or nullify features that you use to explore the region.
Genshin Impact Related Guides

Guides to Sumeru Areas
| Sumeru Area Guides | |
|---|---|
 Rainforest Area Rainforest Area |
 Desert Area Desert Area |
Guide to Desert Regions
| Sumeru Desert Guides | ||
|---|---|---|
 The Great Red Sand The Great Red Sand |
 Desert of Hadramaveth Desert of Hadramaveth |
 Girdle of the Sands Girdle of the Sands |
Guides to Important Sumeru Features
| Notable Sumeru Guides | |
|---|---|
| Dendroculus | Craftable Weapons |
| Tree of Dreams | Commission Unlock |
| Reputation | Shrine of Depths |
| Remarkable Chests | |
Guides to Sumeru Rainforest Domains
| Sumeru Domain Guides | |
|---|---|
| Spire of Solitary Enlightenment | Tower of Abject Pride |
| Steeple of Ignorance | Under the Umbrella's Shade |
| Fragment of Childhood Dreams | The Coordinates of Sun and Rain |
| The Dark Valley | |
Guides to Sumeru Rainforest Quests
Sumeru Rainforest Puzzles and Features
Enemies in the Sumeru Rainforest
| Enemy and Boss Guides | |||
|---|---|---|---|
 Eremites Eremites |
 Aeonblight Drake Aeonblight Drake
|
 Electro Regisvine Electro Regisvine |
 Jadeplume Terrorshroom Jadeplume Terrorshroom |
 Shroom-kin Shroom-kin |
 Ruin Drake Ruin Drake |
||
All Interactive Map Guides
Comment
Author

Tri-Lakshana Creatures Locations in Sumeru
Please participate in our site
improvement survey
03/2026
improvement survey
03/2026
Would you assist in
improving Game8's site?
improving Game8's site?

×
We are listening to our users' valuable opinions and discussing how to act on them.
The information collected through this survey will be used for the purpose of improving our services. In addition, the information will only be disclosed a part of a statistic in a format that will not allow identification of personal information.
Begin Survey
Not Now
×
Please rate each item regarding Game8.co's Advertisements.
Amount of Ads
Very Dissatisfied
Somewhat Dissatisfied
Fine
Somewhat Satisfied
Highly Satisfied
Placement of Ads
Timing of Ad Display
Ad Loading Speed
Safeness of Ads
Content of Ads
×
Please rate each item regarding Game8.co's Quality of Articles.
Amount of information
Very Dissatisfied
Somewhat Dissatisfied
Fine
Somewhat Satisfied
Highly Satisfied
Frequency of updates
Speed of new information
Accuracy of articles
Understandibility of articles
Readability of sentences
×
Please rate each item regarding Game8.co's Usability of the Site.
Ease of finding information
Very Dissatisfied
Somewhat Dissatisfied
Fine
Somewhat Satisfied
Highly Satisfied
Loading Speed
Use of Color
Font Size
Visibility of Images
Easy to Understand Layout
×
Please rate each item regarding Game8.co's Message Boards, Comments.
Ease of Writing
Very Dissatisfied
Somewhat Dissatisfied
Fine
Somewhat Satisfied
Highly Satisfied
Readability
Ease in Finding Information
Comment Quality
Comment Quantity
Admin Response
×
Please rate each item regarding Game8.co's Site's new design.
Please rate our site's new design
Very Dissatisfied
Somewhat Dissatisfied
Fine
Somewhat Satisfied
Highly Satisfied
Do you think that the website's design change makes the site easier to use?
Has the new design made it easier for you to find information on the site?
Has the new design improved the overall visual appeal of the site?
How would you rate your overall satisfaction with the new design of the site?
×
How likely are you to recommend Game8 to someone you know?
Very Unlikely
0
1
2
3
4
5
6
7
8
9
10
Very Likely
If you have other opinions regarding potential improvement to the website, please share them with us. We would appreciate your honest opinion.
Note: This is a free response section, so you can proceed without entering anything.
Note: Please be sure not to enter any kind of personal information into your response.
Note: Please be sure not to enter any kind of personal information into your response.
×
Thank You
×
Thank you for participating in our survey! Your answers will help us to improve the quality of our website and services.
We hope you continue to make use of Game8.
We hope you continue to make use of Game8.
Close


Rankings
Gaming News


![Monster Hunter Stories 3 Review [First Impressions] | Simply Rejuvenating](https://img.game8.co/4438641/2a31b7702bd70e78ec8efd24661dacda.jpeg/thumb)

Popular Games

Genshin Impact Walkthrough & Guides Wiki
Honkai: Star Rail Walkthrough & Guides Wiki
Umamusume: Pretty Derby Walkthrough & Guides Wiki
Pokemon Pokopia Walkthrough & Guides Wiki
Resident Evil Requiem (RE9) Walkthrough & Guides Wiki
Monster Hunter Wilds Walkthrough & Guides Wiki
Wuthering Waves Walkthrough & Guides Wiki
Arknights: Endfield Walkthrough & Guides Wiki
Pokemon FireRed and LeafGreen (FRLG) Walkthrough & Guides Wiki
Pokemon TCG Pocket (PTCGP) Strategies & Guides Wiki


Recommended Games
Diablo 4: Vessel of Hatred Walkthrough & Guides Wiki
Fire Emblem Heroes (FEH) Walkthrough & Guides Wiki
Yu-Gi-Oh! Master Duel Walkthrough & Guides Wiki
Super Smash Bros. Ultimate Walkthrough & Guides Wiki
Pokemon Brilliant Diamond and Shining Pearl (BDSP) Walkthrough & Guides Wiki
Elden Ring Shadow of the Erdtree Walkthrough & Guides Wiki
Monster Hunter World Walkthrough & Guides Wiki
The Legend of Zelda: Tears of the Kingdom Walkthrough & Guides Wiki
Persona 3 Reload Walkthrough & Guides Wiki
Cyberpunk 2077: Ultimate Edition Walkthrough & Guides Wiki


All rights reserved
Copyright© 2012-2024 HoYoverse — COGNOSPHERE. All Rights Reserved.
The copyrights of videos of games used in our content and other intellectual property rights belong to the provider of the game.
The contents we provide on this site were created personally by members of the Game8 editorial department.
We refuse the right to reuse or repost content taken without our permission such as data or images to other sites.