Thunderbird Statue Puzzle Guide
✉ Send your thoughts in our Genshin 6.4 Patch Survey!
★ Exclusive: Dive back in time with the Meta History
◆ Hot: Version 6.4, 6.4 Codes, Linnea, Version 6.5
◆ Builds: Varka, Flins, Skirk, Escoffier
◆ Events: Travelers' Tales, Sightseeing With Friends
◆ Endgame: Spiral Abyss (March 2026)
Thunderbird Statues are puzzles featured in the Tsurumi Island area of Inazuma in Genshin Impact 2.2. Learn how to activate the statues with the Peculiar Pinion Gadget, what puzzles they are used for, and other information in this guide!
List of Contents
Thunderbird Statue Basic Information
What are Thunderbird Statues?
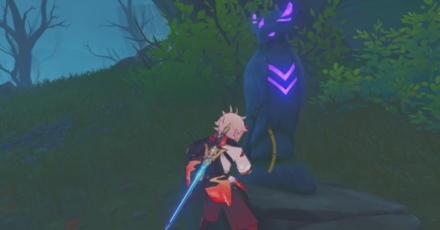
These are statues found all over Tsurumi Island. They resemble the shape of the island's guardian, the Thunderbird.
Activatable Puzzles in Tsurumi Island
Statues with glowing purple marks can be activated. Activating the statue would reveal hints on how to solve nearby puzzles, or show illusions.
Activate with Peculiar Pinion Gadget
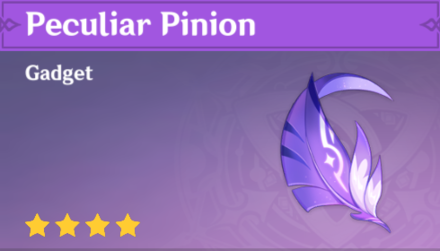
Equip the Peculiar Pinion and use it in front of a Thunderbird Statue to activate it! Check out our Peculiar Pinion Guide to learn how to acquire the gadget:
How to Get and Use the Peculiar Pinion
Thunderbird Statue Locations
All Thunderbird Statue Locations
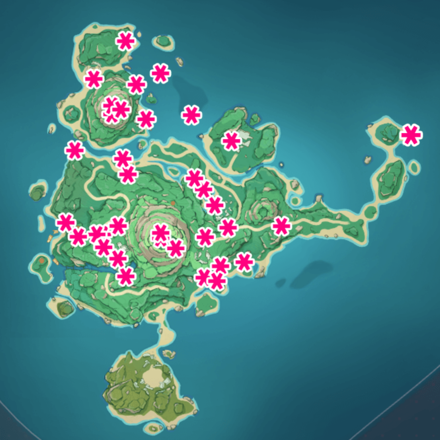
These are the general locations for the interactable Thunderbird Statues in Tsurumi Island. Some of these Thunderbird statues are used in certain puzzles like the Shirikoro Peak puzzles, and some are locked behind quests.
Found on Tsurumi Island

The Thunderbird Statues are found exclusively on Tsurumi Island, the sixth island area of the Inazuma region.
Thunderbird Statue Puzzles and Quests
All Thunderbird Statue Puzzles and Quests
The table below leads to this page's summary walkthroughs of the puzzles and quests that use Thunderbird Statues.
| Click to Jump to a Puzzle Summary! | |
|---|---|
| Chise's Ghost Request | Oina Beach Puzzle |
| Shirikoro Peak Puzzles | Stone Slate Puzzles |
| Octave of the Maushiro Puzzles | |
Chise's Ghost Request

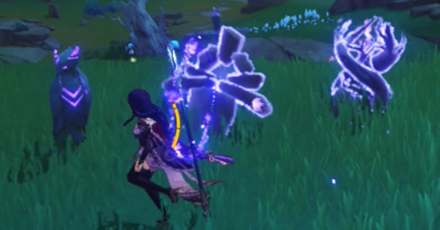
Part of Chise's Ghost Request is lighting up Stormstones that can only be revealed through activating Thunderbird Statues.
View Chise's Ghost Request Guide
Chise's Hidden Stormstone Puzzles
| Chise's Hidden Stormstone Walkthrough | |
|---|---|
| 1 | The first Thunderbird Statue will be right beside Chise. Use the Peculiar Pinion to activate it and reveal the Stormstone Illusion. |
| 2 | The second Thunderbird Statue is to the right of the Autake Plains, near a Thunder Barrier. |
| 3 | The third one is south of the Autake Plains, close to a cube device puzzle by the river. |
Back to List of Puzzle Summaries▲
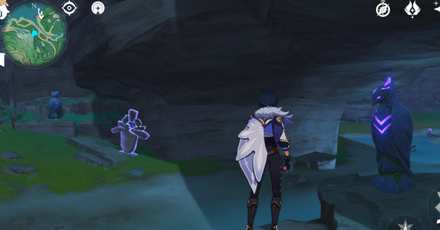
Oina Beach Stormstone Illusion Puzzle
| Oina Beach Walkthrough | |
|---|---|
| 1 | Use the Peculiar Pinion on a Thunderbird Statue beneath the cliff at Oina Beach to reveal a Stormstone illusion. |
| 2 | Light up the Stormstone to activate the Thunderbird Statue close to it. Use the Peculiar Pinion to reveal the next, nearby Stormstone. |
| 3 | Follow the trail of Stormstones and Thunderbird Statues until the fourth Thunderbird Statue. |
| 4 | Activating the last Thunderbird Statue will summon three Thundercraven Rifthound Whelps that you have to defeat. Collect the Exquisite Chest afterwards. |
Back to List of Puzzle Summaries▲
Shirikoro Peak Puzzles
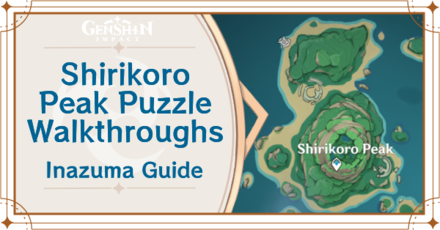
In the underground ruins of Shirikoro Peak, there are five puzzles and one Electroculus that makes use of the Thunderbird Statue.
Below are the summaries of the puzzles in the ruins of Shirikoro Peak that uses Thunderbird Statues.
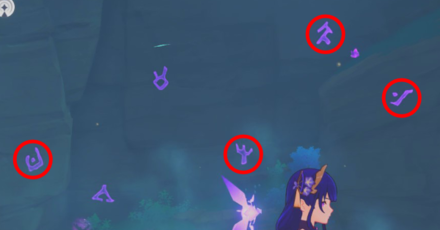
Ishine Script Puzzle
| Ishine Script Walkthrough | |
|---|---|
| 1 | Glide down from the Teleport Waypoint to the Thunderbird Statue with a nearby Thunder Sakura Bough. |
| 2 | Use the Peculiar Pinion on the statue to reveal 6 Ishine Script symbols on the wall. |
| 3 | Take an Electrogranum and interact with only four Ishine Script symbols. Facing the wall, interact with the first, fourth, fifth, and sixth symbols from the left. |
Thunder Barrier Puzzle
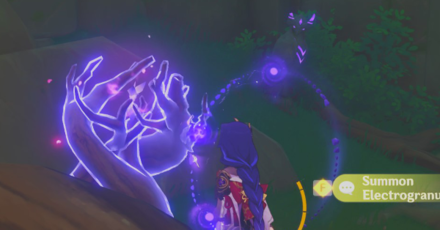
| Thunder Barrier Walkthrough | |
|---|---|
| 1 | Find the Thunderbird Statue closest to the Thunder Barrier near the entrance to the ruins. |
| 2 | Use the Peculiar Pinion on the statue to summon a Thunder Sakura Bough. Take an Electrogranum from the Thunder Sakura Bough to be able to pass through the Thunder Barrier. |
| 3 | Complete the Time Trial Challenge and defeat 4 Ruin Sentinels within 70 seconds to unlock the Precious Chest. |
Collect the Electroculus
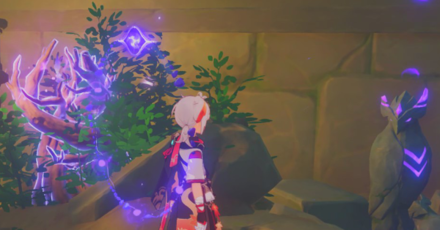
| Electroculus Walkthrough | |
|---|---|
| 1 | Use the Peculiar Pinion on the Thunderbird Statue in the second room of the ruins to summon a Thunder Sakura Bough. |
| 2 | Take an Electrogranum from the Thunder Sakura Bough and climb into the window to the right of the Thunderbird Statue. |
| 3 | The window will lead to a small room with a Thunder Barrier. Go through the Thunder Barrier and collect the Electroculus. |
Pyro Torch Illusions Puzzle
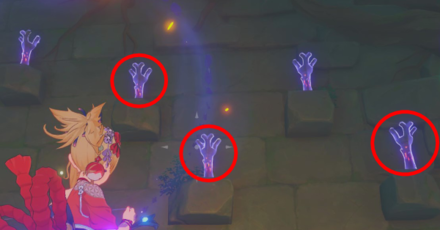
| Torch Illusion Walkthrough | |
|---|---|
| 1 | Find the Thunderbird Statue in the third room of the ruins. |
| 2 | Use the Peculiar Pinion on the Thunderbird Statue to reveal 5 Pyro Torch Illusions placed along the wall. |
| 3 | Light up only 3 Pyro Torch Illusions with the Pyro Element. When facing the wall of torches, the ones to light up will be the second, third, and fifth torches from the left. |
| 4 | Collecting the Exquisite Chest from solving this puzzle will light up another Thunderbird Statue in the room. |
| 5 | Use the Peculiar Pinion on the second Thunderbird Statue to summon a cube mechanism. |
| 6 | Activate the mechanism to drain the nearby water and get to the underground room with a Time Trial Challenge. |
| 7 | Defeat 2 Ruin Guards and 1 Ruin Grader to complete the Time Trial Challenge and unlock a room with a Precious Chest. |
Back to List of Puzzle Summaries▲
Collect the Stone Slates
Thunderbird Statues are part of the puzzles you need to complete to collect 7 Stone Slates all over Tsurumi Island. For a more detailed walkthrough of how to get all Stone Slates and how to use them, go to our full guide:
Below are the summaries of how to get the Stone Slates that use Thunderbird Statues.
Stone Slate 1

| Stone Slate Walkthrough | |
|---|---|
| 1 | Use the Peculiar Pinion to activate the Thunderbird Statue in the middle of the ruins north of Shirikoro Peak. |
| 2 | Move the Ishine Script Stones until they are in front of the rocks with matching markings. |
Stone Slate 2
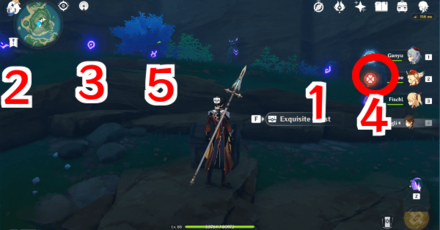
| Stone Slate Walkthrough | |
|---|---|
| 1 | Look for a group of Ishine Script stones at the lowest level of Shirakoro Peak's inner mountain formation. |
| 2 | There will be five Thunderbird Statues in the area. Use the Peculiar Pinion on each Thunderbird Statue to reveal a symbol on the wall beside them. |
| 3 | Pay attention to the direction of the bird statue's gaze,starting from the one beside a Stone Tablet, to determine which symbols go in which order. |
| 4 | Hit the Ishine Script Stones, from left to right, 2nd, 3rd, 5th, 1st, and 4th. |
Stone Slate 3

| Stone Slate Walkthrough | |
|---|---|
| 1 | Use the Peculiar Pinion to activate the Thunderbird Statues in Chirai Shrine and reveal a cube mechanism. |
| 2 | Activate the cube mechanism to show the correct order of the Ishine Script Stones you must hit. |
Stone Slate 4
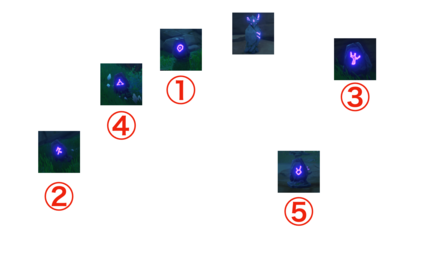
| Stone Slate Walkthrough | |
|---|---|
| 1 | Find the group of Thunderbird Statues on top of a cliff south of Chirai Shrine. |
| 2 | There will only be one Thunderbird Statue activated at a time. Using the Peculiar Pinion on the active Thunderbird Statue will reveal an Ishine Script symbol before activating the next statue. |
| 3 | Pay attention to the order that the Ishine Script symbols appear and hit the Ishine Script Stones in the same order. |
Stone Slate 5
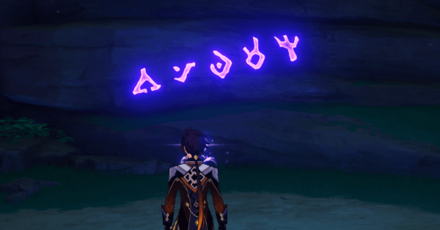
| Stone Slate Walkthrough | |
|---|---|
| 1 | Look for an Electro Seelie south of Mt. Kanna, near the Moshiri Ceremonial site. Follow the Electro Seelie to find the Thunderbird Statue. |
| 2 | Use the Peculiar Pinion to reveal three Seelies that you must follow to find the missing Ishine Script Stones.Beware of enemies that may be nearby. |
| 3 | Place the missing Ishine Script Stones back in their spots and hit them according to the order shown on the wall behind the Electro Seelie from before. |
Stone Slate 6
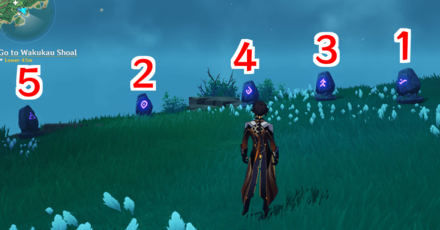
| Stone Slate Walkthrough | |
|---|---|
| 1 | Find the Thunderbird Statue on the cliff near Wakukau Shoal. Use the Peculiar Pinion to summon an Electro Seelie. |
| 2 | Follow the Electro Seelie to a ledge below the cliff, where there will be another Thunderbird Statue. Use the Peculiar Pinion to reveal Ishine Script symbols on the wall. |
| 3 | Use the nearby Electrogranum to activate Thunder Spheres that you can use to get back to the top of the cliff. |
| 4 | Hit the Ishine Script Stones in the order shown on the wall. |
Stone Slate 7

| Stone Slate Walkthrough | |
|---|---|
| 1 | Find the Thunderbird Statue on the beach southwest of the Autake Plains. Use the Peculiar Pinion to activate the statue and reveal the Ishine Script on the surrounding stones. |
| 2 | Move the Ishine Script Stones until they are in front of the rocks with matching markings. |
Back to List of Puzzle Summaries▲
Octave of the Maushiro Quest

The Thunderbird Statue is used in three puzzles for the world quest, Octave of the Maushiro, which is part of the Through the Mist quest series! View the full quest here:
Full Octave of the Maushiro Guide
Below are the summaries of the puzzles in the quest that uses Thunderbird Statues.
Wakukau Shoal Puzzle
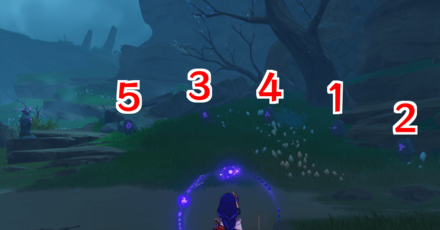
| Wakukau Shoal Walkthrough | |
|---|---|
| 1 | Use the Peculiar Pinion on the Thunderbird Statue to summon an Electro Seelie. |
| 2 | Follow the Electro Seelie to the second Thunderbird Statue. |
| 3 | Use the Peculiar Pinion on the Thunderbird Statue to reveal the hint on how to solve the Ishine Script Stone Puzzle. |
| 4 | Go back to the first Thunderbird Statue and hit the Ishine Script stones in the order shown by the second Thunderbird Statue. |
Oina Beach Puzzle
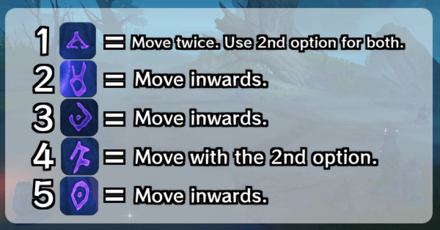
| Oina Beach Walkthrough | |
|---|---|
| 1 | Use the Peculiar Pinion on the Thunderbird Statue to reveal the hint on how to solve the puzzle. |
| 2 | Move the Ishine Script Stones along the grooves on the ground until they are placed in front of the flat rock with matching markings. |
Autake Plains Puzzle
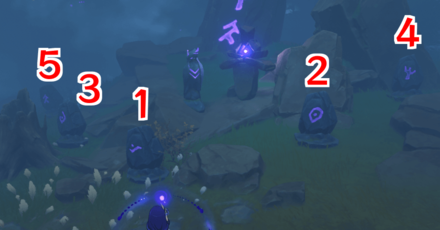
| Autake Beach Walkthrough | |
|---|---|
| 1 | Use the Peculiar Pinion on the Thunderbird Statue to reveal three Seelies. |
| 2 | Follow each Seelie to where the missing Ishine Script Stones are and collect them. Beware of enemies that surround the stones. |
| 3 | Go back to the Thunderbird Statue and place the stones back in their place. |
| 4 | Use the Peculiar Pinion again to reveal the hint on the pillar behind the Thunderbird Statue. |
| 5 | Hit the Ishine Script Stones in the order of the markings on the pillar from top to bottom. |
Back to List of Puzzle Summaries▲
Genshin Impact Related Guides
Guides to Inazuma Areas
| Inazuma Area Guides | |
|---|---|
| Narukami Island | Kannazuka |
| Yashiori Island | Seirai Island |
| Tsurumi Island | Watatsumi Island |
Guides to Inazuma Features
Guides to Inazuma Puzzles
Guides to Inazuma Domains
| Inazuma Domain Puzzle Guides | |
|---|---|
| Shakkei Pavilion | Formation Estate |
| Empty Boat to a Thousand Gates | Palace in a Pool |
| Moshiri Kara | |
Guides to Inazuma Quests
All Interactive Map Guides
Author
Thunderbird Statue Puzzle Guide
Rankings
Gaming News
Popular Games

Genshin Impact Walkthrough & Guides Wiki

Umamusume: Pretty Derby Walkthrough & Guides Wiki

Pokemon Pokopia Walkthrough & Guides Wiki

Honkai: Star Rail Walkthrough & Guides Wiki

Monster Hunter Stories 3: Twisted Reflection Walkthrough & Guides Wiki

Arknights: Endfield Walkthrough & Guides Wiki

Wuthering Waves Walkthrough & Guides Wiki

Zenless Zone Zero Walkthrough & Guides Wiki

Pokemon TCG Pocket (PTCGP) Strategies & Guides Wiki

Monster Hunter Wilds Walkthrough & Guides Wiki
Recommended Games

Diablo 4: Vessel of Hatred Walkthrough & Guides Wiki

Cyberpunk 2077: Ultimate Edition Walkthrough & Guides Wiki

Fire Emblem Heroes (FEH) Walkthrough & Guides Wiki

Yu-Gi-Oh! Master Duel Walkthrough & Guides Wiki

Super Smash Bros. Ultimate Walkthrough & Guides Wiki

Pokemon Brilliant Diamond and Shining Pearl (BDSP) Walkthrough & Guides Wiki

Elden Ring Shadow of the Erdtree Walkthrough & Guides Wiki

Monster Hunter World Walkthrough & Guides Wiki

The Legend of Zelda: Tears of the Kingdom Walkthrough & Guides Wiki

Persona 3 Reload Walkthrough & Guides Wiki
All rights reserved
Copyright© 2012-2024 HoYoverse — COGNOSPHERE. All Rights Reserved.
The copyrights of videos of games used in our content and other intellectual property rights belong to the provider of the game.
The contents we provide on this site were created personally by members of the Game8 editorial department.
We refuse the right to reuse or repost content taken without our permission such as data or images to other sites.


![The Liar Princess and the Blind Prince Review [PC] | Lovely to Look at but Tedious to Play](https://img.game8.co/4442586/8d95f5faf05780f1765ce7e0938bd825.jpeg/show)
![The Liar Princess and the Blind Prince Review [PC] | Lovely to Look at but Tedious to Play](https://img.game8.co/4442586/8d95f5faf05780f1765ce7e0938bd825.jpeg/thumb)
![Marathon Cryo Archive Map Teased as [REDACTED] on Selection Screen](https://img.game8.co/4442236/6357203e58172f6de57f1991e7c39b22.png/thumb)


51243