
This survey will take about 1 minute.
Your answers will help us to improve our website.
Genshin Impact
Sacrificial Offering Quest Guide
✉ Send your thoughts in our Genshin 6.4 Patch Survey!
★ Exclusive: Dive back in time with the Meta History
◆ Hot: Version 6.4, Luna 5 Codes
◆ Builds: Varka, Flins, Skirk, Escoffier
◆ Events: Travelers' Tales, He Who Caught the Wind
◆ Future: Linnea, Version 6.5 Luna VI
Sacrificial Offering is the second quest under the Sacred Sakura Cleansing Ritual quest chain in Inazuma for Genshin Impact 2.0. See how to unlock it, remove the Konda Village Barrier, walkthrough, and the rewards here in this guide!
| Sakura Cleansing Ritual Quests | |||||
|---|---|---|---|---|---|
| Strange Story in Konda | Sacrificial Offering | ||||
| Cleansing Defilement | Tanuki-Bayashi | Yougou Cleansing | |||
List of Contents
How to Unlock Sacrificial Offering
Complete the Prerequisite Quests

To unlock Sacrificial Offering, you must have first completed the previous subquest of the Sacred Sakura Cleansing Ritual quest chain, A Strange Story in Konda!
A Strange Story in Konda Quest Guide
Sacrificial Offering Walkthrough
Go to the Abandoned Shrine Northeast of Konda Village

Go to the Abandoned Shrine, Northeast of Konda Village, the area adjacent to the foothill of Mt. Yougou.
Carry Out the Investigation at the Abandoned Shrine
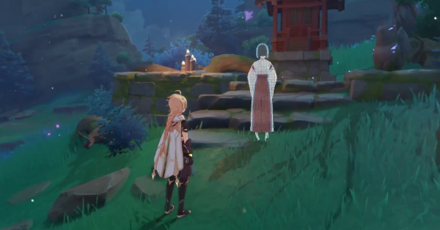
As soon as you pass through the first Shrine Gate along the pathwalk that goes towards the Abandoned Shrine, you'll see a Mysterious Shadow to your left, standing by an altar. A total of three Mysterious Shadows are scattered around the Abandoned Shrine.
How to Solve the Mysterious Shadow Puzzle
To solve the Mysterious Shadow puzzle, you must interact with the three Mysterious Shadows twice each. After every interaction, the Mysterious Shadow will move places until it reaches the three Sky Kitsunes grouped around a small stone platform.
Mysterious Shadow Locations
| Mysterious Shadow Locations | |
|---|---|
| 1 | The first Mysterious Shadow is located standing by the altar on your left after entering first Torii gate. |
| Afterwards, the first Mysterious Shadow will teleport in front of the Sky Kitsune statue on your right, a couple of paces away from the stairs. Interact with this shadow to send it to the three Sky Kitsune group. |
|
| 2 | The second Mysterious Shadow is standing in front of the Abandone Shrine. |
| After interacting with the second Mysterious Shadow once, it will teleport in front of a Sky Kitsune altar, just past the Sky Kitsune group. Interact with this shadow to send it to the three Sky Kitsune group. |
|
| 3 | The third Mysterious Shadow is located hovering just above the Abandoned Shrine's roof. You can go around the shrine and glide down from there to easily reach the shadow! |
| After your first interaction with the third Mysterious Shadow, it will teleport in front of a tree a couple of paces from the Sky Kitsune group, and a Cryo Cicin Mage. |
|
| 4 | Once all three Mysterious Shadows have teleported on the Sky Kitsune statues, head over to its location and open the three Exquisite Chests by each statue. You'll also obtain the Sacred Sakura Cleansing Summary sitting atop the stone platform. |
Investigation at the Abandoned Shrine
Head to the Grand Narukami Shrine
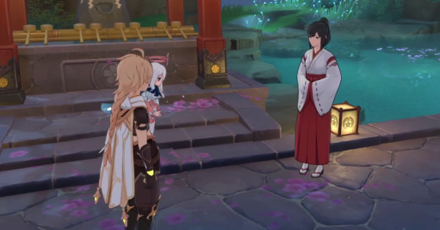
Head to the Grand Narukami Shrine and talk to Inagi Hotomi about the whole situation. Afterwards, obtain the Memento Lens from her.
Return to the Shrine and Use the Memento Lens
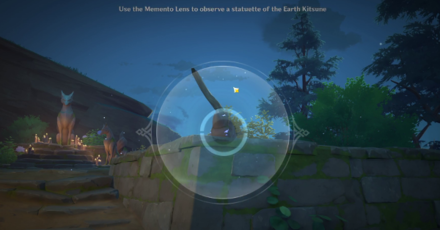
Use the Memento Lens on the Earth Kitsunes scattered around the Abandoned Shrine. There are eight Earth Kitsunes in total, but only three are required to progress through the quest. These three Earth Kitsunes give you the Sacred Words to activate the Sky Kitsune!
Earth Kitsune Locations
| Earth Kitsune Locations | |
|---|---|
| 1 | The first Earth Kitsune is located on the same altar where the first Mysterious Shadow is located! Head over to the first Torii gate along the pathwalk that goes straight into the Abandoned Shrine and use the Memento Lens on the Earth Kitsune beside the altar to get the first line. |
| 2 | The second Earth Kitsune is located right beside the entrance of the Abandoned Shrine, nearby the original location of the second Mysterious Shadow. As with the first Kitsune, use the Memento Lens to obtain the second line. |
| 3 | The third Earth Kitsune is located near the Sky Kitsune statue, few paces away from where you've obtained the Sacred Sakura Cleansing Summary, and right beside the stairs going towards the Sky Kitsune. |
Recite the Sacred Words in Front of the Sky Kitsune
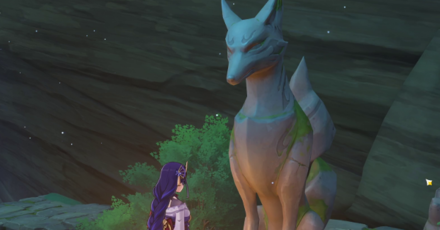
After spotting the three Earth Kitsunes and using the Memento Lens to obtain the three lines, it's time to recite the Sacred Words in Front of the Sky Kitsune!
How to Recite the Sacred Words
- First Line - "In the name of Narukami's Envoy."
- Second Line - "And of the Hakushin bloodline."
- Third Line - "Bring forth the fried tofu!"
Obtain the Ward
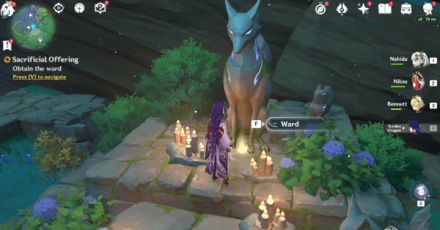
Once you've recited the Sacred Words and activated the Sky Kitsune statue, you'll obtain the Ward. You'll use this ward later to destroy the barrier, the same way you did with the Konda Village's barrier!
Use the Memento Lens to Investigate
Find the Barrier
The barrier in the Abandoned Shrine is located inside a locked cavern, south of the Grand Narukami Shrine. To go there, simply walk straight ahead from the right of the Sky Kitsune, and jump off the cliff.
You'll know it's the right one if you see a big puddle with a locked chest guarded by an Abyss Mage below. You can immediately head towards the locked cave, or defeat the Abyss Mage to get the chest. Either way, use the Rust-Worn Key from Konda Village to open it.
How to Get the Rust-Worn Key
| How to Get the Old Key from Konda Village | |
|---|---|
| 1 | Head back inside the old well behind Konda Densuke's house in Konda Village, and go deep into the cavern until you reach the room of the Konda Village barrier. |
| 2 | From Hanachirusato's location, spot the Thunder Sakura Bough and summon an Electrogranum from it. |
| 3 | Use the overgrown roots to climb towards the ledge and pass through the Electro Barrier. Continue climbing until you see a locked hatch. |
| 4 | Open it and walk inside the abandoned room. Inside is the Rust-Worn Key is sitting atop the table, among many other valuable things, and a Luxury Chest a bit to your left! |
How to Find the Barrier
| How to Find the Barrier | |
|---|---|
| 1 | Once you've obtained the old key, go back to the locked cavern, south of Grand Narukami Shrine. Use the key to open the latch! |
| 2 | Head inside, until you see the small altar similar to the one in Konda Village. Place the Ward inside to activate the barrier! |
Destroy the Barrier
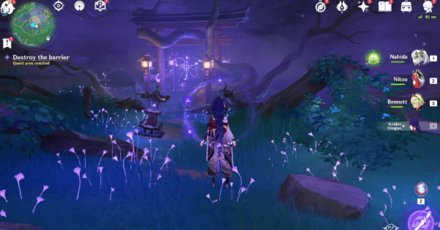
Once activated, you have to destroy the barrier to be able to cleanse it. The puzzle is similar with the one in Konda Village, so it shouldn't be too hard to solve it, but if you feel a bit lost, follow the guide below to Destroy the Barrier!
How to Destroy the Barrier
| How to Destroy the Barrier | |
|---|---|
| 1 | Walk towards the first notch and adjust it until it shows 2. |
| 2 | Next, go towards the small altar on the left and adjust the notch until it becomes 3. |
| 3 | From there, walk towards the farthest altar directly behind the Torii gate, and adjust the notch until it becomes 3. |
| 4 | Afterwards, walk towards the altar to the farthest right of the Torii gate, and adjust it until it becomes 3. |
| 5 | After correctly adjusting all notches, a Mysterious Samurai enemy will spawn. Defeat this enemy to Destroy the Barrier. |
Talk to Hanachirusato
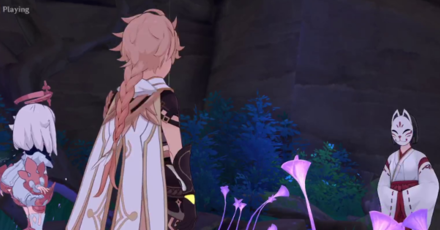
After defeating the Mysterious Samurai, Hanachirusato tells you she's going to leave the cleansing ritual to your hands!
Sacrificial Offering Information
Sub-Quest of Sacred Sakura Cleansing Ritual
Sacrificial Offering is the second part of the Sacred Sakura Cleansing Ritual World Quest where the Traveler cleansed the roots of the Sacred Sakura, with the help of the Hanachirusato.
Sacred Sakura Cleansing Ritual Quest Guide
Sacrificial Offering Rewards
Total Quest Rewards
| Total Quest Rewards |
 Primogem x40 |
 Mora x30,000 |
|---|---|---|
 Memento Lens x1 |
 Hero's Wit x3 |
 Adventure EXP x350 |
Genshin Impact Related Guides

Other Sacred Sakura Cleansing Ritual Quest Guides
| Sacred Sakura Cleansing Ritual World Quest Guides | ||
|---|---|---|
| A Strange Story in Konda | Sacrificial Offering | Cleansing Defilement |
| Tanuki-Bayashi in the Forest | Yougou Cleansing | |
Author

Sacrificial Offering Quest Guide
Please participate in our site
improvement survey
03/2026
improvement survey
03/2026
Would you assist in
improving Game8's site?
improving Game8's site?

×
We are listening to our users' valuable opinions and discussing how to act on them.
The information collected through this survey will be used for the purpose of improving our services. In addition, the information will only be disclosed a part of a statistic in a format that will not allow identification of personal information.
Begin Survey
Not Now
×
Please rate each item regarding Game8.co's Advertisements.
Amount of Ads
Very Dissatisfied
Somewhat Dissatisfied
Fine
Somewhat Satisfied
Highly Satisfied
Placement of Ads
Timing of Ad Display
Ad Loading Speed
Safeness of Ads
Content of Ads
×
Please rate each item regarding Game8.co's Quality of Articles.
Amount of information
Very Dissatisfied
Somewhat Dissatisfied
Fine
Somewhat Satisfied
Highly Satisfied
Frequency of updates
Speed of new information
Accuracy of articles
Understandibility of articles
Readability of sentences
×
Please rate each item regarding Game8.co's Usability of the Site.
Ease of finding information
Very Dissatisfied
Somewhat Dissatisfied
Fine
Somewhat Satisfied
Highly Satisfied
Loading Speed
Use of Color
Font Size
Visibility of Images
Easy to Understand Layout
×
Please rate each item regarding Game8.co's Message Boards, Comments.
Ease of Writing
Very Dissatisfied
Somewhat Dissatisfied
Fine
Somewhat Satisfied
Highly Satisfied
Readability
Ease in Finding Information
Comment Quality
Comment Quantity
Admin Response
×
Please rate each item regarding Game8.co's Site's new design.
Please rate our site's new design
Very Dissatisfied
Somewhat Dissatisfied
Fine
Somewhat Satisfied
Highly Satisfied
Do you think that the website's design change makes the site easier to use?
Has the new design made it easier for you to find information on the site?
Has the new design improved the overall visual appeal of the site?
How would you rate your overall satisfaction with the new design of the site?
×
How likely are you to recommend Game8 to someone you know?
Very Unlikely
0
1
2
3
4
5
6
7
8
9
10
Very Likely
If you have other opinions regarding potential improvement to the website, please share them with us. We would appreciate your honest opinion.
Note: This is a free response section, so you can proceed without entering anything.
Note: Please be sure not to enter any kind of personal information into your response.
Note: Please be sure not to enter any kind of personal information into your response.
×
Thank You
×
Thank you for participating in our survey! Your answers will help us to improve the quality of our website and services.
We hope you continue to make use of Game8.
We hope you continue to make use of Game8.
Close


Rankings
Gaming News


![Everwind Review [Early Access] | The Shaky First Step to A Very Long Journey](https://img.game8.co/4440226/ab079b1153298a042633dd1ef51e878e.png/thumb)

![Monster Hunter Stories 3 Review [First Impressions] | Simply Rejuvenating](https://img.game8.co/4438641/2a31b7702bd70e78ec8efd24661dacda.jpeg/thumb)
Popular Games

Genshin Impact Walkthrough & Guides Wiki
Honkai: Star Rail Walkthrough & Guides Wiki
Umamusume: Pretty Derby Walkthrough & Guides Wiki
Pokemon Pokopia Walkthrough & Guides Wiki
Resident Evil Requiem (RE9) Walkthrough & Guides Wiki
Monster Hunter Wilds Walkthrough & Guides Wiki
Wuthering Waves Walkthrough & Guides Wiki
Arknights: Endfield Walkthrough & Guides Wiki
Pokemon FireRed and LeafGreen (FRLG) Walkthrough & Guides Wiki
Pokemon TCG Pocket (PTCGP) Strategies & Guides Wiki


Recommended Games
Diablo 4: Vessel of Hatred Walkthrough & Guides Wiki
Fire Emblem Heroes (FEH) Walkthrough & Guides Wiki
Yu-Gi-Oh! Master Duel Walkthrough & Guides Wiki
Super Smash Bros. Ultimate Walkthrough & Guides Wiki
Pokemon Brilliant Diamond and Shining Pearl (BDSP) Walkthrough & Guides Wiki
Elden Ring Shadow of the Erdtree Walkthrough & Guides Wiki
Monster Hunter World Walkthrough & Guides Wiki
The Legend of Zelda: Tears of the Kingdom Walkthrough & Guides Wiki
Persona 3 Reload Walkthrough & Guides Wiki
Cyberpunk 2077: Ultimate Edition Walkthrough & Guides Wiki


All rights reserved
Copyright© 2012-2024 HoYoverse — COGNOSPHERE. All Rights Reserved.
The copyrights of videos of games used in our content and other intellectual property rights belong to the provider of the game.
The contents we provide on this site were created personally by members of the Game8 editorial department.
We refuse the right to reuse or repost content taken without our permission such as data or images to other sites.
it’s actually wrong it’s 2 in the middle and 3-3-3 on each side since there’s one not lit up.