Yashiori Island Puzzle Guide | Inazuma Guide
✉ Send your thoughts in our Genshin 6.4 Patch Survey!
★ Exclusive: Dive back in time with the Meta History
◆ Hot: Version 6.4, Luna 5 Codes
◆ Builds: Varka, Flins, Skirk, Escoffier
◆ Events: Travelers' Tales, He Who Caught the Wind
◆ Future: Linnea, Version 6.5 Luna VI
The Yashiori Island pillar device puzzles are featured in the Orobashi's Legacy questline in Genshin Impact. Learn about the Orobashi's Legacy Quest Puzzles in Yashiori Island, how to solve them, the puzzle solutions for the four puzzles on the island, and more in this guide!
List of Contents
How to Solve the Yashiori Island Puzzle
How to use Sacred Stone Mound
 |
||
| Elevation Adjustments | ||
|---|---|---|
 High |
 Center |
 Low Low |
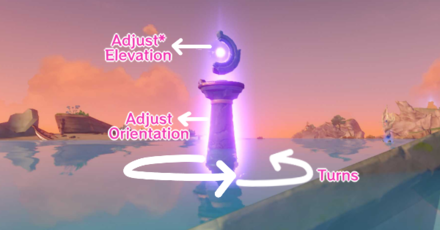
Sacred Stone Mounds can fire electric currents. It can be adjusted to by its elevation and its orientation. The elevation adjusts its head while the orientation turns its body!
Hit to fire Electric Currents
Once this pillar device has been adjusted, you need to hit it with any attacks so it can fire the electric currents.
How to use Thunderbearer Mirrors
 |
||
| Elevation Adjustments | ||
|---|---|---|
 High |
 Center |
 Low |
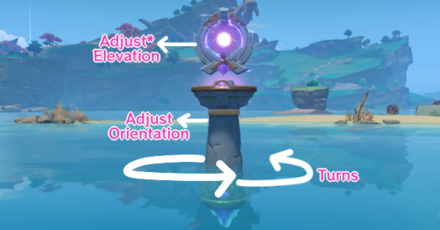
Instead of firing currents, this one catches it and redirects it to another mirror statue! Adjustments are the same as the Sacred Stone Mounds.
Last Thunderbearer Mirror
This puzzle is key to unlocking the water domes that hinder the quest. The last mirror should be adjusted to face a water dome to unlock it!
You will know if you are successful once a mini-cutscene plays after hitting the Sacred Stone Mound.
Yashiori Island Puzzle Solutions
All Yashiori Puzzle Guides
| Click here to jump to a puzzle guide! | |
|---|---|
| Fort Fujitou | Serpent's Head |
| Jakotsu Mine | Fort Mumei |
Fort Fujitou Puzzle
| Oroboshi's Legacy: Part I Puzzle Guide | |
|---|---|
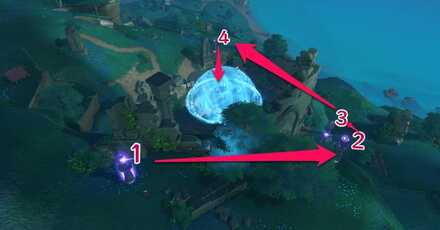 |
How to Adjust the Devices
| Sacred Stone Mound | |
|---|---|
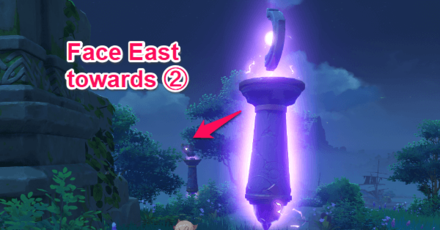 1 |
Orientation: Adjust 3 times towards east. Elevation: No adjusting needed. |
| Thunderbearer Mirror | |
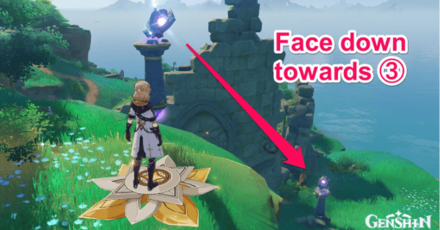 2 |
Orientation: Adjust 3 times towards north. Elevation: Adjust down 1 time. |
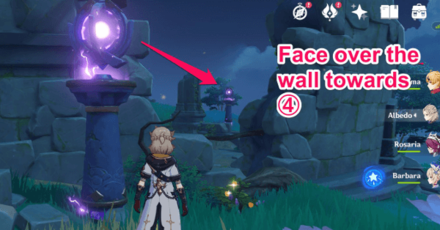 3 |
Orientation: No adjusting needed. Elevation: No adjusting needed. |
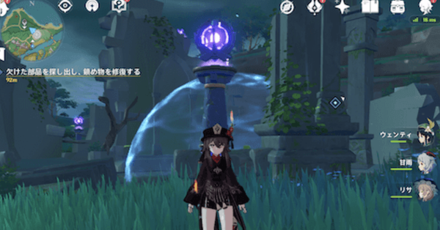 4 |
Orientation: No adjusting needed. Elevation: No adjusting needed. |
| After everything is set up, hit the Sacred Stone Mound, and a cutscene should play. | |
Serpent's Head Puzzle
| Oroboshi's Legacy: Part II Puzzle Guide | |
|---|---|
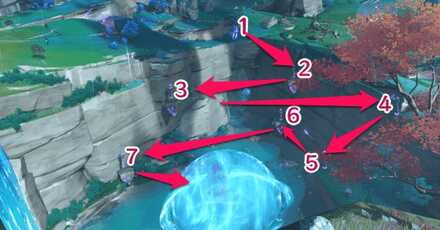 |
How to Adjust the Devices
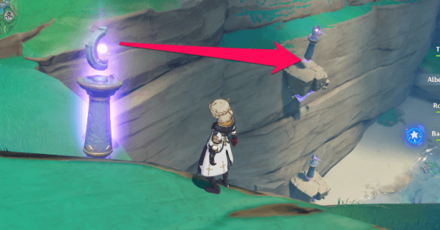 1 |
Orientation: Adjust 1 time towards west. Elevation: No adjusting needed. |
|---|---|
| Thunderbearer Mirror | |
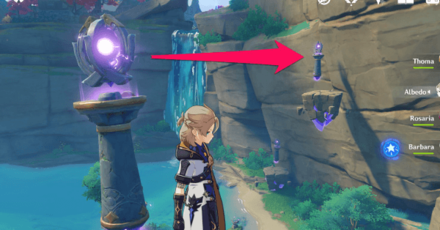 2 |
Orientation: Adjust 1 time towards north. Elevation: No adjusting needed. |
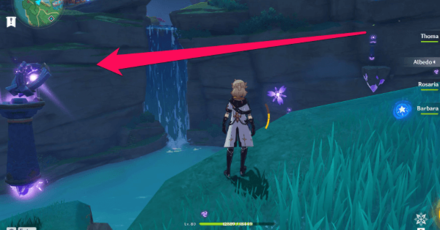 3 |
Orientation: No adjusting needed. Elevation: No adjusting needed. |
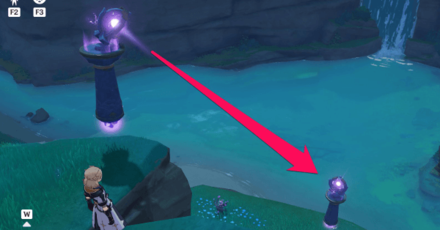 4 |
Orientation: No adjusting needed. Elevation: Adjust down 1 time. |
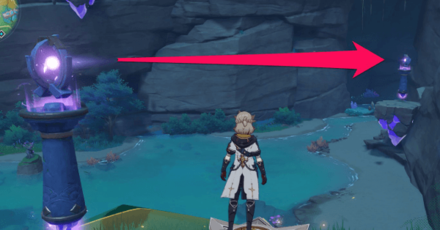 5 |
Orientation: No adjusting needed. Elevation: No adjusting needed. |
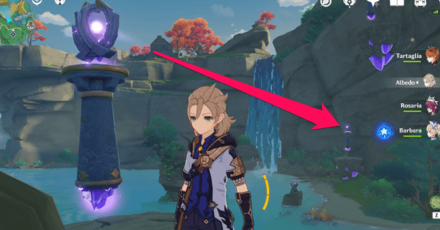 6 |
Orientation: Adjust 1 time towards north. Elevation: No adjusting needed. |
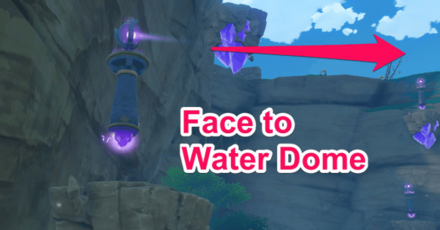 7 |
Orientation: Adjust 1 time towards the water dome. Elevation: No adjusting needed. |
| After everything is set up, hit the Sacred Stone Mound, and a cutscene should play. | |
Jakotsu Mine Puzzle
| Oroboshi's Legacy: Part III Puzzle Guide | |
|---|---|
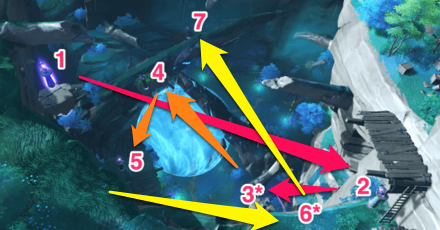 |
Location of 3rd and 6th Pillars
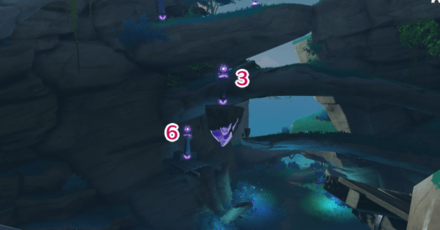
In the screenshot above, the 6th pillar is hidden from view. The 3rd and 6th pillar are somewhat close, but the one on the floating crystal platform is the 3rd one!
How to Adjust the Devices
| Sacred Stone Mound | |
|---|---|
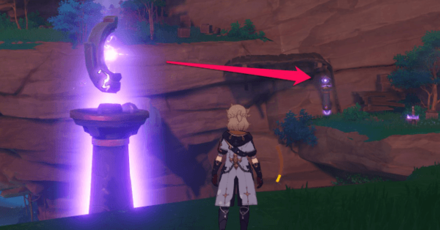 1 |
Orientation: Adjust 2 times towards east. Elevation: No adjusting needed |
| Thunderbearer Mirror | |
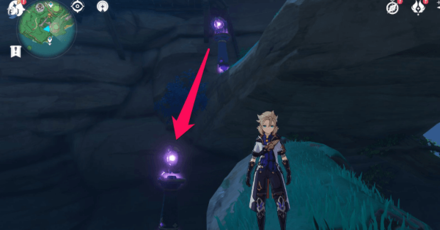 2 |
Orientation: No adjusting needed. Elevation: Adjust down 1 time. |
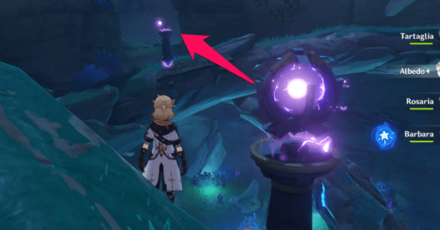 3 |
Orientation: No adjusting needed. Elevation: No adjusting needed. |
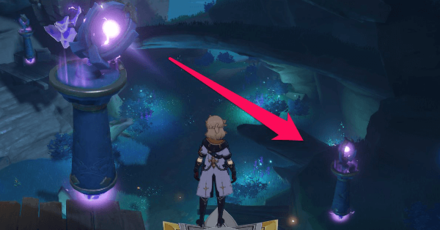 4 |
Orientation: Adjust 3 times facing towards south. Elevation: Adjust down 1 time. |
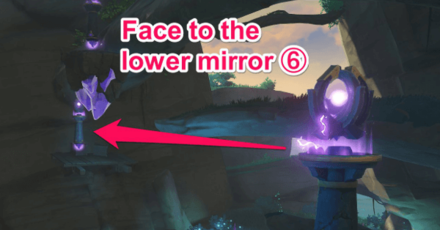 5 |
Orientation: No adjusting needed. Elevation: No adjusting needed. |
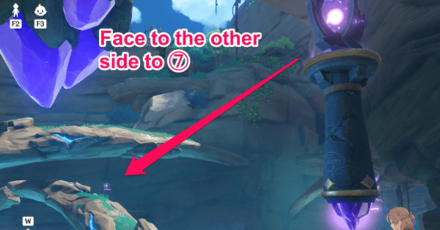 6 |
Orientation: Adjust 3 times towards northwest. Elevation: No adjusting needed. |
 7 |
Orientation: Adjust 1 time towards the water dome. Elevation: Adjust down 1 time. |
| After everything is set up, hit the Sacred Stone Mound, and a cutscene should play. | |
Fort Mumei Puzzle
| Oroboshi's Legacy: Part V Puzzle Guide | |
|---|---|
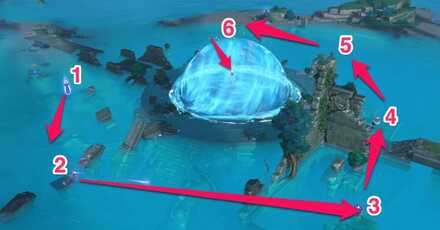 |
How to Adjust the Devices
| Sacred Stone Mound | |
|---|---|
 1 |
Orientation: Adjust 2 times towards east. Elevation: No adjusting needed. |
| Thunderbearer Mirror | |
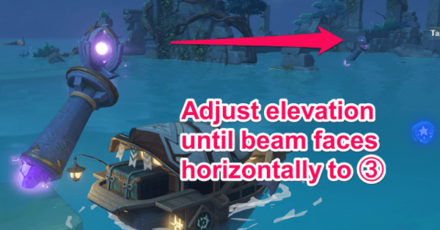 2 |
Orientation: No adjusting needed. Elevation: Adjust 2 times until the beam faces horizontally. |
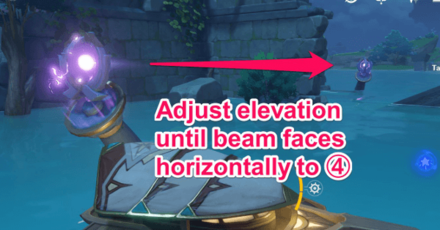 3 |
Orientation: Adjust 2 times facing towards southeast. Elevation: Adjust 1 time until the beam faces horizontally. |
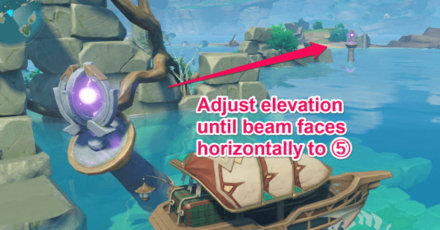 4 |
Orientation: Adjust 2 times facing towards southeast. Elevation: Adjust 1 time until the beam faces horizontally. |
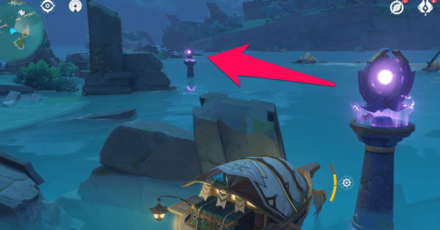 5 |
Orientation: Adjust 3 times facing towards northeast. Elevation: No adjusting needed. |
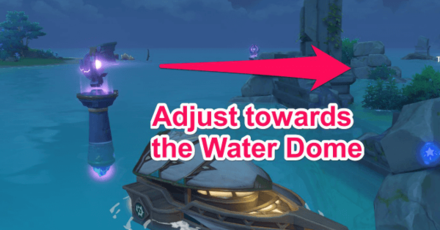 6 |
Orientation: Adjust 2 times towards the Water Dome. Elevation: No adjusting needed. |
| After everything is set up, hit the Sacred Stone Mound, and a cutscene should play. | |
Yashiori Island Puzzle Information
What is the Yashiori Island Puzzle?

The Yashiori Island Puzzle are pillar mechanical devices part of the Marvelous Installations that can suppress the thunderstorms in Yashiori Island.
Featured in Orobashi's Legacy
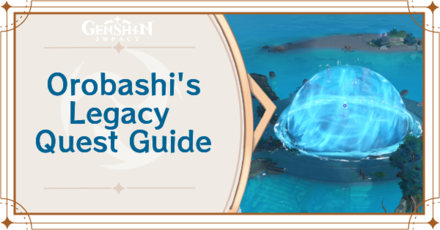
The pillar puzzles are featured in Orobashi's Legacy quest series. The goal of the quests is to stop the vicious thunderstorm, the Tatarigami, on the island!
Orobashi's Legacy Quest Guide
Genshin Impact Related Guides
Guides to Inazuma Areas
| Inazuma Area Guides | |
|---|---|
| Narukami Island | Kannazuka |
| Yashiori Island | Seirai Island |
| Tsurumi Island | Watatsumi Island |
Guides to Inazuma Features
Guides to Inazuma Puzzles
| Inazuma Puzzle Guides | |
|---|---|
| Tatarasuna Barrier | Tatarasuna Keys |
| Watatsumi 9 Cube Puzzle | Seiraimaru Boat |
| Komaki's Daily Fortune | Yashiori Island Puzzle |
| Tsurumi Island Stone Slates | Tsurumi Island Mist |
| Tsurumi Conch Treasure | A Doctor's Odyssey Achievement |
Guides to Inazuma Domains
| Inazuma Domain Puzzle Guides | |
|---|---|
| Shakkei Pavilion | Formation Estate |
| Empty Boat to a Thousand Gates | Palace in a Pool |
| Moshiri Kara | |
Guides to Inazuma Quests
All Interactive Map Guides
Comment
I've got a question! After the second puzzle in the mine, another of those Omamori stands. I found the first missing piece of it but I can't find the second one :/ Could anyone help me out? Thanks!
Author
Yashiori Island Puzzle Guide | Inazuma Guide
improvement survey
03/2026
improving Game8's site?

Your answers will help us to improve our website.
Note: Please be sure not to enter any kind of personal information into your response.

We hope you continue to make use of Game8.
Rankings
- We could not find the message board you were looking for.
Gaming News
Popular Games

Genshin Impact Walkthrough & Guides Wiki

Honkai: Star Rail Walkthrough & Guides Wiki

Umamusume: Pretty Derby Walkthrough & Guides Wiki

Pokemon Pokopia Walkthrough & Guides Wiki

Resident Evil Requiem (RE9) Walkthrough & Guides Wiki

Monster Hunter Wilds Walkthrough & Guides Wiki

Wuthering Waves Walkthrough & Guides Wiki

Arknights: Endfield Walkthrough & Guides Wiki

Pokemon FireRed and LeafGreen (FRLG) Walkthrough & Guides Wiki

Pokemon TCG Pocket (PTCGP) Strategies & Guides Wiki
Recommended Games

Fire Emblem Heroes (FEH) Walkthrough & Guides Wiki

Diablo 4: Vessel of Hatred Walkthrough & Guides Wiki

Yu-Gi-Oh! Master Duel Walkthrough & Guides Wiki

Super Smash Bros. Ultimate Walkthrough & Guides Wiki

Pokemon Brilliant Diamond and Shining Pearl (BDSP) Walkthrough & Guides Wiki

Elden Ring Shadow of the Erdtree Walkthrough & Guides Wiki

Monster Hunter World Walkthrough & Guides Wiki

The Legend of Zelda: Tears of the Kingdom Walkthrough & Guides Wiki

Persona 3 Reload Walkthrough & Guides Wiki

Cyberpunk 2077: Ultimate Edition Walkthrough & Guides Wiki
All rights reserved
Copyright© 2012-2024 HoYoverse — COGNOSPHERE. All Rights Reserved.
The copyrights of videos of games used in our content and other intellectual property rights belong to the provider of the game.
The contents we provide on this site were created personally by members of the Game8 editorial department.
We refuse the right to reuse or repost content taken without our permission such as data or images to other sites.


![Monster Hunter Stories 3 Review [First Impressions] | Simply Rejuvenating](https://img.game8.co/4438641/2a31b7702bd70e78ec8efd24661dacda.jpeg/thumb)


Serpent's Head Puzzle adjustments are wrong. 3rd and 6th are no adjustment to elevation.