Seirai Stormchasers: Part III World Quest Guide
✉ Send your thoughts in our Genshin 6.4 Patch Survey!
★ Exclusive: Dive back in time with the Meta History
◆ Hot: Version 6.4, Luna 5 Codes
◆ Builds: Varka, Flins, Skirk, Escoffier
◆ Events: Travelers' Tales, He Who Caught the Wind
◆ Future: Linnea, Version 6.5 Luna VI
Seirai Stormchasers: Part III is the third quest under the Seirai Stormchasers quest chain in the Seirai Island for Genshin Impact 2.1. See how to unlock the World Quest, its walkthrough, and the complete rewards here in this guide!
| All Seirai Stormchasers Quest Guides | |||
|---|---|---|---|
| Part 1 | Part 2 | Part 3 | Part 4 |
List of Contents
How to Unlock Seirai Stormchasers: Part III
Complete the Prerequisite Quests
The third part of the Seirai Stormchasers quest series will automatically be unlocked once you've finished Seirai Stormchasers: Part II.
Seirai Stormchasers: Part II Quest Guide
Seirai Stormchasers: Part III Walkthrough
Go to the Warding Stone's Location

Go to the area with the third Warding Stone, east of the Statue of Seven in Koseki Village, and talk to Taisuke.
Search for the Path to the Warding Stone
Use the Warding Stone by the Teleport Waypoint

To get to the next Warding Stone's exact location, you need to use the Phase Gate nearby to travel towards a platform with a Thunder Sakura Bough.
Use the Electrogranum to Use Thunder Spheres

Summon an Electrogranum to zip through Thunder Spheres until you reach a platform with a Teleport Waypoint. The Warding Stone will be beside this waypoint.
Don't forget to activate the Teleport Waypoint so you can go back here easily!
Touch the Paper Charm Hangars

There will be three Paper Charm Hangars you need to touch, all in different locations north of Amakumo Peak.
Paper Charm Hangar 1 near the Warding Stone

One Paper Charm Hangar is right beside the Warding Stone, along with some nearby Thunder Spheres and Electrograna.
Paper Charm Hangar 2 North of the Warding Stone

From the Warding Stone, head north using the Thunder Spheres and Electrograna until you get to the second Paper Charm Hangar.
Paper Charm Hangar 3 South of the Warding Stone

You can use either the Teleport Waypoint or Thunder Spheres to go back to the Warding Stone, then head south using the Thunder Spheres to find the third Paper Charm Hangar.
Seal the Warding Stone

Go back to the Warding Stone to rotate the top three times, then the bottom five times to match the Paper Charm Hangars.
Match the Number of Paper Charms
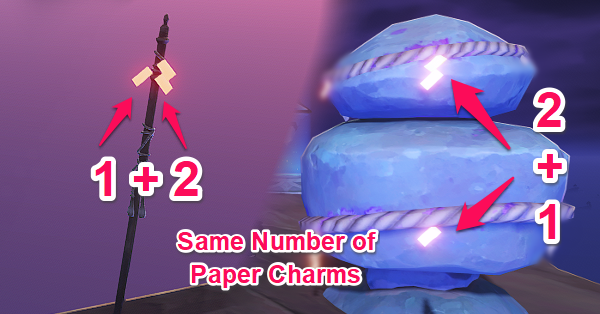
As with the other Warding Stones, match the third Warding Stone by matching the number of Paper Charms on the poles. Most of the Poles are on other floating islands, but note that the Warding Stones must face the Paper Charms for it to work.
After completing the puzzle and triggering the cutscene, you will automatically unlock Seirai Stormchasers: Part IV!
Seirai Stormchasers: Part III Information
Sub-Quest of Seirai Stormchasers

Seirai Stormchasers: Part III is the third subquest of the quest, Seirai Stormchasers, where you join the Adventurers Eiko and Taisuke in solving the problem of Seirai Island's constant thunderstorms.
Seirai Stormchasers World Quest Guide
Seirai Stormchasers: Part III Rewards
Total Quest Rewards
| Total Quest Rewards |
 Primogem x40 |
 Hero's Wit x4 |
 Adventure EXP x300 |
|---|---|---|
Genshin Impact Related Guides

Other Seirai Stormchasers Quest Guides
| Seirai Stormchasers World Quest Guides | ||
|---|---|---|
| Seirai Stormchasers: Part I | Seirai Stormchasers: Part II | Seirai Stormchasers: Part III |
| Seirai Stormchasers: Part IV | ||
Comment
Look at the attached image. It only matters that those symbols align, but there are 2 ways that it does, if the scene has not gone off then just keep rotating the top one until it does and that should work but make sure to match the lit ones facing the flag at the ward and the one to it's left - then only change the top until the scene goes off.
Author
Seirai Stormchasers: Part III World Quest Guide
improvement survey
03/2026
improving Game8's site?

Your answers will help us to improve our website.
Note: Please be sure not to enter any kind of personal information into your response.

We hope you continue to make use of Game8.
Rankings
- We could not find the message board you were looking for.
Gaming News
Popular Games

Genshin Impact Walkthrough & Guides Wiki

Honkai: Star Rail Walkthrough & Guides Wiki

Umamusume: Pretty Derby Walkthrough & Guides Wiki

Pokemon Pokopia Walkthrough & Guides Wiki

Resident Evil Requiem (RE9) Walkthrough & Guides Wiki

Monster Hunter Wilds Walkthrough & Guides Wiki

Wuthering Waves Walkthrough & Guides Wiki

Arknights: Endfield Walkthrough & Guides Wiki

Pokemon FireRed and LeafGreen (FRLG) Walkthrough & Guides Wiki

Pokemon TCG Pocket (PTCGP) Strategies & Guides Wiki
Recommended Games

Diablo 4: Vessel of Hatred Walkthrough & Guides Wiki

Fire Emblem Heroes (FEH) Walkthrough & Guides Wiki

Yu-Gi-Oh! Master Duel Walkthrough & Guides Wiki

Super Smash Bros. Ultimate Walkthrough & Guides Wiki

Pokemon Brilliant Diamond and Shining Pearl (BDSP) Walkthrough & Guides Wiki

Elden Ring Shadow of the Erdtree Walkthrough & Guides Wiki

Monster Hunter World Walkthrough & Guides Wiki

The Legend of Zelda: Tears of the Kingdom Walkthrough & Guides Wiki

Persona 3 Reload Walkthrough & Guides Wiki

Cyberpunk 2077: Ultimate Edition Walkthrough & Guides Wiki
All rights reserved
Copyright© 2012-2024 HoYoverse — COGNOSPHERE. All Rights Reserved.
The copyrights of videos of games used in our content and other intellectual property rights belong to the provider of the game.
The contents we provide on this site were created personally by members of the Game8 editorial department.
We refuse the right to reuse or repost content taken without our permission such as data or images to other sites.


![Everwind Review [Early Access] | The Shaky First Step to A Very Long Journey](https://img.game8.co/4440226/ab079b1153298a042633dd1ef51e878e.png/thumb)

![Monster Hunter Stories 3 Review [First Impressions] | Simply Rejuvenating](https://img.game8.co/4438641/2a31b7702bd70e78ec8efd24661dacda.jpeg/thumb)


Thank you for the image. I started the quest some weeks ago and did not solve it and getting to here helped not either (because it seems to have memorizes how many times I rotated bottom and top). Your image helped to get the correct position.