
This survey will take about 1 minute.
Your answers will help us to improve our website.
Genshin Impact
Treacherous Light of the Depths Quest Guide
✉ Send your thoughts in our Genshin 6.4 Patch Survey!
★ Exclusive: Dive back in time with the Meta History
◆ Hot: Version 6.4, Luna 5 Codes
◆ Builds: Varka, Flins, Skirk, Escoffier
◆ Events: Travelers' Tales, He Who Caught the Wind
◆ Future: Linnea, Version 6.5 Luna VI

Treacherous Light of the Depths is a World Quest introduced in Fontaine in Genshin Impact 4.1. See how to unlock this quest, its walkthrough, and all the rewards of this quest here in this guide!
List of Contents
How to Unlock Treacherous Light of the Depths
Quest Unlock Requirements
| Quest Unlock Requirements | |
|---|---|
 |
|
 |
Aha! Looks like Treacherous Light of the Depths is not locked behind any quest! |
Go to the Fontaine Research Institute Region
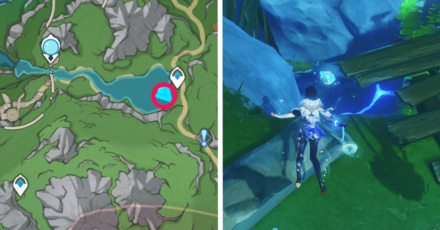
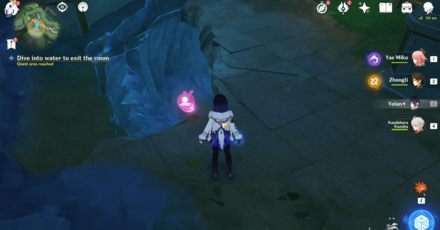
Treacherous Light of the Depths is located in the Fontaine Research Institute Region, in the nation of Fontaine. Use the Teleport Waypoint and dive into the water to discover a blocked-off cavern entrance.
Clear the Rock Using the Jellyfish's Ability
You will see a rock and a Xenochromatic Jellyfish near it. Use the Xenochromatic Jellyfish's Ability to clear the rocks. Once the entrance is open, proceed deeper into the cavern.
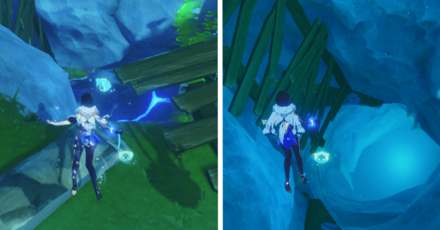
Swim and Explore
Continue swimming down until you land on a puddle. Head down the path until you see a metal door with a switch nearby. Interact with the switch and the door will open to another area, where the Treacherous Light of the Depths World Quest starts!
How to Get to Fontaine and Map Guide
Treacherous Lights of the Depths Walkthrough
Explore Inside the Ruins
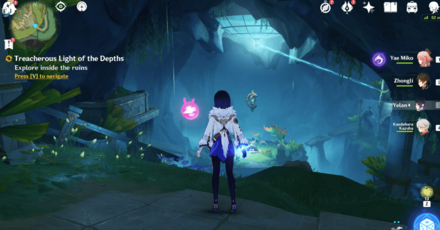
Once you enter the ruins, a short dialogue plays between you and Paimon. Since there is a light-emitting device, follow the beam of light to reach the first optical device that you need to interact with.
Find the First Optical Device
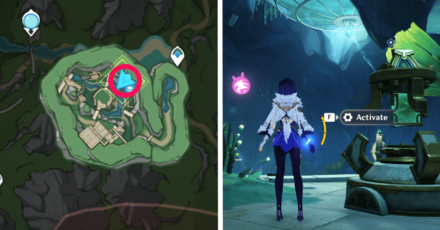
The first optical device is located on the upper right side of the ruins. Glide down towards the middle area then make your way through the broken bridge to get to it.
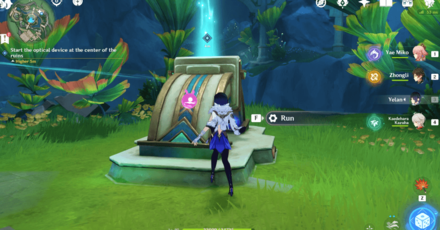
Start the First Optical Device
Now you need to start the first optical device. Activate it and wait until the image becomes clear before calibrating it! It will emit a beam of light if you are successful in starting it.
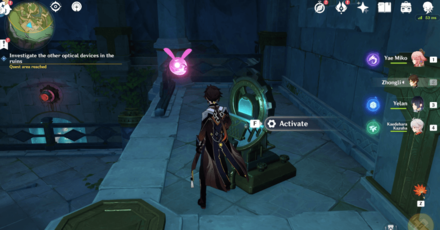
Find the Second Optical Device
Follow the beam of light that the first optical device emitted to find the second optical device. It is located in the lower area of the ruins. Take out the Clockwork Meka that are guarding it first.
Start the Second Optical Device
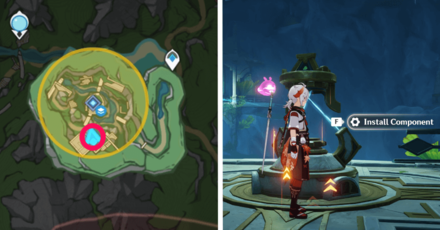
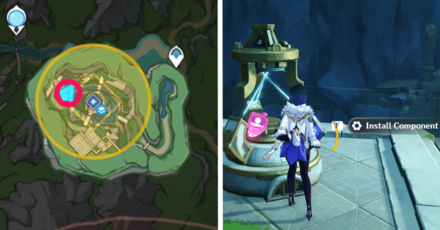
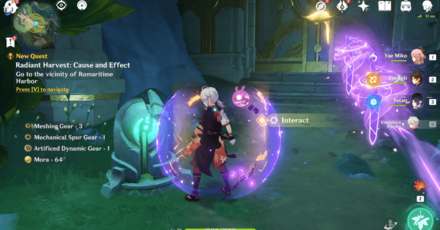
Starting the second optical device is not so easy this time. It is missing a component, which is locked in a room behind a metal door. Interact with the Energy Transfer Terminal nearby to start unlocking the door.
Use the Viewfinder to Unlock the Metal Door
Once in the viewfinder, find the next viewfinder to get a better angle. You will then see two energy cells, so transfer the energy of the right cell to the left cell. This should unlock the metal door and allow you to collect the component.
Take the Component
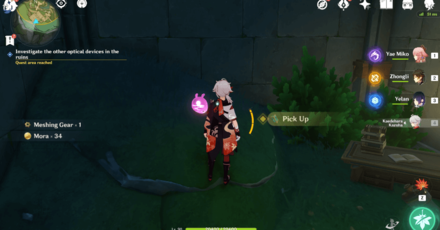
Exit the terminal and enter the room. Take out the Clockwork Meka then take the component buried in the sand where the Meka was facing. Bring it back to the second optical device so you can start it.
Calibrate the Second Optical Device
You can now activate and calibrate the second optical device. This time, there will be two images so you need to calibrate it twice. Remember to wait for the image to become clear before calibrating it.
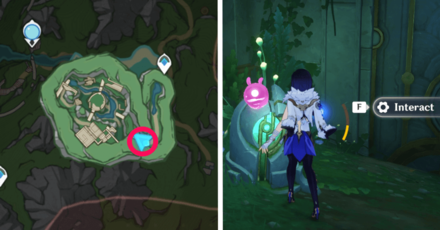
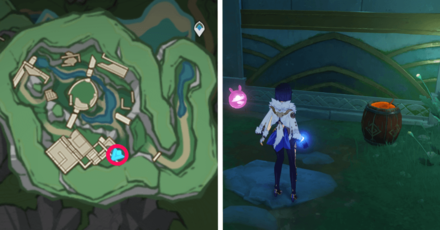
Freeing the Seelie in the Cage
Before going to the Third Optical Device, you can optionally free the Seelie in the other cage. To do this, you need to access a third viewfinder near the entrance of the room. Use it and transfer the energy to the energy cell below.
Once you do, go back to the viewfinder inside and transfer energy to the cell near the cage to unlock it. Once the Seelie is free, follow it towards the next location nearby.
Go to the Other Side of the Room
The Seelie will pass through a barrier and stop, so you have to find another way around. On the other side of the room, you will find a wall with an explosive barrel nearby. Use it to destroy the wall and enter the room.
Beware of the Clockwork Meka inside the room! Take it out first then you can safely follow the Seelie towards its statue. Doing all of this will reward you with a Precious Chest.
Find the Third Optical Device
Follow the beam of light that the second optical device emitted to find the third optical device. It is located on the upper left of the ruins, so glide down and head towards it. The third optical device is also missing a component, so you have to find it.
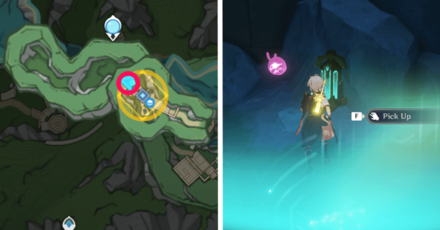
Take the Component From the Upper Floor
The component is located on the upper floor of the ruin. Just climb the wall nearby and pick it up, then take it back to the third optical device to start calibrating it.
Start the Third Optical Device
You can now start and calibrate the third optical device. This time, there will be three images so you need to calibrate it thrice. Remember to wait for the image to become clear before calibrating it.
Start the Central Optical Device
Once the third optical device is calibrated, head to the middle area and start the central optical device. A short cutscene will play and a metal gate will open below the middle area.
Continue Exploring
Enter the gate below the middle area but beware of the Clockwork Meka. Take them out and proceed further into the cave until you see another door with a switch. Interact with it and head into the next area.
Find the Energy Cell
You will see an inactive terminal and some stationary Clockwork Meka. You have to find the energy cell to make the terminal active. The energy cell is in a destructible rock, just north of the room. Take it and bring it back to the terminal then begin the test.
Defeat Lothair and Claire
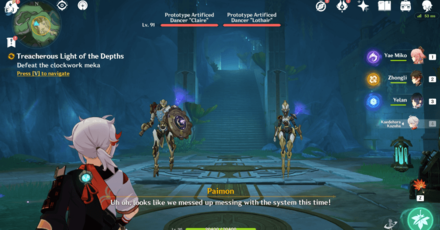
Once the test begins, the Clockwork Meka will move and become hostile. Take them out and a cutscene will play, with a person entering the room after the battle.
Talk to Sevigne
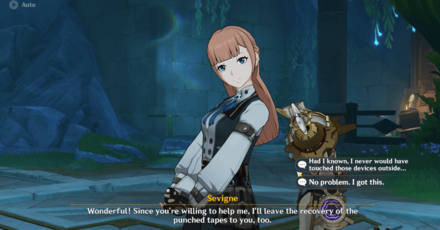
Talk to the researcher who just entered the room. She will turn out to be Sevigne, a researcher from the Fontaine Research Institute. She will ask you to find and recover the Punched Tapes within the room next.
Find the Punched Tapes
The Punched Tapes are scattered all over the room. There are only three Punched Tapes, so they should not be too hard to find.
Recover the First Punched Tape
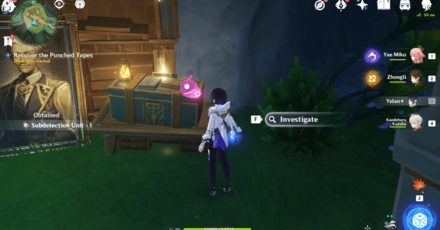
The first Punched Tape is near a big picture frame, just on top of the box with some books on it. Recover it and head to the second Punched Tape.
Recover the Second Punched Tape
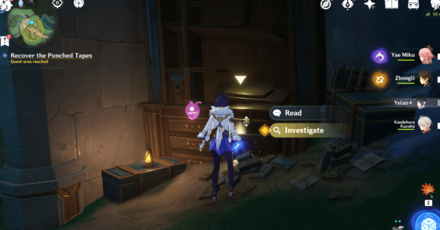
The second Punched Tape is in a drawer of a broken closet, near some scattered books. Take it and head to the third Punched Tape.
Recover the Third Punched Tape
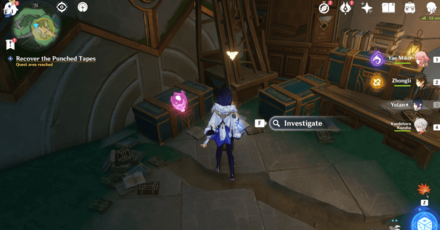
The third Punched Tape is on the floor by a bunch of boxes and books. Take it and head back to Sevigne for another dialogue. She will tell you to go to the Fontaine Research Institute to find Chisseray.
Dive Into the Water
After talking with Sevigne, she will tell you to exit the room by using the crack in the floor. Dive in the water and head towards the current in the water.
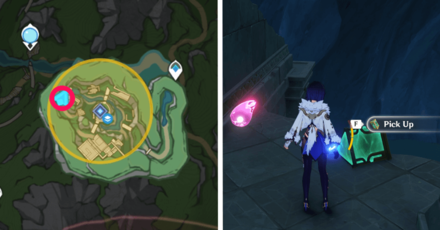
Use the Current to Exit
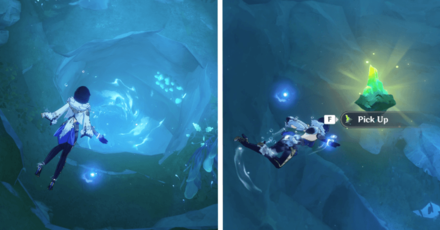
Once you see the current, approach it and it will take you back to the open ocean. On the way out, you will also see a Mysterious Ore which you can pick up. Swim up to the surface and head to the Fontaine Research Institute.
Talk to Chisseray

After teleporting to the Fontaine Research Institute, find and talk to Chisseray. Finish the dialogue and this will finish the quest!
Road to the Singularity Rewards
Total Quest Rewards
| Total Quest Rewards |
 Primogem x40 |
 Mora x33000 |
|---|---|---|
 Hero's Wit x2 |
||
Genshin Impact Related Guides

Other Fontaine Quest Guides
Comment
12  Anonymous 6 months
you need to finish the world quest in the area
Author

Treacherous Light of the Depths Quest Guide
Please participate in our site
improvement survey
03/2026
improvement survey
03/2026
Would you assist in
improving Game8's site?
improving Game8's site?

×
We are listening to our users' valuable opinions and discussing how to act on them.
The information collected through this survey will be used for the purpose of improving our services. In addition, the information will only be disclosed a part of a statistic in a format that will not allow identification of personal information.
Begin Survey
Not Now
×
Please rate each item regarding Game8.co's Advertisements.
Amount of Ads
Very Dissatisfied
Somewhat Dissatisfied
Fine
Somewhat Satisfied
Highly Satisfied
Placement of Ads
Timing of Ad Display
Ad Loading Speed
Safeness of Ads
Content of Ads
×
Please rate each item regarding Game8.co's Quality of Articles.
Amount of information
Very Dissatisfied
Somewhat Dissatisfied
Fine
Somewhat Satisfied
Highly Satisfied
Frequency of updates
Speed of new information
Accuracy of articles
Understandibility of articles
Readability of sentences
×
Please rate each item regarding Game8.co's Usability of the Site.
Ease of finding information
Very Dissatisfied
Somewhat Dissatisfied
Fine
Somewhat Satisfied
Highly Satisfied
Loading Speed
Use of Color
Font Size
Visibility of Images
Easy to Understand Layout
×
Please rate each item regarding Game8.co's Message Boards, Comments.
Ease of Writing
Very Dissatisfied
Somewhat Dissatisfied
Fine
Somewhat Satisfied
Highly Satisfied
Readability
Ease in Finding Information
Comment Quality
Comment Quantity
Admin Response
×
Please rate each item regarding Game8.co's Site's new design.
Please rate our site's new design
Very Dissatisfied
Somewhat Dissatisfied
Fine
Somewhat Satisfied
Highly Satisfied
Do you think that the website's design change makes the site easier to use?
Has the new design made it easier for you to find information on the site?
Has the new design improved the overall visual appeal of the site?
How would you rate your overall satisfaction with the new design of the site?
×
How likely are you to recommend Game8 to someone you know?
Very Unlikely
0
1
2
3
4
5
6
7
8
9
10
Very Likely
If you have other opinions regarding potential improvement to the website, please share them with us. We would appreciate your honest opinion.
Note: This is a free response section, so you can proceed without entering anything.
Note: Please be sure not to enter any kind of personal information into your response.
Note: Please be sure not to enter any kind of personal information into your response.
×
Thank You
×
Thank you for participating in our survey! Your answers will help us to improve the quality of our website and services.
We hope you continue to make use of Game8.
We hope you continue to make use of Game8.
Close


Rankings
Gaming News


![Monster Hunter Stories 3 Review [First Impressions] | Simply Rejuvenating](https://img.game8.co/4438641/2a31b7702bd70e78ec8efd24661dacda.jpeg/thumb)
Popular Games

Genshin Impact Walkthrough & Guides Wiki
Honkai: Star Rail Walkthrough & Guides Wiki
Umamusume: Pretty Derby Walkthrough & Guides Wiki
Pokemon Pokopia Walkthrough & Guides Wiki
Resident Evil Requiem (RE9) Walkthrough & Guides Wiki
Monster Hunter Wilds Walkthrough & Guides Wiki
Wuthering Waves Walkthrough & Guides Wiki
Arknights: Endfield Walkthrough & Guides Wiki
Pokemon FireRed and LeafGreen (FRLG) Walkthrough & Guides Wiki
Pokemon TCG Pocket (PTCGP) Strategies & Guides Wiki


Recommended Games
Diablo 4: Vessel of Hatred Walkthrough & Guides Wiki
Cyberpunk 2077: Ultimate Edition Walkthrough & Guides Wiki
Fire Emblem Heroes (FEH) Walkthrough & Guides Wiki
Yu-Gi-Oh! Master Duel Walkthrough & Guides Wiki
Super Smash Bros. Ultimate Walkthrough & Guides Wiki
Pokemon Brilliant Diamond and Shining Pearl (BDSP) Walkthrough & Guides Wiki
Elden Ring Shadow of the Erdtree Walkthrough & Guides Wiki
Monster Hunter World Walkthrough & Guides Wiki
The Legend of Zelda: Tears of the Kingdom Walkthrough & Guides Wiki
Persona 3 Reload Walkthrough & Guides Wiki


All rights reserved
Copyright© 2012-2024 HoYoverse — COGNOSPHERE. All Rights Reserved.
The copyrights of videos of games used in our content and other intellectual property rights belong to the provider of the game.
The contents we provide on this site were created personally by members of the Game8 editorial department.
We refuse the right to reuse or repost content taken without our permission such as data or images to other sites.
If you are unable to complete the last part of the quest where you need to talk to chisseray, it means you haven't completed the World Quest in the area. You need to finish it first before you can get Chisseray to sit back down