The Dune of Elusion Puzzle Guide and Sacred Seals Locations
✉ Send your thoughts in our Genshin 6.4 Patch Survey!
★ Exclusive: Dive back in time with the Meta History
◆ Hot: Version 6.4, Luna 5 Codes
◆ Builds: Varka, Flins, Skirk, Escoffier
◆ Events: Travelers' Tales, He Who Caught the Wind
◆ Future: Linnea, Version 6.5 Luna VI

See how to complete The Dune of Elusion puzzles and where to find the locations for Sacred Seals and Dendroculus in this guide! The Dune of Elusion is a pyramid found in Hypostyle Desert, Sumeru for Genshin Impact.
List of Contents
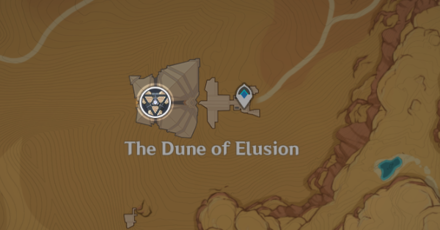
The Dune of Elusion Location
Southeast Pyramid in Hypostyle Desert
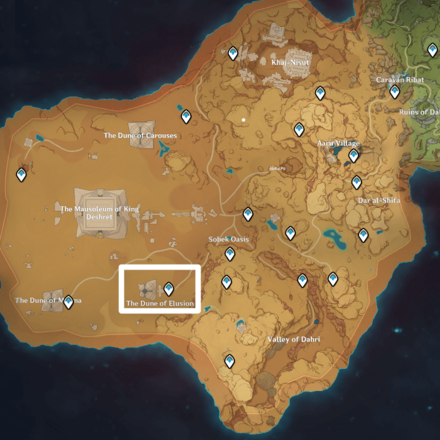
You can get to The Dune of Elusion pyramid by going southeast of The Mausoleum of King Deshret in Hypostyle Desert.
A teleport waypoint can be unlocked in this location.
Recommended to Unlock Dual Evidence Quest
Some puzzles around the pyramid require the Old Notes and New Friends' Dual Evidence quest. We recommend starting the quest chain first to get full clearance.
Dual Evidence Quest and Puzzles Guide
The Dune of Elusion Puzzle Guides
The Dune of Elusion Illusory Murals
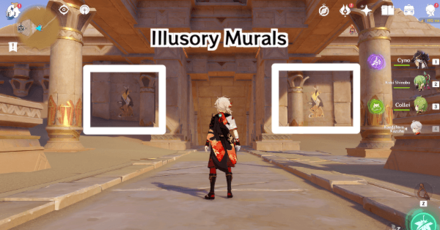
Wavy murals at the entrance of the pyramid are Illusory Murals. You solve these puzzles by changing the time to nighttime, then touching them to spawn enemies.
| Illusory Murals Walkthrough | |
|---|---|
| 1 | 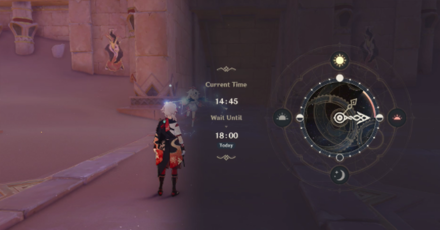 Change the time to nighttime (start from 18:00). |
| 3 | 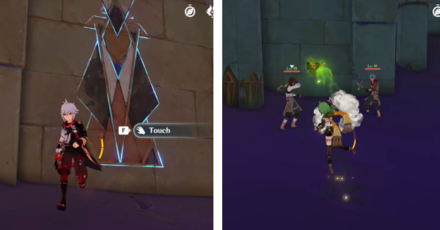 The murals will light up afterwards. Press Touch on both murals, then defeat any enemies that will appear. |
| 3 | 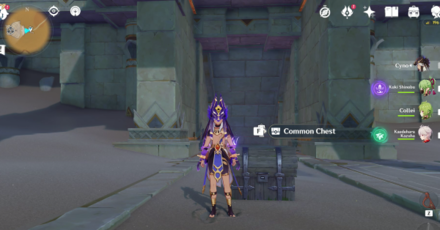 A Common Chest will spawn as your reward! |
Other Puzzles
| Other Puzzles in Dune of Elusion | |
|---|---|
| 1 | 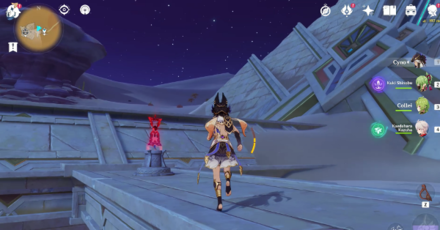 Collect 20 Dendro Particles from the Time Trial Challenge on the roof. |
| 2 | 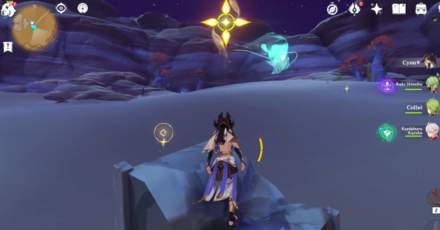 Seelie that goes to the Eremite camp south. |
South Ruin Entrance
The Dune of Elusion Nearby Ruin Location
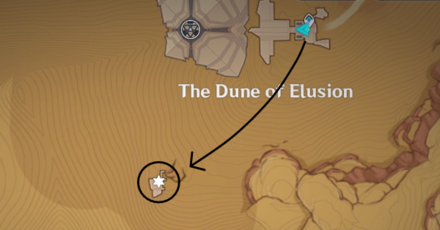 |
From the Waypoint in front of The Dune of Elusion, walk south until you see the ruin entrance guarded by Eremites. The locked door at the end of the hall can be unlocked by rotating the nearby Everlight Cell twice.
South Ruin First Floor Puzzle
| South Ruin First Floor Puzzle | |
|---|---|
| 1 | 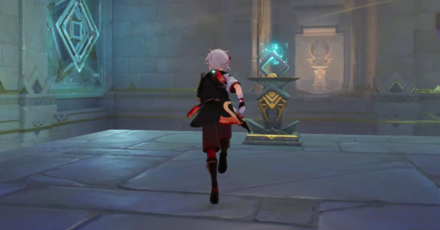 After going down using the elevator, you'll see a room with a ledge on the other side and two Large fans on both sides. Wait for the Large fan on the right to stop moving then release the Primal Ember from its sconce. |
| 2 | 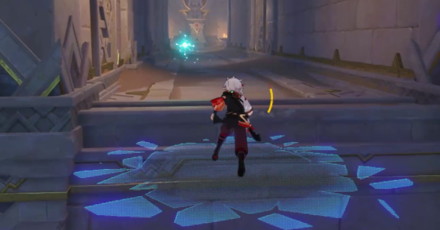 Just keep walking straight on the invisible floor, until you reach the ledge on the other side. Guide the Primal Ember towards the Primal Torch at the end of the hall in front of you. A Forged Primal Light should appear to its right, afterwards. |
| 3 | 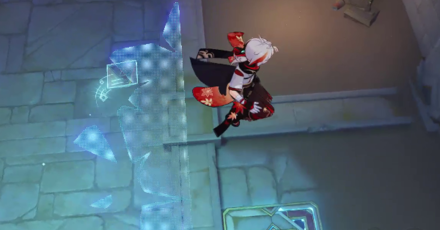 Pick up the Forged Primal Light and bring it to the Replicator Keystone below the invisible floor. Just sprint on your right once you're on top of it to reach the Replicator Keystone below. It will reveal an obscuring cell. |
| 4 | 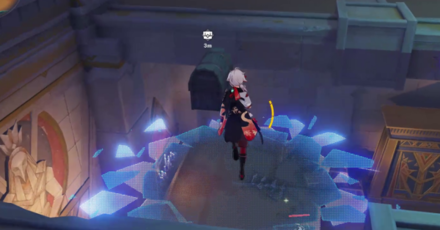 Touch the cell to unlock the nearby Common Chest and reveal a floor below. Although the room below is visible, you cannot access it from your current location. Go back to the elevator that you used before heading to this room to further reach within the ruins. |
South Ruin Second Floor Puzzle
| Nearby Ruin Second Floor Puzzle | |
|---|---|
| 1 | 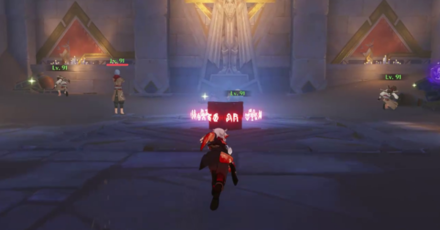 Before you can enter the elevator, the camera will pan towards its entrance and you'll see that it automatically activated. Use the elevator to head towards the room below. Defeat the Eremite inside then, open the door on your left. |
| 2 | 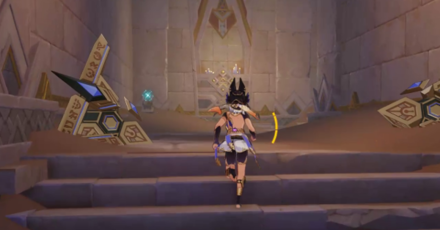 You'll see a Primal Ember on your left after taking the first flight of stairs. Release it from its sconce and guide it towards the room with the Large Fan. You'll encounter an Eremite: Crossbow enemy. Defeat it guide the Primal Ember to the Primal Sconce inside. |
| 3 | 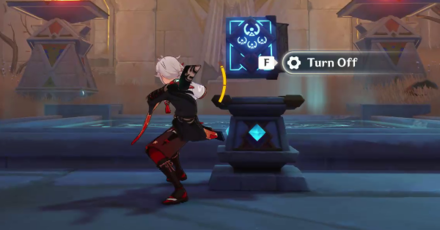 Before releasing the Primal Ember from the sconce, turn off the Large Fan thru the nearby Plinth of the Secret Rites. Afterwards, release the ember and offer it to the Primal Torch. A hole will open in the ceiling afterwards. Reactivate the Large Fan and use the current to glide upward. |
| 4 | 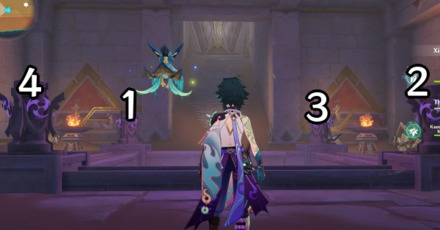 In this floor, you'll see four Electro Monuments sitting by the four corners of the hole. Hit them with Electro in ascending order based on the number of Primal Construct near them. An Exquisite Chest will spawn afterwards and you'll be able to unlock the door at the end of the stairs. |
| 5 | 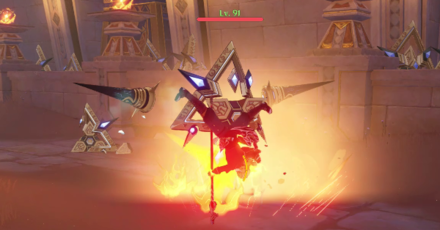 Inside this room is a locked Precious Chest from which, you'll be able to get a piece of Glinting Component. Defeat the Primal Construct: Reshaper and Primal Construct: Prospector enemies to unlock it. |
| 6 | 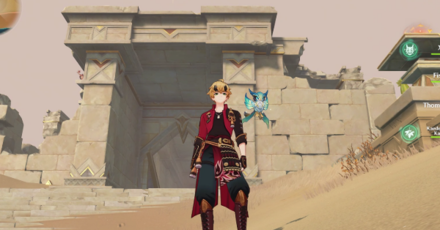 Afterwards, use the elevator to go up the floor and pick up the Dendroculus along the way. Exit the ruins using the door at the end of the hall. You'll get the How Do You Write the Excavation Report achievement once you do. |
The Dune of Elusion Sacred Seals
How to Get to the Dune of Elusions Sacred Seals

Entrances to the caves below are only accessible during the Dual Evidence quest from Khemenu Temple or Sekhem Hall. We recommend completing this questline first before trying to search for these Sacred Seals.
All Dune of Elusion Sacred Seal Locations

You can find a total of two Sacred Seals within the area around The Dune of Elusion. However, the actual entrance is from Khemenu Temple or Sekhem Hall underneath the Mausoleum of King Deshret.
| The Dune of Elusion Sacred Seal Locations | |
|---|---|
| 1 | 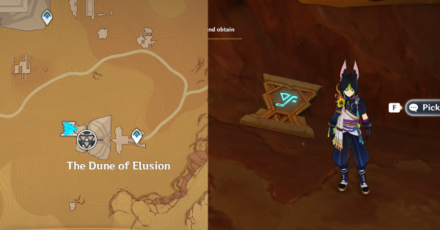 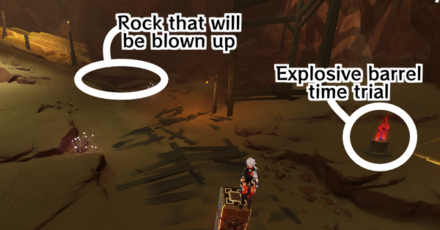 Sacred Seal: Sheep Head • Hidden inside a rock by the spiral ramp. • Complete the nearby explosive barrel time trial to clear the rocks. |
| 2 | 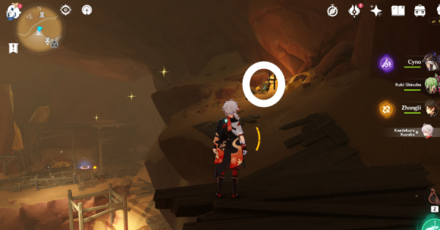 Sacred Seal: Giant Serpent • At the very top of the cavern. If you came from Sekhem Hall, go outside then go to the right ledge • By the two Fungi enemies. |
| 3 |  Sacred Seal: Valley • By the boxes on top of the wooden decks just outside the entrance to Sekham Hall. • Accessible during Dual Evidence quest. |
Sacred Seals Locations and Puzzle Guide
The Dune of Elusion Dendroculus
All Dune of Elusion Dendroculus Locations

There are four Dendroculi within the area around The Dune of Elusion. Two of these are above ground, while the other two are only accesible down a cave and ruins. You will need Dual Evidence completed to get clearance and access to both locations.
| The Dune of Elusion Dendroculus Locations | |
|---|---|
| 1 |  Climb the top of the Pyramid. |
| 2 | 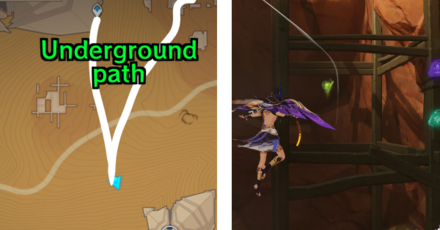 In a scaffolding accessible from Dual Evidence quest. |
| 3 |  Light up all Pyro torches found south of The Dune of Elusion to remove the barrier that covers the Dendroculus. |
| 4 | 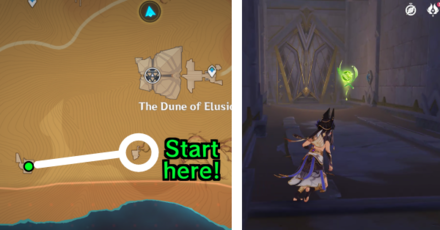 Make your way through all puzzles within the ruins south of Dune of Elusion. The Dendroculus is the final reward from completing it. You will need full clearance to do this. |
The Dune of Elusion Boss
Algorithm of Semi-Intransient Matrix of Overseer Network
The Algorithm of Semi-Intransient Matrix of Overseer Network is the sole enemy, and the main attraction inside the Dune of Elusion pyramid. See how to defeat the boss in the guide below!
Algorithm of Semi-Intransient Matrix Guide
Genshin Impact Related Guides

Guides to Sumeru Areas
| Sumeru Area Guides | |
|---|---|
 Rainforest Area Rainforest Area |
 Desert Area Desert Area |
Guide to Desert Regions
| Sumeru Desert Guides | ||
|---|---|---|
 The Great Red Sand The Great Red Sand |
 Desert of Hadramaveth Desert of Hadramaveth |
 Girdle of the Sands Girdle of the Sands |
Guides to Important Sumeru Features
| Notable Sumeru Guides | |
|---|---|
| Dendroculus | Craftable Weapons |
| Tree of Dreams | Commission Unlock |
| Reputation | Shrine of Depths |
| Remarkable Chests | Chest Locations |
The Great Red Sand World Quests
| Desert Quest Chains | |
|---|---|
| Golden Slumber | Old Notes and New Friends |
| The Exile | A Gifted Rose |
| Golden Slumber Quest Guides | |
| Lost in the Sands | An Introduction to Indoor Archaeology |
| The Secret of Al-Ahmar | Dreams Beneath the Searing Sand |
| Old Notes and New Friends Quest Guides | |
| Dual Evidence | Soheil's Wish |
| Invisible Barrier | Hidden Mercenaries |
| Desert's Remembrance | |
| The Exile Quest Guides | |
| The Exile: Blooming | The Exile: Sprouting |
| A Gifted Rose Quest Guides | |
| A Gifted Rose: Prickly as Thorns | A Gifted Rose: Long Day Ahead |
| A Gifted Rose: Can Stones Bloom | A Gifted Rose: Ballad of Days Gone By |
| A Gifted Rose: Some People Never Fade Away | Golden Rose Seeds |
| Desert World Quests | |
| Afratu's Dilemma | Blooming Sands |
| Join the Eremites and Embrace a Wonderful New Life! | |
The Great Red Sand Puzzles and Features
Enemies in the The Great Red Sand
| Enemy and Boss Guides | |
|---|---|
 Algorithm of Semi-Intransient Matrix Algorithm of Semi-Intransient Matrix |
 Primal Constructs Primal Constructs |
 Eremite Stone Enchanter Eremite Stone Enchanter |
 Eremite Galehunter Eremite Galehunter |
Living Creatures in the The Great Red Sand
Wildlife in the The Great Red Sand
| Wildlife in the The Great Red Sand | ||
|---|---|---|
 Desert Sumpter Beast Desert Sumpter Beast |
 Scorpion Scorpion |
 Red Vulture Red Vulture |
 Scarab Scarab |
 Quicksand Unagi Quicksand Unagi |
 Desert Fox Desert Fox |
Items in the The Great Red Sand
| Items found in the The Great Red Sand | |
|---|---|
 Ajilenakh Nut Ajilenakh Nut |
 Henna Berry Henna Berry |
All Interactive Map Guides

Comment
Author
The Dune of Elusion Puzzle Guide and Sacred Seals Locations
improvement survey
03/2026
improving Game8's site?

Your answers will help us to improve our website.
Note: Please be sure not to enter any kind of personal information into your response.

We hope you continue to make use of Game8.
Rankings
- We could not find the message board you were looking for.
Gaming News
Popular Games

Genshin Impact Walkthrough & Guides Wiki

Honkai: Star Rail Walkthrough & Guides Wiki

Umamusume: Pretty Derby Walkthrough & Guides Wiki

Pokemon Pokopia Walkthrough & Guides Wiki

Resident Evil Requiem (RE9) Walkthrough & Guides Wiki

Monster Hunter Wilds Walkthrough & Guides Wiki

Wuthering Waves Walkthrough & Guides Wiki

Arknights: Endfield Walkthrough & Guides Wiki

Pokemon FireRed and LeafGreen (FRLG) Walkthrough & Guides Wiki

Pokemon TCG Pocket (PTCGP) Strategies & Guides Wiki
Recommended Games

Diablo 4: Vessel of Hatred Walkthrough & Guides Wiki

Cyberpunk 2077: Ultimate Edition Walkthrough & Guides Wiki

Fire Emblem Heroes (FEH) Walkthrough & Guides Wiki

Yu-Gi-Oh! Master Duel Walkthrough & Guides Wiki

Super Smash Bros. Ultimate Walkthrough & Guides Wiki

Pokemon Brilliant Diamond and Shining Pearl (BDSP) Walkthrough & Guides Wiki

Elden Ring Shadow of the Erdtree Walkthrough & Guides Wiki

Monster Hunter World Walkthrough & Guides Wiki

The Legend of Zelda: Tears of the Kingdom Walkthrough & Guides Wiki

Persona 3 Reload Walkthrough & Guides Wiki
All rights reserved
Copyright© 2012-2024 HoYoverse — COGNOSPHERE. All Rights Reserved.
The copyrights of videos of games used in our content and other intellectual property rights belong to the provider of the game.
The contents we provide on this site were created personally by members of the Game8 editorial department.
We refuse the right to reuse or repost content taken without our permission such as data or images to other sites.
 Desert Mirages
 Night Murals
 Invisible Walls
 How to Increase Clearance
 Primal Obelisks
 Sacred Seal Locations
 Replicator Keystones
 Forged Primal Lights
 Primal Embers and Torches
 Primal Beam Transmissions
 Plinth of the Secret Rites
 Verity Cells
 Primal Sandglass
 Obscuring Cell
 Large Fan Blade
 The Mausoleum of King Deshret
 The Dune of Magma
 The Dune of Carouses
 Abdju Road
 Opet Hall
 Duat Hall
 Sekhem Hall
 Place of Rebirth
 Place of Breath
 Place of Swallowing
 Great Hall of Truths
 Aaru's Shut
 Khemenu Temple
 Shrine of Depths


![Monster Hunter Stories 3 Review [First Impressions] | Simply Rejuvenating](https://img.game8.co/4438641/2a31b7702bd70e78ec8efd24661dacda.jpeg/thumb)


