The Mausoleum of King Deshret Puzzle Guide and How to Enter
✉ Send your thoughts in our Genshin 6.4 Patch Survey!
★ Exclusive: Dive back in time with the Meta History
◆ Hot: Version 6.4, Luna 5 Codes
◆ Builds: Varka, Flins, Skirk, Escoffier
◆ Events: Travelers' Tales, He Who Caught the Wind
◆ Future: Linnea, Version 6.5 Luna VI

See how to enter The Mausoleum of King Deshret, how to solve the puzzles, and where to find the Sacred Seals and Dendroculus in this Genshin Impact guide!
List of Contents
How to Enter The Mausoleum of King Deshret
Complete The Secret of Al-Ahmar Quest
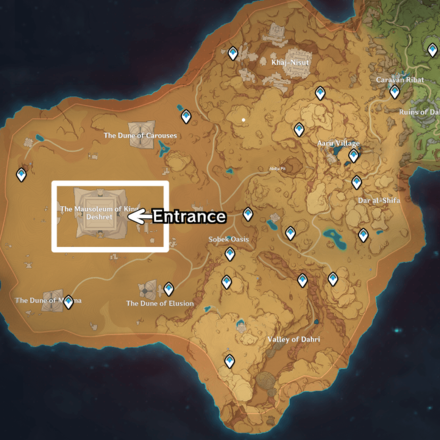
You can enter The Mausoleum of King Deshret by playing through the Golden Slumber sub-quest, The Secret of Al-Ahmar. The entrance to the pyramid is found on its east in Hypostyle Desert.
The Secret of Al-Ahmar Quest Guide
The Mausoleum of King Deshret Puzzles Guide
Coffin Puzzle
| Coffin Ember #1 Walkthrough | |
|---|---|
| 1 |  Inside the coffin room, go to the right door. |
| 2 | 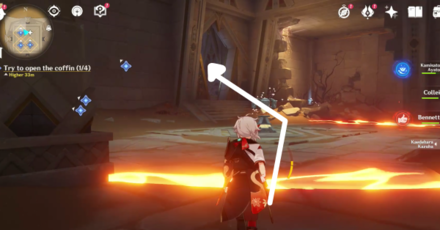 Enter the left corridor. |
| 3 | 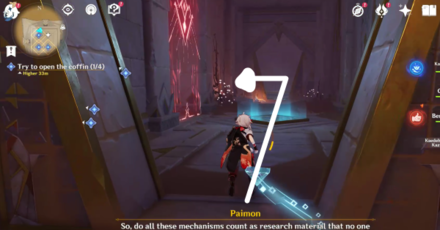 Walk forward, then to turn to the left open corridor. |
| 4 | 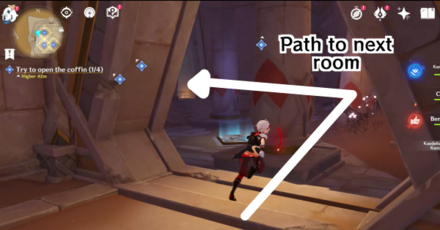 Go inside the room behind the Replicator Keystone. |
| 5 | 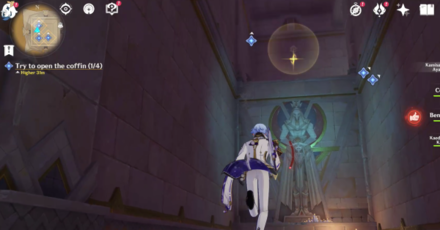 Latch to the Four-Leaf Sigil above you. |
| 6 | 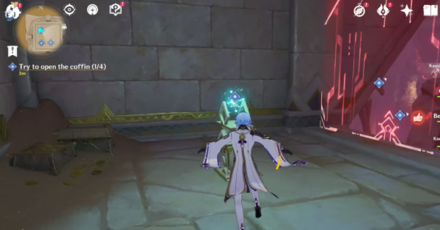 Release the first Primal Ember to the coffin. |
| Coffin Ember #2 Walkthrough | |
| 1 |  Inside the coffin room, go to the right door again. |
| 2 | 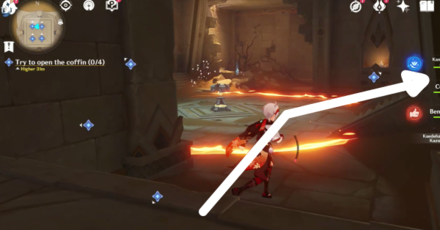 Enter the right corridor. |
| 3 | 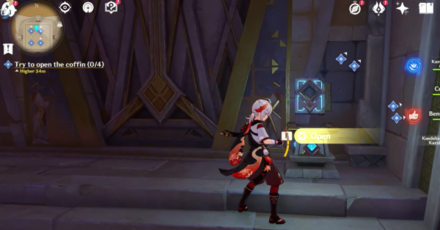 Open the door with an interactable Plinth. |
| 4 | 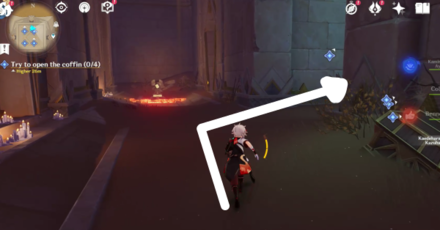 Inside the corridor, go right. |
| 5 | 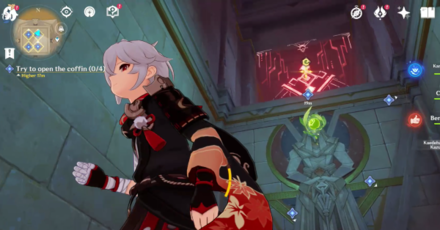 Latch yourself up to the Four-Leaf Sigil. |
| 6 | 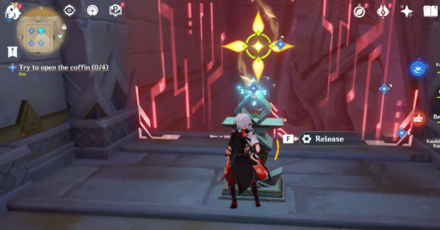 Release the second Primal Ember to the coffin. |
| Coffin Ember #3 Walkthrough | |
| 1 | 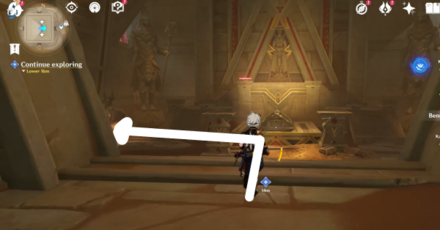 Inside the coffin room, go to the left door. |
| 2 | 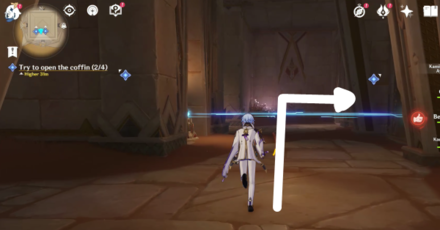 Head to the right corridor. |
| 3 |  Enter the first open door to your right. |
| 4 | 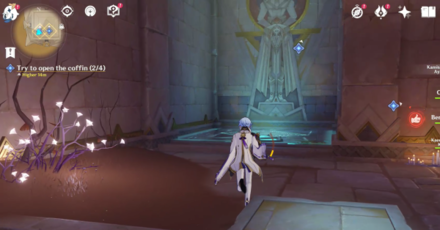 Ride the wind current on the pad. |
| 5 | 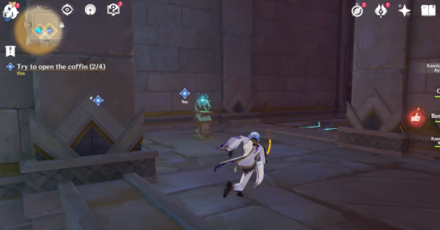 Release the third Primal Ember to the coffin. |
| Coffin Ember #4 Walkthrough | |
| 1 |  Inside the coffin room, go to the left door again. |
| 2 | 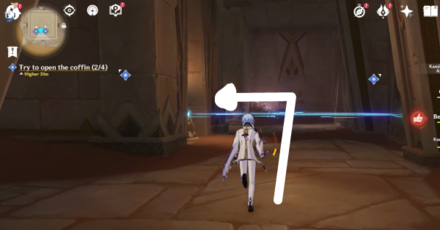 Head to the far left corridor. |
| 3 | 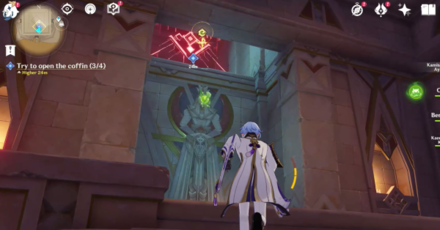 By the Primal Construct, go up the ledge with a sigil. |
| 5 | 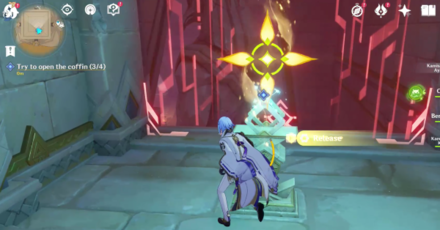 Release the fourth Primal Ember to the coffin. |
Objective for The Secret of Al-Ahmar Quest
The coffin puzzle inside the Mausoleum of King Deshret is the objective for The Secret of Al-Ahmar quest of Golden Slumber. Completing the quest will give you one level of Clearance!
The Secret of Al-Ahmar Quest Guide
Primal Obelisk Puzzle
| Seals Needed |
|---|
Upon completing Golden Slumber and Old Notes and New Friends quest, the center elevator will unlock, which leads you to the Primal Obelisk.
Primal Obelisk Puzzle Guide in Sumeru
Primal Sandglass Puzzle
| The Mausoleum Primal Sandglass Walkthrough | |
|---|---|
| 1 |  Inside the coffin room, go to the right door. |
| 2 | 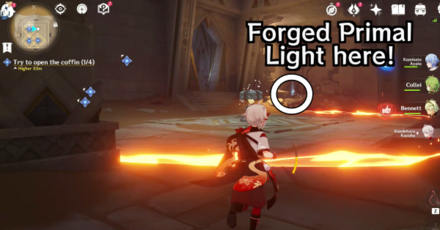 Grab a Forged Primal Light (an inverted blue pyramid). |
| 3 | 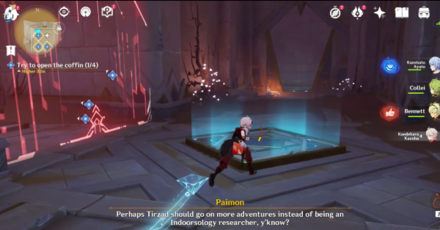 Place the light to the Keystone to create an hourglass. |
| 4 | 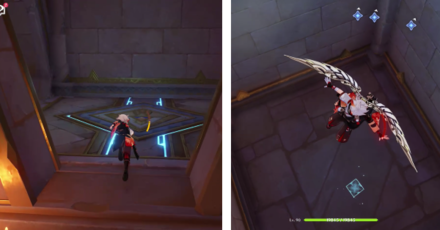 Proceed forward and step on the panel. It will disappear afterwards, revealing another Forged Primal Light. |
| 5 | 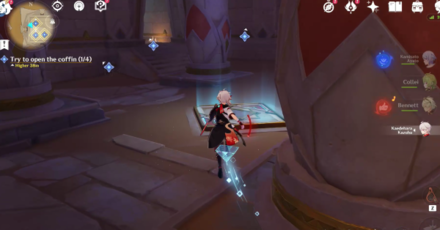 Proceed forward and create another hourglass. |
| 6 | 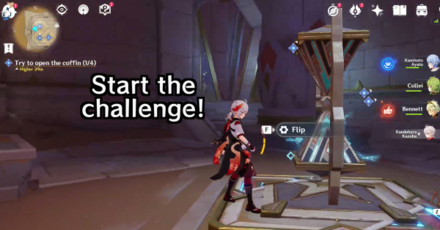 Flip the hourglass to start the challenge. |
| 7 | 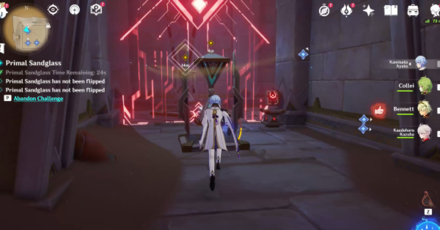 Enter the room left of you, and flip the first hourglass by a blowing fan. (You can exit the red barrier if you have Clearance Level 1, obtained from completing The Secret of Al-Ahmar). |
| 8 | 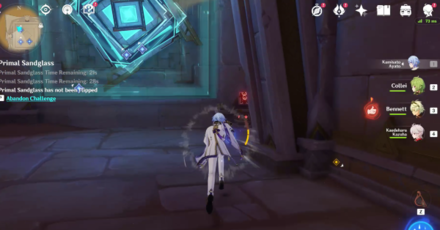 Fight the winds (you can disable it with Clearance Level 2 obtained from Dual Evidence). |
| 9 | 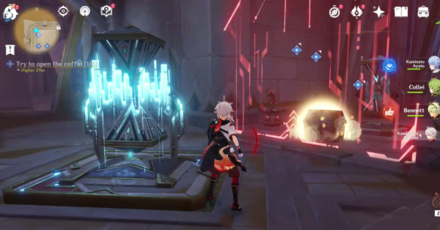 Hurry up to the other hourglass you made earlier and flip it to complete the challenge. |
Primal Sandglass Puzzle Guide in Sumeru
Puzzle at the Top of the Mausoleum

You can find a big Everlight Cell puzzle at the top of the mausoleum (the inverted pyramid). The area is called Aaru's Shut which can only be reached by passing through the Great Hall of Truths.
The puzzle involves different ruin mechanisms and will be completed by having the Everlight Cells at the center hit the two receiver cells on the west side of the area.
Other puzzles locked behind clearance
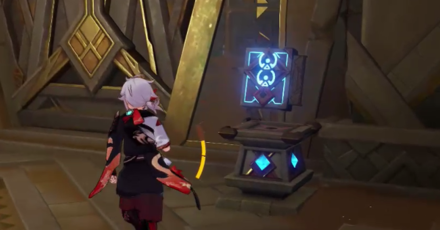
Plinths of the Sacred Rites in the Mausoleum have little half-circles on the book, which indicates the number of levels you need to unlock this function. Large Fan Blades, for example, have two half-circles on their Plinths, which means you need Clearance Level 2.
The Mausoleum of King Deshret Sacred Seals
All Sacred Seal Locations in the Mausoleum
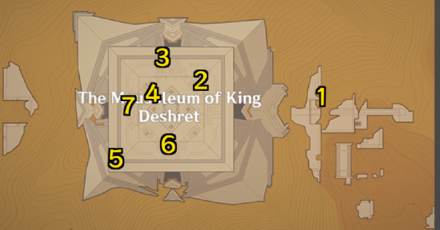
There are six Sacred Seals inside the Mausoleum while one is found just outside. The last one is actually on top of the inverted pyramid, but you'll have to return there by going from the Great Hall of Truths.
Note: The guide below assumes you already have full clearance from completing the Dual Evidence quest.
| Mausoleum Sacred Seal Locations | |
|---|---|
| 1 | 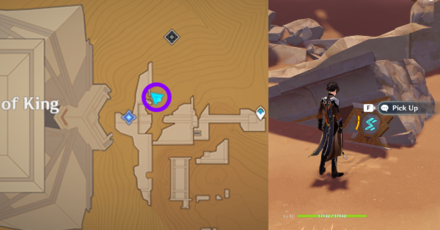 Sacred Seal: Thunderstrike • Outside the Pyramid, just on the surface by the rocks. |
| 2 | 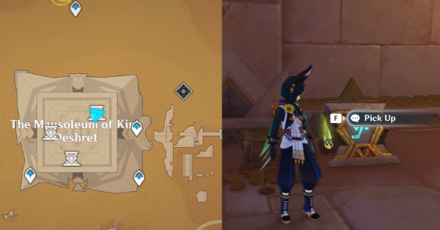 Sacred Seal: Sheep Head • Get to the right path from the entrance, then look up and use the Four-Leaf Sigil to get to its location. |
| 3 | 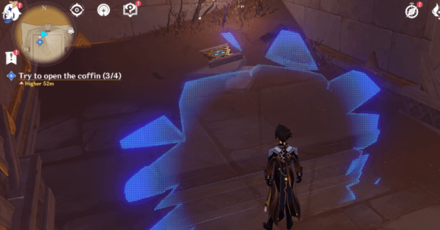 Sacred Seal: Ceremony • Locked behind an invisible wall. The wall disappears after getting full clearance. |
| 4 | 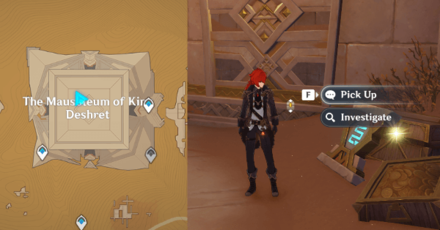 Sacred Seal: Giant Serpent • On the second floor behind a barrier near the elevator, after opening the coffin. |
| 5 | 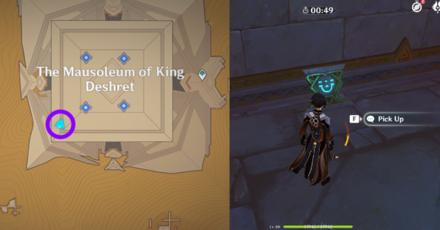 Sacred Seal: Valley • At the corner of the corridor, you can find a bluish platform. When you step on it, the panel will disappear after a brief time. The Seal is under that hole. |
| 6 | 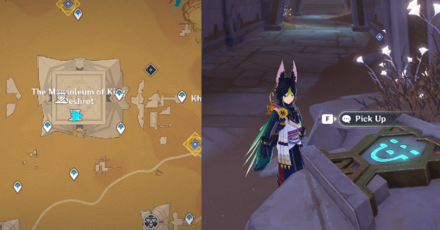 Sacred Seal: Valley • After getting enough clearance, go to the southern corridor and find the large fan blades. Turn it off by interacting the book to get the seal. |
| 7 | 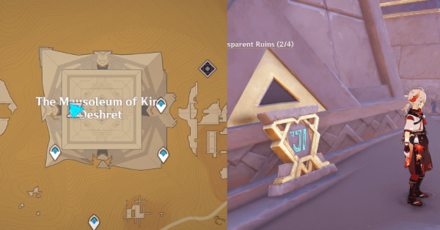 Sacred Seal: Crocodile Head • Located on top of the Inverted Pyramid. Get there by passing through the Great Hall of Truths once more. You can use the teleport waypoint found south of the pyramid. |
The Mausoleum of King Deshret Dendroculus Locations
All Dendroculus Locations in the Mausoleum

There are four Dendroculi within the area around the Mausoelum of King Deshret. Two of which can already be obtained outside, while the other two are locked behind The Secret of Al-Ahmar quest.
| The Mausoleum Dendroculus Locations | |
|---|---|
| 1 |  Inside a hole in the wall outside of the pyramid. |
| 2 |  On top of the right room mural reachable with a sigil. |
| 3 |  On top of the left room mural reachable with a sigil. |
| 4 |  On top of the pyramid (not the inverted). |
The Mausoleum of King Deshret Waypoint Locations
Three Hidden Waypoints
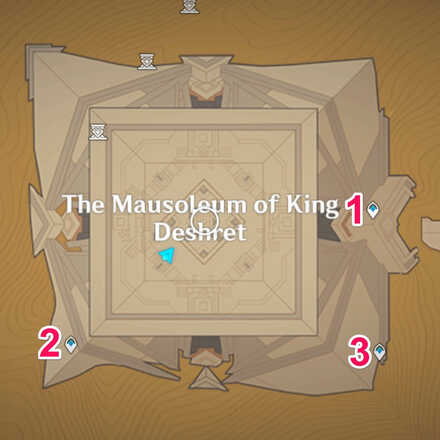
There are three Hidden Waypoints found within The Mausoleum of King Deshret. These are waypoints that are not initially marked on the map even after activating a Statue of the Seven and will only appear after reaching its exact location, usually underground and/or during a quest.
| How to Unlock the Waypoint | |
|---|---|
| 1 | 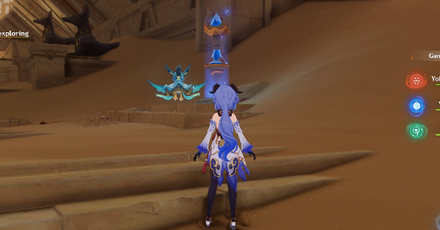 Found by opening the entrance to the Mausoleum of King Deshret during The Secret of Al-ahmar World Quest. |
| 2 | 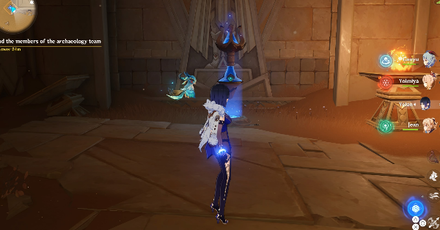 Inside the ruin of The Mausoleum of King Deshret. Gain deeper access by getting the Everlight Cell Clearance during the Secret of Al-ahmar World Quest. |
| 3 | 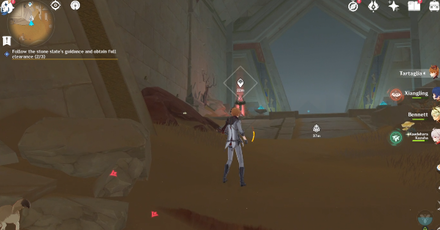 Near the Sekhem Hall. Encountered during the Place of Rebirth puzzle during the Dual Evidence World Quest |
All Sumeru Desert Hidden Waypoints
The Mausoleum of King Deshret Information
Main Hypostyle Desert Pyramid
The Mausoleum of King Deshret is an ancient pyramid ruin found in Hypostyle Desert, Sumeru. It is the largest of the four desert pyramids where you can find puzzles, Dendroculus, Sacred Seals, and Treasure Chests.
| Hypostyle Desert Pyramids | |
|---|---|
 The Mausoleum of King Deshret The Mausoleum of King Deshret |
 The Dune of Carouses The Dune of Carouses |
 The Dune of Magma The Dune of Magma |
 The Dune of Elusion The Dune of Elusion |
Connected to Other Ruins
There are also other ruins, mostly underground, that you can reach through The Mausoleum of King Deshret. You will be able to explore all of these ruins during the Golden Slumber questline and Dual Evidence world quest!
| Other Ruins Within The Mausoleum of King Deshret | |
|---|---|
| Opet Hall | Duat Hall |
| Sekhem Hall | Place of Rebirth |
| Place of Breath | Place of Swallowing |
| Great Hall of Truths | Aaru's Shut |
| Khemenu Temple | |
Genshin Impact Related Guides

Guides to Sumeru Areas
| Sumeru Area Guides | |
|---|---|
 Rainforest Area Rainforest Area |
 Desert Area Desert Area |
Guide to Desert Regions
| Sumeru Desert Guides | ||
|---|---|---|
 The Great Red Sand The Great Red Sand |
 Desert of Hadramaveth Desert of Hadramaveth |
 Girdle of the Sands Girdle of the Sands |
Guides to Important Sumeru Features
| Notable Sumeru Guides | |
|---|---|
| Dendroculus | Craftable Weapons |
| Tree of Dreams | Commission Unlock |
| Reputation | Shrine of Depths |
| Remarkable Chests | Chest Locations |
The Great Red Sand World Quests
| Desert Quest Chains | |
|---|---|
| Golden Slumber | Old Notes and New Friends |
| The Exile | A Gifted Rose |
| Golden Slumber Quest Guides | |
| Lost in the Sands | An Introduction to Indoor Archaeology |
| The Secret of Al-Ahmar | Dreams Beneath the Searing Sand |
| Old Notes and New Friends Quest Guides | |
| Dual Evidence | Soheil's Wish |
| Invisible Barrier | Hidden Mercenaries |
| Desert's Remembrance | |
| The Exile Quest Guides | |
| The Exile: Blooming | The Exile: Sprouting |
| A Gifted Rose Quest Guides | |
| A Gifted Rose: Prickly as Thorns | A Gifted Rose: Long Day Ahead |
| A Gifted Rose: Can Stones Bloom | A Gifted Rose: Ballad of Days Gone By |
| A Gifted Rose: Some People Never Fade Away | Golden Rose Seeds |
| Desert World Quests | |
| Afratu's Dilemma | Blooming Sands |
| Join the Eremites and Embrace a Wonderful New Life! | |
The Great Red Sand Puzzles and Features
Enemies in the The Great Red Sand
| Enemy and Boss Guides | |
|---|---|
 Algorithm of Semi-Intransient Matrix Algorithm of Semi-Intransient Matrix |
 Primal Constructs Primal Constructs |
 Eremite Stone Enchanter Eremite Stone Enchanter |
 Eremite Galehunter Eremite Galehunter |
Living Creatures in the The Great Red Sand
Wildlife in the The Great Red Sand
| Wildlife in the The Great Red Sand | ||
|---|---|---|
 Desert Sumpter Beast Desert Sumpter Beast |
 Scorpion Scorpion |
 Red Vulture Red Vulture |
 Scarab Scarab |
 Quicksand Unagi Quicksand Unagi |
 Desert Fox Desert Fox |
Items in the The Great Red Sand
| Items found in the The Great Red Sand | |
|---|---|
 Ajilenakh Nut Ajilenakh Nut |
 Henna Berry Henna Berry |
All Interactive Map Guides

Comment
Author
The Mausoleum of King Deshret Puzzle Guide and How to Enter
improvement survey
03/2026
improving Game8's site?

Your answers will help us to improve our website.
Note: Please be sure not to enter any kind of personal information into your response.

We hope you continue to make use of Game8.
Rankings
Gaming News
Popular Games

Genshin Impact Walkthrough & Guides Wiki

Honkai: Star Rail Walkthrough & Guides Wiki

Umamusume: Pretty Derby Walkthrough & Guides Wiki

Pokemon Pokopia Walkthrough & Guides Wiki

Resident Evil Requiem (RE9) Walkthrough & Guides Wiki

Monster Hunter Wilds Walkthrough & Guides Wiki

Wuthering Waves Walkthrough & Guides Wiki

Arknights: Endfield Walkthrough & Guides Wiki

Pokemon FireRed and LeafGreen (FRLG) Walkthrough & Guides Wiki

Pokemon TCG Pocket (PTCGP) Strategies & Guides Wiki
Recommended Games

Diablo 4: Vessel of Hatred Walkthrough & Guides Wiki

Cyberpunk 2077: Ultimate Edition Walkthrough & Guides Wiki

Fire Emblem Heroes (FEH) Walkthrough & Guides Wiki

Yu-Gi-Oh! Master Duel Walkthrough & Guides Wiki

Super Smash Bros. Ultimate Walkthrough & Guides Wiki

Pokemon Brilliant Diamond and Shining Pearl (BDSP) Walkthrough & Guides Wiki

Elden Ring Shadow of the Erdtree Walkthrough & Guides Wiki

Monster Hunter World Walkthrough & Guides Wiki

The Legend of Zelda: Tears of the Kingdom Walkthrough & Guides Wiki

Persona 3 Reload Walkthrough & Guides Wiki
All rights reserved
Copyright© 2012-2024 HoYoverse — COGNOSPHERE. All Rights Reserved.
The copyrights of videos of games used in our content and other intellectual property rights belong to the provider of the game.
The contents we provide on this site were created personally by members of the Game8 editorial department.
We refuse the right to reuse or repost content taken without our permission such as data or images to other sites.
 Desert Mirages
 Night Murals
 Invisible Walls
 How to Increase Clearance
 Primal Obelisks
 Sacred Seal Locations
 Replicator Keystones
 Forged Primal Lights
 Primal Embers and Torches
 Primal Beam Transmissions
 Plinth of the Secret Rites
 Verity Cells
 Primal Sandglass
 Obscuring Cell
 Large Fan Blade
 Abdju Road
 Opet Hall
 Duat Hall
 Sekhem Hall
 Place of Rebirth
 Place of Breath
 Place of Swallowing
 Great Hall of Truths
 Khemenu Temple
 Shrine of Depths


![Monster Hunter Stories 3 Review [First Impressions] | Simply Rejuvenating](https://img.game8.co/4438641/2a31b7702bd70e78ec8efd24661dacda.jpeg/thumb)


