Opet Hall Puzzles and Treasure Chest Guide
✉ Send your thoughts in our Genshin 6.4 Patch Survey!
★ Exclusive: Dive back in time with the Meta History
◆ Hot: Version 6.4, Luna 5 Codes
◆ Builds: Varka, Flins, Skirk, Escoffier
◆ Events: Travelers' Tales, He Who Caught the Wind
◆ Future: Linnea, Version 6.5 Luna VI

See how to complete Opet Hall puzzles and where to find the Sacred Seals and Dendroculus in this Genshin Impact guide! Find out how to get more clearance to access Opet Hall, and its location here!
List of Contents
Opet Hall Location
Found under The Mausoleum of King Deshret
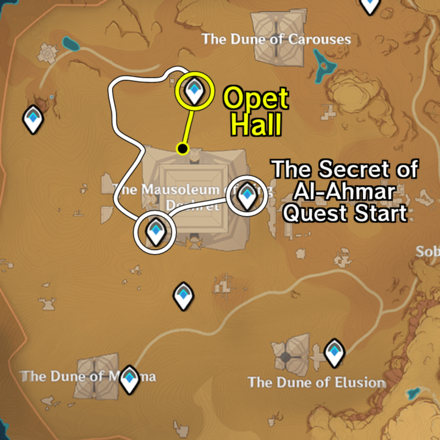
Opet Hall is an underground desert ruin unlocked by playing through the The Secret of Al-Ahmar quest in Golden Slumber. Getting to this location is a necessary step to complete the quest and unlock the hidden waypoints underneath The Mausoelum of King Deshret.
The Secret of Al-Ahmar Quest Guide
How to Get Inside Opet Hall
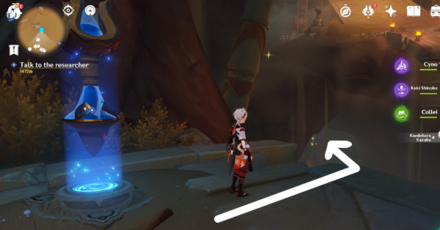
The entrance to Opet Hall is below the Teleport Waypoint. You can see the entrance by a pillar with a Dendroculus above it. Open the door by interacting the Plinth of the Sacred Rites.
Opet Hall Puzzles Guide
Opet Hall Primal Ember Puzzle
The main puzzle in Opet Hall is the searching for the Primal Embers in The Secret of Al-Ahmar quest. You can solve this puzzle by unlocking the Primal Ember rooms with the Everlight Cell.
| Opet Hall Primal Ember Walkthrough | |
|---|---|
| 1 | 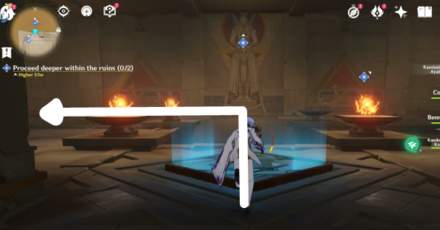 Inside the lower entrance, go upstairs, then head to the left corridor. |
| 2 | 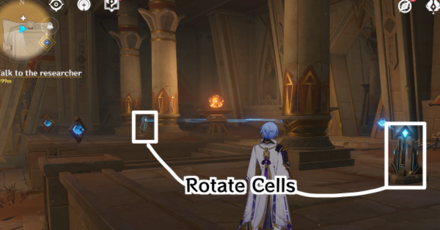 Once you're inside the big room with multiple Everlight Cells, rotate the cells nearest to the right door and open it by linking up both cells. |
| 3 | 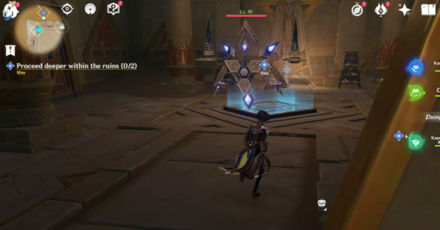 Defeat the Primal Construct inside. There should be a Sacred Seal inside too! |
| 4 | 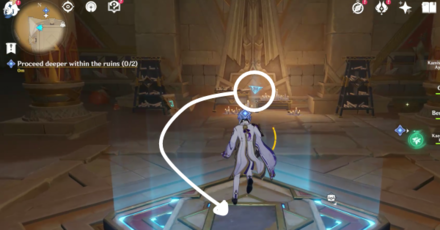 Obtain the floating inverted triangle and put it on the Keystone to spawn the Primal Ember. |
| 5 | 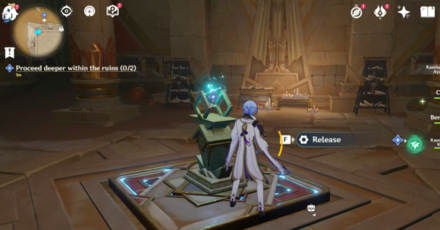 Release the Primal Ember and follow it. |
| 6 | 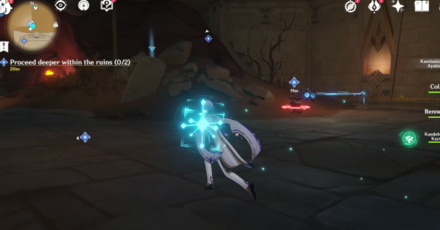 When it goes outside a door, you'll notice another locked Primal Ember. Do this first before proceeding. |
| 7 | 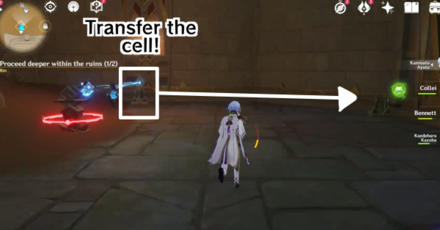 Move the cell from the left side to the right side nearest to the door. |
| 8 | 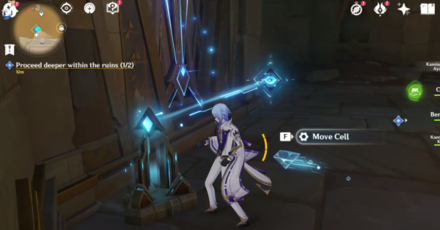 Wait for the cell to open the door. |
| 9 | 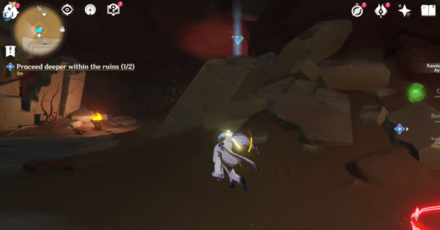 Collect the Forged Primal Light behind you. |
| 10 | 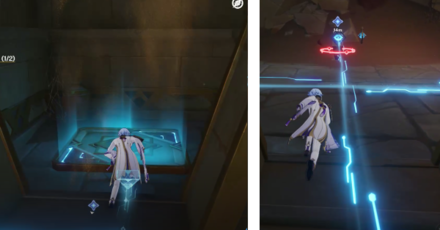 Place the Primal Lights on the Keystone to make another cell. |
| 11 | 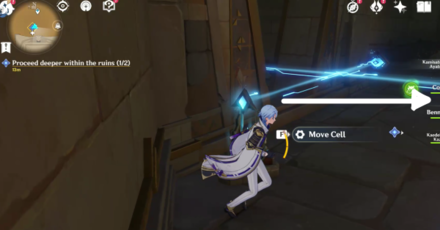 Move the first cell back to its original position. |
| 12 |  Second Primal Ember will unlock. |
| 13 | 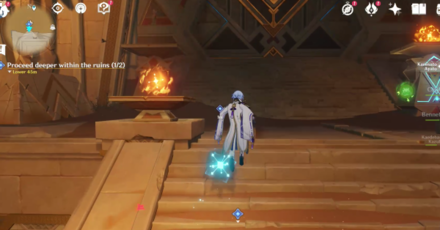 Guide the two Primal Embers to their Torches to complete this puzzle! |
Opet Hall Everlight Cells Puzzle
Opet Hall Precious Chest Puzzle
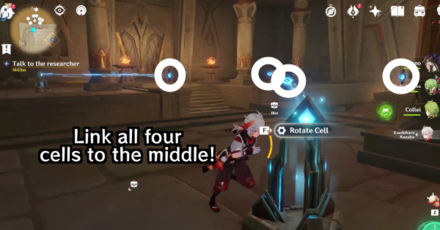
Link all four Everlight Cells to the middle floating cells to open the Precious Chest.
Opet Hall Left and Right Doors
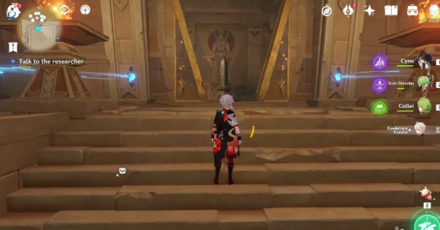
You can open the left or right doors by beaming the cells nearest to the door with the Everlight Cells. The left door gives you access to the Primal Obelisk, while the right door gives you access to the Primal Ember.
Opet Hall Verity Cell Puzzle
| Verity Cell Puzzle Walkthrough | |
|---|---|
| 1 | 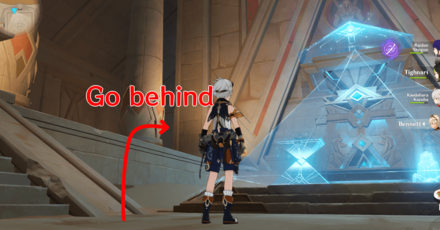 Go behind the mechanism that shows a map inside Opet Hall. |
| 2 | 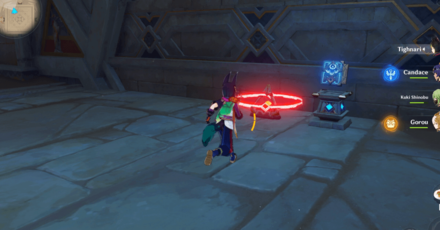 Unlock the Verity Cell using the Plinth of the Secret Rites with Level 4 Clearance, which you can get after clearing the Dual Evidence quest. |
| 3 | 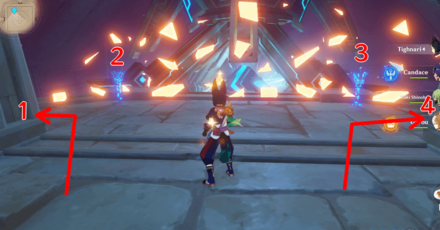 Use the Verity Cell to materialize the four torches overseeing the Great Hall of Truths. |
| 4 | 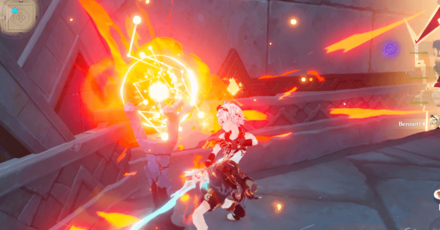 Attack with Pyro to light those torches up and loot the Precious Chest that'll appear. |
Opet Hall Primal Obelisk
| Seals Needed |
|---|
The Primal Obelisk in Opet Hall is found in the Everlight Cell room. You can access the Obelisk by projecting the beams to the cells nearest to the left door.
Primal Obelisk Puzzle Guide in Sumeru
Opet Hall Hourglass Puzzle
| Opet Hall Primal Sandglass Walkthrough | |
|---|---|
| 1 | 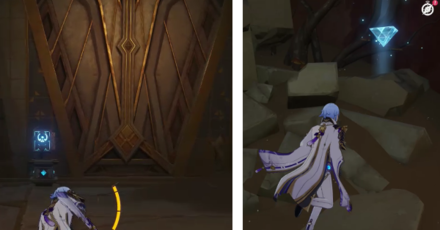 Before the Everlight Cell room, open the door on the right and get the Forged Primal Light. |
| 2 | 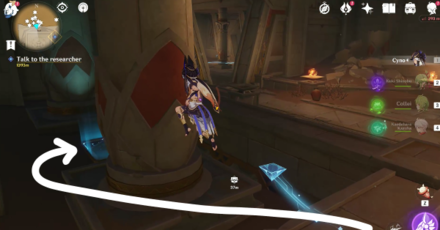 Jump the wall and put the Primal Lights to the platform to spawn the Hourglass. |
| 3 | 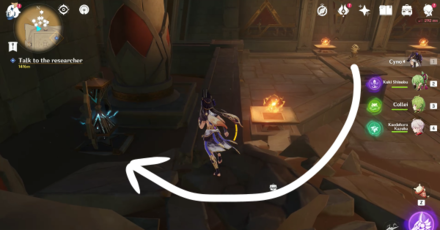 Start the Primal Sandglass time trial challenge by flipping the Hourglass on the other side. You'll have to enter from the back, as there are invisible walls if you try to climb. |
| 4 | 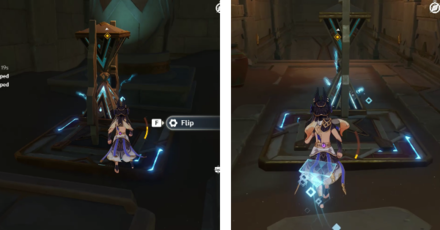 Flip the hourglasses. One is just inside the Forged Primal Light room, and the other is what you created earlier. |
| 6 | 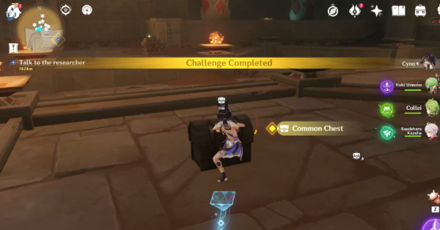 A Common Chest will be your reward. |
Primal Sandglass Puzzle Guide in Sumeru
Opet Hall Sacred Seals
| Opet Hall Sacred Seals Locations | |
|---|---|
| 1 | 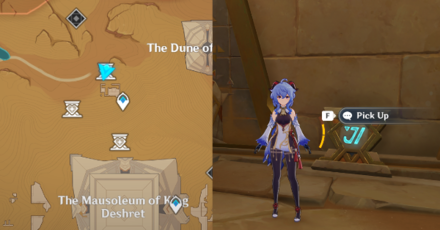 Sacred Seal: Crocodile Head • Behind the Teleport Waypoint, make your way to the Fatui Camp and head to the path on your right. |
| 2 | 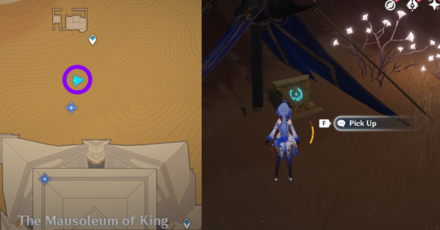 Sacred Seal: Sunrise • Outside Opet Hall in the lower area by a Fatui enacampment. |
| 3 | 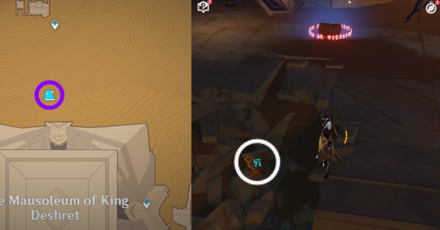 Sacred Seal: Danger • Outside Opet Hall in the upper area by a Fatui enacampment. |
| 4 |  Sacred Seal: Valley • Upon entering the lower entrance, go to the right path. The Seal is sitting by the wall. |
| 5 | 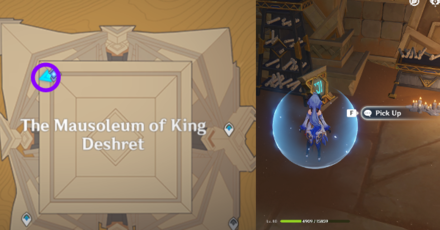 Sacred Seal: Crocodile Head • Inside the Primal Ember room deep in Opet Hall. |
Sacred Seals Locations and Puzzle Guide
Opet Hall Dendroculus
| Opet Hall Dendroculus Locations | |
|---|---|
| 1 |  Outside the waypoint in The Mausoleum of King Deshret during The Secret of Al-Ahmar quest. Make your way above the statues where you can find the Dendroculus on the top floor by some pillars. |
| 2 |  En route to Opet Hall. It is on top of the big statue. |
| 3 |  South of the teleport waypoint below Opet Hall. The Dendroculus is on top of the pillar |
| 4 |  Inside Opet Hall, complete a Primal Sandglass puzzle in the room for a Four-Leaf Sigil to appear above, which will get you to the Dendroculus. You can also just climb. |
| 5 |  On top of the ruins, go behind the hologram room to get to the Dendroculus. |
Genshin Impact Related Guides

Guides to Sumeru Areas
| Sumeru Area Guides | |
|---|---|
 Rainforest Area Rainforest Area |
 Desert Area Desert Area |
Guide to Desert Regions
| Sumeru Desert Guides | ||
|---|---|---|
 The Great Red Sand The Great Red Sand |
 Desert of Hadramaveth Desert of Hadramaveth |
 Girdle of the Sands Girdle of the Sands |
Guides to Important Sumeru Features
| Notable Sumeru Guides | |
|---|---|
| Dendroculus | Craftable Weapons |
| Tree of Dreams | Commission Unlock |
| Reputation | Shrine of Depths |
| Remarkable Chests | Chest Locations |
The Great Red Sand World Quests
| Desert Quest Chains | |
|---|---|
| Golden Slumber | Old Notes and New Friends |
| The Exile | A Gifted Rose |
| Golden Slumber Quest Guides | |
| Lost in the Sands | An Introduction to Indoor Archaeology |
| The Secret of Al-Ahmar | Dreams Beneath the Searing Sand |
| Old Notes and New Friends Quest Guides | |
| Dual Evidence | Soheil's Wish |
| Invisible Barrier | Hidden Mercenaries |
| Desert's Remembrance | |
| The Exile Quest Guides | |
| The Exile: Blooming | The Exile: Sprouting |
| A Gifted Rose Quest Guides | |
| A Gifted Rose: Prickly as Thorns | A Gifted Rose: Long Day Ahead |
| A Gifted Rose: Can Stones Bloom | A Gifted Rose: Ballad of Days Gone By |
| A Gifted Rose: Some People Never Fade Away | Golden Rose Seeds |
| Desert World Quests | |
| Afratu's Dilemma | Blooming Sands |
| Join the Eremites and Embrace a Wonderful New Life! | |
The Great Red Sand Puzzles and Features
Enemies in the The Great Red Sand
| Enemy and Boss Guides | |
|---|---|
 Algorithm of Semi-Intransient Matrix Algorithm of Semi-Intransient Matrix |
 Primal Constructs Primal Constructs |
 Eremite Stone Enchanter Eremite Stone Enchanter |
 Eremite Galehunter Eremite Galehunter |
Living Creatures in the The Great Red Sand
Wildlife in the The Great Red Sand
| Wildlife in the The Great Red Sand | ||
|---|---|---|
 Desert Sumpter Beast Desert Sumpter Beast |
 Scorpion Scorpion |
 Red Vulture Red Vulture |
 Scarab Scarab |
 Quicksand Unagi Quicksand Unagi |
 Desert Fox Desert Fox |
Items in the The Great Red Sand
| Items found in the The Great Red Sand | |
|---|---|
 Ajilenakh Nut Ajilenakh Nut |
 Henna Berry Henna Berry |
All Interactive Map Guides

Comment
Author
Opet Hall Puzzles and Treasure Chest Guide
improvement survey
03/2026
improving Game8's site?

Your answers will help us to improve our website.
Note: Please be sure not to enter any kind of personal information into your response.

We hope you continue to make use of Game8.
Rankings
Gaming News
Popular Games

Genshin Impact Walkthrough & Guides Wiki

Honkai: Star Rail Walkthrough & Guides Wiki

Umamusume: Pretty Derby Walkthrough & Guides Wiki

Pokemon Pokopia Walkthrough & Guides Wiki

Resident Evil Requiem (RE9) Walkthrough & Guides Wiki

Monster Hunter Wilds Walkthrough & Guides Wiki

Wuthering Waves Walkthrough & Guides Wiki

Arknights: Endfield Walkthrough & Guides Wiki

Pokemon FireRed and LeafGreen (FRLG) Walkthrough & Guides Wiki

Pokemon TCG Pocket (PTCGP) Strategies & Guides Wiki
Recommended Games

Diablo 4: Vessel of Hatred Walkthrough & Guides Wiki

Cyberpunk 2077: Ultimate Edition Walkthrough & Guides Wiki

Fire Emblem Heroes (FEH) Walkthrough & Guides Wiki

Yu-Gi-Oh! Master Duel Walkthrough & Guides Wiki

Super Smash Bros. Ultimate Walkthrough & Guides Wiki

Pokemon Brilliant Diamond and Shining Pearl (BDSP) Walkthrough & Guides Wiki

Elden Ring Shadow of the Erdtree Walkthrough & Guides Wiki

Monster Hunter World Walkthrough & Guides Wiki

The Legend of Zelda: Tears of the Kingdom Walkthrough & Guides Wiki

Persona 3 Reload Walkthrough & Guides Wiki
All rights reserved
Copyright© 2012-2024 HoYoverse — COGNOSPHERE. All Rights Reserved.
The copyrights of videos of games used in our content and other intellectual property rights belong to the provider of the game.
The contents we provide on this site were created personally by members of the Game8 editorial department.
We refuse the right to reuse or repost content taken without our permission such as data or images to other sites.
 Desert Mirages
 Night Murals
 Invisible Walls
 How to Increase Clearance
 Primal Obelisks
 Sacred Seal Locations
 Replicator Keystones
 Forged Primal Lights
 Primal Embers and Torches
 Primal Beam Transmissions
 Plinth of the Secret Rites
 Verity Cells
 Primal Sandglass
 Obscuring Cell
 Large Fan Blade
 The Mausoleum of King Deshret
 The Dune of Magma
 The Dune of Elusion
 The Dune of Carouses
 Abdju Road
 Duat Hall
 Sekhem Hall
 Place of Rebirth
 Place of Breath
 Place of Swallowing
 Great Hall of Truths
 Aaru's Shut
 Khemenu Temple
 Shrine of Depths


![Monster Hunter Stories 3 Review [First Impressions] | Simply Rejuvenating](https://img.game8.co/4438641/2a31b7702bd70e78ec8efd24661dacda.jpeg/thumb)


