Togekiss - Moveset & Best Build for Ranked Battle
★ Tier List / Doubles Tier List / Movesets / Rental Teams
✬ Pokemon HOME Dex Completion Shiny Rewards:
┗ Meloetta | Manaphy | Enamorus | Keldeo | Meltan
☆ Competitive Battle Guide
This is a strategy guide for using Togekiss in competitive play for the games Pokemon Sword and Shield. Read on for tips on the best Nature, EV spreads, Movesets, Builds, and Held Items to use with Togekiss, as well as its strengths and weak points.
| Togekiss - Related Guides | |
|---|---|
 Evolution and Learnset Evolution and Learnset |
 Build for Ranked Battle Build for Ranked Battle |
List of Contents
Basic Information for Togekiss
Types and Abilities
| Pokemon | Type 1 | Type 2 |
|---|---|---|

|

|
|
| Abilities | ||
| Serene Grace | Boosts the likelihood of added effects appearing. | |
| Hustle | Boosts the Attack stat, but lowers accuracy. | |
| Super Luck (Hidden) | Heightens the critical-hit ratios of moves. | |
Togekiss Weaknesses and Resistances
| Type | |
|---|---|
| Takes 4x damage |
|
| Takes 2x damage |


|
| Takes 0.5x damage |


|
| Takes 1/4x damage |


|
| Takes 0x damage |


|
Base Stats
| HP | Attack | Defense | Sp. Atk | Sp. Def | Speed |
|---|---|---|---|---|---|
| 85 | 50 | 95 | 120 | 115 | 80 |
Best Nature for Togekiss
| Best Natures | ||
|---|---|---|
| Timid (+Spd, -Atk) |
Modest (+SpAtk, -Atk) |
|
Singles Movesets for Togekiss
Special Attacker Moveset & Best Build

| Nature | Timid (+Spd, -Atk) |
|---|---|
| EV Spread | HP 244 / Sp.Atk 30 / Spd. 236 |
| Final Stat Values | HP 191 / Def 115 / Sp.Atk 144 / Sp.Def 135 / Spd 143 |
| Ability | Serene Grace |
| Held Item | Weakness Policy |
| Moveset | ・Air Slash ・Fire Blast ・Dazzling Gleam ・Nasty Plot |
With Togekiss's high Defense and Special Defense, and doubled HP when it Dynamaxes, this is a build made to cover its weak points and maximize its effectiveness. On Dynamaxing, Togekiss's Air Slash will turn into Max Airstream, which has the side effect of boosting its Speed, giving Togekiss the potential to sweep hard and fast.
Other Viable Moves
| Flamethrower | An alternate choice for Fire Blast. Trades off power for 100% accuracy. |
|---|---|
| Aura Sphere | A Fighting-type Move that never misses. For using against Steel or Rock types. |
| Mystical Fire | A substitute for Fire Blast. Higher accuracy while also lowering the opposing Pokemon's Special Attack stat. |
| Ancient Power | A Rock-type move that can be used in place of Dazzling Gleam. |
Paralysis + Flinch Moveset & Best Build

| Nature | Modest (+SpAtk, -Atk) |
|---|---|
| EV Spread | HP 252 / Sp.Atk 252 / Spd 4 |
| Final Stat Values | HP 192 / Def 115 / Sp.Atk 189 / Sp.Def 135 / Spd 101 |
| Ability | Serene Grace |
| Held Item | Lum Berry |
| Moveset | ・Air Slash ・Thunder Wave ・Dazzling Gleam ・Aura Sphere |
With its Ability Serene Grace, Togekiss reaches a whopping 60% flinch rate with Air Slash. It can also paralyze with Thunder Wave to ensure that it can outspeed the opponent, further raising its potential to cause flinching.
Because Dynamaxed opponents do not flinch, this set is not as effective as in previous generations, but this strategy still poses a huge threat in the metagame.
Other Viable Moves
| Flamethrower | A choice focusing on accuracy for hitting foes of various other types. A useful counter for Ferrothorn. |
|---|---|
| Fire Blast | The same purpose as Flamethrower, but emphasizing power over accuracy. |
| Nasty Plot | By raising its Special Attack, increases its effectiveness as an attacker. |
Scope Lens Moveset & Best Build
| Nature | Timid (+Spd, -Atk) |
|---|---|
| EV Spread | HP 4 / Sp.Atk 252 / Spd 252 |
| Final Stat Values | HP 161 / Def. 115 / Sp.Atk. 172 / Sp.Def. 135 / Spd. 145 |
| Ability | Super Luck |
| Held Item | Scope Lens |
| Moveset | ・Air Slash ・Fire Blast ・Dazzling Gleam ・Nasty Plot |
The combination of Super Luck and Scope Lens means this Togekiss build has a chance to critically hit every turn. This combined with strong moves as Air Slash, Fire Blast, and Dazzling Gleam means you can sweep with this Pokemon if you can luck it out with the crit ratios.
Other Viable Moves
| Flamethrower | A choice focusing on accuracy for hitting foes of various other types. A useful counter for Ferrothorn. |
|---|
Doubles Movesets for Togekiss
Follow Me Doubles Support Moveset & Best Build

| Nature | Calm (+Sp.Def, -Atk) |
|---|---|
| EV Spread | HP 252 / Def 144 / Sp.Def 48 / Spd 64 |
| Final Stat Values | HP 192 / Def. 133 / Sp.Atk. 142 / Sp.Def. 155 / Spd. 108 |
| Ability | Super Luck |
| Held Item | Sitrus Berry |
| Moveset | ・Dazzling Gleam ・Follow Me ・Life Dew ・Helping Hand |
With it's great dual typing and excellent mixed bulk, Togekiss is the best pokemon to use for redirection support in the Doubles Format and can easily fit in most teams - from hyper offense to more balanced ones.
What sets it apart from other Follow Me users is that it can also heal its teammate with Life Dew. This gives Togekiss additional utility when it's not redirecting attacks . It can further support its teammate by using Helping Hand, boosting their attack by 50%.
Dazzling Gleam is this Togekiss' last move, hitting both opposing Pokemon and has its critical hit ratio boosted by its ability Super Luck.
Check out our article below to learn more about the mechanics of redirection in the doubles format:
Basics of Competitive Doubles Team Building
About Togekiss' Held Item
We're using Sitrus Berry for Togekiss. The doubles format is a fast-paced environment and the immediate recovery this berry provides is superior to Leftovers, which requires more turns to provide the same amount of healing.
About Togekiss' EV Spread
This EV spread is meant to highlight Togekiss' mixed bulk.. With 144 Defense EVs, it can take two hits from an Adamant Bisharp's super effective Iron Head, while 48 Sp.Def Evs allows it to survive a super effective hit from a Timid Gengar's Sludge Wave.
The remaining Speed Evs ensure that Togekiss can outpace slower walls that have naturally low speed, such as Amoonguss or Slowbro, to ensure that it can support its team before being crippled by opposing support moves.
Other Viable Moves
| Protect | An alternative to Helping Hand that allows Togekiss to scout the opposing team's moves. |
|---|---|
| Roost | Another great alternative to Helping Hand that allows Togekiss to heal off damage and stay in the battle for a longer time. |
| Safeguard | A good alternative to Tailwind if your team already has speed control. This moves protects your team from status conditions like Burn, Sleep, and Paralysis. |
How to Build a Team with Togekiss
Togekiss is one of the best pokemon in the competitive battling scene thanks to its excellent stats, wide support movepool, and versatility. It can fill the role of a bulky special attacker, physical or special wall, or as redirection support in doubles!
A bulky Special Attacker for Hyper Offense
Great mixed bulk, access to Nasty Plot, and a wide special movepool make Togekiss an excellent choice if you're looking for a bulky set-up sweeper for your Hyper Offense team. It's versatility means that when it comes to competitive team building, it can fill a secondary role within your Pokemon's ranks - either forces walls to switch or as a check to Dragon-type Pokemon.
Check out our Hyper Offense team building page below to learn more about how to use Togekiss as a special attacker in Singles.
How to Build an Offensive Team
The best Redirection Support in Doubles
Togekiss is arguably the best pokemon to use for redirection support as it can do more than just redirect attacks, such as provide Tailwind or Helping Hand support.
Check out our Doubles team building page below to learn more about how to use Togekiss as redirection support in Doubles.
How to Build a Doubles Team
How to Use Togekiss Effectively
Use Serene Grace to disable the opponent
Togekiss has the ability Serene Grace, which doubles the chance of its attacks' side-effects to take effect. This potential to cripple foes' effectiveness that made it feared in past generations returns in Sword and Shield as its primary strategy.
A prime user of Weakness Policy
Although Togekiss has low HP, its high Defense and Special Defense, paired with the doubled HP granted by Dynamax, allow it to often survive even super effective attacks. This can allow it to take a super effective hit, activating Weakness Policy, then hit back with a two-stage boost to its already-high Special Attack.
Counters for Togekiss
| Weakness |
|
|---|
Use a Pokemon with a type advantage
The most efficient way to deal with Togekiss is simply to use a Pokemon which can take its attacks with reduced damage while also dishing out super effective damage of its own.
Best Pokemon to Use
| Pokemon | Description |
|---|---|
 Toxtricity Toxtricity
|
Ranking: ★★★★★ ・Can take almost all of its attacks with reduced damage ・Can deal super effective Poison or Electric damage Best Ranked Battle Build for Toxtricity |
 Heat Rotom Heat Rotom
|
Ranking: ★★★★★ ・Can take almost all of its attacks with reduced damage ・Can deal super effective Electric damage Best Ranked Battle Build for Heat Rotom |
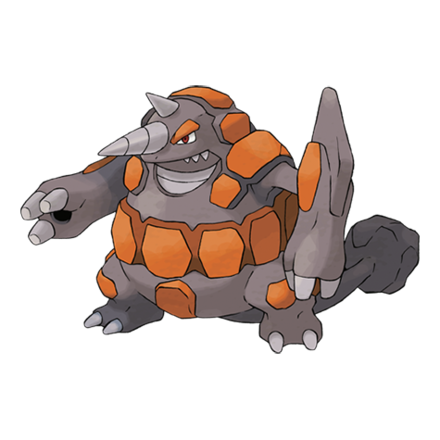 Rhyperior Rhyperior
|
Ranking: ★★★★☆ ・Can take almost all of its attacks with reduced damage ・Can deal heavy Physical damage with super-effective Rock moves |
 Excadrill Excadrill
|
Ranking: ★★★★☆ ・Its Steel typing is useful offensively and defensively ・Watch out for Togekiss's Fire moves Best Ranked Battle Build for Excadrill |
Best Teams Featuring Togekiss
All our Best Teams are available for free rental, and usable in Ranked Battle with no EV Training necessary.
All Best Teams for Ranked Battle
Best Team for Ranked Battle from a World Top 3 Player
| Best Team for Ranked Battle from a World Top 3 Player | ||
|---|---|---|
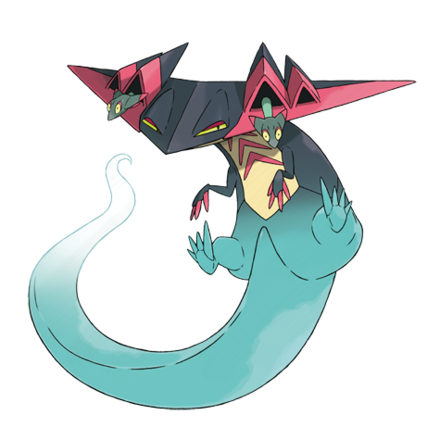 Dragapult Dragapult
|
Excadrill
|
 Grimmsnarl Grimmsnarl
|
 Togekiss Togekiss
|
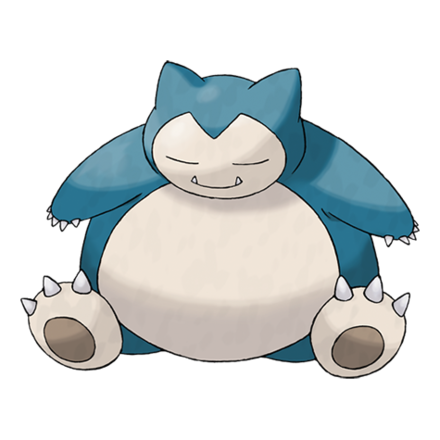 Snorlax Snorlax
|
 Cloyster Cloyster
|
This is the primary set used by a former World Top 3 from a previous game in the series. Despite that daunting promise, it's an easy set to use for beginners, as the order to use Pokemon and which moves should be used are readily apparent. Not only that, but the set is carefully sculpted to be highly effective and dangerous even in the upper echelons of the Master Ball tier.
Best Team for Ranked Battle from a World Top 3 Player
Related Links

All Competitive Builds for Ranked Battle
Competitive Guides for Pokemon Sword and Shield
| Competitive Pokemon Battle Guides | |||||
|---|---|---|---|---|---|
 Tier List Tier List |
 Best Builds Best Builds |
 Series 10 List of Contenders Series 10 List of Contenders |
|||
 Doubles Tier List Doubles Tier List
|
 Team Building Team Building |
 Rental Teams Rental Teams |
|||
Best Builds for Returning Pokemon
All Competitive Builds for Ranked Battle
## Competitive Guides for Pokemon Sword and Shield
| Competitive Pokemon Battle Guides | |||||
|---|---|---|---|---|---|
| Tier List |
Best Builds |
Series 10 List of Contenders |
|||
| Doubles Tier List
|
Team Building |
Rental Teams |
|||
Best Builds for Returning Pokemon
Author

Togekiss - Moveset & Best Build for Ranked Battle
Rankings

Gaming News

![Monster Hunter Stories 3 Review [First Impressions] | Simply Rejuvenating](https://img.game8.co/4438641/2a31b7702bd70e78ec8efd24661dacda.jpeg/show)


![Monster Hunter Stories 3 Review [First Impressions] | Simply Rejuvenating](https://img.game8.co/4438641/2a31b7702bd70e78ec8efd24661dacda.jpeg/thumb)
Popular Games

Genshin Impact Walkthrough & Guides Wiki
Honkai: Star Rail Walkthrough & Guides Wiki
Umamusume: Pretty Derby Walkthrough & Guides Wiki
Pokemon Pokopia Walkthrough & Guides Wiki
Resident Evil Requiem (RE9) Walkthrough & Guides Wiki
Monster Hunter Wilds Walkthrough & Guides Wiki
Wuthering Waves Walkthrough & Guides Wiki
Arknights: Endfield Walkthrough & Guides Wiki
Pokemon FireRed and LeafGreen (FRLG) Walkthrough & Guides Wiki
Pokemon TCG Pocket (PTCGP) Strategies & Guides Wiki


Recommended Games
Diablo 4: Vessel of Hatred Walkthrough & Guides Wiki
Cyberpunk 2077: Ultimate Edition Walkthrough & Guides Wiki
Fire Emblem Heroes (FEH) Walkthrough & Guides Wiki
Yu-Gi-Oh! Master Duel Walkthrough & Guides Wiki
Super Smash Bros. Ultimate Walkthrough & Guides Wiki
Pokemon Brilliant Diamond and Shining Pearl (BDSP) Walkthrough & Guides Wiki
Elden Ring Shadow of the Erdtree Walkthrough & Guides Wiki
Monster Hunter World Walkthrough & Guides Wiki
The Legend of Zelda: Tears of the Kingdom Walkthrough & Guides Wiki
Persona 3 Reload Walkthrough & Guides Wiki


All rights reserved
©2019 Pokémon. ©1995-2019 Nintendo/Creatures Inc. /GAME FREAK inc.
The copyrights of videos of games used in our content and other intellectual property rights belong to the provider of the game.
The contents we provide on this site were created personally by members of the Game8 editorial department.
We refuse the right to reuse or repost content taken without our permission such as data or images to other sites.