Operation Stronghold Defense Event Guide
★ Exclusive: See results of the February 2026 Survey
◆ Hot: Version 6.4, 6.4 Codes, Version 6.5 Livestream
◆ Builds: Varka, Flins, Skirk, Escoffier
◆ Events: Operation Stronghold Defense
◆ Upcoming: Version 6.5, Linnea
Operation Stronghold Defense is the tower defense event in Genshin Impact 6.4. See how to play the Tower Defense Event, and all event rewards in this guide!
 |
|---|
 under the page title to be notified of more updates!
Operation Stronghold Defense Stage Strategies
Operation Stronghold Defense Stage Unlock Dates
| Stage | Unlock Date |
|---|---|
| 1 - First Battle! Support From a Warmhearted Weasel | March 23, 2026 |
| 2 - Got 'Em! Mechanism Supplies | March 23, 2026 |
| 3 - Transformation? A Cunning New Trick | March 24, 2026 |
| 4 - Energy! A Reliable Partner | March 25, 2026 |
| 5 - Traps? The Key to Stopping Enemies | March 26, 2026 |
| Stage 6 | March 27, 2026 |
Stage 1: First Battle! Support From a Warmhearted Weasel
| First Battle! Support From a Warmhearted Weasel Stage Overview | |
|---|---|
 |
|
| Opponents | |
| Recommended Mechanisms | |
| Recommended Support Skill | |
Stage 1 Strategy and Setup
| Wave | Recommended Strategy |
|---|---|
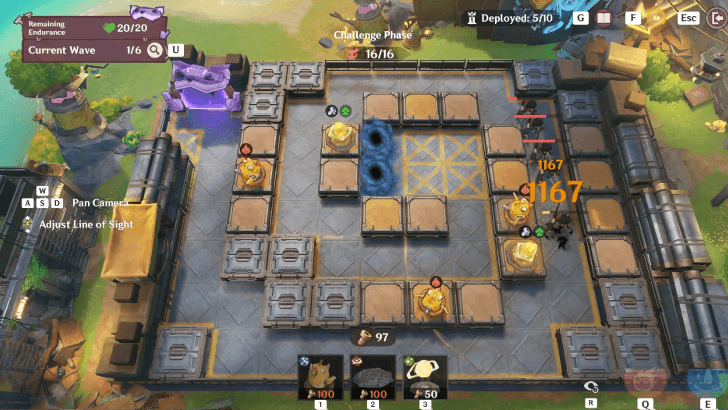
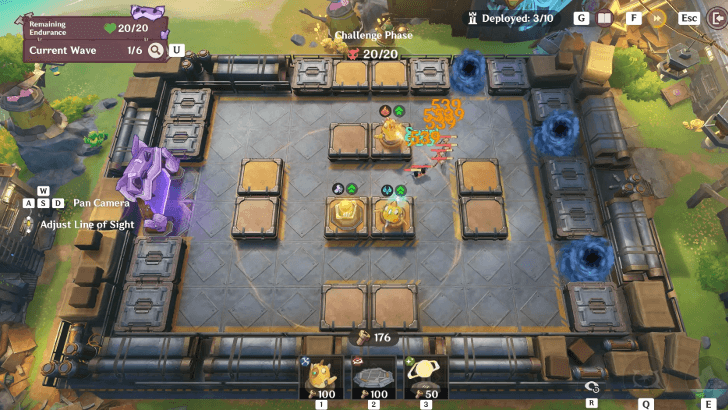
| 1 | 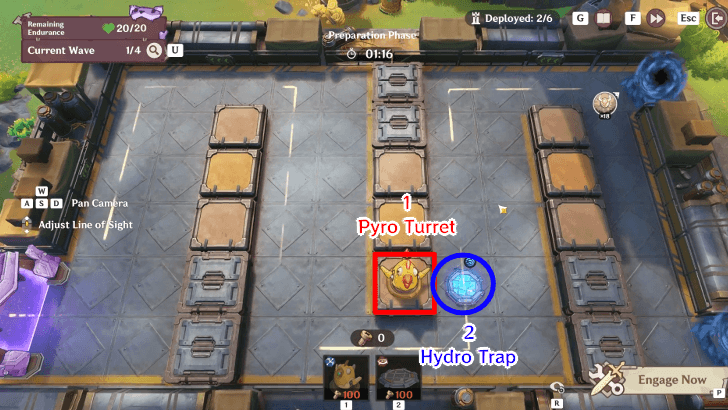 Preparation: The tutorial wave will have you be forced to place a Pyro turret and a Hydro trap. Simply place these two mechanisms next to each other for the preparation phase. Deployed Mechanisms: 1. Turret - Pyro 2. Trap - Hydro |
 Challenge: When starting the battle, wait for more Hilichurls to spawn before using your Fireball or Thunderstrike abilities to lessen the burden on your turret! Note that ability cooldowns are shared for all waves, so try to save at least one of them per wave. |
|
| 2 | 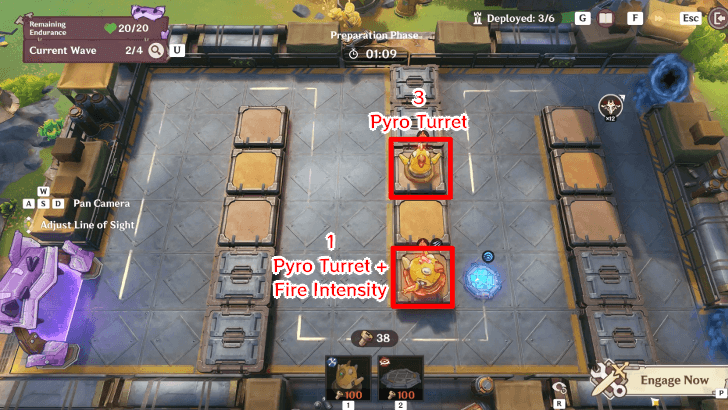 Preparation: Upgrade your first turret with Fire Intensity, which will rapid fire shots anything that will touch the Hydro Trap and cause Vaporize. Set another Turret on the same column. It can be of any elements but another Pyro is recommended in preparation for Wave 4. Deployed Mechanisms: 1. Turret - Pyro + Fire Intensity 2. Trap - Hydro 3. Turret - Pyro |
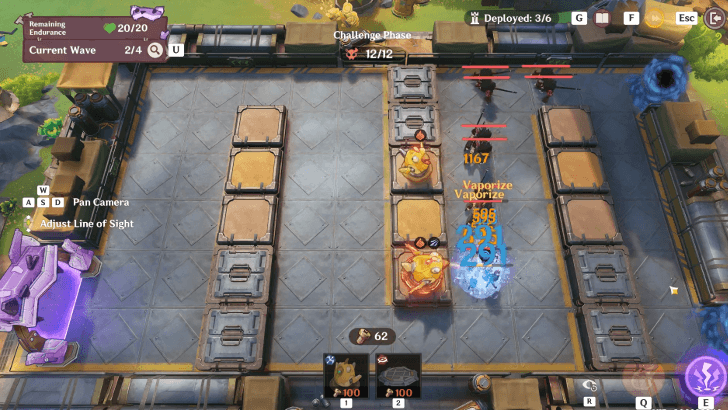 Challenge: The trap and turrets on the same lane should be able to handle this wave even without using any abilities. At the very least, save the Thunderstrike ability for Wave 3. |
|
| 3 | 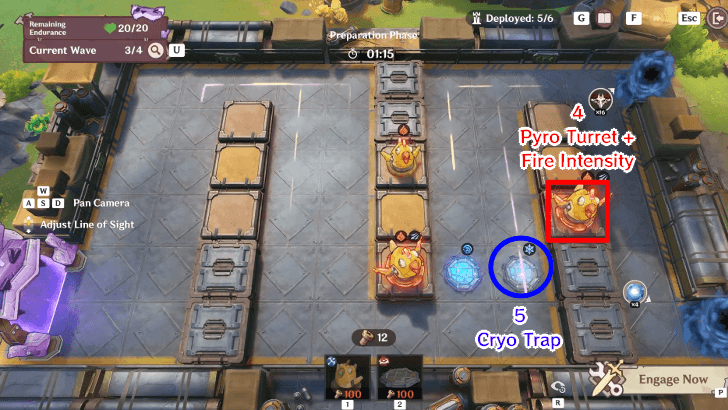 Preparation: This wave features the hasty Hydro Finches on the second lane. Place a Cryo trap and another Turret on the right side to stop them from moving. Deployed Mechanisms: 1. Turret - Pyro + Fire Intensity 2. Trap - Hydro 3. Turret - Pyro 4. Turret - Pyro + Fire Intensity 5. Trap - Cryo |
 Challenge: Multiple waves of Finches and Mitachurls start immediately. If you have the abilities available for this round, wait for the 2nd batch of Finches to appear before using it (we recommend using the Thunderstrike ability to damage all enemies at once.) |
|
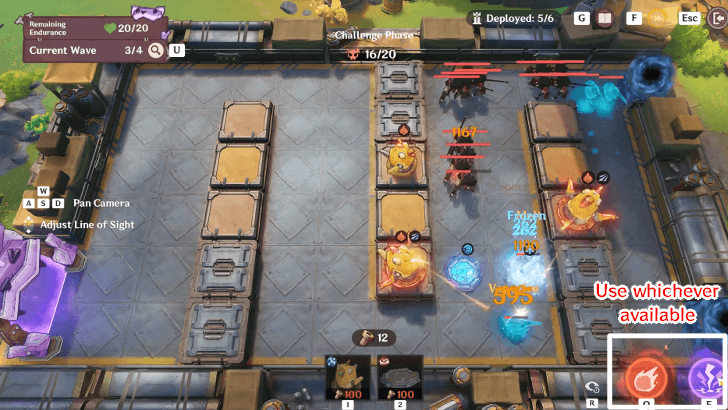
| 4 | 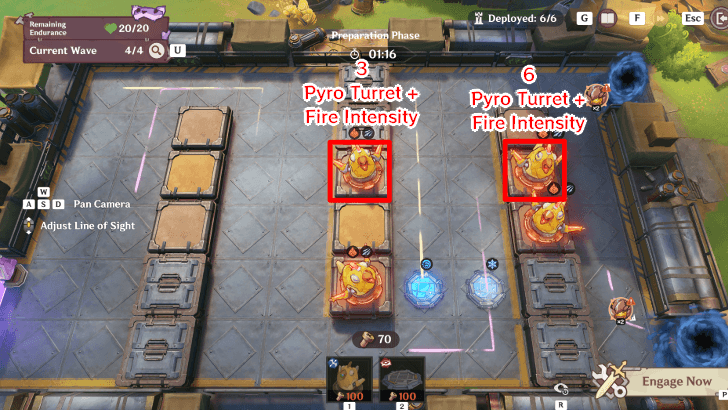 Preparation: Upgrade all your Pyro turrets with Fire Intensity to counter the Eroding Avatar of Lava, which is weak to Pyro. Deployed Mechanisms: 1. Turret - Pyro + Fire Intensity 2. Trap - Hydro 3. Turret - Pyro + Fire Intensity 4. Turret - Pyro + Fire Intensity 5. Trap - Cryo 6. Turret - Pyro + Fire Intensity |
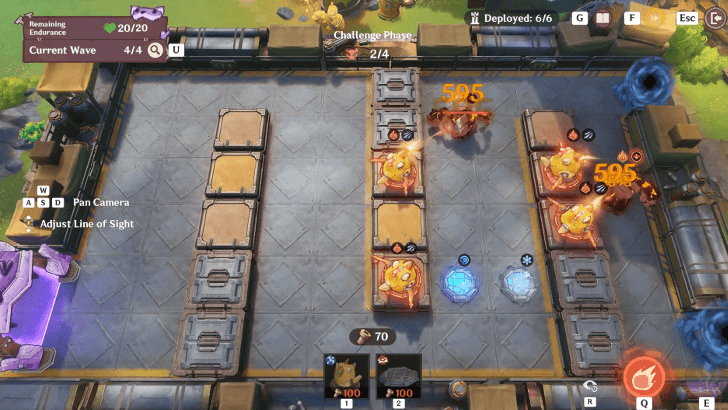 Challenge: The Avatars of Lava will self-destruct themselves when enough Pyro is accumulated on its bar. As all turrets are Pyro and have Fire Intensity, they should be able to handle the Avatars of Lava even without using any of your abilities. |
Stage 2: Got 'Em! Mechanism Supplies
| Got 'Em! Mechanism Supplies Stage Overview | |
|---|---|
 |
|
| Opponents | |
| Recommended Mechanisms | |
| Recommended Support Skill | |
Stage 2 Strategy and Setup
| Wave | Recommended Strategy |
|---|---|
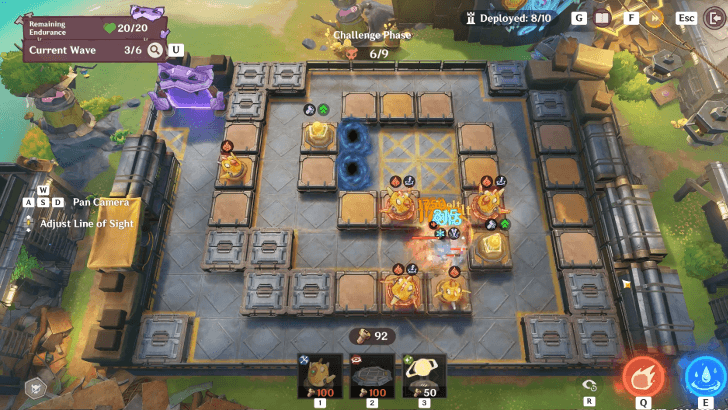
| 1 | 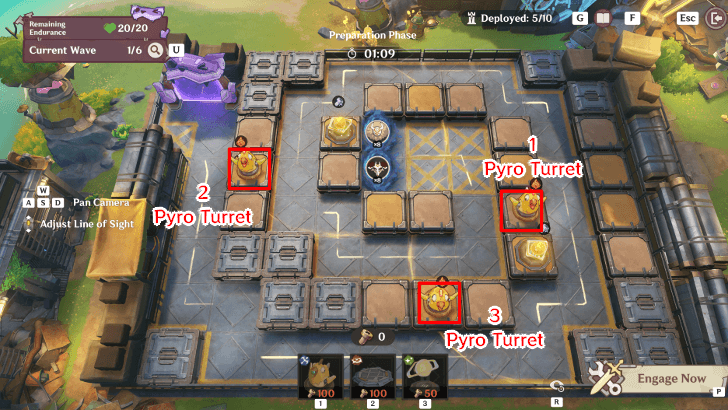 Preparation: This round features the new Collection Mechanism, which rewards bonus Bolts whenever an enemy is defeated within its range. Two Mechanisms are already deployed for you, so you'll only need to set up 3 Turrets around them. Make sure to put turrets nearby the Collection Mechanism's range to rake in more Bolts. Deployed Mechanisms: 1. Turret - Pyro 2. Turret - Pyro 3. Turret - Pyro ▲ Collection - Bolt (already deployed) ▲ Collection - Bolt (already deployed) |
 Challenge: With the format of the turrets above, the enemies should all start getting chipped and eventually gets defeated within the Collection Mechanisms' ranges. Don't fret if some enemies go past the first Turrets, as the setup ensures that the remaining stragglers are defeated as they walk on the lower right corner, which has the Collection Mechanism in range as well. |
|
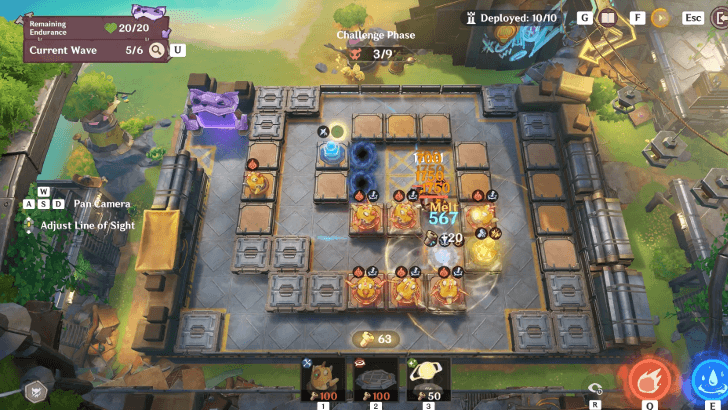
| 2 | 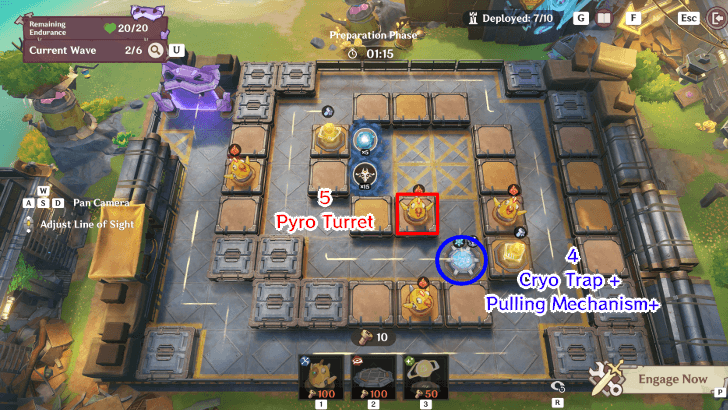 Preparation: Buy another turret and most importantly a Cryo Trap right at the corner in the middle. With this strat, we will start to fill the area with Turrets to frontload splashing DMG when we get the AoE DMG upgrade. If you have enough Bolts to upgrade the Trap, choose the Pulling Mechanism buff to ensure enemies get stuck between three turrets. If you don't have enough bolts, simply buy it during the challenge. Deployed Mechanisms: 1. Turret - Pyro 2. Turret - Pyro 3. Turret - Pyro 4. Trap - Cryo + Pulling Mechanism 5. Turret - Pyro ▲ Collection - Bolt ▲ Collection - Bolt |
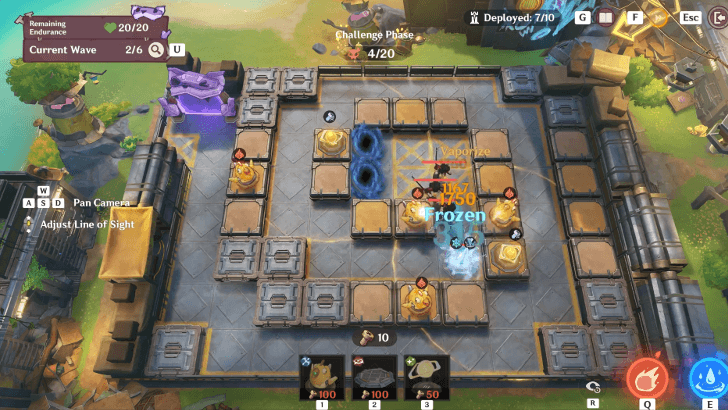 Challenge: As the Cryo Trap applies Cryo, your Pyro Turrets will Melt the enemies too! The Cryo Trap will also Freeze the Finch in place for a brief moment, which gives your turrets an opportunity to chunk them out even if it goes past the first turrets. With the nature of the stage, the outer turrets can deal with any remaining enemies should they go past the center area. |
|
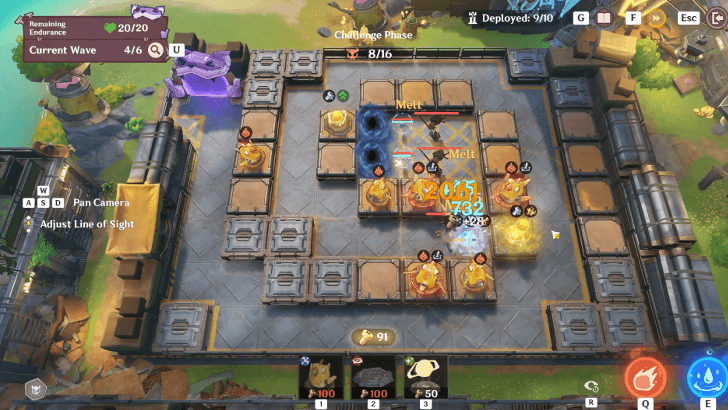
| 3 | 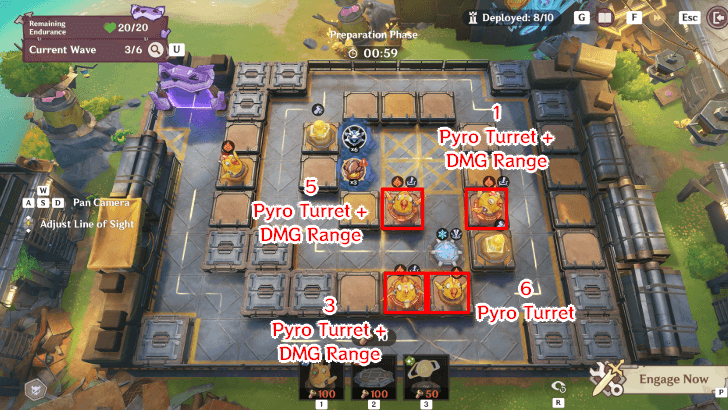 Preparation: This wave features the Eroding Avatar of Lava and Samachurls that will heal its allies. To quickly deal with them, upgrade at least two to three of your Turrets with DMG Range, which upgrades your turrets to deal splash AoE DMG. Create another Pyro Turret to end this round. Deployed Mechanisms: 1. Turret - Pyro + DMG Range 2. Turret - Pyro 3. Turret - Pyro + DMG Range 4. Trap - Cryo + Pulling Mechanism 5. Turret - Pyro + DMG Range 6. Turret - Pyro ▲ Collection - Bolt ▲ Collection - Bolt |
 Challenge: The Cryo Trap with pulling mechanism should be able to entrap all Samachurls within the device. If needed, you can use your Rumble-Rumble Rainstorm Hydro Skill on enemies standing on the Cryo Trap to Freeze Samachurls and stop them from healing the Avatar of Lava. |
|
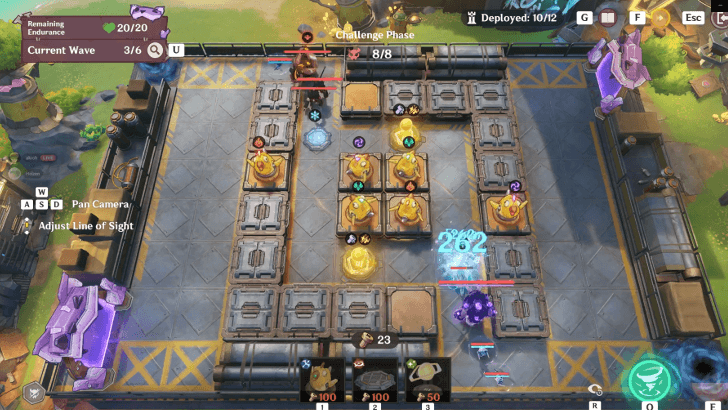
| 4 | 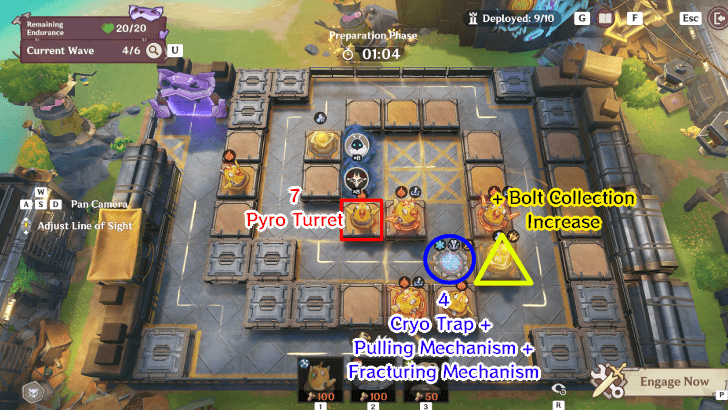 Preparation: This round is free for any meaningful upgrades, but we recommend getting the Fracturing Mechanism upgrade for the Cryo Trap to shred the enemies' defenses. Otherwise, Bolt Collection Increase and another Pyro Turret should be enough for this preparation round. Deployed Mechanisms: 1. Turret - Pyro + DMG Range 2. Turret - Pyro 3. Turret - Pyro+ DMG Range 4. Trap - Cryo + Pulling Mechanism + Fracturing Mechanism 5. Turret - Pyro + DMG Range 6. Turret - Pyro 7. Turret - Pyro ▲ Collection - Bolt + Collection Increase ▲ Collection - Bolt |
 Challenge: Cryo-shielded Abyss Mages start spawning in this wave. As we have all the Pyro Turrets frontloaded at the starting area, they won't be able to move past them. |
|
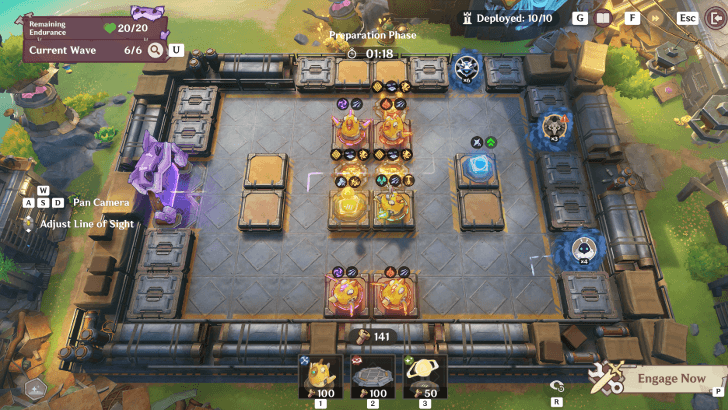
| 5 | 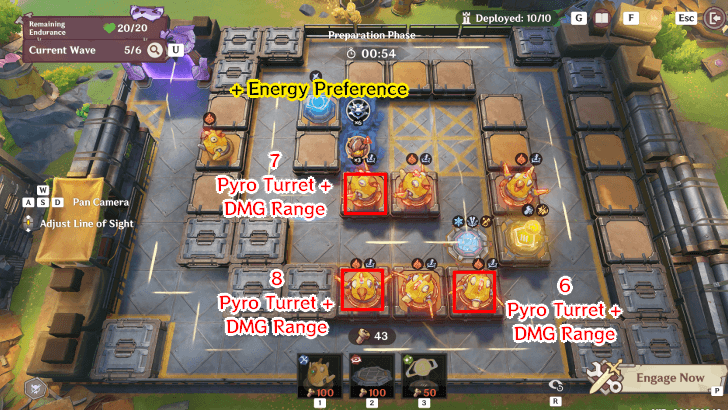 Preparation: Upgrade your remaining inner turrets with DMG Range, and buy the last Pyro Turret with DMG Range. You can also change your Collection Mechanisms into Energy. Deployed Mechanisms: 1. Turret - Pyro + DMG Range 2. Turret - Pyro 3. Turret - Pyro + DMG Range 4. Trap - Cryo + Pulling Mechanism + Fracturing Mechanism 5. Turret - Pyro + DMG Range 6. Turret - Pyro + DMG Range 7. Turret - Pyro + DMG Range 8. Turret - Pyro + DMG Range ▲ Collection - Bolt + Collection Increase ▲ Collection - Change to Energy |
 Challenge: This wave is the same as Wave 3 and made easier with our current setup. As such, save both your skills for the final wave against the Cryo Lawachurl. |
|
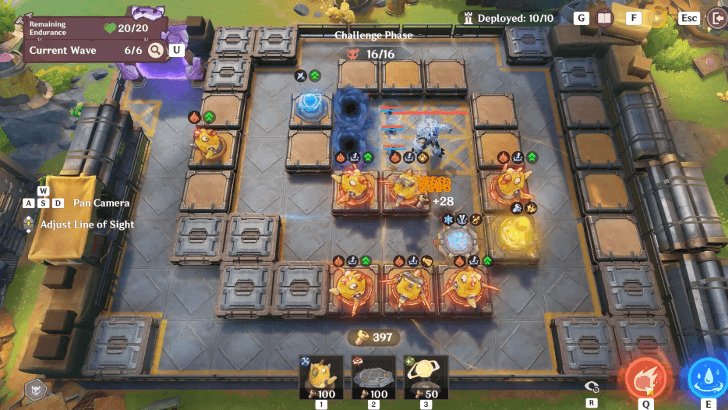
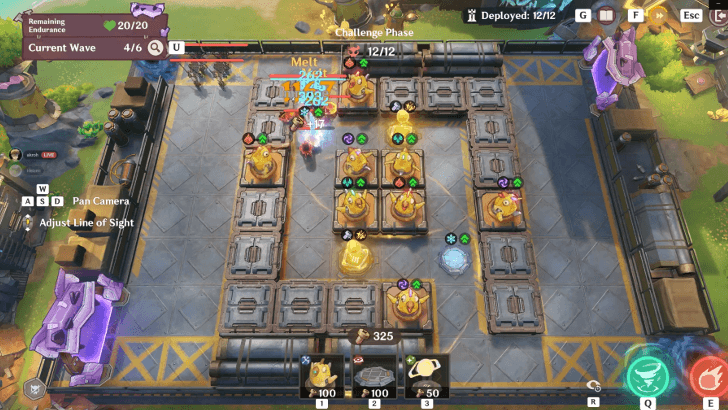
| 6 | 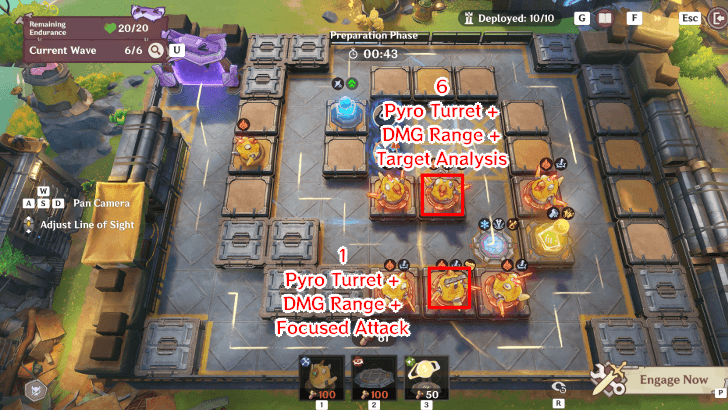 Preparation: Upgrade two of your inner turrets with Target Analysis, which reduces RES, and Focused Attack, which is focused on single-target burst. This is crucial for the Cryo Lawachurl to defeat it fast while it's within the range of all 6 Turrets. Deployed Mechanisms: 1. Turret - Pyro + DMG Range + Focused Attack 2. Turret - Pyro 3. Turret - Pyro + DMG Range 4. Trap - Cryo + Pulling Mechanism + Fracturing Mechanism 5. Turret - Pyro + DMG Range 6. Turret - Pyro + DMG Range + Target Analysis 7. Turret - Pyro + DMG Range 8. Turret - Pyro + DMG Range ▲ Collection - Bolt + Collection Increase ▲ Collection - Energy |
Challenge: The main challenge in this final wave is defeating the Cryo Lawachurl. When the Cryo Lawachurl spawns, ready your Fireball ability and fire it when it creates its Cryo shield. Once the Cryo Shield is gone, when the Lawachurl walks over the Cryo Trap, place your Rainstorm ability to Freeze the shield-less Lawachurl in place until the turrets burst it down. The Hydro Abyss Mages should be a non-issue as they freeze themselves when they go in the range of the Cryo Trap. |
Stage 3: Transformation? A Cunning New Trick
| Transformation? A Cunning New Trick Stage Overview | |
|---|---|
 |
|
| Opponents | |
| Recommended Mechanisms | |
| Recommended Support Skill | |
Stage 3 Strategy and Setup
| Wave | Recommended Strategy |
|---|---|
| 1 | 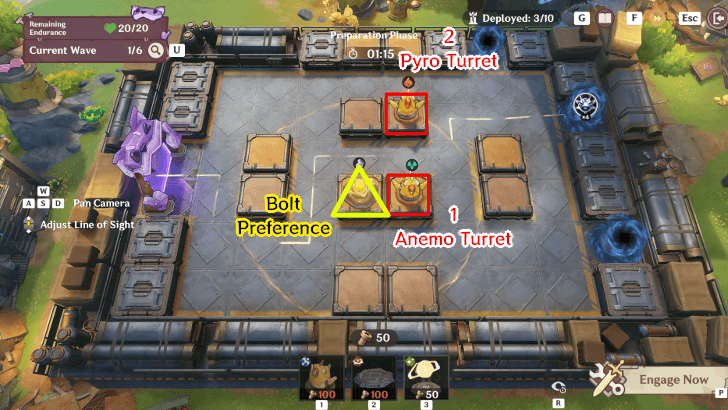 Preparation: As this round have three lanes, it's important to have a strong middle area to take care of the two lanes by itself. We recommend having the Anemo Turret there as it's great for Swirl AoE DMG and Elemental Application for the Tenebrous Mimiflora later. Place a Bolt Collection Mechanism beside it too as most enemies will be defeated within that range. Deployed Mechanisms: 1. Turret - Anemo 2. Turret - Pyro ▲ Collection - Bolt |
 Challenge: All the Hilichurls will walk towards the middle lane, but as you have the Anemo Turret to Swirl the Pyro Turret's attacks, the AoE damage should be able to defeat these enemies within the Collection Mechanism's range with ease. |
|
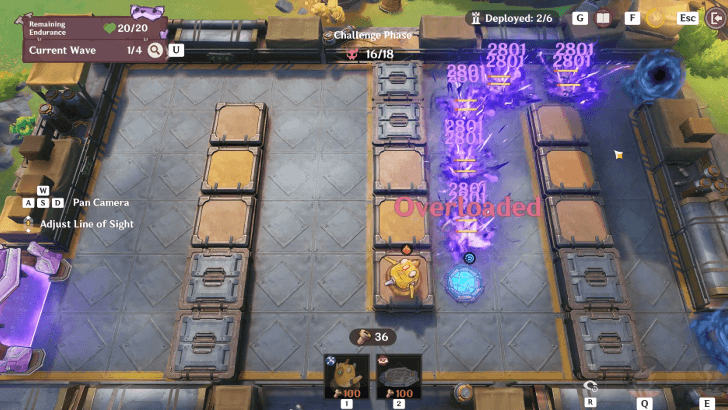
| 2 | 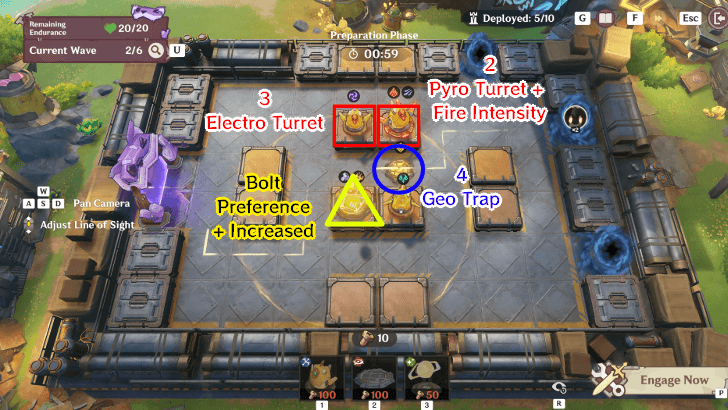 Preparation: Place an Electro Turret beside the Pyro Turret, then upgrade the Pyro Turret with Fire Intensity. Place a Geo Trap as well in the upper middle lane in preparation for the Geo-shielded enemies. The setups from hereon will utilize Overloaded with the Geo Traps to defeat the upcoming shielded enemies. If you have enough Bolts, buy the Collection Increase buff as well to allow you to buy important upgrades from Wave 3 onwards. Deployed Mechanisms: 1. Turret - Anemo 2. Turret - Pyro + Fire Intensity 3. Turret - Electro 4. Trap - Geo ▲ Collection - Bolt + Collection Increase |
 Challenge: Waves of Mitachurls and Large Geo Slimes with Geo shields will path in the middle. The Geo Trap we placed can already remove these shields by itself, with the Electro and Pyro Turrets supporting as well by causing Overload and knocking back all enemies away. Do not use your abilities here as you may need it for Wave 3. |
|
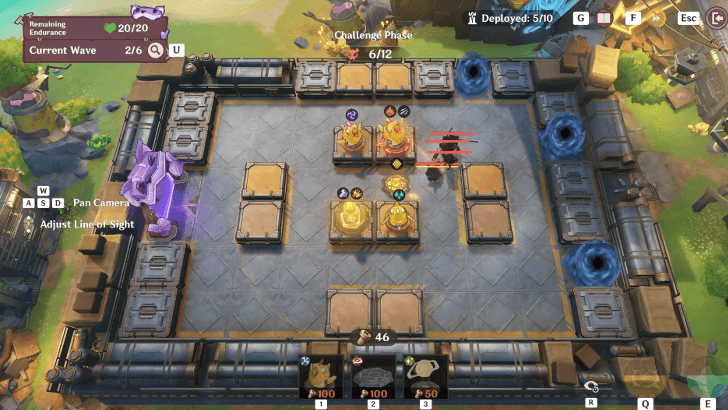
| 3 |  Preparation: You may choose any of the enhancement protocol cards on this round, as our strategy doesn't rely on using any of your abilities for this entire stage. Place another Electro+Pyro Turret combo on the southern boxes, then make sure to upgrade your Anemo Turret with Fire Intensity. This setup should be able to defeat the Mimiflora enemies by themselves. If you have enough bolts, you can also buy an Energy Preference Collection Mechanism if you want to use your skills more. Deployed Mechanisms: 1. Turret - Anemo + Fire Intensity 2. Turret - Pyro + Fire Intensity 3. Turret - Electro 4. Trap - Geo 5. Turret - Pyro 6. Turret - Electro ▲ Collection - Bolt + Collection Increase ▲ Collection - Energy |
Challenge: The main nuisance in this wave is the Tenebrous Mimiflora with its Ward Shield on the southern lane. With the setup above with the Anemo Turret upgraded, the three turrets at the south should apply enough Elemental Attacks to remove the shield and stun it in place even without using any of your support abilities. The Anemo Turret will focus on the Mimiflora once it goes near, but if for some reason the Anemo Turret doesn't, use one of your abilities to remove the shield. |
|
| 4 | 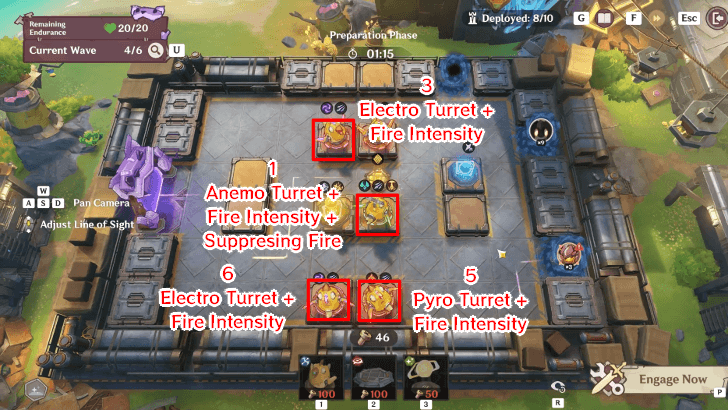 Preparation: This phase will have you upgrading all your turrets. Ensure that all your Electro and Pyro Turrets have Fire Intensity. Additionally, upgrade your Anemo Turret as well with Suppressing Fire as the Anemo Turret is your strongest AoE asset. Deployed Mechanisms: 1. Turret - Anemo + Fire Intensity + Suppresing Fire 2. Turret - Pyro + Fire Intensity 3. Turret - Electro + Fire Intensity 4. Trap - Geo 5. Turret - Pyro + Fire Intensity 6. Turret - Electro + Fire Intensity ▲ Collection - Bolt + Collection Increase ▲ Collection - Energy |
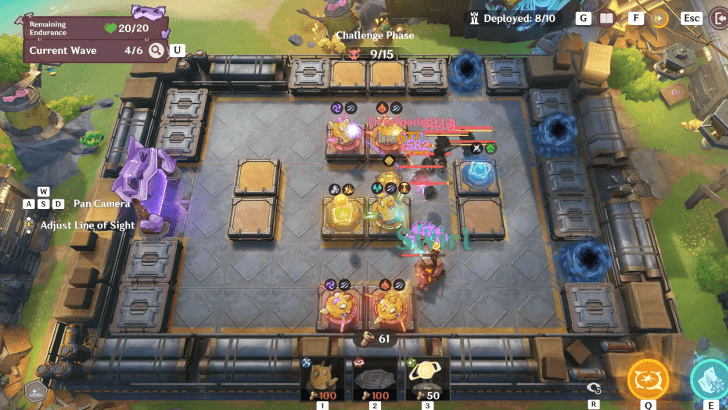 Challenge: Multiple waves of Geo Slimes, Mitachurls, and Eroding Avatar of Lava spawns in this round. With all your Electro and Pyro Turrets upgraded, they would endlessly cause Overload on the enemies and stop them from advancing. Overload also causes Pyro DMG and contribute to the Pyro Gauge from the Avatar of Lava. |
|
| 5 | 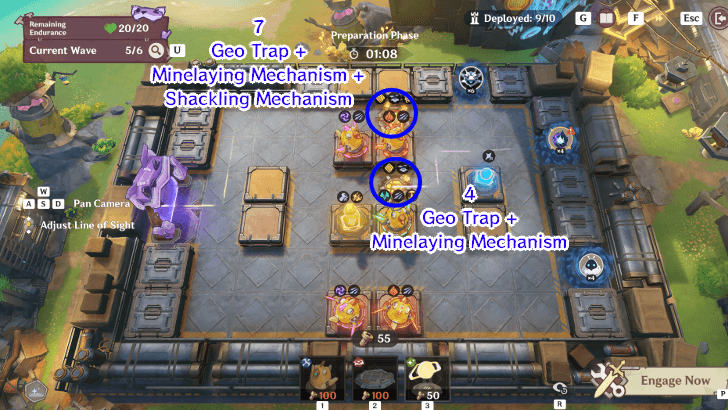 Preparation: This stage have the upper path accessible by the enemies, so place a Geo Trap there with both Minelaying and Shackling upgrade to ensure that side is safe as the Anemo Turret is not in range. Other than that, upgrade your other Geo Trap with Minelaying as well. Deployed Mechanisms: 1. Turret - Anemo + Fire Intensity + Suppresing Fire 2. Turret - Pyro + Fire Intensity 3. Turret - Electro + Fire Intensity 4. Trap - Geo + Minelaying Mechanism 5. Turret - Pyro + Fire Intensity 6. Turret - Electro + Fire Intensity 7. Trap - Geo + Minelaying Mechanism + Shackling Mechanism ▲ Collection - Bolt + Collection Increase ▲ Collection - Energy |
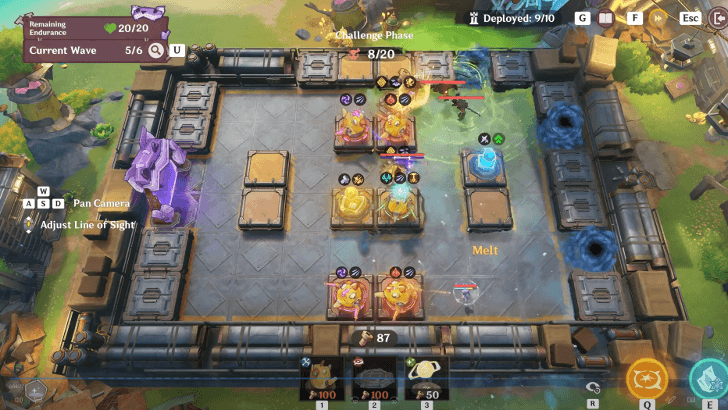 Challenge: Like Wave 3, the Anemo Turret + Overload should be able to remove the Mimiflora's shield going to the middle path. The Geo Trap on the north side with the Shackling upgrade should be able to take care of the northern side as well, but if for some reason the Mimiflora was able to go past the Anemo Turret, use one of your abilities. |
|
| 6 | 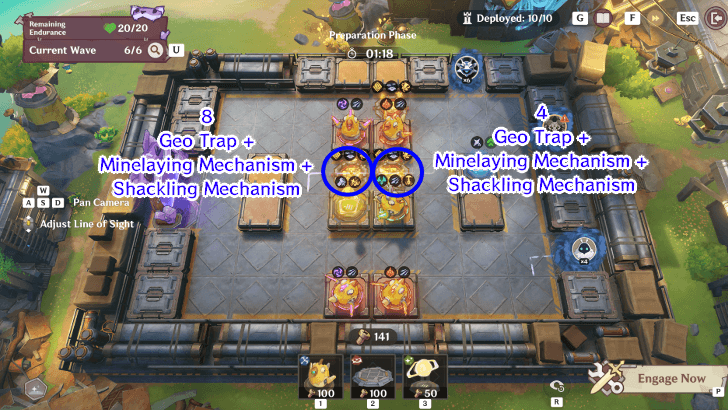 Preparation: There will be a Geo Lawachurl for this round going to the middle path, so place another Geo Trap beside your first one, and upgrade both with Shackling Mechanism. If you have spare bolts, you can also upgrade the rest of your inner turrets. Deployed Mechanisms: 1. Turret - Anemo + Fire Intensity + Suppresing Fire 2. Turret - Pyro + Fire Intensity 3. Turret - Electro + Fire Intensity 4. Trap - Geo + Minelaying Mechanism + Shackling Mechanism 5. Turret - Pyro + Fire Intensity 6. Turret - Electro + Fire Intensity 7. Trap - Geo + Minelaying Mechanism + Shackling Mechanism 8. Trap - Geo + Minelaying Mechanism + Shackling Mechanism ▲ Collection - Bolt + Collection Increase ▲ Collection - Energy |
Challenge: The Geo Lawachurl spawns with a beefy Geo shield. With the setup above, the two Geo Traps placed in the middle with Shackling Mechanisms should temporarily stun the Lawachurl twice, which allows your Turrets to wittle down its shield and get knocked back a bit by Overload. If for some reason they went past your turrets, use your saved Geo or Cryo abilties just in case. |
Stage 4: Energy! A Reliable Partner
| Energy! A Reliable Partner Stage Overview | |
|---|---|
 |
|
| Opponents | |
| Recommended Mechanisms | |
| Recommended Support Skill | |
Stage 4 Strategy and Setup
| Wave | Recommended Strategy |
|---|---|
| 1 | 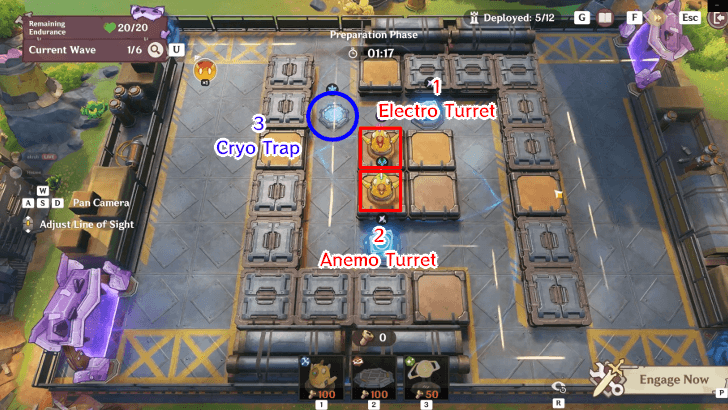 Preparation: The field already have two Energy Collection Mechanisms, but if you're following this strat, we will not use Support Skills as much, so we'll change both of them to Bolts on Wave 2. If you're not comfortable with not using much skills, at the very least, save the skills on Wave 2, 3, and 6. Deploy Electro and Anemo Turrets at the center, and a Cryo Trap on the intersection. Deployed Mechanisms: 1. Turret - Electro 2. Turret - Anemo 3. Trap - Cryo ▲ Collection - Energy (already deployed) ▲ Collection - Energy (already deployed) |
 Challenge: The Mitachurls will spawn with a Pyro aura. With the Cryo Trap removing this aura for you, the trap and your Electro Turret will cause a mix of Superconduct, Overload, and Melt damage in an AoE with your Anemo Turret! No need to use skills here. |
|
| 2 | 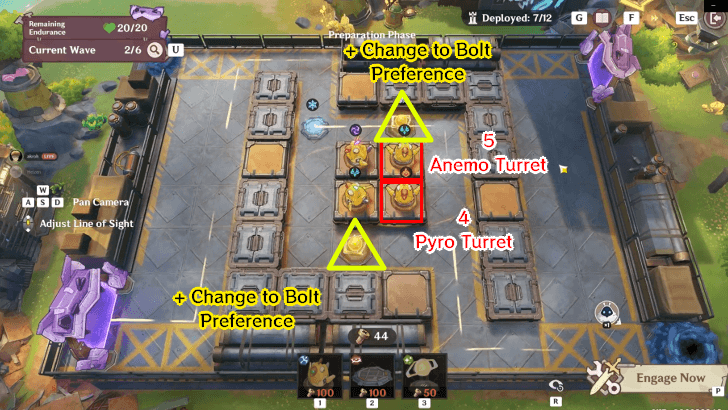 Preparation: As mentioned, we will now be changing the Energy Collection Mechanism to Bolts to get enough resources and obtain important upgrades for our turrets later. Afterwards, deploy a Pyro and Anemo Turret on the remaining central boxes. Deployed Mechanisms: 1. Turret - Electro 2. Turret - Anemo 3. Trap - Cryo 4. Turret - Pyro 5. Turret - Anemo ▲ Collection - Change to Bolt ▲ Collection - Change to Bolt |
Challenge: Fireball Ability recommended. The right side will now spawn Mitachurls and a Cryo Abyss Mage. The Pyro and Anemo turret should be able to defeat the initial enemies, while the remaining stragglers are taken care of by the Electro Turret. Optimally, use your Fireball Ability when the Cryo Abyss Mage envelops the Mitachurls with Cryo. |
|
| 3 | 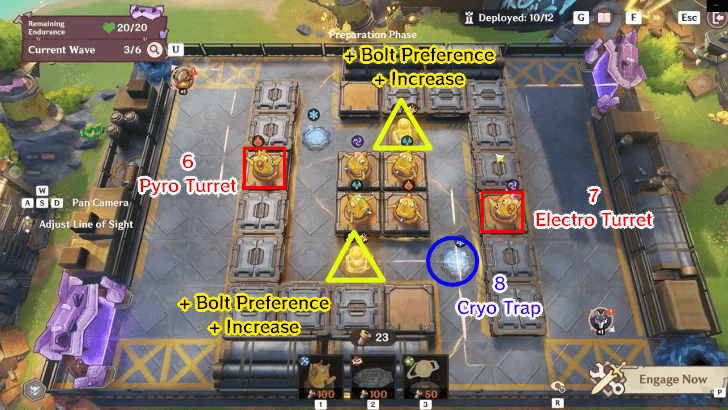 Preparation: For the Enhancement Protocol, we recommend redrawing to get either Melt, Superconduct, or Overload buffs, whichever has more benefitted mechanisms. Place another Cryo Trap on the southeast intersection in preparation for the Electro Lawachurl, then one Pyro and Electro Towers on the left and right outer boxes. Lastly, upgrade the two Bolt Collection Mechanisms with Collection Increase. Deployed Mechanisms: 1. Turret - Electro 2. Turret - Anemo 3. Trap - Cryo 4. Turret - Pyro 5. Turret - Anemo 6. Turret - Pyro 7. Turret - Electro 8. Trap - Cryo ▲ Collection - Bolt + Collection Increase ▲ Collection - Bolt + Collection Increase |
 Challenge: Anemo Ability recommended. This wave now spawns the Electro Lawachurl, Hydro Finches, Cryo and Hydro Abyss Mages, and an Avatar of Lava. Your Anemo Turret should be able to swirl the Lawachurl's electro shield to Superconduct the Cryo Abyss Mages, while both the Traps and your Overload turrets wittles down the rest. Use the Anemo ability once all enemies converge in the middle. |
|
| 4 | 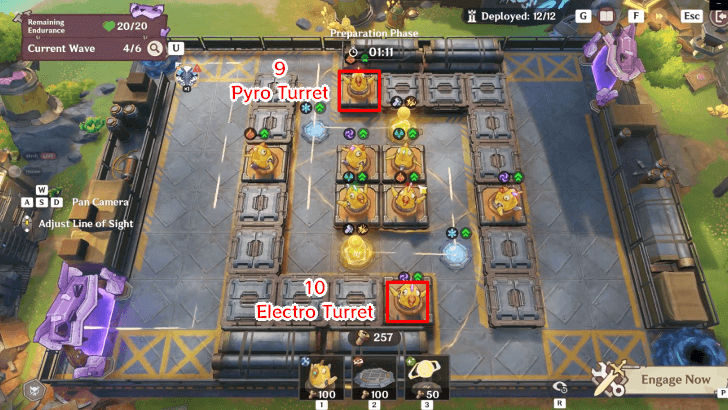 Preparation: Deploy your last Pyro and Anemo turrets on the north and south outer boxes. Deployed Mechanisms: 1. Turret - Electro 2. Turret - Anemo 3. Trap - Cryo 4. Turret - Pyro 5. Turret - Anemo 6. Turret - Pyro 7. Turret - Electro 8. Trap - Cryo 9. Turret - Pyro 10. Turret - Electro ▲ Collection - Bolt + Collection Increase ▲ Collection - Bolt + Collection Increase |
 Challenge: Luckily for us, the mobs will rotate 1 lap around the central area instead of moving forward, so there's no need to use skills here. The overload turrets will also knockback the enemies, letting your other turrets focus fire on the Lawachurl who approches forward. | |
| 5 | 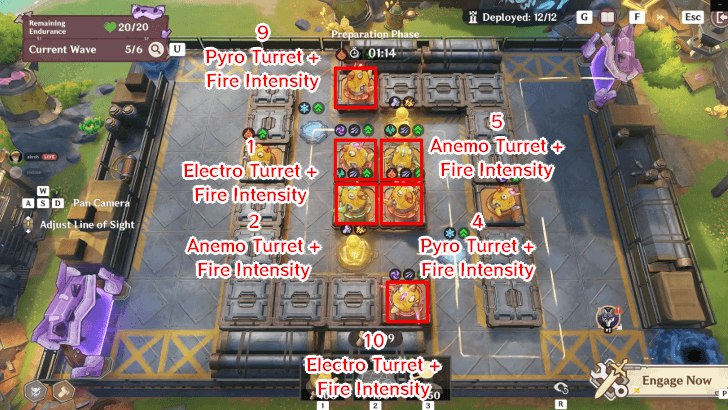 Preparation: Another Enhancement Protocol round. Choosing 200 Bolts should be enough with our setup without having to do the Bounties, unless you really need it. For the upgrades, we recommend upgrading 6 of your Turrets with Fire Intensity, as it will be handy later on against the Wild Hunt elites. Deployed Mechanisms: 1. Turret - Electro + Fire Intensity 2. Turret - Anemo + Fire Intensity 3. Trap - Cryo 4. Turret - Pyro + Fire Intensity 5. Turret - Anemo + Fire Intensity 6. Turret - Pyro 7. Turret - Electro 8. Trap - Cryo 9. Turret - Pyro + Fire Intensity 10. Turret - Electro + Fire Intensity ▲ Collection - Bolt + Collection Increase ▲ Collection - Bolt + Collection Increase |
 Challenge: Like Wave 4, enemies will lap around the central area. With the Turrets surrounding all enemies, it should take care of all stragglers. No need to use skills here, but if you chose any bounty Enhancement Protocol, consider using only one of your skills if needed. |
|
| 6 | 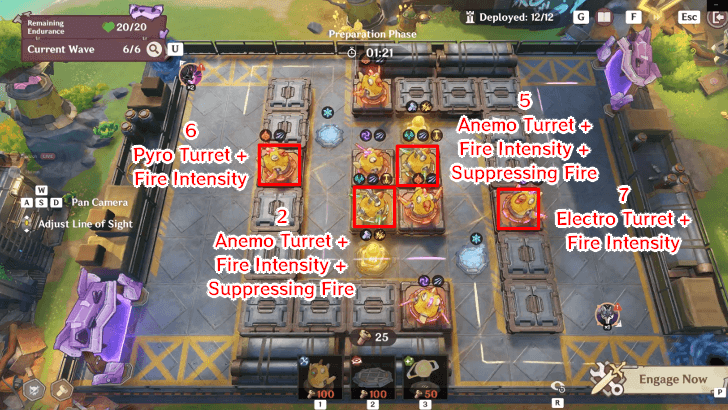 Preparation: Upgrade your remaining two turrets with Fire Intensity. Have your Anemo Turrets be upgraded with Suppresing Fire to reduce enemy RES as well! Deployed Mechanisms: 1. Turret - Electro+ Fire Intensity 2. Turret - Anemo + Fire Intensity + Suppressing Fire 3. Trap - Cryo 4. Turret - Pyro+Fire Intensity 5. Turret - Anemo + Fire Intensity + Suppressing Fire 6. Turret - Pyro + Fire Intensity 7. Turret - Electro + Fire Intensity 8. Trap - Cryo 9. Turret - Pyro + Fire Intensity 10. Turret - Electro + Fire Intensity ▲ Collection - Bolt + Collection Increase ▲ Collection - Bolt + Collection Increase |
Challenge: The toughest enemy here yet is the Wild Hunt elite. With Suppressing Fire Anemo Turret and all Turrets having Fire Intensity + Overload DMG, the Elite can be endlessly staggered until it gets defeated. On worst case scenarios, if the Elite is about to exit the central area use your Anemo or Pyro Skills immediately. |
Stage 5: Traps? The Key to Stopping Enemies
| Traps? The Key to Stopping Enemies | |
|---|---|
 |
|
| Opponents | |
| Recommended Mechanisms |
|
| Recommended Support Skill | |
Stage 5 Strategy and Setup
| Wave | Recommended Strategy |
|---|---|
| 1 | 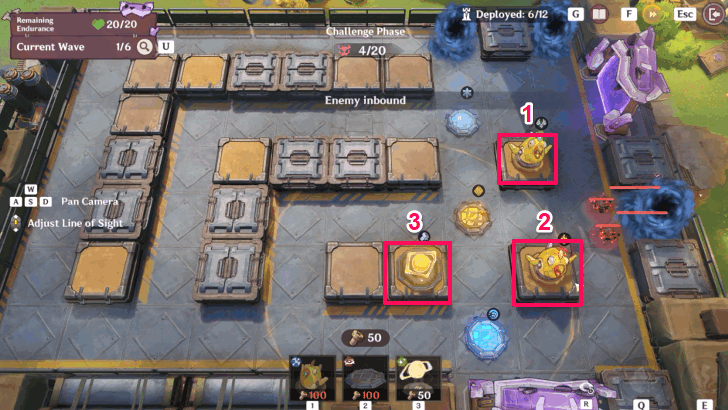 Preparation: The field already has three Trap Mechanisms deployed, so no need to place any traps for the rest of the game. Place a Collection Mechanism - Bolt on the bottom side, on the left of the Geo and Hydro traps. Deploy an Anemo turret on the middle row, rightmost part, in between the Cryo and Geo traps. Then, a Pyro turret just below the Anemo turret, between the Geo and Hydro traps. Deployed Mechanisms: 1. Turret - Anemo 2. Turret - Pyro 3. Collection - Bolt 4. Trap - Cryo (already deployed) 5. Trap - Geo (already deployed) 6. Trap - Hydro (already deployed) |
| Challenge: Once you gain 100 Bolts, place an Electro turret on the middle row, left side, in between of the Cryo and Geo traps. |
|
| 2 | 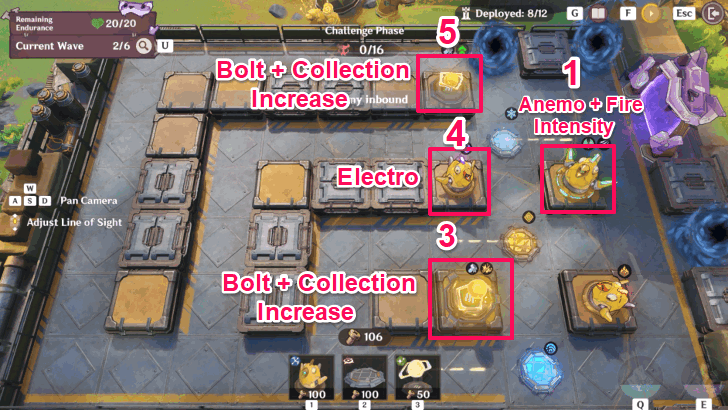 Preparation: Place a Collection Mechanism - Bolt on top row, in between the Enemy Spawn Point and Cryo trap. Then, upgrade the two Collection Mechanisms on the field for the Collection Increase. Lastly, upgrade the Anemo turret to have the Fire Intensity. Deployed Mechanisms: 1. Turret - Anemo + Fire Intensity 2. Turret - Pyro 3. Collection - Bolt + Collection Increase 4. Turret - Electro 5. Collection - Bolt + Collection Increase 6. Trap - Cryo 7. Trap - Geo 8. Trap - Hydro |
| Challenge: During the challenge phase, upgrade the Electro and Pyro turrets to have the Fire Intensity as well to help with all the enemies. At the end of Wave 2, you will be given a chance to select an enhancement card. You may choose any card you want, most preferably reaction buffs or decrease in upgrade costs. |
|
| 3 | 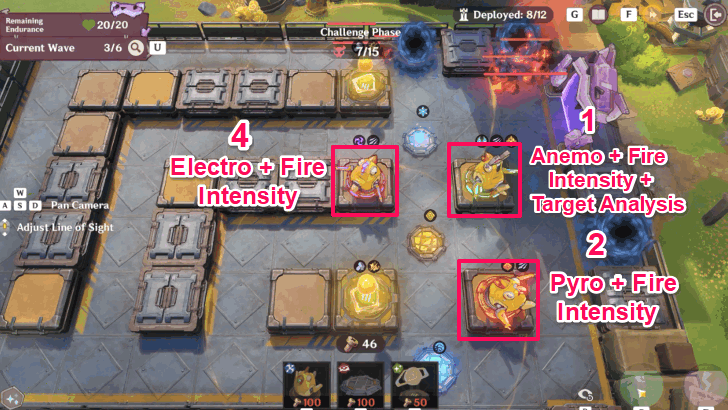 Preparation: Upgrade the Anemo turret to have the Target Analysis, which will be the most important factor in the upcoming waves. The rest of the upgrades will be done during the Challenge Phase. Deployed Mechanisms: 1. Turret - Anemo + Fire Intensity + Target Analysis 2. Turret - Pyro + Fire Intensity 3. Collection - Bolt + Collection Increase 4. Turret - Electro + Fire Intensity 5. Collection - Bolt + Collection Increase 6. Trap - Cryo 7. Trap - Geo 8. Trap - Hydro |
| Challenge: During the challenge phase, upgrade the Electro turret to have the Target Analysis. Then, upgrade the Cryo trap to have the Minelaying Mechanism. Lastly, place a Pyro Turret on the top row, beside the Collection Mechanism. |
|
| 4 | 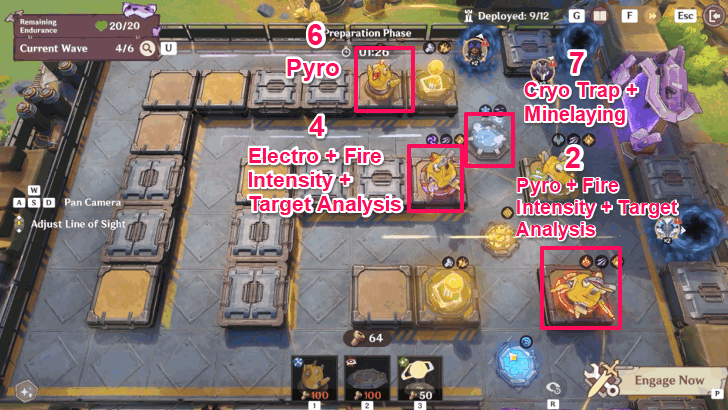 Preparation: Upgrade the Pyro turret to have the Target Analysis, which is located below the Anemo turret. The rest of the upgrades will be done during the Challenge Phase. Deployed Mechanisms: 1. Turret - Anemo + Fire Intensity + Target Analysis 2. Turret - Pyro + Fire Intensity + Target Analysis 3. Collection - Bolt + Collection Increase 4. Turret - Electro + Fire Intensity + Target Analysis 5. Collection - Bolt + Collection Increase 6. Turret - Pyro 7. Trap - Cryo + Minelaying 8. Trap - Geo 9. Trap - Hydro |
| Challenge: This is where everything goes critical. During Wave 4, you will need to place another Pyro turret at the bottom row, beside the Collection Mechanism. Then, upgrade it to have the Fire Intensity. This needs to be the top priority as it helps in defeating the Lawachurls. Lastly, upgrade the Geo trap to have the Minelaying Mechanism and the Pyro turret on the |
|
| 5 | 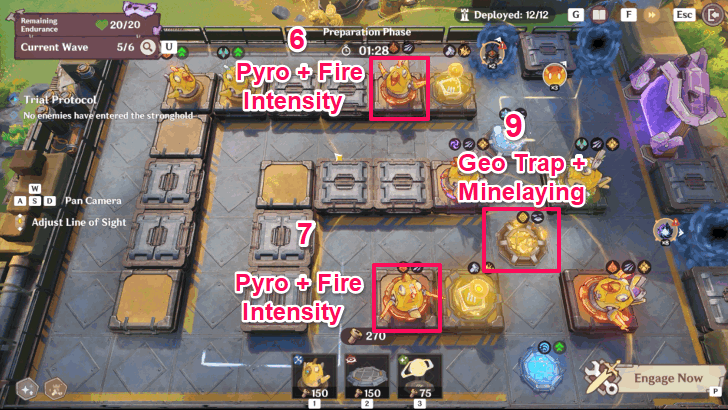 Preparation: Upgrade the Pyro turret on the top row to have the Fire Intensity. This is to help with the enemies on the top side. The rest of the upgrades will be done during the Challenge Phase. There should be a total of 10 deployed units for you at this point. The next steps will be either to upgrade every unit to the max or add two more units on the field and place them wherever. Deployed Mechanisms: 1. Turret - Anemo + Fire Intensity + Target Analysis 2. Turret - Pyro + Fire Intensity + Target Analysis 3. Collection - Bolt + Collection Increase 4. Turret - Electro + Fire Intensity + Target Analysis 5. Collection - Bolt + Collection Increase 6. Turret - Pyro + Fire Intensity 7. Turret - Pyro + Fire Intensity 8. Trap - Cryo + Minelaying 9. Trap - Geo + Minelaying 10. Trap - Hydro |
| Challenge: Everything should be in place now and all you need to do is upgrade every turret to have the Target Analysis and upgrade every trap to have the Minelaying and Fracturing Mechanisms. If you do decide to place additional two units, you may do so as well. The strategy for Stage 5 is complete and all you need to is upgrade everything. |
|
| 6 |  Preparation: Upgrade all turrets to have the Fire Intensity and Target Analysis. Then, upgrade all traps to have Minelaying and Fracturing Mechanisms. These upgrades can deal True Damage to enemies which applies massive damage and neglects their shield. Deployed Mechanisms: 1. Turret - Anemo + Fire Intensity + Target Analysis 2. Turret - Pyro + Fire Intensity + Target Analysis 3. Collection - Bolt + Collection Increase 4. Turret - Electro + Fire Intensity + Target Analysis 5. Collection - Bolt + Collection Increase 6. Turret - Pyro + Fire Intensity + Target Analysis 7. Turret - Pyro + Fire Intensity + Target Analysis 8. Trap - Cryo + Minelaying + Fracturing 9. Trap - Geo + Minelaying + Fracturing 10. Trap - Hydro + Minelaying + Fracturing |
| Challenge: With everything in place, you can just sit back and relax. You may also use the Skills to complete the stage faster. However, if you are using this strat, we can assure you that there is no need to use it. |
Operation Stronghold Defense Event Information
Base Defense Event Details
| Event Start | March 23, 2026 |
|---|---|
| Event End | April 2, 2026 |
| How to Unlock | Adventure Rank 20 Complete Song of the Dragon and Freedom Optional Nod-Krai Archon Quest True Moon for the Best Experience |
| Rewards |
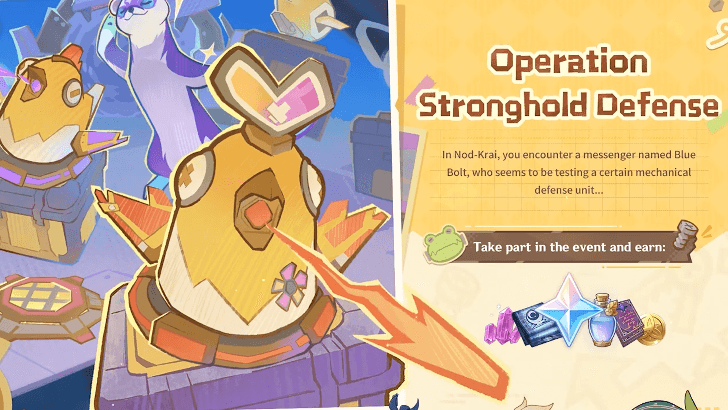
What is Operation Stronghold Defense?
Operation Stronghold Defense is tower defense event in Version 6.4 Luna V where players must use and upgrade mechanisms and traps to defeat waves of enemies.
Other Current & Upcoming Events
How to Play Operation Stronghold Defense
Set Up Your Defense During Preparation Phase
Choose defensive mechanisms and place them in strategic locations on the stage depending on the waves' pathing. Each Mechanisms cost Bolts, which is mainly obtained by defeating enemies.
Bolts can also be used to upgrade the mechanisms and obtain more powerful effects to help you defeat waves of enemies faster or more efficiently.
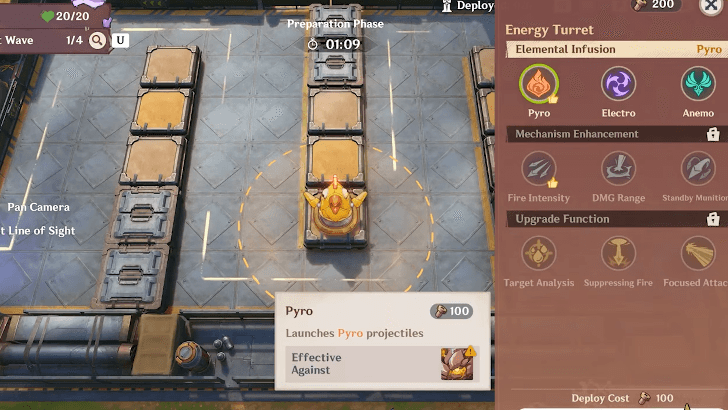
Mechanisms in Operation Stronghold Defense
There are three types of mechanisms you can deploy in the event:
| Mechanism | Features |
|---|---|
| Ranged device you place on blocks. It is your main source of DMG. It can infuse Pyro, Electro, or Anemo elements and can react to any elements applied by other Mechanisms. Attack pattern can be upgraded to rapid fire, splash, or stock artillery shots against enemies. | |
| Ground traps that activate when enemies step on it. Unlike most conventional traps, these won't expire. Traps can be upgraded to either pull enemies towards it, continuously produce mines, or periodically unleash waves of Elemental Shockwaves even without an enemy stepping on it. | |
| Supportive Mechanism that allows you to increase Bolts or Energy gained. Bolt Mechanism is especially helpful at lower levels to get your setup going, before changing it to Energy for later. Effects within range doesn't stack, so you can't overlap two of the same effects. |
Defeat Waves of Enemies During Challenge Phase
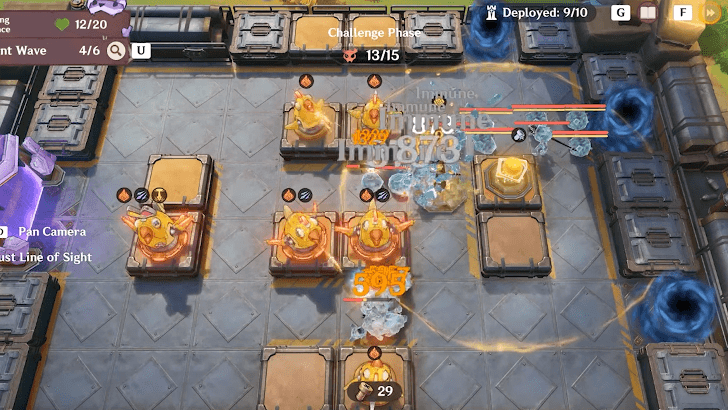
Once you're done setting up your mechanisms, waves of enemies will appear attempting to breach your defenses. Defeat as many waves as possible to get more points! Note that you can place or upgrade any mechanisms even during the challenge phase.
Use your Support Skills, which replaces your Elemental Skill and Burst, to help your turrets defeat enemies. Support Skills have cooldowns which fills overtime. This cooldown doesn't reset on each waves, so it's best to save at least one skill per wave just in case you need it for later.
Support Skills in Operation Stronghold Defense
| Mechanism | Features |
|---|---|
| |
AoE Skill. Shoots a fireball that deals massive Pyro DMG to opponents within its AoE. |
| Global Skill. Strikes all opponents on the field with a Thunderstrike that deals Electro DMG. | |
| AoE Skill. Unleashes rainfall within an area, applying Wet and a stackable Movement SPD Reduction to all opponents within its AoE. At the same time, deal Hydro DMG. | |
| AoE Skill. Triggers an earthquake that deals high-frequency Geo DMG to opponents within its AoE, reducing their Movement SPD. | |
| Global Skill. Freezes all opponents on the field. | |
| AoE Skill. Summons a vortex that continuously deals Anemo DMG to opponents within its AoE. |
Operation Stronghold Defense Event Rewards
Total Tower Defense Rewards
| All Windblume Event Rewards | ||
|---|---|---|
|
|
|
|
|
|
|
|
We'll update this section once more information is available!
Sightseeing With Friends Stage Rewards
| Stage | Objectives | Rewards |
|---|---|---|
| 1 | Fend off 2 waves of opponents | |
| Fend off 3 waves of opponents | ||
| Fend off 4 waves of opponents | ||
| 2 | Fend off 4 waves of opponents | |
| Fend off 5 waves of opponents | ||
| Fend off 6 waves of opponents | ||
| 3 | Fend off 4 waves of opponents | |
| Fend off 5 waves of opponents | ||
| Fend off 6 waves of opponents | ||
| 4 | Fend off 4 waves of opponents | |
| Fend off 5 waves of opponents | ||
| Fend off 6 waves of opponents | ||
| 5 | Fend off 4 waves of opponents | |
| Fend off 5 waves of opponents | ||
| Fend off 6 waves of opponents |
Genshin Impact Related Guides

Current Events
| Event Guide | Date and Rewards |
|---|---|
|
Operation Stronghold Defense
|
03/23/2026 - 04/02/2026
|
 Sightseeing With Friends Sightseeing With Friends
|
03/16/2026 - 03/26/2026
+ Talent Up Materials |
Upcoming Events
| Event Guide | Date and Rewards |
|---|---|
 Overflowing Abundance 6.4 Rerun Overflowing Abundance 6.4 Rerun
|
03/30/2026 - 04/06/2026
Weapon and Talent Up Materials
|
Permanent/Recurring Events
| Event Guide | Date and Rewards |
|---|---|
 To Temper Thyself and Journey Far To Temper Thyself and Journey Far
|
02/23/2026 - 05/18/2026
+ 5-Star Stella Fortuna |
 Stygian Onslaught Stygian Onslaught
|
03/04/2026 - 04/07/2026
+ Dust of Enlightenment |
 Travelers' Tales Travelers' Tales
|
Permanently Available after Version 6.0
|
 Repertoire of Myriad Melodies Repertoire of Myriad Melodies
|
Permanently Available
|
 Test Run Test Run
|
Permanently Available
+ Ascension Materials |
 Hangout Events Hangout Events
|
Permanently Available after Version 1.4
+ Talent Materials + Specialty Dish |
 Baptism of Song Baptism of Song
|
Permanently Available
+ Free Barbara
|
 Daily Check-In Daily Check-In
|
2021/03/01 - Permanently Available
|
 Stellar Reunion Returnee Event Stellar Reunion Returnee Event
|
Permanently Available
+ Prototype Rancour |
Past Events
Comment
Author

Operation Stronghold Defense Event Guide
Premium Articles


Rankings
Gaming News


![Death Stranding 2: On The Beach Review [PC] | A Port That Delivers](https://img.game8.co/4447392/15310a0c9aa1b6843bb713b2ea216930.jpeg/thumb)
Popular Games

Genshin Impact Walkthrough & Guides Wiki
Umamusume: Pretty Derby Walkthrough & Guides Wiki
Crimson Desert Walkthrough & Guides Wiki
Monster Hunter Stories 3: Twisted Reflection Walkthrough & Guides Wiki
Honkai: Star Rail Walkthrough & Guides Wiki
Pokemon Pokopia Walkthrough & Guides Wiki
The Seven Deadly Sins: Origin Walkthrough & Guides Wiki
Wuthering Waves Walkthrough & Guides Wiki
Zenless Zone Zero Walkthrough & Guides Wiki
Arknights: Endfield Walkthrough & Guides Wiki


Recommended Games
Fire Emblem Heroes (FEH) Walkthrough & Guides Wiki
Diablo 4: Vessel of Hatred Walkthrough & Guides Wiki
Cyberpunk 2077: Ultimate Edition Walkthrough & Guides Wiki
Yu-Gi-Oh! Master Duel Walkthrough & Guides Wiki
Super Smash Bros. Ultimate Walkthrough & Guides Wiki
Pokemon Brilliant Diamond and Shining Pearl (BDSP) Walkthrough & Guides Wiki
Elden Ring Shadow of the Erdtree Walkthrough & Guides Wiki
Monster Hunter World Walkthrough & Guides Wiki
The Legend of Zelda: Tears of the Kingdom Walkthrough & Guides Wiki
Persona 3 Reload Walkthrough & Guides Wiki


All rights reserved
Copyright© 2012-2024 HoYoverse — COGNOSPHERE. All Rights Reserved.
The copyrights of videos of games used in our content and other intellectual property rights belong to the provider of the game.
The contents we provide on this site were created personally by members of the Game8 editorial department.
We refuse the right to reuse or repost content taken without our permission such as data or images to other sites.