The Catch How to Get and Best Characters
✉ Send your thoughts in our Genshin 6.4 Patch Survey!
★ Exclusive: Dive back in time with the Meta History
◆ Hot: Version 6.4, Luna 5 Codes
◆ Builds: Varka, Flins, Skirk, Escoffier
◆ Events: Travelers' Tales, He Who Caught the Wind
◆ Future: Linnea, Version 6.5 Luna VI

The Catch is a 4-Star Polearm obtained from the Inazuma Fishing Association in Genshin Impact. Check out how to get The Catch, its fishing spots, The Catch refinement materials, and the best characters for this weapon here!
List of Contents
How to Get The Catch
Catch the Fish Required for Exchange
- Catch 20 Rusty Koi
- Catch 20 Golden Koi
- Catch 6 Raimei Angelfish
- Exchange the fish in Kujirai Momiji's shop.
Go to the Inazuma Fishing Association

You can find Kujirai Momiji at the beach between Byakko Plain and Inazuma City. The shop can only be unlocked after completing the quest Exploding Population.
Best Fishing Spots for The Catch
Liyue Fishing Spots

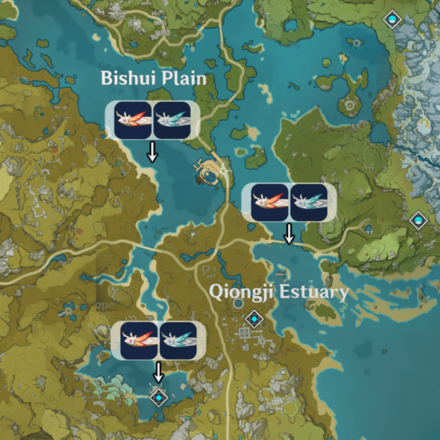
Liyue will be the best place to fish for Rusty and Golden Kois. Both Rusty Koi and Golden Koi need the Fake Fly Bait to be caught.
Inazuma Fishing Spots

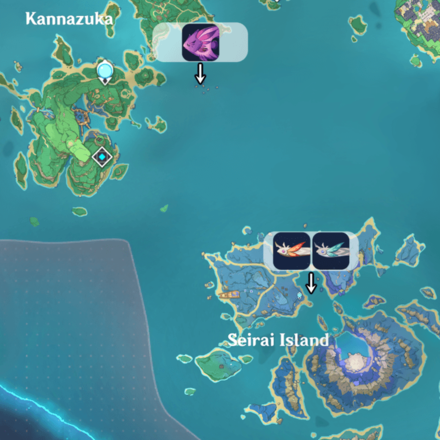
Raimei Angelfish can only be caught in one area in Inazuma, and needs False Worm Bait to bite. There are also some Fishing Spots in Inazuma that have both Rusty and Golden Kois!
The Catch Fish Appearance Times and Bait
| List of Fish | In-Game Time & Bait |
|---|---|
| Anytime |
|
| 18:00 to 6:00 |
The Rusty and Golden Koi can be fished all around the clock, while the Raimei Angelfish can only be caught between 18:00 and 6:00. Use the in-game time adjuster function for the Raimei Angelfish!
Place Thoma in Your Team

Thoma's Talent, Snap and Swing, gives you a 20% chance of getting twice the amount of fish while fishing in Inazuma when you have him in your current team!
How Long Does It Take to Farm The Catch?
Two Weeks in Real Time
You can only get a set amount of fish per pool area and fish respawns will take up to 72 hours in real life. On average, fishing for the catch can take up to 2 weeks to complete.
Faster by Visiting Other Player Worlds
If you have generous friends, ask them if you could fish in their world! You can bypass the fishing limit by fishing in another player's world. This way, it could be possible to farm for The Catch in less than a day!
| Genshin Co-Op Boards | ||
|---|---|---|
The Catch Stats and Information
The Catch Basic Stats and Skills
| The Catch | |
|---|---|

|
|
| Type | Polearm |
| Base ATK | 42 |
| Rarity | ★★★★ |
| Bonus Effect |
Energy Recharge + 10.0% |
| Skill |
Shanty Increases Elemental Burst DMG by 16% and Elemental Burst CRIT Rate by 6%. |
The Catch Stats
| Lvl. | Base ATK | Energy Recharge |
|---|---|---|
| 1/20 | 42 | 10.0% |
| 20/20 | 109 | 17.7% |
| 40/40 | 205 | 25.8% |
| 50/50 | 266 | 29.8% |
| 60/60 | 327 | 33.8% |
| 70/70 | 388 | 37.9% |
| 80/80 | 449 | 41.9% |
| 90/90 | 510 | 45.9% |
The Catch Refinement Levels
| Skill Effect |
|---|
| Increases Elemental Burst DMG by 16% and Elemental Burst CRIT Rate by 6%. |
| Skill Effect |
|---|
| Increases Elemental Burst DMG by 20% and Elemental Burst CRIT Rate by 7.5%. |
| Skill Effect |
|---|
| Increases Elemental Burst DMG by 24% and Elemental Burst CRIT Rate by 9%. |
| Skill Effect |
|---|
| Increases Elemental Burst DMG by 28% and Elemental Burst CRIT Rate by 10.5%. |
| Skill Effect |
|---|
| Increases Elemental Burst DMG by 32% and Elemental Burst CRIT Rate by 12%. |
The Catch Rating
| Main-DPS | Sub-DPS | Support |
|---|---|---|
| N/A | N/A |
Is The Catch a good weapon?
The Catch is one of the best weapons for Sub-DPS polearm characters, particularly ones that often use their Elemental Burst. It can also be obtained and refined easily through fishing, provided you have the time and patience to invest in it.
Best Characters for The Catch
Who is The Catch Good for?
| Recommended Characters | ||
|---|---|---|
|
|
|
|
|
|
|
|
|
|
|
|
Great for Elemental Burst Build Characters
The Catch is great for characters that require extra Energy Recharge and are likely to use their Elemental Burst. Raiden, Thoma, Yun Jin and Shenhe in particular can use The Catch to its full potential!
Note that while you can use this on certain polearm characters, their best in slot weapons may vary. For more information on their best weapons, check out our character tier list with their best in slot weapons!
How to Refine The Catch
Use Ako's Sake Vessel Refinement Material
| Item | List of Fish Needed |
|---|---|
|
|
The Catch can only be refined using Ako's Sake Vessel, which can be exchanged for fish at the Inazuma Fishing Association.
The Catch Ascension Materials
Total Ascension Materials
| Ascension Materials | Total |
|---|---|
| 150,000 | |
| 18 | |
| 15 | |
| 27 | |
| 4 | |
| 9 | |
| 9 | |
| 3 | |
| 18 | |
| 10 | |
| 15 | |
Ascension Materials for Each Level
| 20 → 40 |
|
|---|---|
| 40 → 50 |
|
| 50 → 60 |
|
| 60 → 70 |
|
| 70 → 80 |
|
| 80 → 90 |
|
Related Weapons Guide
All Weapons

List of Polearms
Comment
I see people complaining about the tie it takes to obtain this, waiting for resets, etc. I actually enjoy things like this. It gives me something to do everyday!
Author
The Catch How to Get and Best Characters
improvement survey
03/2026
improving Game8's site?

Your answers will help us to improve our website.
Note: Please be sure not to enter any kind of personal information into your response.

We hope you continue to make use of Game8.
Rankings
- We could not find the message board you were looking for.
Gaming News
Popular Games

Genshin Impact Walkthrough & Guides Wiki

Honkai: Star Rail Walkthrough & Guides Wiki

Umamusume: Pretty Derby Walkthrough & Guides Wiki

Pokemon Pokopia Walkthrough & Guides Wiki

Resident Evil Requiem (RE9) Walkthrough & Guides Wiki

Monster Hunter Wilds Walkthrough & Guides Wiki

Wuthering Waves Walkthrough & Guides Wiki

Arknights: Endfield Walkthrough & Guides Wiki

Pokemon FireRed and LeafGreen (FRLG) Walkthrough & Guides Wiki

Pokemon TCG Pocket (PTCGP) Strategies & Guides Wiki
Recommended Games

Diablo 4: Vessel of Hatred Walkthrough & Guides Wiki

Fire Emblem Heroes (FEH) Walkthrough & Guides Wiki

Yu-Gi-Oh! Master Duel Walkthrough & Guides Wiki

Super Smash Bros. Ultimate Walkthrough & Guides Wiki

Pokemon Brilliant Diamond and Shining Pearl (BDSP) Walkthrough & Guides Wiki

Elden Ring Shadow of the Erdtree Walkthrough & Guides Wiki

Monster Hunter World Walkthrough & Guides Wiki

The Legend of Zelda: Tears of the Kingdom Walkthrough & Guides Wiki

Persona 3 Reload Walkthrough & Guides Wiki

Cyberpunk 2077: Ultimate Edition Walkthrough & Guides Wiki
All rights reserved
Copyright© 2012-2024 HoYoverse — COGNOSPHERE. All Rights Reserved.
The copyrights of videos of games used in our content and other intellectual property rights belong to the provider of the game.
The contents we provide on this site were created personally by members of the Game8 editorial department.
We refuse the right to reuse or repost content taken without our permission such as data or images to other sites.


Someone needs to update this. Thoma does not need to be on your current team. He only needs to be on your account. The passive is active as long as he's been acquired.