As the Courtyard in Spring Once Appeared Puzzles and Treasure Chest Locations
✉ Send your thoughts in our Genshin 6.4 Patch Survey!
★ Exclusive: Dive back in time with the Meta History
◆ Hot: Version 6.4, 6.4 Codes, Linnea, Version 6.5
◆ Builds: Varka, Flins, Skirk, Escoffier
◆ Events: Travelers' Tales, Sightseeing With Friends
◆ Endgame: Spiral Abyss (March 2026)

See how to complete Genshin Impact's "As the Courtyard in Spring Once Appeared" and its quests and puzzles. Check out Kazuha Domain's quests, puzzles, treasure chest locations for Part 1, Part 2, and Part 3, and Phantasmal Conch location!
List of Contents
As the Courtyard in Spring Once Appeared: Part 1 Guide
| Step by Step Instructions | |
|---|---|
| 1 | Adjust the time to the next day at 06:00 - 24:00. |
| 2 | Ride the Waverider now known as Miituboru to the marked location in Pudding Isle. |
| 3 | You will be transported to a domain once you interact with the bonsai, so prepare your best team before going near the bonsai. |
| 4 | Check out the paper on the table in front of you. |
| 5 | On your left, fire the Prismatic Rampart to collect the Yellow Prismatic Gem. |
| 6 | Use the switch nearby to open up the Unknown Chamber. |
| 7 |  When the door to the Unknown Chamber is opened, you will find a sealed Treasure Chest. Use the Yellow Prismatic Gem to change the Prismatic Rampart's color and readjust the relay devices then fire to remove the seal. |
| 8 | Move forward until you find a table. Check the note on the table. |
| 9 | Move back to the previous room and use the switch in there to open up the first Unknown Chamber. |
| 10 | Defeat the Enemies in the room to get the Yellow Prismatic Gem. |
| 11 |  Head back to the switch and select the Collection Room. Use the Yellow Prismatic Gem to change the Prismatic Rampart's color and adjust the relay devices then fire. |
| 12 | Head back to the switch and select the second Unknown Chamber. |
| 13 | Move forward until you find a locked door. |
| 14 | You can find the first Melodic Omamori as you turn right. |
| 15 | The second Melodic Omamori can be found as you move forward. You will climb some ladders, cross a bridge, and dodge Electro arrows on the way until you find an Exquisite Chest. Then jump over the hole nearby to open the door. |
| 16 | You will find 3 more Melodic Omamori on the way and three more special shrines. Afterwards you will find Kazuha. |
As the Courtyard in Spring Once Appeared: Part 2 Guide
| How to Complete Part 2 | |
|---|---|
| 1 | Proceed to the quest marker on top of the stone formation. It's easier to teleport there than climb the whole thing. |
| 2 | Defeat the enemies and open the Treasure Chest they were guarding. You'll get the tools that Kazuha needs. |
| 3 | Go back to the Bonsai and enter a new domain. Go into the only open room. |
| 4 | Ignore the sealed lever for now and pick up the Melodic Omamori on the left. Offer it to the shrine in the middle of the room. This will trigger a wind current. |
| 5 | Ride the wind current into a new area and explore until you see an unsealed lever. |
| 6 | Use the lever to flip the room upside down. |
| 7 | Collect the amulet in the middle of the room you flipped. |
| 8 | Walk a little further and drop down into the hole in the floor, where a puzzle and Melodic Omamori will be waiting for you. |
| 9 |  |
| 10 | Collect the Melodic Omamori beside the firing device. |
| 11 | Use wind current by the shrine to go back to the previous room. |
| 12 | Use the lever to flip the room back to its original state. |
| 13 | Place the Melodic Omamoris in the shrines on the left and ride side of the room. This will open the door. |
| 14 | Follow the path until you see another lever. Use that lever to flip the next room upside down. |
| 15 | Drop down and look for the yellow Prismatic Gem for the firing device. |
| 16 | Ride the wind current back up and use the lever to rotate the room back. |
| 17 | Apply the yellow Prismatic Gem to your firing device. |
| 18 | 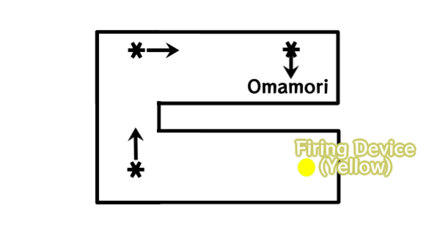 |
| 19 | Use the yellow firing device to unseal the Omomori and pick the Omomori up. |
| 20 | Rotate the room again and go inside to put the Omomori in the shrine. This will unlock the door. |
| 21 | Follow the path until you get to a cutscene, then climb the stairs until you get to the dojo with a sealed chest. |
| 22 | Defeat the Visiting Samurai and open the chest. |
| 23 | Follow the quest marker to the next location. It will lead you to the room first room with a sealed lever, but the lever will be unlocked now. |
| 24 | Use the lever to rotate the room and drop down into the hole. |
| 25 | Follow the path until you see another lever. Use it to rotate the next room. |
| 26 | Drop down into the wind barrier to collect the chest and dispel the barrier. |
| 27 | 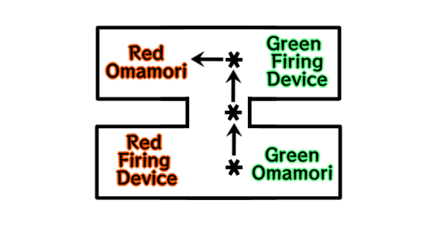 Let's break the red seal first. Rotate the devices until they look like the image, then use the red Firing Device to unseal and pick up the Omamori. |
| 28 |  Let's break the green seal now. Rotate the devices until they look like the image, then use the green Firing Device to unseal and pick up the other Omamori. |
| 29 | Use the wind current to get back to the lever, then rotate the room again. |
| 30 | Go inside the room and place the Omamoris in the shrine. |
| 31 | Use the new wind current to go into the next area and keep following the path. |
| 32 |  |
| 33 | Use the lever to flip the room so you can rotate the devices on the other side. |
| 34 |  Let's start with the green Omamori first. Just rotate the device aligned with the green seal until it faces the green seal. It should look like the image above. If it's in the correct position, flip the room and use the green Firing Device. |
| 35 |  Let's ge the red Omamori now. You can get red Prismatic Gem on a ledge when the room is upside down. Rotate the devices until they look like the image above, so that they point to the red Omamori seal. |
| 36 | Once you have both Omamoris, return the room to its original state (you should have the Firing Device on the floor). Ride the wind current up to the shrines and place the Omamoris there. |
| 37 | Open the chest and ride the wind current again to the other side. Follow the path until you get another cutscene. |
| 38 | Enter the dojo to your left and defeat the Nobushi that spawn. Don't forget to open the chest before leaving the room. |
| 39 | Get out of the dojo and climb the stairs. Keep following the path until you enter the last room. |
| 40 | Keep walking to the left of the black and white room until you get to Kazuha. This will start a cutscene and teleport you outside, ending part 2! |
As the Courtyard in Spring Once Appeared: Part 3 Guide
| Step by Step Instructions | |
|---|---|
| 1 | Fire the Prismatic Rampart without having to adjust the relay devices. |
| 2 | Collect the Melodic Omamori and place it on the shrine to activate the Wind Current. |
| 3 | Use the Wind Current to glide to the next house. |
| 4 | Collect the Melodic Omamori on top of the table and place it on a shrine to activate another Wind Current. |
| 5 | Interact with the switch to activate yet another Wind Current. |
| 6 | Collect the Melodic Omamori by the top of the stairs and on top of some leaves. |
| 7 | Interact with the Phantasmal Conch on the table and nearby a Treasure Chest. |
| 8 | Use the Melodic Omamori to activate another Wind Current. |
| 9 | After gliding, you can find a Treasure Chest on your right. |
| 10 | Follow the Electro Seelie as it will lead you to the first Melodic Omamori. |
| 11 |  For the second Omamori, you must unlock it using the Prismatic Rampart. Collect the Red Prismatic Gem first by firing it with a green one. |
| 12 | 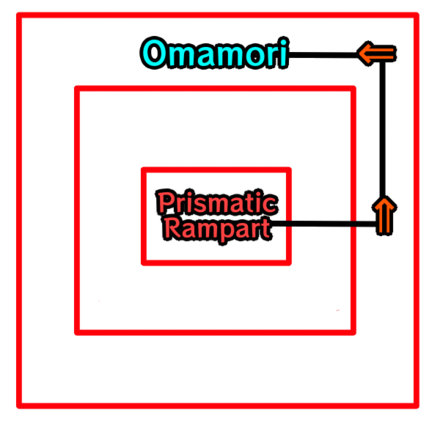 Afterwards, use the Red Gem to change the Prismatic Rampart's color and fire to remove the Red Prismatic Seal and collect the second Omamori. |
| 13 | Place the two Omamori on the shrines beside the closed door. |
| 14 | Follow the next path and then fight some Tenryou Commission Soldiers and collect the Treasure Chest on the same room. |
| 15 | Chase after the Electro Seelie to fight some more soldiers. |
| 16 | After defeating the soldiers, fire the Prismatic Rampart to collect a couple of Omamori and a chest. |
| 17 | Place the two Omamori on the shrines near the boat. |
| 18 | Collect the Precious Chest near the boat. |
| 19 | Fly the Wind Current to the next platform and defeat three waves of enemies. |
| 20 | Go on board the Alcor to complete the domain. |
As the Courtyard in Spring Once Appeared Quest Details
Part II of Summertime Odyssey

As the Courtyard in Spring Once Appeared is part of the Summertime Odyssey event in Genshin Impact. Explore more about this event featuring Fischl in the Golden Apple Archipelago here!
Summertime Odyssey Event Guide
As the Courtyard in Spring Once Appeared Release Date
Released in Version 2.8
As the Courtyard in Spring Once Appeared was released on July 16, 2022 during the Version 2.8 update!
Version 2.8 Release Date and Patch Notes
Genshin Impact Related Guides

Summertime Odyssey Event Guide
Summertime Odyssey Phantom Realm
| Phantom Realm Guides | |
|---|---|
 Misty Hills, Foggy Vales Misty Hills, Foggy Vales |
 The Islands' Stirring Strings The Islands' Stirring Strings |
 Immernachtreich Keep Immernachtreich Keep |
 Temple of the Star Latitudes Temple of the Star Latitudes |
Summertime Odyssey Quest Guides
| Summertime Odyssey Main Event Quests | |
|---|---|
 The Golden Apple Vacation Returns! The Golden Apple Vacation Returns! |
As the Courtyard in Spring Once Appeared Treasure Chests Guide |
 Blazin' Trails Blazin' TrailsTreasure Chests Guide |
 Immernachtreich Apokalypse Immernachtreich ApokalypseTreasure Chests Guide |
 The Ancient Azure Stars The Ancient Azure StarsTreasure Chests Guide |
 Like Rhyme and Song, the Summer Reverie Like Rhyme and Song, the Summer Reverie |
Other Summertime Odyssey Guides
| Summertime Odyssey Guides | |
|---|---|
 Surfpiercer Event Guide Surfpiercer Event Guide |
 All Character Locations All Character Locations |
2.8 Archipelago Puzzle Guides
Other 2.8 Golden Apple Archipelago Guides
2.8 Archipelago Quest Guides
| Summertime Odyssey Main Quest Guides | |||||
|---|---|---|---|---|---|
| The Golden Apple Vacation Returns! | As the Courtyard in Spring Once Appeared | ||||
| Blazin' Trails | Immernachtreich Apokalypse | ||||
| The Ancient Azure Stars | Like Rhyme and Song, the Summer Reverie | ||||
| Limited-Time World Quest Guides | |||||
| Bake-Danuki Wanderlust | Treasure Voyage | ||||
| The Final Treasure | The Misplaced Photo | ||||
| A Misplaced Conch | The Discarded Insignia | ||||
| Drama Phantasmagoria Quest Series | |||||
| Prologue | Interludes | Finale | |||
| The Treasure of the Four Skerries Quest Guides | |||||
| Treasure Clue: Minacious Isle | Treasure Clue: Broken Isle | ||||
| Treasure Clue: Twinning Isle | Treasure Clue: Pudding Isle | ||||
| Where the Treasure Dwells | |||||
| Thus Was the Work Done in Vain Quest Guides | |||||
| Secret Chamber | Ruins on the Ocean Surface | ||||
| Lake Island Notes | Hints & Sweet Madame | ||||
| Sea Salt-Crusted Key | |||||
2.8 Archipelago Map Features
Golden Apple Archipelago 2.8 Rerun Guide
All Genshin Impact Events

Comment
Hey! Just wanted to point out that the Warehouse is labeled as the Hall in the article, and vice versa for the first part with the chests.
Author

As the Courtyard in Spring Once Appeared Puzzles and Treasure Chest Locations


Rankings
Gaming News


![The Liar Princess and the Blind Prince Review [PC] | Lovely to Look at but Tedious to Play](https://img.game8.co/4442586/8d95f5faf05780f1765ce7e0938bd825.jpeg/thumb)
![Marathon Cryo Archive Map Teased as [REDACTED] on Selection Screen](https://img.game8.co/4442236/6357203e58172f6de57f1991e7c39b22.png/thumb)

Popular Games

Genshin Impact Walkthrough & Guides Wiki
Umamusume: Pretty Derby Walkthrough & Guides Wiki
Pokemon Pokopia Walkthrough & Guides Wiki
Honkai: Star Rail Walkthrough & Guides Wiki
Monster Hunter Stories 3: Twisted Reflection Walkthrough & Guides Wiki
Arknights: Endfield Walkthrough & Guides Wiki
Wuthering Waves Walkthrough & Guides Wiki
Zenless Zone Zero Walkthrough & Guides Wiki
Pokemon TCG Pocket (PTCGP) Strategies & Guides Wiki
Monster Hunter Wilds Walkthrough & Guides Wiki


Recommended Games
Diablo 4: Vessel of Hatred Walkthrough & Guides Wiki
Cyberpunk 2077: Ultimate Edition Walkthrough & Guides Wiki
Fire Emblem Heroes (FEH) Walkthrough & Guides Wiki
Yu-Gi-Oh! Master Duel Walkthrough & Guides Wiki
Super Smash Bros. Ultimate Walkthrough & Guides Wiki
Pokemon Brilliant Diamond and Shining Pearl (BDSP) Walkthrough & Guides Wiki
Elden Ring Shadow of the Erdtree Walkthrough & Guides Wiki
Monster Hunter World Walkthrough & Guides Wiki
The Legend of Zelda: Tears of the Kingdom Walkthrough & Guides Wiki
Persona 3 Reload Walkthrough & Guides Wiki


All rights reserved
Copyright© 2012-2024 HoYoverse — COGNOSPHERE. All Rights Reserved.
The copyrights of videos of games used in our content and other intellectual property rights belong to the provider of the game.
The contents we provide on this site were created personally by members of the Game8 editorial department.
We refuse the right to reuse or repost content taken without our permission such as data or images to other sites.
Hey there! Thanks for pointing this out! We've updated the guide to have the correct info now~