How to Solve the Astral Puzzles 1, 2, and 3 in the Mona Domain
✉ Send your thoughts in our Genshin 6.4 Patch Survey!
★ Exclusive: Dive back in time with the Meta History
◆ Hot: Version 6.4, Luna 5 Codes
◆ Builds: Varka, Flins, Skirk, Escoffier
◆ Events: Travelers' Tales, He Who Caught the Wind
◆ Future: Linnea, Version 6.5 Luna VI
See how to solve all Astral Puzzles 1, 2, 3, and 4 and Mirage Puzzles in Mona's Domain in this Genshin Impact guide! These are all astrology star puzzles with constellations that you will need to complete in order to get Treasure Chests!
List of Contents
Mona Domain All Astral and Mirage Puzzles
| Location | Puzzles |
|---|---|
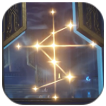 Door 1 Door 1 |
• Bow and Arrow • Pronged Fork • Paper Crane • G-Shape • Constellations with Buttons |
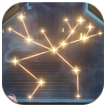 Door 2 Door 2 |
• Triangle in the Sky • Two Mechanisms • Mirage Bridges Room |
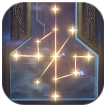 Door 3 Door 3 |
• Running Man • Heart |
 Door 4 Door 4 |
• Squid • Strange Star and Mirage Bridges |
 Main Room Main Room |
• Mona's Constellation |
The Ancient Azure Stars Quest Guide
How to Solve All Astral Puzzles in Mona's Domain
Mona Domain Astral Puzzle #1
 |
|
|---|---|
| Location |  Door 1 Door 1 |
| Constellation | Bow and Arrow |
| Rewards | Exquisite Chest + Asterism Shard x1 + Strange Star spawns |
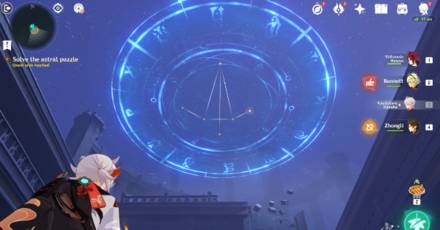
The first Astral Puzzle can be found inside the first door inside Mona's domain. It's the first star puzzle that you'll encounter and you're required to complete it to proceed.
In this room, you will find six devices. Hitting the device with any normal attacks will activate it and shoot out a laser. You can also rotate these devices.
Astral Puzzle #1 Hint
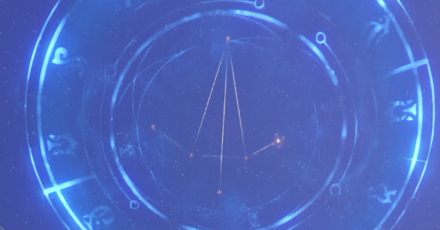
Looking up the sky will show a constellation. This constellation's appearance looks like a bow and arrow, which also serves as your hint!
Astral Puzzle #1 Solution

Form the bow and arrow-like constellation to solve the first puzzle. You can view the hint by looking up in the sky.
Solving this will give you a Chest and an Astersim Shard. A Strange Star will spawn as well!
Mona Domain Astral Puzzle #2
 |
|
|---|---|
| Location |  Door 1 Door 1 |
| Constellation | Triple Constellations |
| Rewards | Exquisite Chest |
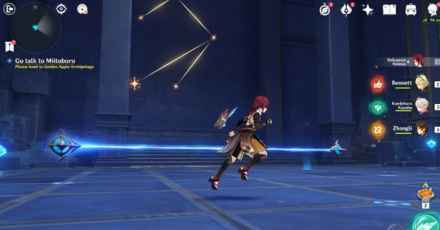
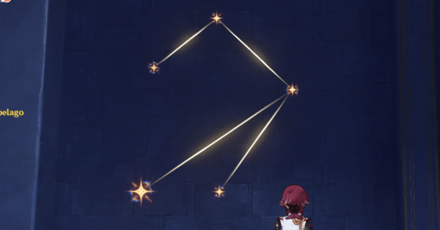
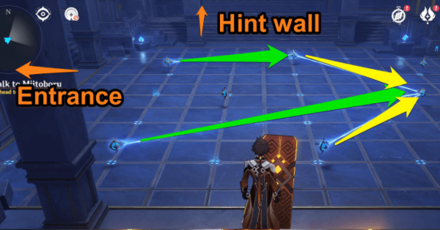
Astral Puzzle #2 First Constellation
 Hint #1 |
 Solution #1 |
The first constellation to show up in this room looks like a pronged fork, or a sideways tent. The flow of lights should end to the right star on the center.
The perspective shown on the images above is away from the hint wall.
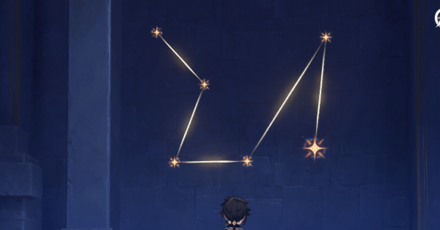
Astral Puzzle #2 Second Constellation
 Hint #2 |
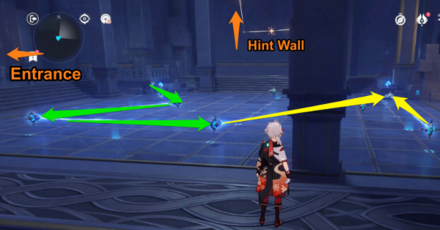 Solution #2 |
After completing the first constellation, a second set of stars will show up. This pattern resembles a paper crane. The flow of lights should end on the top right star. Make sure to turn off the top right star as it isn't needed!
The perspective shown on the second images above is away from the hint wall.
Astral Puzzle #2 Third Constellation
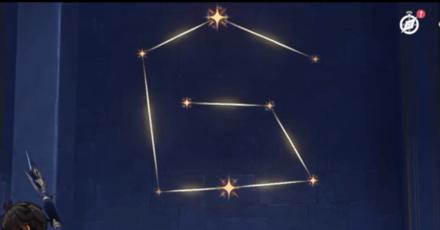 Hint #3 |
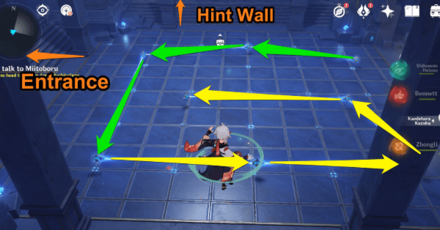 Solution #3 |
The last constellation to solve is the G-shaped pattern. Simply rotate the stars going from top going to center. The central device doesn't need to be turned on.
The perspective shown on the third images above is away from the hint wall. Solving it will spawn an Exquisite Chest, but your journey still hasn't ended here!
Astral Puzzle #2 Fake Wall
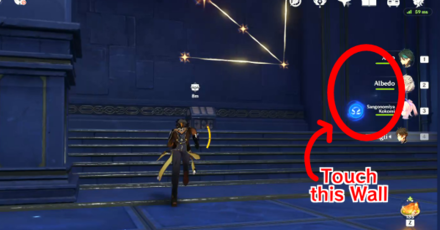
You can't solve the pointing arrow constellation with the devices. Instead, the constellation points to a fake wall beside it. Head there and press Touch on the fake wall to move on from here!
Mona Domain Astral Puzzle #3
 |
|
|---|---|
| Location |  Door 1 Door 1 |
| Constellation | Constellations with Buttons |
| Rewards | Precious Chest + Strange Star spawns |
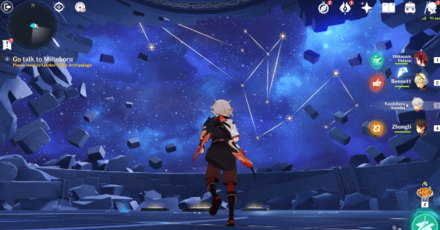
Beyond the fake wall lies the final Astral Puzzle inside Door 1. It involves four buttons, with stars etched on the floor and the sky. You can also find a Phantasmal Conch nearby!
Astral Puzzle #3 Button Hint
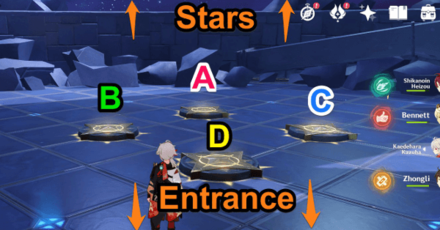 Buttons |
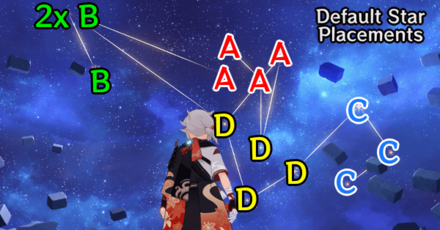 Star-to-Button Assignments |
2x B means that its position occupies two small stars.
The buttons affecting the stars are indicated with the respective letters in the above image. Pressing a button only moves its specific stars.
The perspective shown is facing the sky constellation and buttons.
Astral Puzzle #3 Star Solution
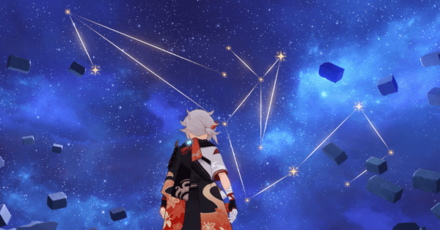 Stars Before |
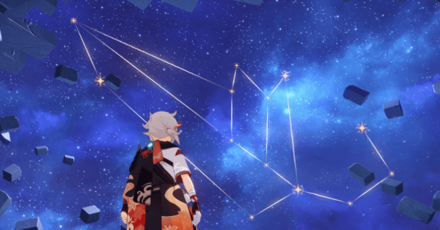 What It Should Look Like |
The stars written on the floor is the pattern that must be replicated to the stars in the sky.
You will notice that the stars from the default setting (when you first entered the room) has the same position as the final position in the images above.
The trick here is that you're essentially rotating all stars to return to the default position, but the stars will connect differently to look like the constellation hint on the floor.
Astral Puzzle #3 Button Solution
 Buttons |
|
 Before Interacting the Buttons |
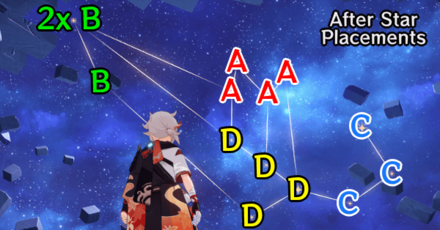 After Interacting the Buttons |
2x B means that its position occupies two small stars.
You only need to step on all buttons three times each to solve the third puzzle. This will make the stars revert to their original position. Afterwards, the connections will look different.
If you've already moved the stars with the buttons, refer to the images above to know which stars do the buttons correspond to.
Astral Puzzle #3 Reward and Continuation
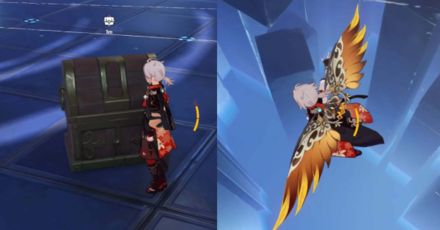
Solving this puzzle unlocks the Precious Chest. Opening it will also spawn a Strange Star, which leads you to a chasm and another Challenge of the Starry Sky. The Puzzles in Door 1 should end here though!
Mona Domain Astral Puzzle #4
 |
|
|---|---|
| Location |  Door 2 Door 2 |
| Constellation | Triangle in the Sky |
| Rewards | Exquisite Chest + Asterism Shard x1 + Strange Star spawns |
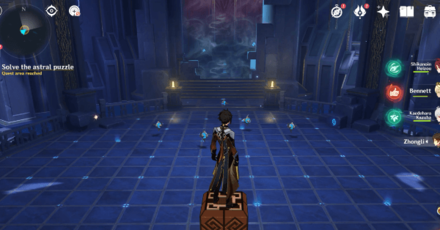
Entering the second door during Mona's main quest greets you with Astral Puzzle 2. This time, the hint isn't as obvious as the first one.
Astral Puzzle #4 Hint
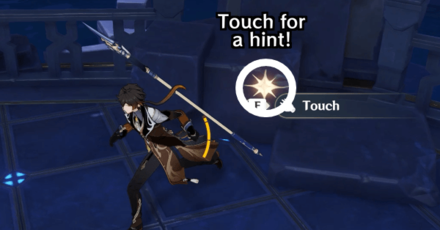 Star that gives the Hint |
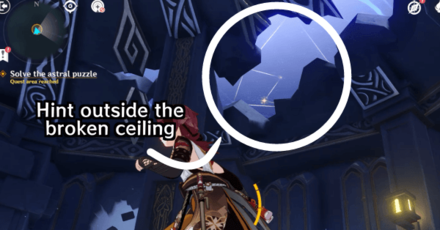 Hint in the Crack |
When you enter the room, you will notice a star on the wall in the far left side of the room. Pressing Touch on the star will make it move towards a broken crack in the ceiling. Inspecting the hole reveals a triangular constellation, which will be your hint for this puzzle!
Astral Puzzle #4 Solution

Form the devices into a triangular shape to solve the fourth puzzle. You can view the hint by looking up the broken crack in the ceiling.
The perspective shown on the image above is from the entrance. Solving this will give you a Precious Chest and an Astersim Shard. A Strange Star will also spawn, which you'll have to follow.
Mona Domain Astral Puzzle #5
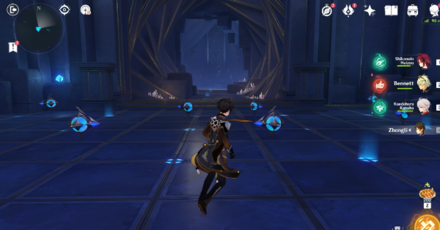 |
|
|---|---|
| Location |  Door 2 Door 2 |
| Constellation | Flattened Circle with Two Mechanisms |
| Rewards | Exquisite Chest |
Beyond the Triangle puzzle, you will seemingly come across a dead end. Simply move forward until the fake wall moves. Inside, you will see light devices, a movable wall, and two mechanisms on either sides.
Astral Puzzle #5 Hint
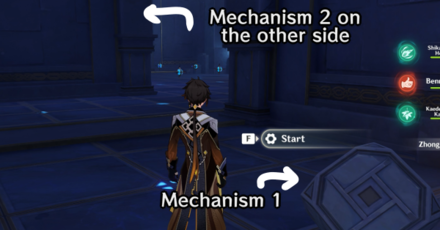 Mechanism 1 |
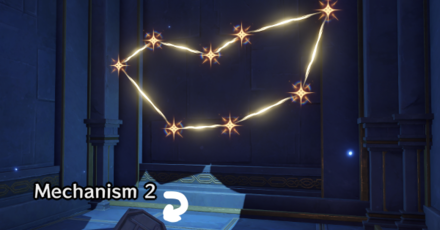 Mechanism 2 |
You will see Mechanism #1 on your right side when entering this room. Interact with this once.
The second mechanism on the left side should now be accessible. Go here and move the wall towards you so that the hint will reveal itself.
Astral Puzzle #5 Solution

Simply rotate each devices so the lights flow in a single direction, like a circle.
The perspective shown on the image above is from the entrance beside the two mechanisms. Solving this will give you an Exquisite Chest.
Mona Domain Astral Puzzle #6
 |
|
|---|---|
| Location |  Door 2 Door 2 |
| Constellation | Wavelengths |
| Rewards | Exquisite Chest |
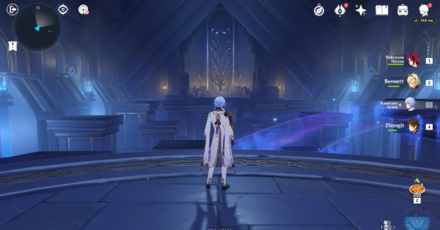
Once you head inside the big room, you will see the following:
- Laser devices on some platforms.
- Three interactable glowing stars on some platforms.
- Asterism Shard Stand on the far side of the room.
- Random Mirage Bridges appearing before you.
Interacting with each of these objects is the key in solving this astral room.
Astral Puzzle #6 Hint
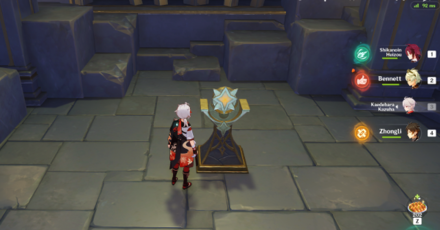
The hint will be shown in the ceiling once you touch the glowing stars on the walls, then place the Asterism Shard on the stand found in the other side of the room. You can do this by doing the following:
| Steps to Get Clue | |
|---|---|
| 1 | 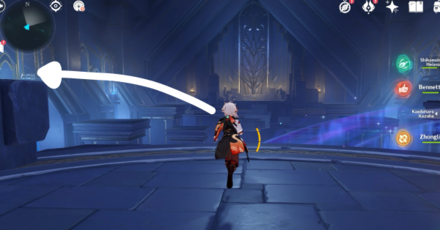 Upon entering the room look immediately to your left. |
| 2 | 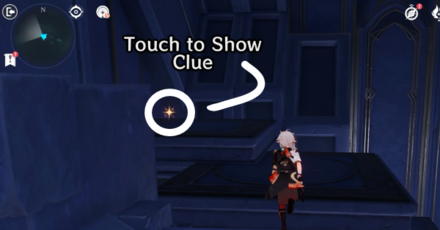 Touch the star on the wall. |
| 3 | 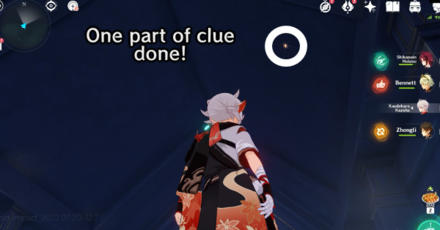 When you touch the stars, it will reveal parts of the constellation! |
| 4 | 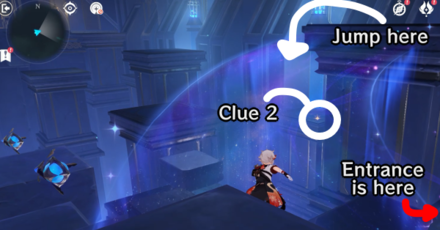 Get the second clue by jumping on the side of the rooom. |
| 5 | 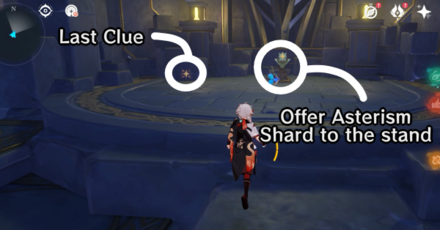 Get the last clue on the other side of the room by gliding or by crossing with random Mirage Bridges. Offer the Asterism Shard you got from the Triangle Constellation room to the stand. |
| 6 | 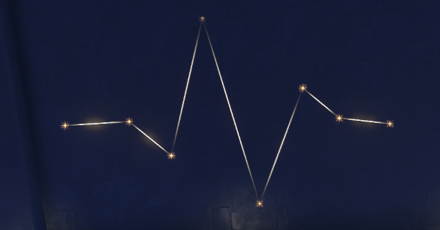 Constellation is revealed in the ceiling. |
Astral Puzzle #6 Solution
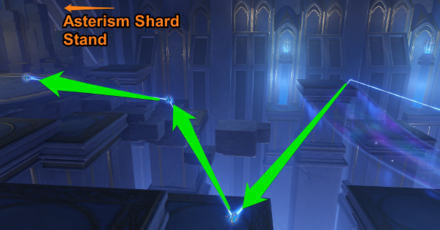 Left Side Solution |
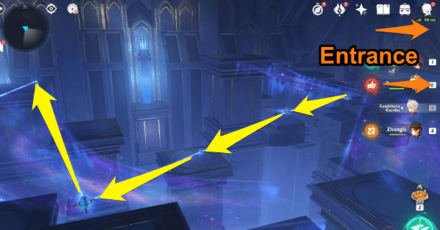 Right Side Solution |
The constellation is shaped like a wavelength. Simply connect the lights from right to left, starting from the entrance.
The perspective shown on the image above is facing the clue on the stars on the ceiling, with the shard stand on your left, and entrance on the right. Solving this will give you an Exquisite Chest.
How to Get to the Other Side of the Room
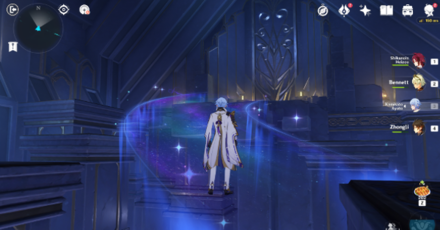
Mirage bridges will appear as you go around this area, and you'll have to use it to cross the chasm. However, it will disappear when you cross it, so your movements are only limited! Don't worry about falling, as you'll land on an invisible floor anyways!
We recommend using Geo Traveler or Kazuha so you can glide your way easily to the Shard Stand on the other side of the room!
Mona Domain Astral Puzzle #7
 |
|
|---|---|
| Location |  Door 3 Door 3 |
| Constellation | Running Man |
| Rewards | Exquisite Chest + Asterism Shard x1 + Strange Star spawns |
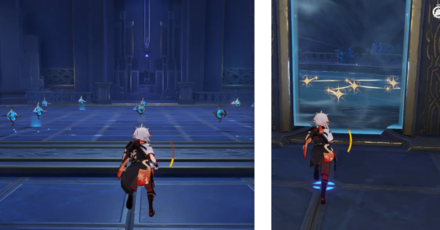
Inside Door 3, you'll have to complete another Astral Puzzle to continue the domain.
Astral Puzzle #7 Hint
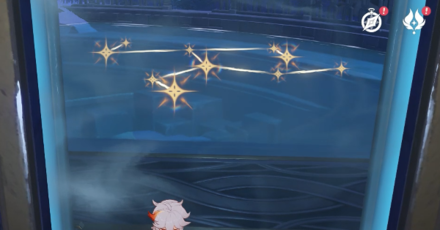
From the entrance, go to the right door and observe the set of stars floating above the water. The constellation resembles a headless running man.
Astral Puzzle #7 Solution
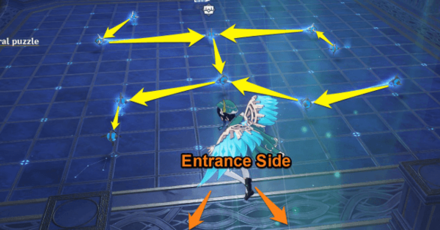 Solution 1 |
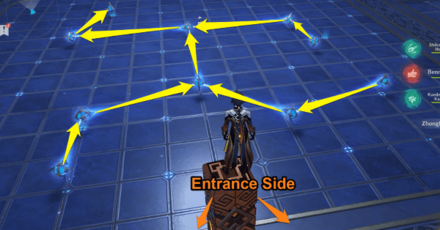 Solution 2 |
Match the man-shaped constellation with the solutions above to complete this puzzle. Either solutions can work! Make sure to deactivate the endpoint devices as they don't need to be lit up!
Mona Domain Astral Puzzle #8
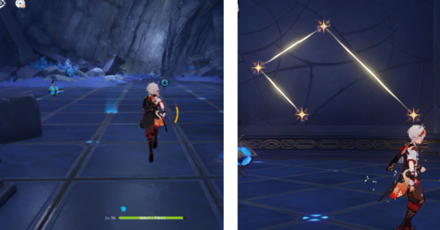 |
|
|---|---|
| Location |  Door 3 Door 3 |
| Constellation | Heart |
| Rewards | Exquisite Chest |
Returning to the passage where the running-man constellation hint was enables you to move forward for more puzzles. Once such puzzle is the half-heart sign on the wall. The key in solving the puzzles inside Door 3 is the reflections of water.
Astral Puzzle #8 Hint
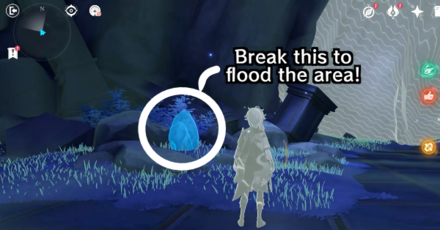
Break the Hydro rock nearby to flood the area. This will make reflections of objects on the water. As a result, the stars on the wall will mirror, creating a heart-like shape.
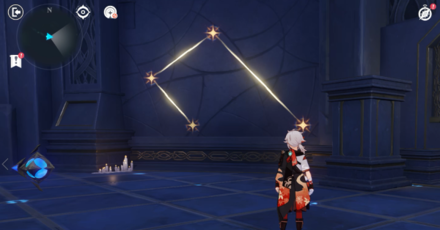 Half of Heart |
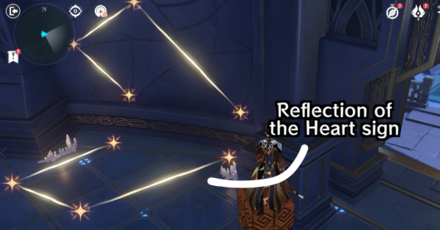 Heart Reflected |
Astral Puzzle #8 Solution

With the Heart-shape in full view, rotate all lights counterclockwise so it shoots in a single flow as shown above!
Solving this will give you an Exquisite Chest, but you can continue your journey by going through the fake rock as seen below.
Additional Treasure Chests beyond Astral Puzzle #8
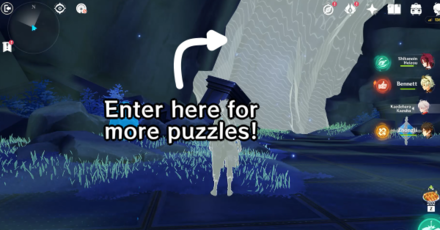
Astral Puzzles in Door 3 end here, but you can still enter the fake wall and solve reflection puzzles to get the other Treasure Chests in the domain!
To know more about the optional treasure chests in the domain, check out our page here!
Mona Domain Astral Puzzle #9
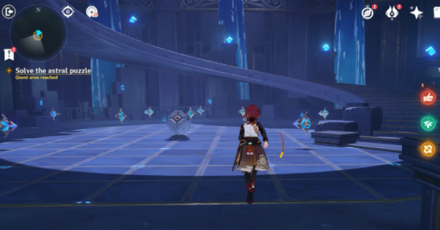 |
|
|---|---|
| Location |  Door 4 Door 4 |
| Constellation | Squid |
| Rewards | Exquisite Chest + Asterism Shard x1 + Strange Star spawns |
Proceed to the fourth door after removing Door 2's lower shard and placing it on this door's upper shard. Inside, you will come across Door 4's Astral Puzzle below the staircase, with a mechanism in the middle.
Astral Puzzle #9 Hint
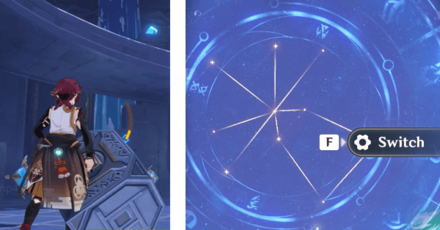
You can use the mechanism in the room to cycle through constellations in the sky. You can only solve the squid pattern though!
The other constellations will just create a water elevator in front of you for a Common Chest.
Astral Puzzle #9 Solution

Form a squid-shape constellation by using the light devices to solve the puzzle in Door 4. The "head" of the squid should rotate in a circle, while the tentacles should flow towards the middle.
Mona Domain Astral Puzzle #10
 |
|
|---|---|
| Location |  Door 4 Door 4 |
| Constellation | None |
| Rewards | Exquisite Chest |
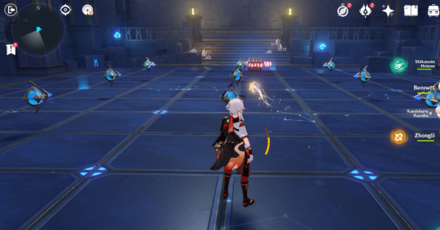
Head up the long stairs and enter the room with a Strange Star inside. The star will go up the ceiling and stay there. The goal here is for you to reach the star above by creating mirage bridges from the light devices nearby.
Astral Puzzle #10 Hint
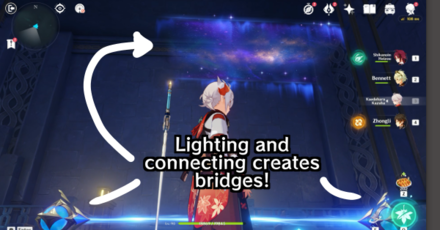
Connecting two light devices will create a mirage bridge under the strange star. The farthest devices from the entrance will create the highest bridges, while the closest will create the lowest. Zig-zagging light devices will also create a slope.
Astral Puzzle #10 Solution
| Steps to Get the Strange Star | |
|---|---|
| 1 | 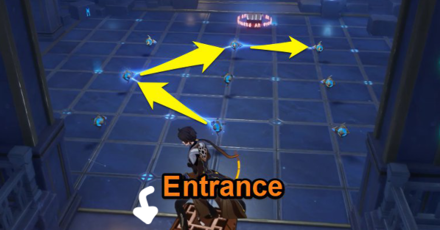 Light up the devices as shown above. You are free to create other bridges, but this pattern is one of the many solutions you can do to reach the ceiling! |
| 2 | 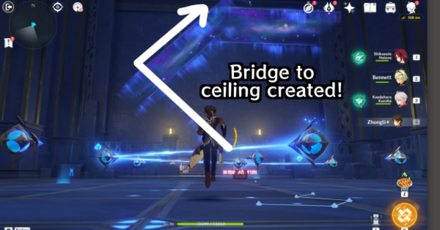 Bridge to ceiling is created. |
| 3 | 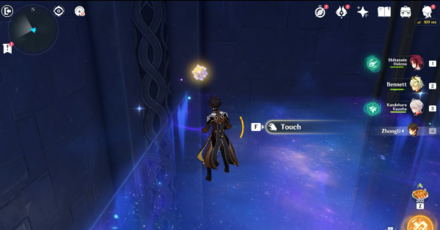 Climb up the bridges and touch the star. |
| 4 | 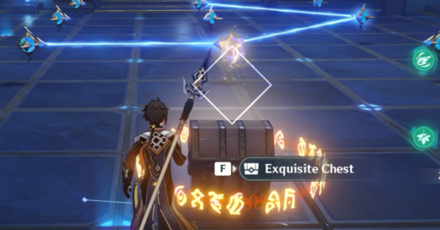 Star will descend, and the chest will unlock!. |
Two More Common Chests By Riding the Platform
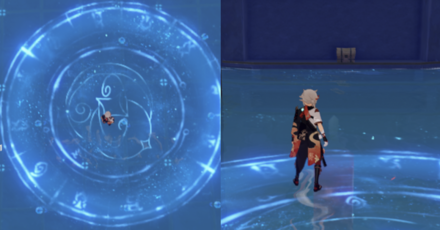
A large blue constellation circle will appear in the middle once you get the chest. Ascending twice with the platform allows you to get two more Common Chests on each level!
Mona Domain Astral Puzzle #11
 |
|
|---|---|
| Location |  Main Room Main Room |
| Constellation | Mona's Constellation |
| Rewards | Luxurious Chest |
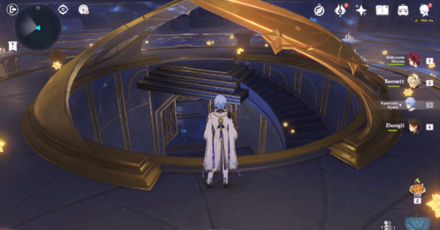
After completing The Ancient Azure Stars quest, return to the pool in the center of the main room. Head down and go inside the Mirage Door. This will transport you back to Mona's room. Interacting with the star globe will lead you to another constellation puzzle.
Astral Puzzle #11 Hint

The hint for this puzzle is Mona herself. You'll have to form the same constellation as you see in her character profile with the buttons nearby.
Astral Puzzle #11 Solution

If this is the first time you've entered the area, press all the four buttons counter-clockwise starting from the south button. You can also return and re-enter to reset everything.
This will open up a door and spawn a Luxurious Chest!
Tips on Completing Astral Puzzles in Mona's Domain
Basics in Solving Astral Puzzles
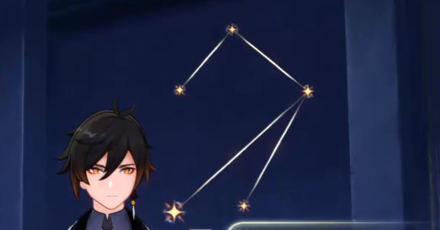
You have to connect the laser devices to match the shape of the given constellation to solve astral and mirage puzzles. The hint for the constellation isn't always shown outright, so you'll have to investigate the confines of the room thoroughly!
Completing Astral Puzzles reveals Treasure Chests, spawn Strange Stars, and get Asterism Shards to unlock the locked mirage doors from the main room!
Activating and Rotating Laser Devices
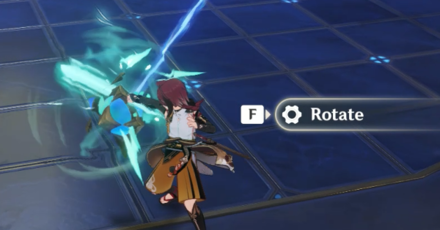
To activate the device, simply hit it with any normal attack. Doing so will shoot a line towards the device it points to.
You can also rotate these laser devices by simply clicking the Rotate button. Correct laser orientation and flow are the keys in completing these constellation puzzles.
Deactivate Extra Laser Devices
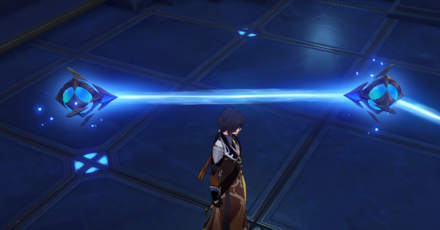
Remember to turn off extra lasers that aren't needed. Some puzzles may not register as a result even if the constellation you made is correct.
Rotation for Some Lights are Limited
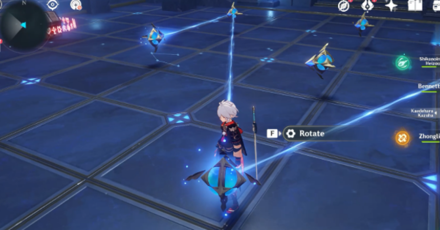
You may notice that some of the lights are limited to two or three rotations. Not all laser can connect to each devices, which means that their rotation are only limited.
When you've come to an event where you can't point a specific light to another, simply think backwards, and move the flow somewhere else.
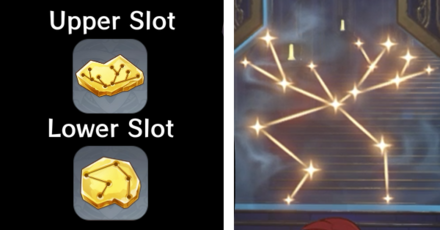
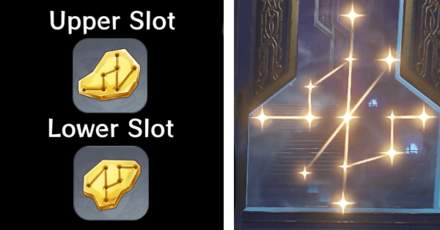
Asterism Shards to Open All Four Doors
| Asterism Shard Slots | |
|---|---|
 |
 |
 |
 |
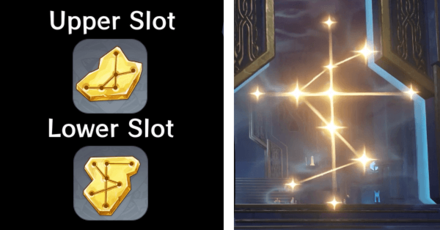
All Asterism Shards are unmissable, as chests containing it are required to be open to continue the main quest. However, you'll have to take Door 2's lower slot if you want to head inside Door 4.
Completing the Squid pattern will give you the a duplicate of the same shard though!
Other Mona's Domain Puzzles

The Astral and other puzzles inside Mona's domain are available in the 2.8 Rerun of the Golden Apple Archipelago, under The Ancient Azure Stars quest.
| Mona's Domain Guides | |
|---|---|
| All Chest Locations | 20th Phantasmal Conch |
| The Ancient Azure Stars Quest Guide | |
Mona's Island Puzzles

Looking for the Astral Puzzles in Mona's Island? You can check our in-depth illustrations for each puzzles on the guide below!
All Astral Puzzles in Minacious Island
Genshin Impact Related Guides

Summertime Odyssey Event Guide
Summertime Odyssey Phantom Realm
| Phantom Realm Guides | |
|---|---|
 Misty Hills, Foggy Vales Misty Hills, Foggy Vales |
 The Islands' Stirring Strings The Islands' Stirring Strings |
 Immernachtreich Keep Immernachtreich Keep |
 Temple of the Star Latitudes Temple of the Star Latitudes |
Summertime Odyssey Quest Guides
Other Summertime Odyssey Guides
| Summertime Odyssey Guides | |
|---|---|
 Surfpiercer Event Guide Surfpiercer Event Guide |
 All Character Locations All Character Locations |
2.8 Archipelago Puzzle Guides
Other 2.8 Golden Apple Archipelago Guides
2.8 Archipelago Quest Guides
2.8 Archipelago Map Features
Golden Apple Archipelago 2.8 Rerun Guide
All Genshin Impact Events
Comment
In door 4 there is one more common chest that isn’t showed here 😊
Author
How to Solve the Astral Puzzles 1, 2, and 3 in the Mona Domain
improvement survey
03/2026
improving Game8's site?

Your answers will help us to improve our website.
Note: Please be sure not to enter any kind of personal information into your response.

We hope you continue to make use of Game8.
Rankings
Gaming News
Popular Games

Genshin Impact Walkthrough & Guides Wiki

Honkai: Star Rail Walkthrough & Guides Wiki

Umamusume: Pretty Derby Walkthrough & Guides Wiki

Pokemon Pokopia Walkthrough & Guides Wiki

Resident Evil Requiem (RE9) Walkthrough & Guides Wiki

Monster Hunter Wilds Walkthrough & Guides Wiki

Wuthering Waves Walkthrough & Guides Wiki

Arknights: Endfield Walkthrough & Guides Wiki

Pokemon FireRed and LeafGreen (FRLG) Walkthrough & Guides Wiki

Pokemon TCG Pocket (PTCGP) Strategies & Guides Wiki
Recommended Games

Diablo 4: Vessel of Hatred Walkthrough & Guides Wiki

Cyberpunk 2077: Ultimate Edition Walkthrough & Guides Wiki

Fire Emblem Heroes (FEH) Walkthrough & Guides Wiki

Yu-Gi-Oh! Master Duel Walkthrough & Guides Wiki

Super Smash Bros. Ultimate Walkthrough & Guides Wiki

Pokemon Brilliant Diamond and Shining Pearl (BDSP) Walkthrough & Guides Wiki

Elden Ring Shadow of the Erdtree Walkthrough & Guides Wiki

Monster Hunter World Walkthrough & Guides Wiki

The Legend of Zelda: Tears of the Kingdom Walkthrough & Guides Wiki

Persona 3 Reload Walkthrough & Guides Wiki
All rights reserved
Copyright© 2012-2024 HoYoverse — COGNOSPHERE. All Rights Reserved.
The copyrights of videos of games used in our content and other intellectual property rights belong to the provider of the game.
The contents we provide on this site were created personally by members of the Game8 editorial department.
We refuse the right to reuse or repost content taken without our permission such as data or images to other sites.
 The Golden Apple Vacation Returns!
 As the Courtyard in Spring Once Appeared
 Blazin' Trails
 Immernachtreich Apokalypse
 Like Rhyme and Song, the Summer Reverie


![Monster Hunter Stories 3 Review [First Impressions] | Simply Rejuvenating](https://img.game8.co/4438641/2a31b7702bd70e78ec8efd24661dacda.jpeg/thumb)


for puzzle #6 you told us to put a shard in the shard holder, but didnt specify which one. so now i cant enter door three without the higher shard and the shard holder wont let me take it back