Safe Engagement Training Event Guide
✉ Send your thoughts in our Genshin 6.4 Patch Survey!
★ Exclusive: Dive back in time with the Meta History
◆ Hot: Version 6.4, 6.4 Codes, Linnea, Version 6.5
◆ Builds: Varka, Flins, Skirk, Escoffier
◆ Events: Travelers' Tales, Sightseeing With Friends
◆ Endgame: Spiral Abyss (March 2026)

Safe Engagement Training is the combat mini-game for the Ruins Exploration: Fieldwise Center event in Genshin Impact 6.1. See how to play Safe Engagement Training and stage rewards here!
| Ruins Exploration: Fieldwise Center Guides | |||
|---|---|---|---|
 Skillful Scouting Skillful Scouting |
 Puzzle Paradigm Puzzle Paradigm |
 Engagement Training Engagement Training |
 Free Collei Copy Free Collei Copy |
Safe Engagement Training Stage Guides
All Engagement Training Stages and Unlock Dates
| Scouting Stage | Unlock Date |
|---|---|
| Safe Engagement Training Stage 1 | November 7, 2025 |
| Safe Engagement Training Stage 2 | November 7, 2025 |
| Safe Engagement Training Stage 3 | November 9, 2025 |
| Safe Engagement Training Stage 4 | November 9, 2025 |
| Safe Engagement Training Stage 5 | November 11, 2025 |
| Safe Engagement Training Stage 6 | November 11, 2025 |
Stage 1 - Grassy Blasty Reporting for Duty
| Best Teams | Phase 1 Phase 2 |
|---|---|
| Enemies | Phase 1 Phase 2 |
| Objectives | Phase 1 Trigger Burgeon Reactions Phase 2 Reach 1000/2000/4000 Points |
Burgeon Team for Phase 1
For Phase 1, along with the trial character Nahida, it is best to bring another Dendro and two Pyro to reliably trigger Burgeon reactions. There's no need to bring Hydro because all of the enemies are Hydro slime, which allows you to effortlessly generate Dendro Cores.
Characters with HP Increase and Decrease Mechanic for Phase 2
For Phase 2 you want to utilize the stage buff by bringing characters that have an HP increase and decrease machanic.Fontainian characters will be ideal for this round because the majority of them utilize this mechanic.
You can also form teams around Furina, or bring teams capable of inflicting self-damage, such as the Bloom and Burgeon teams.
Grassy Blasty Reporting for Duty Guide
Stage 2 - Curtain of Geo
| Best Teams | Phase 1 Phase 2 |
|---|---|
| Enemies | Phase 1 Phase 2 |
| Objectives | Phase 1 Collect Elemental Shards Phase 2 Reach 1000/2000/4000 Points |
Geo Team for Phase 1
Navia will serve as your trial character during Phase 1. It is best to bring another Geo character with Navia for this round in order to generate Elemental Shards effectively.
You do not need to defeat enemies as long as you can continuously generate and collect shards to level up the buff for the following phase.
Dendro Team for Phase 2
For Phase 2, you will receive a damage buff for the Bloom, Hyperbloom, Burgeon, and Lunar-Bloom reactions.
With this in mind, it is best to bring characters who are capable of utilizing the stage buff; also, bringing Dendro DPS will make dealing with the Tainted Water Phantasm much easier.
Stage 3 - Explore the Mist
| Best Teams | Phase 1 Phase 2 |
|---|---|
| Enemies | Phase 1 Phase 2 |
| Objectives | Phase 1 Break Void Wards Phase 2 Reach 1000/2000/4000 Points |
Nightsoul-Based Team for Phase 1
Its highly advisable that you form a Nightsoul-Based team to deal with the waves of Tenebrous Mimesis.
Chasca can satisfy this caveat since she can consistently deal Nightsoul-Based damage and elemental applications.
Hydro-Related Reaction Team for Phase 2
Bloom, Hyperbloom, Electro-Charged, and Vaporize are best for Phase 2, but as long as you can trigger Hydro-related reaction, anything should suffice.
Stage 4 - Low-Temperature Warning
| Best Teams | Phase 1 Phase 2 |
|---|---|
| Enemies | Phase 1 Phase 2 |
| Objectives | Phase 1 Deal multiple hits against frozen enemies. Phase 2 Reach 1000/2000/4000 Points |
Freeze Team for Phase 1
Skirk is available as a trial character. Pair her up with Hydro and Cryo characters, especially Escoffier and Furina, and consistently deal damage to frozen enemies, and players can comfortably clear this stage with high levels.
Electro-Charged or Lunar-Charged Team for Phase 2
Electro-Charged and Lunar-Charged are best to utilize the buffs acquired during Advanced Preparation.
Flins and Ineffa are highly recommended for this stage, but any teams that can satisfy the caveat of triggering Electro-Charged and Lunar-Charged would suffice.
Stage 5 - Thunderstorm Approaching
| Best Teams | Phase 1 Phase 2 |
|---|---|
| Enemies | Phase 1 Phase 2 |
| Objectives | Phase 1 Number of time Electro-Charged or Lunar-Charged DMG dealt. Phase 2 Reach 1000/2000/4000 Points |
Electro-Charged or Lunar-Charged Team for Phase 1
Ineffa is available as trial character, making all players have access to Lunar-Charged.
Electro-Charged or Lunar-Charged team is a must have for this stage.
Bond of Life Team for Phase 2
Characters that have access to Bond of Life are highly recommended.
For instance, Arlecchino is an amazing character to bring for this stage.
Thunderstorm Approaching Event Guide
Stage 6 - Healing Reserves
| Best Teams | Phase 1 Phase 2 |
|---|---|
| Enemies | Phase 1 Phase 2 |
| Objectives | Phase 1 Total HP recovered Phase 2 Reach 1000/2000/4000 Points |
Full Healer Team for Phase 1
A full Healer team is genuinely a very good strategy for this stage. Don't bother too much with setup and just constantly heal.
Make use of Kokomi as she is a trial character for this stage.
A Team That Can Freeze for Phase 2
Note that its not exclusively a Freeze team because as along as the team can proc Freeze, It's viable enough to clear the stage.
Feel free to bring a Shatter or Melt team, provided you have enough damage.
How to Play Safe Engagement Training
Choose Two Teams in Each Stage
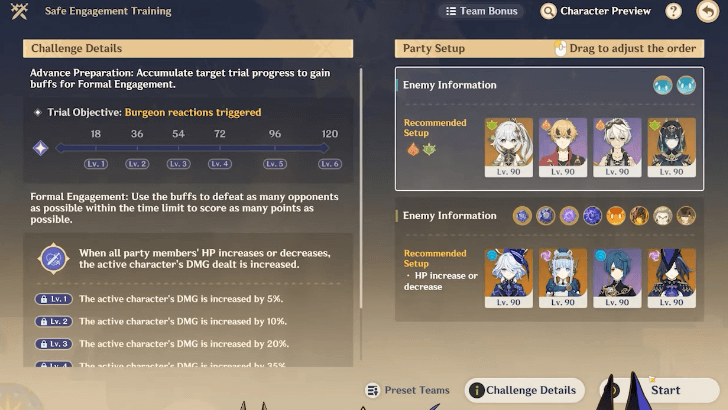
Each stage in Safe Engagement Training requires two separate teams, one for each phase of the stage. You can edit the party setup and choose characters based on the objectives and enemies in the beginning of the stage.
Complete Trial Objectives in Phase 1 Advance Preparations

Players can complete trial objectives to gain buffs in the first half of each stage, known as Advance Preparation! The more objectives you complete, the stronger the buff you get!
Defeat As Many Enemies As Possible in Phase 2 Formal Engagement

In the second half of the stage, Formal Engagement, the buffs gained from Advance Preparation are activated and players must defeat as many enemies as possible within the time limit. The more enemies you defeat, the higher your final score for the stage.
How to Unlock Safe Engagement Training
Progress the Ruins Exploration Event Quest Act 1

To unlock Safe Engagement Training, players must progress the Field Mastery, Unyielding Progress event quest.
Return from the Mysterious Realm
Complete Safe Engagement Training Quest

Talk to Dehya located in Aaru Village during the Fieldwise Mastery, Unyielding Progress! quest to access and begin playing Safe Engagement Training!
Fieldwise Mastery, Unyielding Progress!
Safe Engagement Training Event Information
Part of the Ruins Exploration: Fieldwise Center Event
Safe Engagement Training is one of the three mini-games for the Ruins Exploration: Fieldwise Center event! This event and its story is set in Sumeru.
Ruins Exploration: Fieldwise Center Event
Safe Engagement Training Event Rewards
Total Safe Engagement Training Event Rewards
| All Ruins Exploration: Fieldwise Center Rewards | ||
|---|---|---|
|
|
|
|
|
|
|
|
We'll update this section once more information is available!
Safe Engagement Training Stage Rewards
| Stage | Objectives | Rewards |
|---|---|---|
| 1 | Get 1000 Points | |
| Get 2000 Points | ||
| Get 4000 Points | ||
| 2 | Get 1000 Points | |
| Get 2000 Points | ||
| Get 4000 Points | ||
| 3 | Get 1000 Points | |
| Get 2000 Points | ||
| Get 4000 Points | ||
| 4 | Get 1000 Points | |
| Get 2000 Points | ||
| Get 4000 Points | ||
| 5 | Get 1000 Points | |
| Get 2000 Points | ||
| Get 4000 Points | ||
| 6 | Get 1000 Points | |
| Get 2000 Points | ||
| Get 4000 Points |
Genshin Impact Related Guides

Ruins Exploration: Fieldwise Center Event
Ruins Exploration: Fieldwise Center Guides
| Ruins Exploration: Fieldwise Center Guides | ||
|---|---|---|
| Skillful Scouting |
Mechanical Puzzle-Parsing Paradigm |
Safe Engagement Training |
Safe Engagement Training Stage Guides
| Safe Engagement Training Stages | |
|---|---|
 1 - Grassy Blasty Reporting for Duty! 1 - Grassy Blasty Reporting for Duty! |
2 - Curtain of Geo |
| 3 - Explore the Mist |
4 - Low-Temperature Warning |
| 5 - Thunderstorm Approaching |
6 - Healing Reserves |
Ruins Exploration: Fieldwise Center Quests
| Ruins Exploration Quests | |
|---|---|
 Return From the Mysterious Realm Return From the Mysterious Realm |
Fieldwise Mastery, Unyielding Progress |
 Headlong Into the Sands Headlong Into the Sands |
|
Other Ruins Exploration: Fieldwise Center Guides
| Ruins Exploration: Fieldwise Center Guides | |
|---|---|
 How to Get Free Collei How to Get Free Collei |
 Character Locations Character Locations |
Other Events and Schedule

Author

Safe Engagement Training Event Guide


Rankings
Gaming News

![The Liar Princess and the Blind Prince Review [PC] | Lovely to Look at but Tedious to Play](https://img.game8.co/4442586/8d95f5faf05780f1765ce7e0938bd825.jpeg/show)
![The Seven Deadly Sins: Origin [First Impressions] | A Promising Start](https://img.game8.co/4440581/584e0bfb87908f12c4eab6e846eb1afd.png/thumb)
![The Liar Princess and the Blind Prince Review [PC] | Lovely to Look at but Tedious to Play](https://img.game8.co/4442586/8d95f5faf05780f1765ce7e0938bd825.jpeg/thumb)
![Marathon Cryo Archive Map Teased as [REDACTED] on Selection Screen](https://img.game8.co/4442236/6357203e58172f6de57f1991e7c39b22.png/thumb)
Popular Games

Genshin Impact Walkthrough & Guides Wiki
Umamusume: Pretty Derby Walkthrough & Guides Wiki
Pokemon Pokopia Walkthrough & Guides Wiki
Honkai: Star Rail Walkthrough & Guides Wiki
Monster Hunter Stories 3: Twisted Reflection Walkthrough & Guides Wiki
Arknights: Endfield Walkthrough & Guides Wiki
Wuthering Waves Walkthrough & Guides Wiki
Zenless Zone Zero Walkthrough & Guides Wiki
Pokemon TCG Pocket (PTCGP) Strategies & Guides Wiki
Monster Hunter Wilds Walkthrough & Guides Wiki


Recommended Games
Diablo 4: Vessel of Hatred Walkthrough & Guides Wiki
Cyberpunk 2077: Ultimate Edition Walkthrough & Guides Wiki
Fire Emblem Heroes (FEH) Walkthrough & Guides Wiki
Yu-Gi-Oh! Master Duel Walkthrough & Guides Wiki
Super Smash Bros. Ultimate Walkthrough & Guides Wiki
Pokemon Brilliant Diamond and Shining Pearl (BDSP) Walkthrough & Guides Wiki
Elden Ring Shadow of the Erdtree Walkthrough & Guides Wiki
Monster Hunter World Walkthrough & Guides Wiki
The Legend of Zelda: Tears of the Kingdom Walkthrough & Guides Wiki
Persona 3 Reload Walkthrough & Guides Wiki


All rights reserved
Copyright© 2012-2024 HoYoverse — COGNOSPHERE. All Rights Reserved.
The copyrights of videos of games used in our content and other intellectual property rights belong to the provider of the game.
The contents we provide on this site were created personally by members of the Game8 editorial department.
We refuse the right to reuse or repost content taken without our permission such as data or images to other sites.
Can someone at Hoyoverse tell the devs that this inst Stygian onslaught. This is supposed to be a fun event for everyone. Why the heck do we only get one trial character per level?