This survey will take about 1 minute.
Your answers will help us to improve our website.
Genshin Impact
How to Solve the Orthant's Puzzle
✉ Send your thoughts in our Genshin 6.4 Patch Survey!
★ Exclusive: Dive back in time with the Meta History
◆ Hot: Version 6.4, Luna 5 Codes
◆ Builds: Varka, Flins, Skirk, Escoffier
◆ Events: Travelers' Tales, He Who Caught the Wind
◆ Future: Linnea, Version 6.5 Luna VI
How to solve the Orthant's Puzzle is a major objective of the Search in the Algae Sea quest from the In the Wake of Narcissus quest chain in Genshin Impact 4.2. See how to solve the four Orthant's Puzzles and the information here!
List of Contents
Orthant's Puzzle for Muse's Mother
How to Solve The Orthant's Puzzle
| How to Solve The Orthant's Puzzle | |
|---|---|
| 1 | 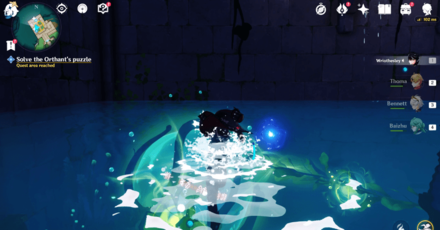 To solve the Orthant of Memory Puzzle, you must release the Energy from the devices located to the right, and far-end of the room. |
| 2 | 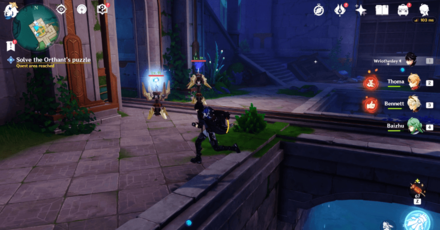 To do this, head towards the machine across the chamber. The entrance to this machine is guarded by two Gardemeks, so prepare for a fight! |
| 3 | Next, go beside the machine and release the energy. You can watch it flow towards the machine in the middle of the room, to get a good grasp of how the whole mechanism works! |
| 4 | Then, head to the right side of the room, towards the closed door with a Feather Valve, and an Eliphas Beam puzzle. To solve this puzzle, hit the blue lantern once, to unlock the clip of the Eliphas Beam puzzle. Doing so, also turns the lantern to orange. |
| 5 | Once done, use the power of the Ball Octopus and fire at the Feather Valve until the Eliphas Beam is floating all the way up. Quickly hit the lantern once more to lock the beam in place. This also reverts its color back to blue. |
| 6 | After the door has opened, use the machine to go down. You'll see a small hallway with another Feather Valve puzzle, and a closed door. Walk towards the door, but not too far from the Valve. Fire at the Valve continuously, then bolt towards the door. |
| 7 | Then, go to the machine, and release the energy from it. Wait until the energy reaches the lift you used to go down, then go up the original using the same lift. |
| 8 | Lastly, hit release, and wait for the energy flow to reach the machine at the middle of the room to solve the Orthant of Memory's puzzle! |
Orthant's Puzzle for Meteoric Lance
How to Solve The Orthant's Puzzle
| How to Solve The Orthant's Puzzle | |
|---|---|
| 1 |  To solve the Orthant of Wish Puzzle, from the ledge, glide down to your right until you see the Eliphas Beam puzzle. |
| 2 | Use the Ball Octopus' ability and fire at the left column first, as this one reverts back to its original position slower than the one in the right. Once the left column is pushed all the way down, immediately fire at the right column. |
| 3 | Once the door opens, defeat the Mek enemy in front, and ride down using the lift. |
| 4 | Press forward, while you defeat the enemy Hydro Slimes along the way. As you reach halfway the end of the cavern, you'll see a Regulating Valve puzzle. Don't forget to borrow the Ball Octopus' ability from the nearby orb. |
| 5 | Fire at the Receiving Node of the Feather Valve, and continuously do so until the gears of the Regulative Valve clicks on the angle of its tracks. This will be marked a blue light, indicating the valves are in the right position. |
| 6 | Once all the valves lit up, release the Energy from the machine. It will flow towards the other machine from across the cavern. Use this machine as you lift to reach the floor above. Make sure stand by right beside it as there are times that the Go Up option doesn't appear! |
| 7 | After reaching the floor above, release the energy from the machine, and watch it go straight to the machine at the middle of the room. |
| 8 | Then, lead the Seelie you just saw towards its court below the machine. Doing so removes the barrier on the surface of the water, which means you can now dive freely! |
| 9 | After diving, you'll see another Regulating Valve Puzzle underwater. You must first defeat the Mek Fish enemies to free the Ball Octopus Aberrant so you can borrow its abilities. |
| 10 | Once done, fire at the Feather Valve nearest to the machine first. Make sure to hit the Receiving Node that will rotate the three valves clockwise. Immediately stop once they've rotated clockwise, two times. |
| 11 | Then, go to the other Valve and do the same thing. Hit the Node that will make the two valves rotate clockwise, two times, as well. Once all valves have lit up, release energy from the machine. |
| 12 | Afterwards, borrow the ability of the Sting Ray, to be able cut the seagrass that blocks the exit. Make sure to hit their weakpoints at once, to be able to cut them cleanly! |
| 13 | Once you've exited the puzzle, use the lift to go the upper floor. You'll have to press go up two times to reach the uppermost floor! Lastly, release the energy from the machine, and defeat the enemy Meks along the way! |
Orthant's Puzzle for Cupid's Lover
How to Solve The Orthant's Puzzle
| How to Solve The Orthant's Puzzle | |
|---|---|
| 1 | Once you're inside, immediately release the energy from the Energy Flow device. You'll see that the door across needs a Special Key to be opened, which you can get later! |
| 2 | From the locked door, glide down to your left, until you see the huge door with enemy Meks guarding outside. Defeat them and press forward. |
| 3 | From the main machine mechanism, make a sharp turn to your left, until you see a lift, and a Looking Glass hanging by the wall. Enter the glass. |
| 4 | Then, exit using the portrait hanging beside two fire torches. You will then get teleported out into a hallway with an Energy Flow device at the end. Alternatively, you can simply use the nearby lift to get to the upper floor. |
| 5 | Either way, you should see an Energy Flow device at the end. Head towards the device, and pick up the Special Key behind it, as well as the Hydroculus. Then go across the hallway, and use the switch to call the Lift, if you used the Looking Glass. |
| 6 | Once the lift, and the Energy Device are on the same floor, release the Energy from the device. This will summon enemy Meks, so defeat them, and press on. |
| 7 | After defeating the enemies, go down the floor below, and hit release once the lift stops. |
| 8 | Walk towards the machine at the middle, then make a sharp turn to your left. You should see an Energy Flow device. Use it to go to the floor below. |
| 9 | As soon as you step out of the lift, swim towards the submerged room. Hit the Blue Lantern once, to unlock the door, and summon a Fontaine Current. Enter the room. |
| 10 | Once inside, hit the Orange Lantern slightly hidden to your left. This will open the door, revealing a Fontemer Aberrant Ball Octopus inside. |
| 11 | Swim slightly closer to the door, without actually going in, then hit the Orange Lantern once. This will close the outer door, so make sure to quickly swim, so you won't get locked out. |
| 12 | The Energy Flow device should now be unlocked. Release the energy from it once to drain the water from the room. This also unlocks all doors behind you, which leads to a room filled with enemy meks. |
| 13 | Use the Hydro Bubble to quickly access the Energy Flow device. Use it to go up the floor above, then hit release, as soon as it stops. |
| 14 | Then, walk towards the main Energy Flow device, then turn to your left. You will see another Hydro Bubble, which you should use to access the locked door that needs a Special Key. |
| 15 | Lastly, go to the floor below using the lift, then hit release once it stops. The energy should reach the main mechanism, solving the Orthant of Soul puzzle! |
Orthant's Puzzle for Thalia and Melpomene
How to Solve The Orthant's Puzzle
| How to Solve The Orthant's Puzzle | |
|---|---|
| 1 | To solve the Orthant of Persona Puzzle, release the Energy from the very first machine storage you see. |
| 2 | Then, press forward until you see a small bridge, and two Clockwork Mek enemies below. Jump down, and defeat the enemies, then release the Energy from the nearby machine. |
| 3 | Next, is to ride the lift once the machine has activated. Once it's reached the upper floor, release the Energy from it, and let it flow along the bridge, all the way to the across the other side of the chamber. |
| 4 | Once you've reached the submerged area of the chamber, you'll realize that the room at far-end needs a Special Key to be opened, while the one to your right has a red barrier. Swim underneath, until you see the room full of deactivated Meks. |
| 5 | From the room, make a sharp turn to your right, until you see a Regulative Valve puzzle, and a Feather Valve puzzle with missing Receiving Nodes. |
| 6 | The Receiving Nodes are hidden within the nearby boulder, which you can destroy using the ability of an Armored Crab Aberrant. Another nearby boulder by the wall hides an Aberrant Ball Octopus, while another one at your back, hides the machine storage! |
| 7 | After destroying the three boulders, and placing the Receiving Nodes to their corresponding Feather Valve, use the Ball Octopus ability and fire at the leftmost node, and wait for the Valves to rotate twice. |
| 8 | Once they light up, head to the machine storage, and release the Energy. Then, swim upward, until you see another machine storage, and wait for the energy to reach it. Once it has, release again. |
| 9 | As you continue, you will be taken back the previously-submerged awhile back. Defeat the enemy Meks, and exit using the lift behind the door. |
| 10 | Once you've reached the upper floor, release once, until it reaches the machine at the middle of the room! |
Thalia and Melpomene Quest Guide
Orthant's Puzzle Information
Part of the Search in the Algae Sea Quest
The Orthant's Puzzle is a major objective in obtaining Orthant pieces for the Search in the Algae Sea quest. The Search in the Algae Sea is the first part of the In the Wake of Narcissus world quest chain.
Search in the Algae Sea Quest Guide
Genshin Impact Related Guides
All Tips and Tricks Guides

All Version 4.2 Tips & Tricks
| Other Tips & Tricks | ||
|---|---|---|
| How to Reveal the Altar's Secrets | Decode This Level's Puzzle Guide | How to Brainstorm and Find a Breakthrough Guide |
| How to Search for the key near the Mouth of the Spring | Salvage the Lost Items Guide | How to Solve the Orthant's Puzzle |
Other Quest Tips & Tricks
Comment
1  Fish 5 months
my game has to be bugged cuz I am doing the things and yet it tells me the water channels are not connected ugh
Author

How to Solve the Orthant's Puzzle
Please participate in our site
improvement survey
03/2026
improvement survey
03/2026
Would you assist in
improving Game8's site?
improving Game8's site?

×
We are listening to our users' valuable opinions and discussing how to act on them.
The information collected through this survey will be used for the purpose of improving our services. In addition, the information will only be disclosed a part of a statistic in a format that will not allow identification of personal information.
Begin Survey
Not Now
×
Please rate each item regarding Game8.co's Advertisements.
Amount of Ads
Very Dissatisfied
Somewhat Dissatisfied
Fine
Somewhat Satisfied
Highly Satisfied
Placement of Ads
Timing of Ad Display
Ad Loading Speed
Safeness of Ads
Content of Ads
×
Please rate each item regarding Game8.co's Quality of Articles.
Amount of information
Very Dissatisfied
Somewhat Dissatisfied
Fine
Somewhat Satisfied
Highly Satisfied
Frequency of updates
Speed of new information
Accuracy of articles
Understandibility of articles
Readability of sentences
×
Please rate each item regarding Game8.co's Usability of the Site.
Ease of finding information
Very Dissatisfied
Somewhat Dissatisfied
Fine
Somewhat Satisfied
Highly Satisfied
Loading Speed
Use of Color
Font Size
Visibility of Images
Easy to Understand Layout
×
Please rate each item regarding Game8.co's Message Boards, Comments.
Ease of Writing
Very Dissatisfied
Somewhat Dissatisfied
Fine
Somewhat Satisfied
Highly Satisfied
Readability
Ease in Finding Information
Comment Quality
Comment Quantity
Admin Response
×
Please rate each item regarding Game8.co's Site's new design.
Please rate our site's new design
Very Dissatisfied
Somewhat Dissatisfied
Fine
Somewhat Satisfied
Highly Satisfied
Do you think that the website's design change makes the site easier to use?
Has the new design made it easier for you to find information on the site?
Has the new design improved the overall visual appeal of the site?
How would you rate your overall satisfaction with the new design of the site?
×
How likely are you to recommend Game8 to someone you know?
Very Unlikely
0
1
2
3
4
5
6
7
8
9
10
Very Likely
If you have other opinions regarding potential improvement to the website, please share them with us. We would appreciate your honest opinion.
Note: This is a free response section, so you can proceed without entering anything.
Note: Please be sure not to enter any kind of personal information into your response.
Note: Please be sure not to enter any kind of personal information into your response.
×
Thank You
×
Thank you for participating in our survey! Your answers will help us to improve the quality of our website and services.
We hope you continue to make use of Game8.
We hope you continue to make use of Game8.
Close


Rankings
Gaming News


![Monster Hunter Stories 3 Review [First Impressions] | Simply Rejuvenating](https://img.game8.co/4438641/2a31b7702bd70e78ec8efd24661dacda.jpeg/thumb)
Popular Games

Genshin Impact Walkthrough & Guides Wiki
Honkai: Star Rail Walkthrough & Guides Wiki
Umamusume: Pretty Derby Walkthrough & Guides Wiki
Pokemon Pokopia Walkthrough & Guides Wiki
Resident Evil Requiem (RE9) Walkthrough & Guides Wiki
Monster Hunter Wilds Walkthrough & Guides Wiki
Wuthering Waves Walkthrough & Guides Wiki
Arknights: Endfield Walkthrough & Guides Wiki
Pokemon FireRed and LeafGreen (FRLG) Walkthrough & Guides Wiki
Pokemon TCG Pocket (PTCGP) Strategies & Guides Wiki


Recommended Games
Diablo 4: Vessel of Hatred Walkthrough & Guides Wiki
Cyberpunk 2077: Ultimate Edition Walkthrough & Guides Wiki
Fire Emblem Heroes (FEH) Walkthrough & Guides Wiki
Yu-Gi-Oh! Master Duel Walkthrough & Guides Wiki
Super Smash Bros. Ultimate Walkthrough & Guides Wiki
Pokemon Brilliant Diamond and Shining Pearl (BDSP) Walkthrough & Guides Wiki
Elden Ring Shadow of the Erdtree Walkthrough & Guides Wiki
Monster Hunter World Walkthrough & Guides Wiki
The Legend of Zelda: Tears of the Kingdom Walkthrough & Guides Wiki
Persona 3 Reload Walkthrough & Guides Wiki


All rights reserved
Copyright© 2012-2024 HoYoverse — COGNOSPHERE. All Rights Reserved.
The copyrights of videos of games used in our content and other intellectual property rights belong to the provider of the game.
The contents we provide on this site were created personally by members of the Game8 editorial department.
We refuse the right to reuse or repost content taken without our permission such as data or images to other sites.
What elevator r u on u might be clicking release not go down