Priorities First Quest Guide
✉ Send your thoughts in our Genshin 6.4 Patch Survey!
★ Exclusive: Dive back in time with the Meta History
◆ Hot: Version 6.4, 6.4 Codes, Linnea, Version 6.5
◆ Builds: Varka, Flins, Skirk, Escoffier
◆ Events: Travelers' Tales, Sightseeing With Friends
◆ Endgame: Spiral Abyss (March 2026)
Priorities First is a World Quest introduced in Genshin Impact Luna I. See where to find this quest, how to unlock it, its walkthrough, how to solve its barrier puzzles, all Data Storage Cassette locations, and the quest's rewards in this guide!
List of Contents
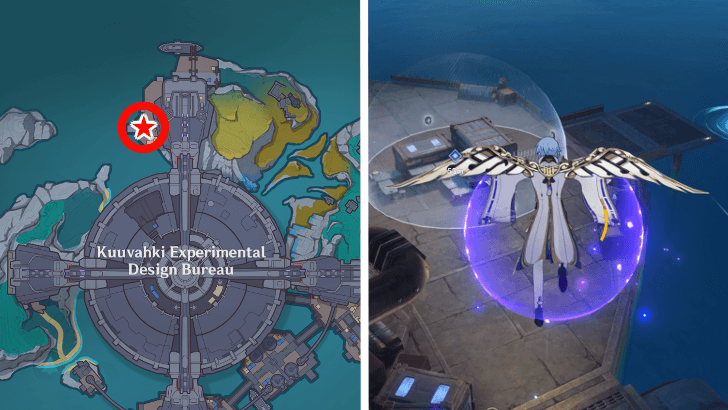
Priorities First Quest Location
Go to Kuuvahki Experimental Design Bureau
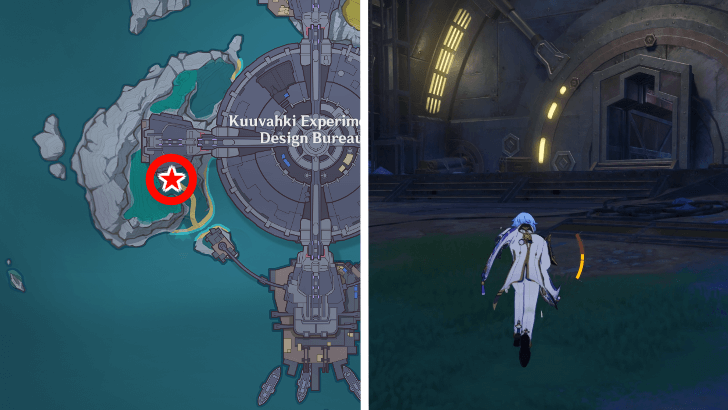
Priorities First is located to the southwest corner of the Kuuvahki Experimental Design Bureau nation of Nod-Krai. The facility and its entrance should be easy to find.
How to Unlock Priorities First
Unlocked by Default
| Quest Unlock Requirements | |
|---|---|
 |
Aha! Looks like Priorities First is not locked behind any quest! |
The Priorities First world quest is not locked behind any other quest and is automatically unlocked upon reaching Nod-Krai!
Nod-Krai Location and How to Unlock
Priorities First Walkthrough
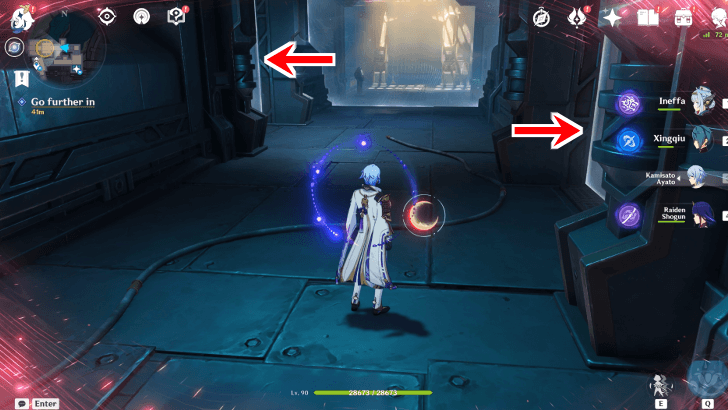
Infiltrate the Facility
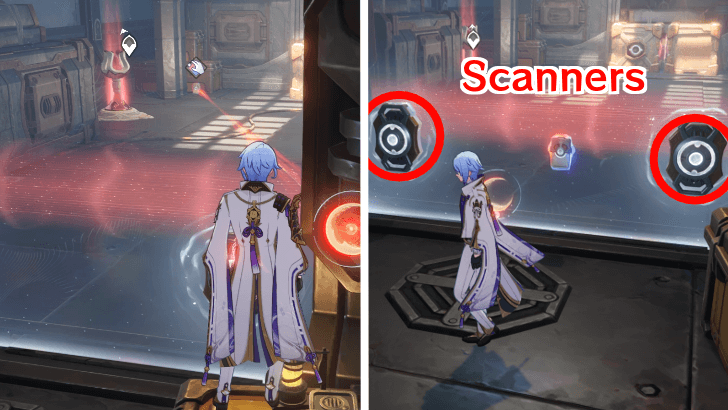
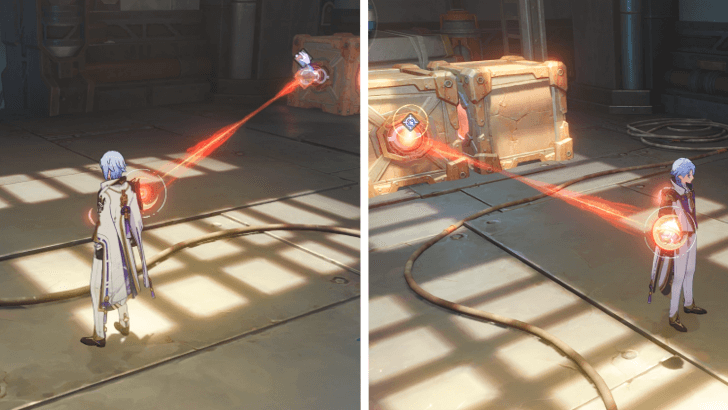
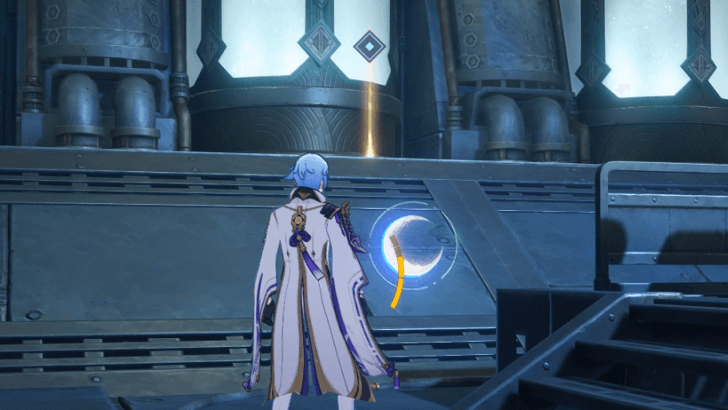
Upon entering the facility and riding the elevator down, the entrance will be barred by a barrier with two scanners. It's also worth noting that the area will constantly have you in the empowered state.
To start, make sure you are elevated by the crate to the right. Then, grab the ID Card in the distance on the other side of the barrier. The elevation will allow the ID Card to bypass the red beam. Hold the card against the scanners for a few seconds to disable the barrier.
Use the Key to Access the Exquisite Chest
Before proceeding, look to the crate by the entrance and spot a key you can grab. Take it and use it on the crates behind you (which is directly in front of the entrance) to reveal an Exquisite Chest you can open.
Afterwards, proceed further into the facility via the downward ramp.
Bipolar and Unipolar Objects Guide
Evade the Barriers
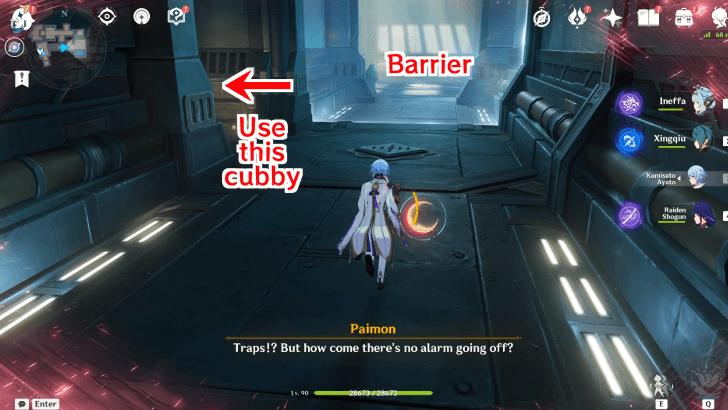
This time, the hallways will deploy a security barrier that blocks access and pushes you back to the entrance.
Evade this by using the cubby to the left, which also happens to have a Common Chest. After making it to the end of the tunnel, use the console to disable the security barrier.
Defeat the Opponents by the Facility Entrance
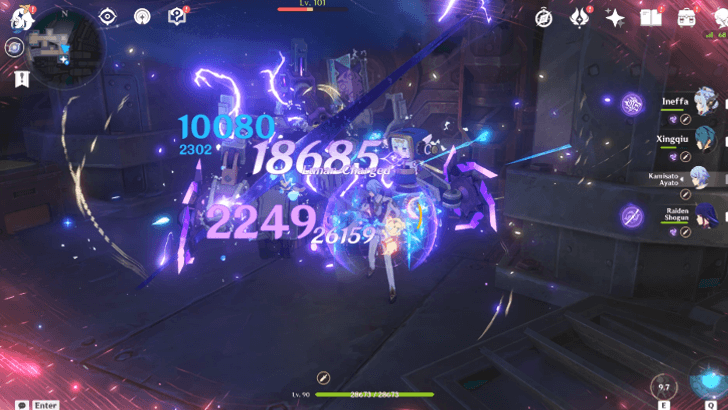
The main entrance to the facility will be guarded by a giant mech. Defeat it and try to proceed onward only to find the entrance locked from the other side, which will prompt you and Paimon to find a way around it.
Climb the Ventilation Shaft
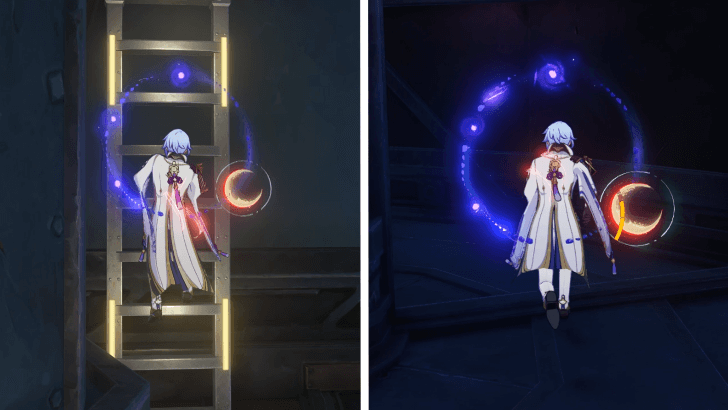
Look to the right of the locked entrance to spot a ladder that leads to a spacious ventilation shaft.
Climb the ladder and follow the vent, then drop down the hatch at the end of it. This should lead right on the other side of the locked entrance.
Evade the Second Security Barrier
You will encounter another hallway with a security barrier. This time, there will be two cubbies, both also blocked with barriers that require ID Cards.
How to Bypass the Second Security Barrier
| Steps | |
|---|---|
| 1 | Wait for the barrier to reset, then do the right one first since it's closer. Position yourself so that the ID Card immediately gets placed against the scanner upon picking it up. Enter the cubby upon successfully disabling this barrier. |
| 2 | Let the barrier pass, then proceed to unlock the left cubby, employing the same strategy. Position yourself right in front of the scanner to place the ID Card immediately against the scanner upon picking it up. Open the Exquisite Chest inside. |
| 3 | Wait for the barrier to pass. Once it does, rush to the end of the hallway, then use the console to disable the security barrier. |
Enter the Kuuvahki Chamber

After landing on the lower floor, make your way to the Kuuvahki chamber ahead and watch the cutscene that will play.
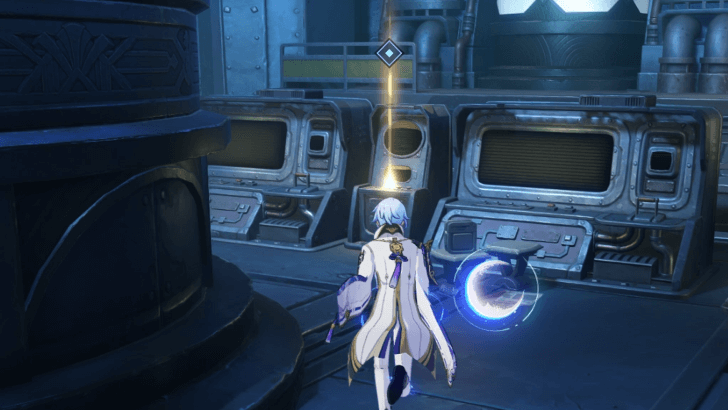
Investigate the Chamber
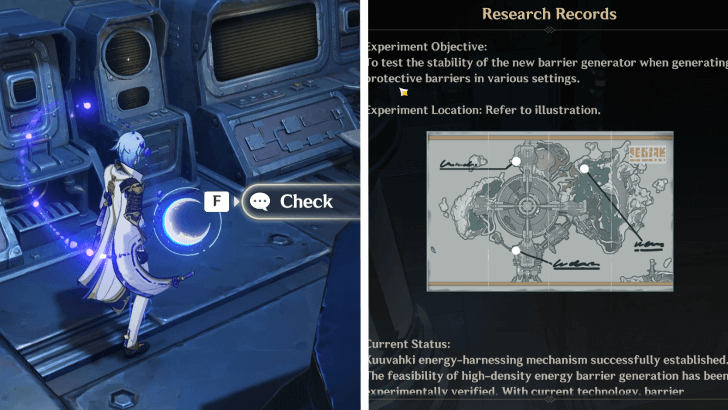
Look around the chamber for clues on the Fatui's experiments. While most of the clues scattered about aren't helpful, the clue on the console to the north will yield the most information.
The clue will point to three specific locations around the Design Bureau, so your work is cut out for you.
Go to the First Marked Location
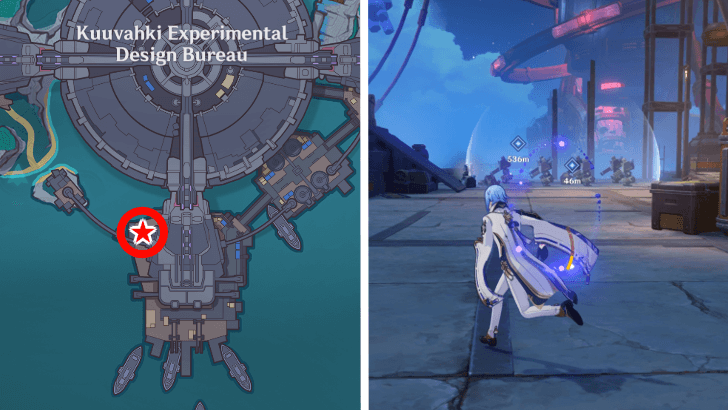
The first marked location is at the very south of the Design Bureau. You'll know you're there when you spot some robots inside a dome barrier.
Disable the First Dome Barrier
To disable the dome barrier containing the robots, use the ID Card inside the dome and hold it up against the three scanners.
How to Disable the First Dome Barrier
| Steps | |
|---|---|
| 1 | 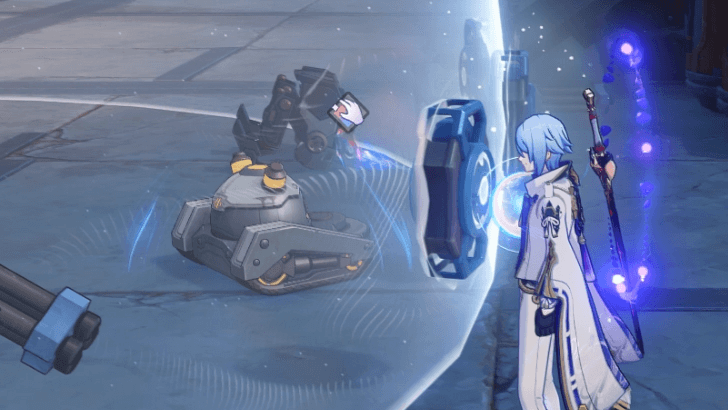 Grab the ID Card right next to the stationary cleaning bot. |
| 2 | Simply run the ID Card across all three scanners to disable the barrier. |
Defeat the Robots
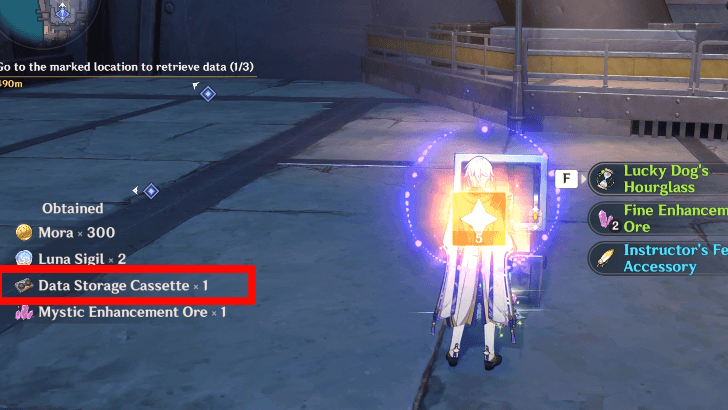
As expected, once the dome barrier is breached, the robots inside will activate, so destroy them as quickly as possible
Once you're done, open the Exquisite Chest to grab some loot, as well as the necessary quest item, Data Storage Cassette.
Go to the Second Marked Location

The second marked location is to the northeast of the Design Bureau. Once again, the data is protected by a dome that you need to disable.
Disable the Second Dome Barrier
Take note of the cleaning bot that puts you in the empowered state. Its only route is to go all the way around the dome.
How to Disable the Second Dome Barrier
| Steps | |
|---|---|
| 1 | Once the cleaning bot is in the proper position, pull the crate out of the way. |
| 2 | Stay close to the cleaning bot and grab the ID Card. Be sure to match the bot's pace as going too fast may result in you dropping the ID card. If you do, it will go back to its starting positionand you'll have to start all over again. |
| 3 | Follow the cleaning bot around the dome until you reach the scanners. |
| 4 | Pass the card through all three scanners. Grab the Data Storage Cassette from the Precious Chest. |
Go to the Third Marked Location
The third marked location is located to the very north of the Design Bureau. Look for the dome barrier containing different crates.
Disable the Third Dome Barrier
The third dome barrier is a bit more complicated than the first two as it will involve the use of several cleaning bots to get the job done.
How to Disable the Northern Dome Barrier
| Steps | |
|---|---|
| 1 | Facing the sea, look behind you to spot a red Kuuvahki relay. Get up close to it and you will enter the empowered state, thanks to the cleaning robot on the other side. Activate it to destroy the relay and release the bot. Grab the Remarkable Chest inside as well. |
| 2 | Go to the westernmost scanner (the one facing the sea) and wait for the cleaning bot to get to your position. Once it does, grab the ID core and have the first scanner verify it. |
| 3 | Stay close to the cleaning bot, matching its pace, and pass the ID Card through the second scanner. |
| 4 | Continue to the third scanner. The cleaning bot you've been following will cut its route off here, but thanks to the bot you released earlier, you'll stay in the empowered state and keep holding onto the ID Card. |
| 5 | Carefully make your way to the third stationary cleaning bot and pass the final scanner to complete the puzzle. After disabling the dome, grab the last Data Storage Cassette from the Precious Chest. |
Return to the Facility and Submit the Data
Teleport back to the Kuuvahki chamber you started in and submit the Data Storage Cassettes to the console. Watch the cutscenes that will ensue.
Defeat Kholodov and His Henchmen
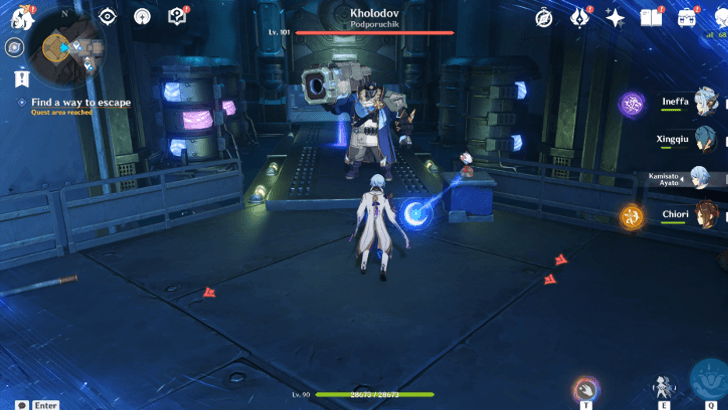
The cutscene will end with you trapped inside a dome barrier. Use the ID Card to instantly shatter the dome, then defeat Kholodov and all of his Fatui henchmen. Afterwards, watch the cutscene.
Investigate the Source of the Strange Sound
Go to the marked location within the chamber to investigate the strange noise you and Paimon heard. This should conclude the quest!
Priorities First Rewards
Total Quest Rewards
| Total Quest Rewards |
 Primogem x40 |
 Mora x33000 |
|---|---|---|
 Hero's Wit x2 |
||

Genshin Impact Related Guides

Other Nod-Krai Quest Guides
Comment
Hiii. The same happened to me, i was almost about to fill a feedback report, turns out there was some item inside the lab that i hadn't interacted yet, (a note in the floor in my case). After that, the game just jumped to the cutscene instantly. Hope it works for u too.
Author

Priorities First Quest Guide


Rankings
Gaming News

![Monster Hunter Stories 3 Review [First Impressions] | Simply Rejuvenating](https://img.game8.co/4438641/2a31b7702bd70e78ec8efd24661dacda.jpeg/show)
![The Liar Princess and the Blind Prince Review [PC] | Lovely to Look at but Tedious to Play](https://img.game8.co/4442586/8d95f5faf05780f1765ce7e0938bd825.jpeg/thumb)
![Marathon Cryo Archive Map Teased as [REDACTED] on Selection Screen](https://img.game8.co/4442236/6357203e58172f6de57f1991e7c39b22.png/thumb)

Popular Games

Genshin Impact Walkthrough & Guides Wiki
Umamusume: Pretty Derby Walkthrough & Guides Wiki
Pokemon Pokopia Walkthrough & Guides Wiki
Honkai: Star Rail Walkthrough & Guides Wiki
Monster Hunter Stories 3: Twisted Reflection Walkthrough & Guides Wiki
Arknights: Endfield Walkthrough & Guides Wiki
Wuthering Waves Walkthrough & Guides Wiki
Zenless Zone Zero Walkthrough & Guides Wiki
Pokemon TCG Pocket (PTCGP) Strategies & Guides Wiki
Monster Hunter Wilds Walkthrough & Guides Wiki


Recommended Games
Diablo 4: Vessel of Hatred Walkthrough & Guides Wiki
Cyberpunk 2077: Ultimate Edition Walkthrough & Guides Wiki
Fire Emblem Heroes (FEH) Walkthrough & Guides Wiki
Yu-Gi-Oh! Master Duel Walkthrough & Guides Wiki
Super Smash Bros. Ultimate Walkthrough & Guides Wiki
Pokemon Brilliant Diamond and Shining Pearl (BDSP) Walkthrough & Guides Wiki
Elden Ring Shadow of the Erdtree Walkthrough & Guides Wiki
Monster Hunter World Walkthrough & Guides Wiki
The Legend of Zelda: Tears of the Kingdom Walkthrough & Guides Wiki
Persona 3 Reload Walkthrough & Guides Wiki


All rights reserved
Copyright© 2012-2024 HoYoverse — COGNOSPHERE. All Rights Reserved.
The copyrights of videos of games used in our content and other intellectual property rights belong to the provider of the game.
The contents we provide on this site were created personally by members of the Game8 editorial department.
We refuse the right to reuse or repost content taken without our permission such as data or images to other sites.
When you finish all the above, go to Speranza in Nasha Town. You'll find the kids that work there and the white Weasel Thief that took Paimon's stash. Talk to them to have a cutscene that ends the quest, giving you some Mora