What can you do as a free member?

Member benefits illustration

Create your free account today and unlock all our premium features and tools to enhance your gaming experience.

Member benefits illustration

Create your free account today and save articles to your watchlist and get notified when they're updated with new information.

Member benefits illustration

Create your free account today and save your favorite games for quick access later, synced across all your devices.

Member benefits illustration

By creating a Game8 account and logging in, you'll receive instant notifications when someone replies to your posts.

Comment rating feature illustration

By creating a Game8 account and logging in, you can make use of convenient features in the comments section, such as rating and sorting comments.

Premium archive feature illustration

By creating a Game8 account and logging in, you can access Premium articles that are exclusively available to members.

Site Interface

Guest
Free Member
Article Watchlist
Game Bookmarks
Cross-device Sync
Light/Dark Theme Toggle
User Profiles
Direct Feedback
Comment Rating

Game Tools

Guest
Free Member
Interactive Map Access
Interactive Map Pins
Interactive Map Comments
Interactive Map Pins Cross-Device
Check List
Event Choice Checker
Deck Builder Cross-Device
Message Board Notification
Message Board Cross-Device
Build Planner
Stat Calculator
Diagnostic Tool
Weapon/Armor Wishlist

Want more information?Learn more

Genshin Impact

How to Operate Bipolar Objects and Unipolar Charges

Add to Watchlist

◆ New: Tier List Maker and Community Tier List Contest!
◆ Hot: 6.2 Luna 3, Luna 3 Maintenance, Luna 3 Codes
◆ Featured: Durin, Jahoda, Venti, Varesa, Xilonen
Hexerei: Razor, Sucrose, Klee, Albedo, Mona, Fischl
◆ Events: To Temper Thyself Season 2

Genshin Impact How to Operate Bipolar Objects and Unipolar Charges

Bipolar Objects and Unipolar Charges can be found in Nod-Krai and are operated with the empowered state in Genshin Impact. Learn how to operate bipolar objects and unipolar charges, information on their functions, and where to find them here!

How to Operate Bipolar Objects and Unipolar Charges

Enter the Empowered State and Press the Interaction Button

Genshin Impact How to Operate Bipolar and Unipolar Objects

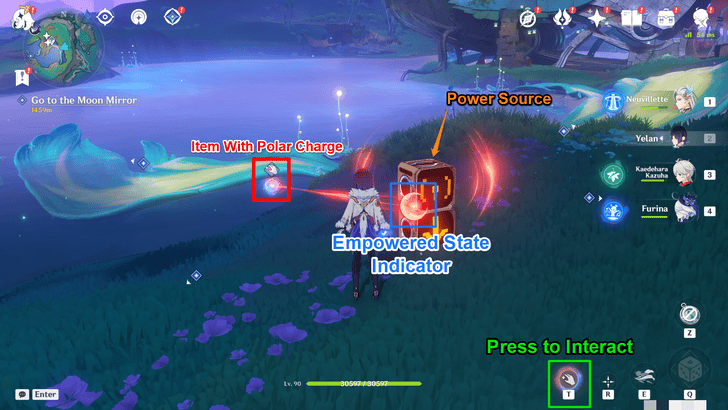
Approaching a special power source, typically glowing objects or plants in the overworld, automatically activates the empowered state, indicated by a red or blue crescent moon above your shoulder.

In this state, you can interact with polar-charged objects. Depending on your Kuuvahki energy color and the object’s polar charge, you’ll be able to push, pull, carry, throw, or even destroy them.

Kuuvahki Guide

Bipolar Objects and Unipolar Charges Information

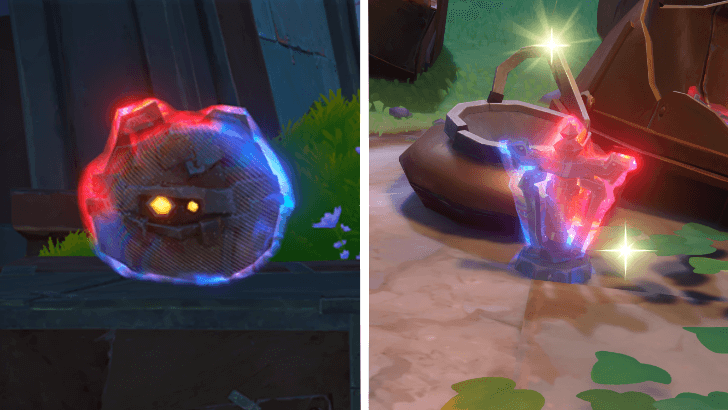
Bipolar Objects Have Red and Blue Charges

Genshin Impact Bipolar Objects

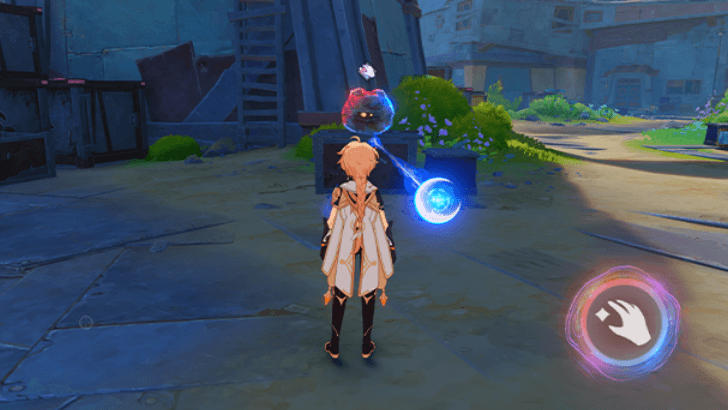
Bipolar objects present themselves in the overworld as items that have both a blue and red outline, and can either be carried or thrown. Getting closer to a Bipolar object while empowered will show a hand symbol outlined in red and blue, indicating that you may pick it up regardless of your energy's color.

Common type of Bipolar Objects are Kuuvahki Dewdrops and Portable Bearings in Lempo Isle, ID Cards in Paha Isle, or the robotic scraps you can find in the overworld.

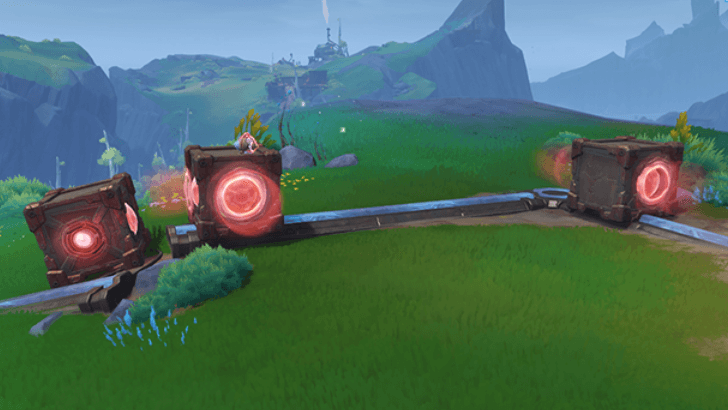
Unipolar Objects Have Only One Polar Charge

Genshin Impact Unipolar Charges

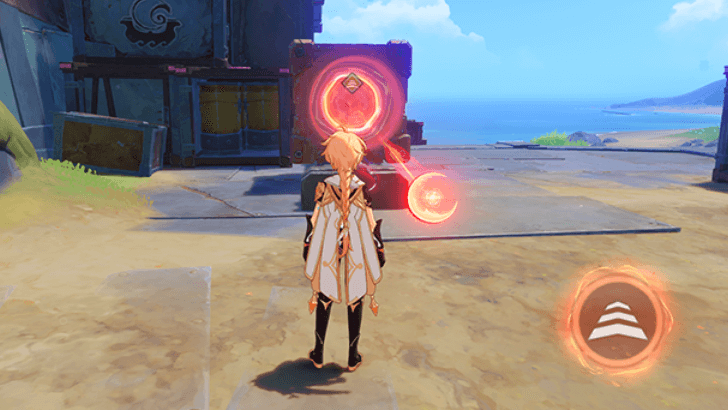
As its name suggests, Unipolar objects only have either a red or blue charge, not both at the same time. These objects can either be destroyed or moved when interacted with, and will display a red or blue icon with a white arrow pointing forward depending on your empowered energy.

Unipolar Charges are often seen in Moon Mirror puzzles located within Hiisi Island, Kuuvahki Relays, Assembly Modules, and interactable robots in Lempo Isle.

Where to Find Bipolar Objects and Unipolar Charges

Nod-Krai Overworld Collectibles

Genshin Impact Bipolar Collectibles

Bipolar objects are common amongst collectible items, such as the Portable Bearing which can be found within Lempo Isle and other destructible scraps which reward you with Mora when broken!

How to Get to Nod-Krai and Map Guide

Overworld Puzzles

Genshin Impact Assembly Module Puzzle

Overworld Puzzles commonly feature both Bipolar and Unipolar objects as their puzzle pieces, all of which you'll have to move in your empowered state in order to solve!

List of Overworld Puzzles

Puzzles With Bipolar and Unipolar Objects
Moon Mirror Guide Kuuvahki Relay Mechanism
Assembly Modules Mechanism Barrowmoss Barrens Red Beam Puzzle
Lempo Isle Mole and Robot Challenge -

Objectives in Quests

Quests will also have objectives that use the red-blue Bipolar and Unipolar principles for their tasks, whether it be solving puzzles or moving objects to a secondary location.

List of Quests

Quests With Bipolar and Unipolar Objects
For a Green Island... Priorities First Quest Guide The Stress of Changing Careers
Whisper Beneath the Waves Team Rigor or Team Intuition Drifting Toward a Promised Sky
The Shoemaker's Children Go Barefoot The Mirrors, the Maze, and the Tsar Blues of the Old World
Crimson Cleansing Friends of Moleyvalley The Tale-Telling Heart
Where the Moon Rises In the Shadows of Night Problem-Sorting Robot

Bipolar Objects and Unipolar Charges Release Date

Released in Version 6.0 Luna I

Genshin Impact Version 6.0 Luna I
Genshin Impact - Version 6.0 Luna I - A Dance of Snowy Tides and Hoarfrost Groves
Phase 1 Date September 10, 2025

Bipolar Objects and Unipolar Charges are an overworld mechanic released on September 10, 2024 for the Version Luna I update, along with the new region of Nod-Krai and other exciting content!

Version 6.0 - Luna I Release Date and Banners

Genshin Impact Related Guides

All Tips and Tricks Guides

Genshin Impact - Tips and Tricks

All Tips & Tricks Guides

All Version Luna I Tips & Tricks

Other Tips & Tricks
Bipolar and Unipolar Objects ID Cards Mechanism Guide Cleaning Bots Guide
Clever Little Sniffer Moles Guide The Moon Mirror Mechanism Guide How to Get to Maximum Construction Level
Kuuvahki Relay Mechanism Guide Assembly Modules Mechanism Guide Moonlane Guide
How to Remove the Barrier in Barrowmoss Barrens Conch-Patterned Pages Locations Lempo Isle Mole and Robot Challenge Guide
Hiisi Island Waterfall Moon Mirrors Puzzle Guide Bounty Token Locations Guide Hiisi Island Three Statues Puzzle Guide
Barrowmoss Barrens Robot Locations Lempo Isle Evermoon Seal Location Hiisi Island Evermoon Seal Location
Evermoon Seal Locations Moonsign Guide Kuuhenki Seelie Guide
Kuuvahki Guide

Other Regional Tips & Tricks

Other Tips & Tricks
Achupalla Challenge Guide Aloha Challenge Puzzle Colorfall Cave Pyroculus
Colorful Return to Sender Guide Delivery Order Challenge Guide Bean-Eating Shark Challenge Contest
She Said ''I Do'' Achievement Even Flying Gets a Ten! Hidden Achievement Guide Golden Rays Over a Leisurely Town Achievement Guide
Among the Seven Colors Hidden Achievement Guide Circular Arena Dodge Contest Popping Aphimead Bubbles Hidden Challenge Guide
Rantiy's Hat Location and How to Use Ayar Heroes' Cup Hidden Achievement Guide How to Unlock Asha Paint Colors
How to Clear The Twisted Dark Mud That Which Was Once Ehecatl Guide How to Destroy Oozing Core
How to Break Pulverite Ancient Sacred Mountain Dragon Puzzles Guide Sunset-Blue Obsidian Ring Location and How to Use
Magnifico's Photoshoot Locations Woven Scroll Portals Puzzle Guide Mamull Challenge Puzzle Guide
Ancient Inscribed Rings Puzzle Guide Pale Mist Puzzle Guide Furnace of Fiery Embers Puzzle Guide
The Finishing Touch Achievement How to Get Crimson Obsidian Ring Location and How to Use Purple Obsidian Ring Location and How to Use
Phlogiston Wind Tunnel Guide Nightspirit Graffiti Puzzle Guide Nightspirit Sigils Puzzle Guide
Peculiar Monetoo Puzzle Guide Painted Stones Puzzle Guide Huitztli Hill Puzzle Guide and Luxurious Chests
Warrior Challenge Locations How to Unlock Natlan Reputation How to Use Coilgrass Sigils
How to Use Flamegranates How to Use Relay Balls How to Use Grappling Hooks
How to Use Spiritways How to Unlock Firethief's Secret Isle Luxurious Chest Strange Saurian Cart Key Location and How to Use
How to Get Blazing Flint Ore All Four Iridescent Inscription Locations and How to Use Wooden Model Alpaca Locations and How to Use
Broken, Graffiti-Marked Stone Locations Phlogiston Extraction Research Center Puzzle Guide Night Jade Location and How to Use
Key to Somewhere Location and How to Use Green Obsidian Ring Location and How to Use Azure Obsidian Ring Location and How to Use
Obsidian Fragment and Ring Locations Yellow Obsidian Ring Location and How to Use Nightsoul's Blessing and Burst Mechanic Guide
Phlogiston of Natlan Guide All 8 Eremite Camp Locations in Sumeru Replicator Keystones and How to Create Ruin Devices
Invisible Wall Puzzle Guide in Sumeru Forged Primal Lights Puzzles and How to Use Sekhem Hall Puzzles and Treasure Guide
Desert Mirage Puzzles Guide in Sumeru Aaru's Shut Puzzle Guide and Sacred Seal Locations Abdju Road Puzzles and Treasures Guide
Primal Obelisk Locations and Puzzle Guide in Sumeru Floral Throne Location and Puzzle Guide Wounded Shin Valley Luxurious Chest and Other Puzzles Guide
Gurabad's Ruin - Temple of Deshret Puzzles Guide All Wadi Al-Majuj Sacred Seals in Sumeru Desert 3.4 Dual-Phase Neverlight Cells in Hadramaveth Desert
How to Upgrade the Power of Jinni in the Magic Bottle Runic Window and Runic Pane Switch Puzzle Guide How to Break Weathered Rocks in the Desert
How to Get Rid of Small and Large Atmospheric Vortexes Passage of Ghouls Luxurious Chest and Pyro Totem Puzzle Guide Safhe Shatranj Sand Puzzle and Luxurious Chest Guide
How to Get the Final Clearance in Desert of Hadramaveth How to Solve Cascade Pools and Spouts Puzzle Guide How to Use Jinn Shrines Guide
Manifestation Mechanisms and Signal Spirits Puzzle Guide Primal Sandglass Puzzle Guide in Sumeru Weathered Obelisk Puzzle Solutions and Locations
Memories of the Eternal Oasis Location and Puzzle Guide Clearance Guide to Get More Special Levels How to Disperse the Purple Mist in Asipattravana Swamp
Hadramaveth Remarkable Chest Locations and How to Get Nirodha Fruit Locations and Puzzle Guide Khvarena Mayfly Locations and Puzzle Guide
Asipattravana Swamp Luxurious Chest Puzzle Ruebright Blooms Puzzle Guide All Time Trials in Gavireh Lajavard and Realm of Farakhkert
Burgeoning Spirit Puzzle Guide How to Destroy Gray Crystals with Khvarena How to Jump Over the Corresponding Floating Mushrooms
All Elemental Totems in Gavireh Lajavard and Realm of Farakhkert All Torch Puzzle Solutions in 3.6 Girdle of the Sands All Plume of Purifying Light Locations
Possible Door to Khaenri'ah Location in Gavireh Lajavard Amrita Mayflies Puzzle Guide Sunyata Flower Locations and Puzzle Guide
Bright Flame Altar Puzzle Guide How to Use the Power of Khvarena Passage of the Ghouls Torch Puzzle Guide
Great Hall of Truths Location and Puzzle Guide How to Unlock and Use Obscuring Cells All 76 Aranara Locations in Sumeru and Puzzle Guide
Desert Illusory Murals Guide in Sumeru Vanarana Luxurious Chest Puzzle and 3 Seelies Locations Strange Energy Extraction Device Puzzles and Key Locations Guide
Broken Monuments in Sumeru Locations and Puzzle Guide Strange Parchment Locations and Puzzle Guide Unsealed Parchment Locations and Puzzle Guide
Guiding Parchment Locations and Puzzle Guide Whispering Parchment Locations and Puzzle Guide Sumeru Arrow Rune Puzzle Locations and Guide
Scylla Details and How to Summon Currents Fontaine Viewpoints and Location What is the Might of the Ancient Symphony?
Washer Octopus Puzzle Guide Lost Grimoire Locations and Bookshelf Puzzle Guide The Flying Outlander Achievement Guide
How to Pet Osse Wonderchime Flowers and Allochromatic Anemones Puzzle Guide All Ancient Autoharmonic Music Box Score Locations
Lacrimosa Score Location and How to Use Confutatis Score Location and How to Use Dies Irae Location and How to Use
Rex Tremendae Location and How to Use Tuba Mirum Location and How to Use Locus Amoenus Score Location and How to Use
Auric Anglerfish Locations and Puzzle Guide Chizhang Wall Puzzle and How to Solve What are Allogravity-Condensed Water Bodies?
How to Destroy Red Meanies Fixed Storage and Energy Transfer Device How to Destroy the Thorny Cyst
How to Stop the Strange Eels Pneumousia Relay Guide Pneumousia Storage Box Guide
Fantastical Floating Ball Guide Sonar Resonance Points Guide High-Pressure Water Vent Guide
How to Solve Fontaine Echoing Conches Water Volume Detection Crystal Puzzle Guide Locked Underwater Dome in Fontaine Puzzle Guide
How to Destroy Bullet Barnacles Transoceanic Sourcewater Guide Knocking Vases Locations in Chenyu Vale
Cube Device Puzzle Guide | Inazuma Cube Pattern Puzzle Aranyaka Mysterious Clipboard Locations and Aranara Painting Guide How to Collect the Carp Spirit Orb
How to Get the Secret Miracle Achievement Strange Phenomenon: Miasma Puzzle Guide How to Solve Millennia of History Puzzles
Scenes of Flowing Lotuses Puzzle Guide How to Get the Adeptus's Repose Luxurious Chest How to Find the Secret Stashed in the Arcane Archive
All Ancient Swordsman's Inscription Locations Xuanji Chest and How to Open Jade Incense Cauldron Locations and Puzzle Guide
Golden Carp's Leap Puzzle Guide Sacred Simulacrum Types and Puzzles Guide Stone Pillar Seal Puzzle Locations and Guide
Where to Get the Ancient Stone Key Mysterious Clipboard 1 Location and Aranara Painting Mysterious Clipboard 13 Location and Aranara Painting
Mysterious Clipboard 12 Location and Aranara Painting Mysterious Clipboard 9 Location and Aranara Painting Mysterious Clipboard 10 Location and Aranara Painting
Mysterious Clipboard 3 Location and Aranara Painting Mysterious Clipboard 2 Location and Aranara Painting Mysterious Clipboard 4 Location and Aranara Painting
Mysterious Clipboard 5 Location and Aranara Painting Mysterious Clipboard 6 Location and Aranara Painting Mysterious Clipboard 8 Location and Aranara Painting
Mysterious Clipboard 7 Location and Aranara Painting Mysterious Clipboard 11 Location and Aranara Painting How to Solve Pipe Diverter Valve Puzzles in the Sumeru Desert 3.4
All Chess Piece Locations and How to Use Safhe Shatranj Chess Puzzle Guide Everlight Cell and Beam Transmission Puzzles in Sumeru
Lightcall Path Puzzle Guide Cipher Letter Puzzle and Locations Not So Strait is the Gate in Bravais' Hidden Study
How to Retrieve All 4 Replica Anchors Remains of the Day Secret Achievement and Chest Guide Khemenu Temple Puzzle Guide
Look For A Fravashi Tree Locations and Puzzle Guide How to Play Kory Drums and Locations How to Search for Nurseries in the Wild and All Locations in the Forest
How to Solve Floating Crystal Flowers and Platforms Potential Energy Orbs How to Solve and Locations Humongous Hat Jellyfish How to Solve and Locations
How to Solve Harmonious Reed Pipes and Locations How to Solve Dew Bubbles and Branches How to Remove Contaminated Bacterial Mats
Water Barrier Seelie Luxurious Chest How to Use Energy Transfer Terminals How to Go to the Abandoned Production Zone
Gear Drivetrain and Drive Valve Puzzle How to Solve the Forging Press Puzzle Flying Energy Thief Guide
How to Operate the Drive Valve to Open Access to Supply Warehouse 1 Stabilizer Puzzle Guide How to Avoid the Searchlight's Detection Range
How to Get to Narzissenkreuz Ordo Opera Epiclese Heart Plant Co-Op Chest Underwater Combat and Exploration Guide
Mysterious Parchment Locations and Puzzle Guide How to Get and Use the Twin-Horned Chaplet How to Get the Lumenspar Behind the Chasm Locked Gate
Vourukasha Oasis Heart Pool Co-Op Chest How To Find The Great Songs of Khvarena Guide How to Use Scarlet Quartz and Break Ancient Rime
"You do not have enough clearance" Guide How to Go Through the Passage and Reach the Balladeer | Deus Foundry Domain and Chest Guide How to Try to Open the Coffin in Mausoleum of King Deshret
How to Enter Thutmose's Secret Base in Lamb-Devourer Rock How to Collect Sumeru Rose Seeds Follow the Stone Slate's Guidance and Obtain Full Clearance
Drusus's Riddle and Sumeru Bulletin Board Puzzle Guide How to Go to the Fane of Ashvattha Location and Lower the Water Level How to Proceed to the Location Shown in the Painting in Static Views
How to Look for the Head Mushroom Where to Find Xinyue Kiosk's Location in Liyue Harbor How to Purify the Large Crystal in The Chasm
How to Ring the Two Bells on Either Side of the Ruins Nameless Treasure Locations, Rewards, and Where to Sell How to Follow the Water's Flow and Search for the Source in The Chasm
How to Look for the Ring Stolen from Taliesin How to Avoid Balethunder Damage | Balethunder Guide Electric Lamp Puzzle Guide
How to Get to Heart Island | Secret Island Location and Rewards Dandy's Time Trial Challenge | Locations and Rewards
    Please participate in our site
    improvement survey
    12/2025
    Would you assist in
    improving Game8's site?
    ×
    This survey will take about 1 minute.
    Your answers will help us to improve our website.
    We are listening to our users' valuable opinions and discussing how to act on them.
    The information collected through this survey will be used for the purpose of improving our services. In addition, the information will only be disclosed a part of a statistic in a format that will not allow identification of personal information.
    Begin Survey

    All rights reserved

    Guide Index