In the Shadows of Night Quest Guide
★ Exclusive: Dive back in time with the Meta History
◆ Hot: Version 6.4, 6.4 Codes, Linnea, Version 6.5
◆ Builds: Varka, Flins, Skirk, Escoffier
◆ Events: Travelers' Tales, Sightseeing With Friends
◆ Endgame: Spiral Abyss (March 2026)

In the Shadows of Night is the third part of the Archon Quest A Dance of Snowy Tides and Hoarfrost Groves, Act 1 in Genshin Impact. See how to operate the terminal and head to the freight shaft entrance, how to pass through the ventilation duct, how to solve the mechanism and shut the fan off, how to unlock this quest, its walkthrough, and all the rewards of this quest!
List of Contents
How to Unlock In the Shadows of Night
Complete the Reunion Beneath the Moonlight Quest
To unlock In the Shadows of Night, you must have completed the previous subquest of A Dance of Snowy Tides and Hoarfrost Groves, Reunion Beneath the Moonlight!
Reunion Beneath the Moonlight Quest Guide
In the Shadows of Night Walkthrough
Head to the Meet-Up Point
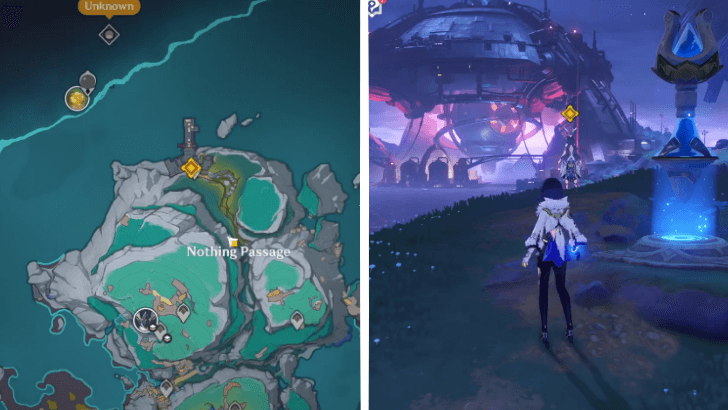
Set the in-game clock to the next day between 20:00 - 23:00, then head to the cliff overlooking the Fatui Experimental Design Bureau at the northernmost point of Lempo Isle. If you haven’t unlocked the nearby waypoint, you’ll need to make the trek north on foot; otherwise, simply teleport there.
Meet Lauma at the designated spot and wait for Jahoda to arrive so the group can finalize the infiltration plan. Once the discussion ends, speak to Jahoda again to begin the infiltration.
Infiltrate the Fatui Experimental Design Bureau

Interact with the control panel on the left side of the Bureau’s gate to trigger a cutscene, during which Jahoda reveals the access clearance card she stole. Afterward, interact with the panel again to open the front gates and proceed to the next area.
Choose a Suitable Route to Continue
The next gate is guarded by drones equipped with searchlights, which will reset your current position if you enter their detection radius.
To bypass them, take the ladder to the left of the gate, which leads to an elevated path. Continue along the rooftops, following the green arrow signs, until you reach another ladder that will lead you to the next area upon moving forward.
Operate the Terminal and Head to the Freight Shaft Entrance
More drones with searchlights will be present at the freight bay which you'll have to avoid by directing the drones away from their current location. Use the terminal within the location to move around the drones to your advantage.
Operate the Drone Terminal
| How to Operate the Drone Terminal | |
|---|---|
| 1 | 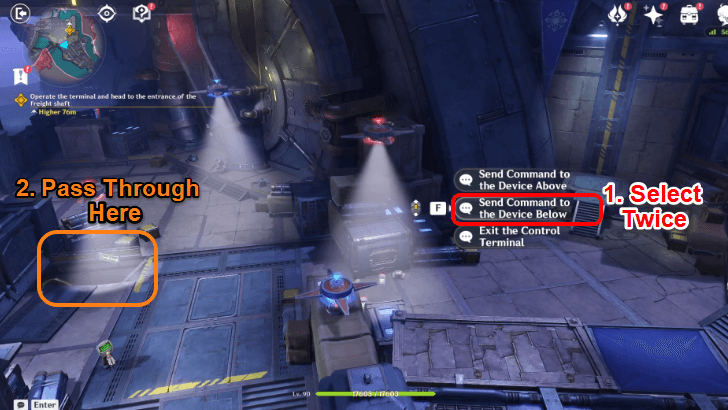 Interact with the control panel and select Send Command to the Device Below twice to move the drone guarding the underground path to the left. Once the area is clear, proceed down the unguarded path. |
| 2 | 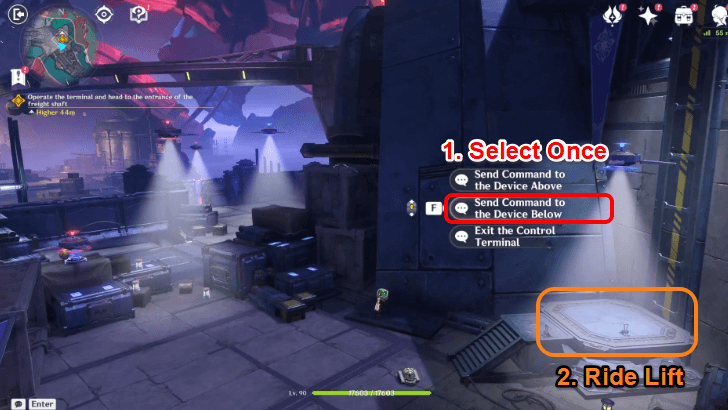 Operate the terminal on the other side of the underground path and select Send Command to the Device Below once to move the drone guarding the freight shaft away. Ride the lift upward, then interact with the next terminal at the very top. |
Approach the Terminal

Evade the search drones by slipping through the walkway on the left, keeping behind the crates, and interact with the terminal near the staircase. Jahoda notes that the terminal is inactive and requires a power boot, then tasks you with retrieving the charging devices Lauma detected on the other side of the terminal.
Look for a Charging Device
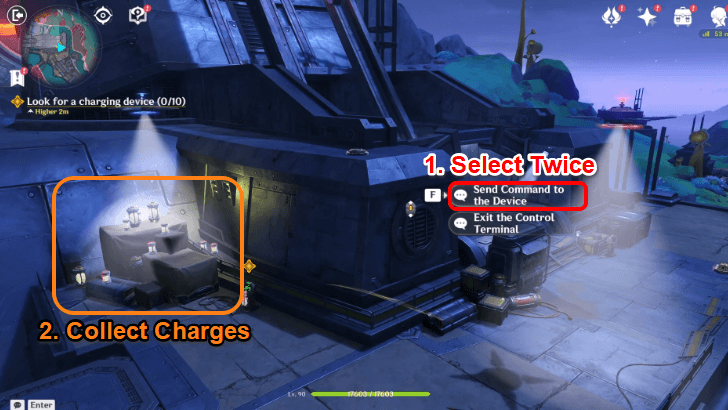
Head back to where you came from by sneaking behind the crates, then turn right, toward the active terminal in front of the lift. Operate the terminal and select Send Command to the Device twice in order to disable the drone watching over the charging devices.
Afterwards, collect all 10 Khuuvaki tubes on top of the crates and return to the inactive terminal to reboot it.
Go to the Upper Levels of the Bureau
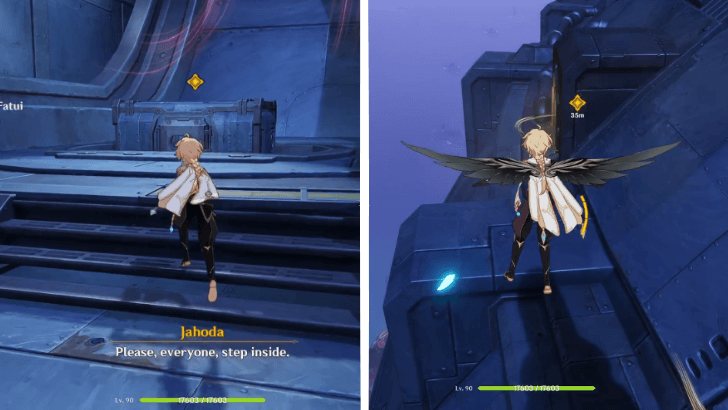
Ride the cargo crate that appears afterwards, only for your journey to be interrupted midway. After going out of the lift, fly down to the Ventilation Duct to find another path in. Upon entering, however, the vent gate closes up immediately, separating Jahoda from the group.
Pass Through the Ventilation Duct
After being separated, Jahoda locates a terminal to reestablish communication with the group and warns of a hall of lasers blocking the vents. Once Lauma reveals the laser layout, you must guide Jahoda in rotating the vent hallway to create a safe path forward.
Safely Pass Through the Ventilation Duct
| How to Pass Through the Ventilation Duct | |
|---|---|
| 1 | 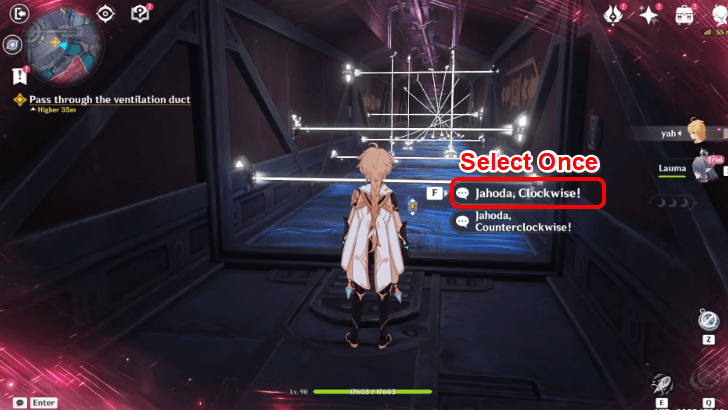 Instruct Jahoda to move the hallway clockwise once and pass through the middle of the vent. |
| 2 | 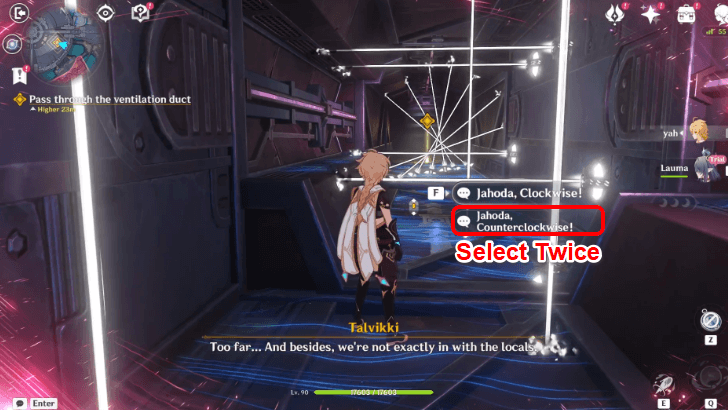 On the second portion, instruct Jahoda to turn the hallway counterclockwise twice and proceed through. |
| 3 | 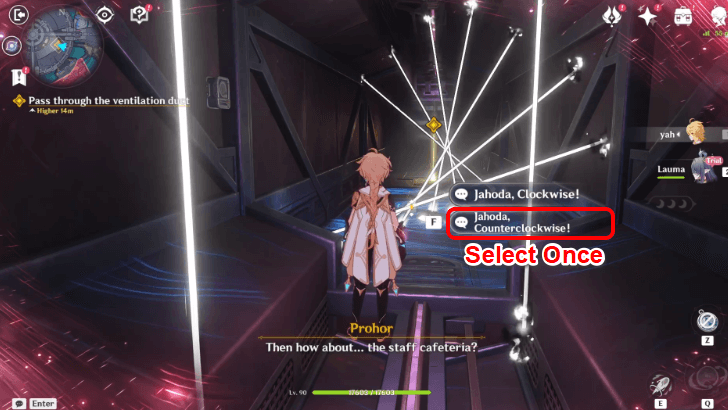 Finally, instruct Jahoda to turn the hallway counterclockwise once then walk through the clear path on the right. |
Obtain a High-Level Access Card
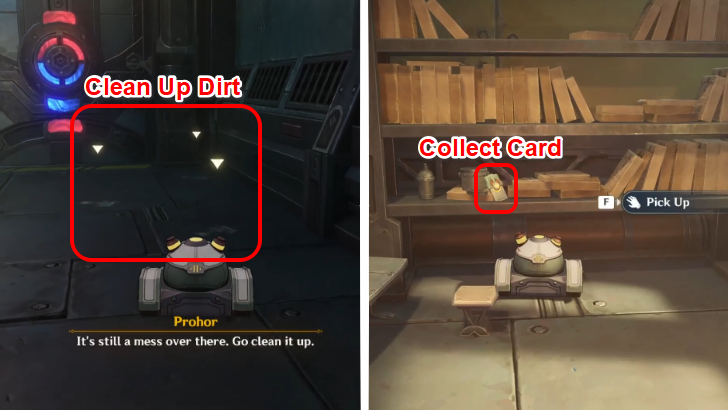
Meanwhile, Jahoda takes control of a janitor bot to secure a high-level access card. As the bot, sweep up all the dirt patches on the floor until the platform with two Fatui members becomes accessible.
Grab the high-level access card from the shelf to the left, then quickly exit through the small hole that opens on the opposite side of the room.
Continue Infiltrating

Listen to Jahoda during the cutscene, then continue to infiltrate the Experimental Design Bureau. Use the High-Level Access Card to get into the lift and reach the lower level.
Solve the Mechanism and Shut the Fan Off

As you enter the next area, the core is protected by the Core Guardian and drones. You can get around the fan's perimeter, as it's rotating, and shoot the drones at their back.
You can also focus the mechanism at the center and shoot it with Kuuvahki Drops, while neglecting the other enemies by dodging their attacks. Once the fan mechanism is off after breaking the core, proceed to the lower level to check for an escape route.
Bipolar and Unipolar Objects Guide
Enter the Space Underneath
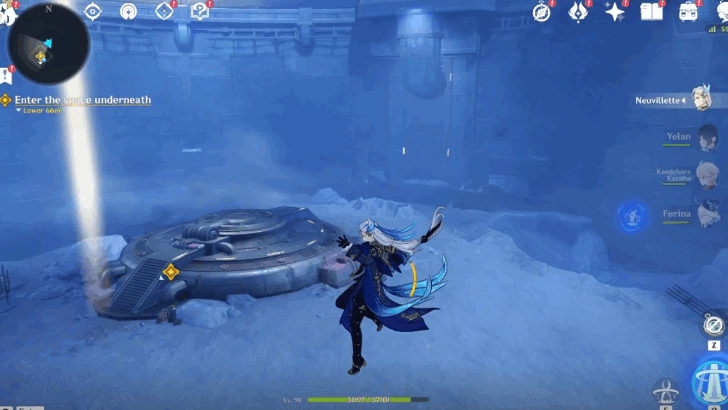
Plunge from the platform to reach the space below, which seems to be another fragment of the Ancient Moon's Remnants. As the metal door opens, a lengthy cutscene plays while Vilemina reveals her intentions.
Try to Seal the Wild Hunt

Make your way out of the Experimental Design Bureau to confront the Marionette. However, multiple waves of the Wild Hunt will appear instead, and you must defeat them to seal it away.
Find Everyone
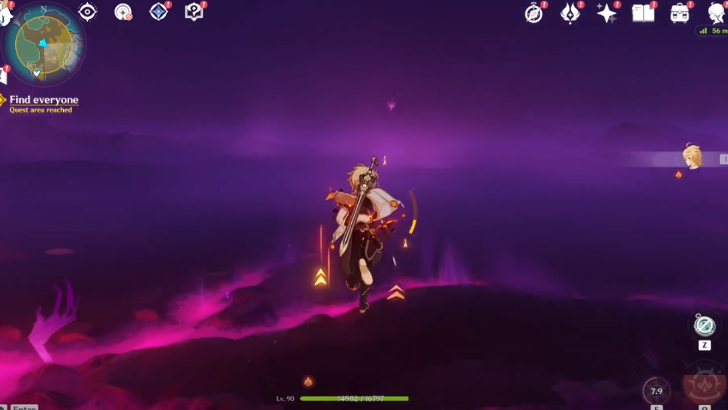
After defeating the enemy, the seal exploded, surrounding the area with Abyssal energy. Try to find your allies and follow the source of the familiar voice.
Return to the Curatorium of Secrets
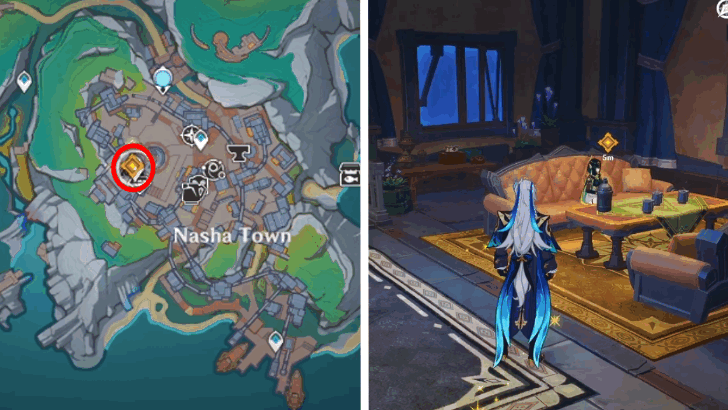
Teleport to Nasha Town and head straight to the Curatorium of Secrets, then talk to Nefer, who is sitting on the couch.
Accompany Lauma Back to Hiisi Island
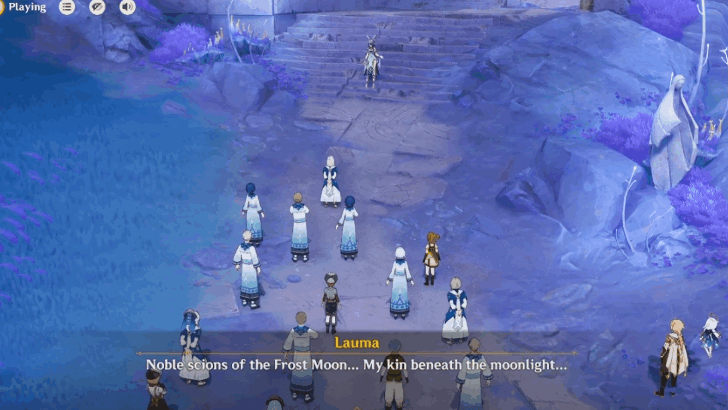
After Lauma acquires the Moon Marrow, accompany her back to the Hiisi Island, where she reveals the hidden truth about the history and true identity of their moon goddess.
In the Shadows of Night Rewards
Total Quest Rewards
| Total Quest Rewards |
 Primogem x60 |
 Mora x68175 |
|---|---|---|
 Hero's Wit x6 |
 Adventure EXP x1550 |
|

Genshin Impact Related Guides

Other A Dance of Snowy Tides and Hoarfrost Groves Quest Guides
| A Dance of Snowy Tides and Hoarfrost Groves Quest Guides | ||
|---|---|---|
| Where the Moon Rises | Reunion Beneath the Moonlight | In the Shadows of Night |
A Dance of Snowy Tides and Hoarfrost Groves Quest Line Guide
Author

In the Shadows of Night Quest Guide


Rankings
- We could not find the message board you were looking for.
Gaming News


Popular Games

Genshin Impact Walkthrough & Guides Wiki
Umamusume: Pretty Derby Walkthrough & Guides Wiki
Pokemon Pokopia Walkthrough & Guides Wiki
Honkai: Star Rail Walkthrough & Guides Wiki
Monster Hunter Stories 3: Twisted Reflection Walkthrough & Guides Wiki
Arknights: Endfield Walkthrough & Guides Wiki
Wuthering Waves Walkthrough & Guides Wiki
Zenless Zone Zero Walkthrough & Guides Wiki
Pokemon TCG Pocket (PTCGP) Strategies & Guides Wiki
Monster Hunter Wilds Walkthrough & Guides Wiki


Recommended Games
Fire Emblem Heroes (FEH) Walkthrough & Guides Wiki
Diablo 4: Vessel of Hatred Walkthrough & Guides Wiki
Cyberpunk 2077: Ultimate Edition Walkthrough & Guides Wiki
Yu-Gi-Oh! Master Duel Walkthrough & Guides Wiki
Super Smash Bros. Ultimate Walkthrough & Guides Wiki
Pokemon Brilliant Diamond and Shining Pearl (BDSP) Walkthrough & Guides Wiki
Elden Ring Shadow of the Erdtree Walkthrough & Guides Wiki
Monster Hunter World Walkthrough & Guides Wiki
The Legend of Zelda: Tears of the Kingdom Walkthrough & Guides Wiki
Persona 3 Reload Walkthrough & Guides Wiki


All rights reserved
Copyright© 2012-2024 HoYoverse — COGNOSPHERE. All Rights Reserved.
The copyrights of videos of games used in our content and other intellectual property rights belong to the provider of the game.
The contents we provide on this site were created personally by members of the Game8 editorial department.
We refuse the right to reuse or repost content taken without our permission such as data or images to other sites.
The first chest is easily missable, if you just ride the elevator, which triggers a cutscene. Be careful.