This survey will take about 1 minute.
Your answers will help us to improve our website.
Genshin Impact
Extinction: Aeonblight's End Stage 1 Guide
✉ Send your thoughts in our Genshin 6.4 Patch Survey!
★ Exclusive: Dive back in time with the Meta History
◆ Hot: Version 6.4, Luna 5 Codes
◆ Builds: Varka, Flins, Skirk, Escoffier
◆ Events: Travelers' Tales, He Who Caught the Wind
◆ Future: Linnea, Version 6.5 Luna VI
Extinction: Aeonblight's End is the first stage of the Unlimited Fighting Championship event in Genshin Impact 5.5. See the best teams for the first and second half, how to deplete the boss HP 900 times, and all rewards for it here!
| Unlimited Fighting Championship Stages | ||||
|---|---|---|---|---|
List of Contents
Best Teams For Aeonblight's End
Recommended Teams For Stage 1
| First Half Teams | |||
|---|---|---|---|
|
|
|
|
|
|
|
|
|
|
| Second Half Teams | |||
|
|
|
|
|
|
|
|
|
|
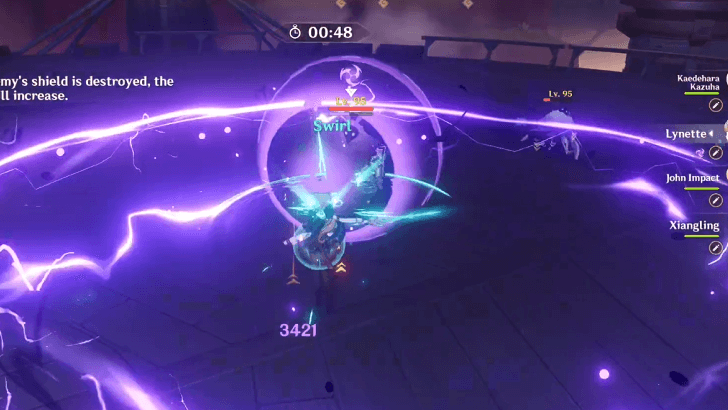
Bring Pyro Swirl For The First Half
Due to the never-ending wave of Electro and Cryo Abyss Mages in the first half, bringing a dominantly Pyro team along with an Anemo Swirler will do wonders in breaking their Shields quickly in order to reap maximum buffs.
Take note that since these Abyss Mages spawn in the same spot, playing circle impact with an Anemo character like Kazuha is completely viable as you can effectively lock down their spawn point with Pyro swirls.
Bring At Least One Bow Character For The Second Half
With the Aeonblight Drake's periodic resistance phase, bringing a Bow character to bring it down from the sky can speed up how quickly you can deplete the boss's HP bar.
Aeonblight's End First Half Strategy
Maintain Consistent Pyro Swirls

The First Half is arguably more important than the Second Half due to this part dictating how many buffs you will have available to you later on.
The main strategy here is to ensure that you constantly swirl Pyro, as that will quickly break both elemental Abyss Mage shields and allow you to rack up points.
Keep Enemies Grouped Up
Especially against the Electro Abyss Mage, try your best to keep both enemies close to each other as you are more likely to swirl both Pyro and Electro, which may activate Overload and blast the enemies away from you.
Aeonblight's End Second Half Strategy
Disable Aeonblight Wings With a Bow
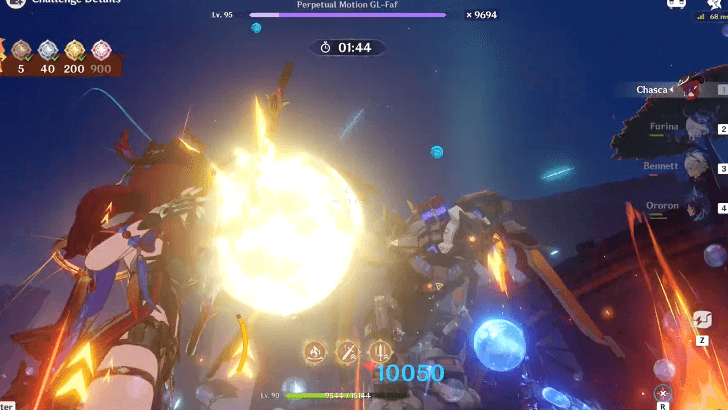
Your main gimmick with the Second Half is to create a consistent damage rotation against the Aeonblight Drake. This is only interrupted when the Drake activates its special mechanics and gains resistance.
When this happens, immediately switch to your Bow Character and fire Aimed Shots at their wing rotors to bring them down and continue your combo.
Take Advantage of the First Half Buffs
If you are struggling to reach your desired number of Boss HP depletions, then you are free to retry the First Half segment if you did not gain access to all of the possible buffs.
These buffs can be game-changing as the bonus DMG can make or break the rate at how fast you can clear the boss's HP bars.
Aeonblight's End Stage Details
Stage 1 Trial Characters
| Aeonblight's End Trial Characters | |
|---|---|
 Mizuki Mizuki
|
 Chasca Chasca
|
For Stage 1 of the Unlimited Fighting Championship event, you will have trial variants of Mizuki and Chasca to aid in the fight.
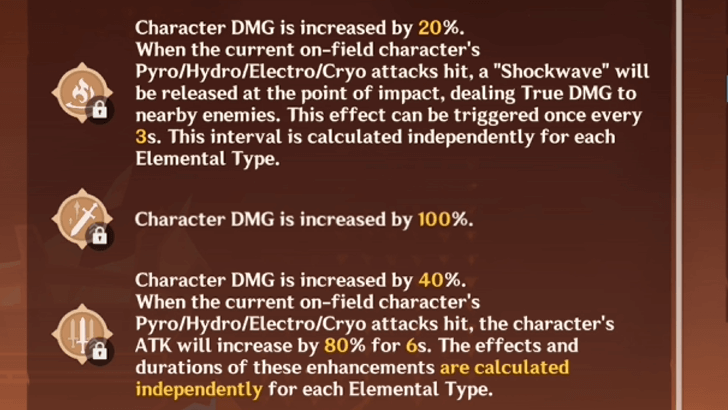
Stage 1 Buffs
| Stage 1 Buffs | Description |
|---|---|
| Character DMG is increased by 20%. When the current on-field character's Pyro/Hydro/Electro/Cryo attacks hit, a "Shockwave" will be released at the point of impact, dealing True DMG to nearby enemies. This effect can be triggered once every 3s. This interval is calculated independently for each Elemental Type. |
|
| Character DMG is increased by 100%. | |
| Character DMG is increased by 40%. When the current on-field character's Pyro/Hydro/Electro/Cryo attacks hit, the character's ATK will increase by 80% for 6s. The effects and durations of these enhancements are calculated independently for each Elemental Type. |
Stage 1 Enemies
| Aeonblight's End Enemies |
|---|
| First Half: Second Half: |
Part of the Unlimited Fighting Championship Event
Extinction: Aeonblight's End is the 1st stage of the Unlimited Fighting Championship Event, where players must face and defeat powerful opponents as many times as they can.
Unlimited Fighting Championship
Aeonblight's End Rewards
All Unlimited Fighting Championship Stage 1 Rewards
| Objective | Rewards |
|---|---|
| In a single attempt, deplete the HP bar of a boss in the second half 5 times |
|
| In a single attempt, deplete the HP bar of a boss in the second half 40 times |
|
| In a single attempt, deplete the HP bar of a boss in the second half 200 times |
|
| In a single attempt, deplete the HP bar of a boss in the second half 900 times |
|
Genshin Impact Related Guides

Unlimited Fighting Championship
Unlimited Fighting Championship Stage Guides
| Unlimited Fighting Championship Stages | |
|---|---|
 1 - Extinction: Aeonblight's End 1 - Extinction: Aeonblight's End |
 2 - Ruin: Summit the Mountain King 2 - Ruin: Summit the Mountain King |
 3 - Blaze: Lay Low the Lava's Lord 3 - Blaze: Lay Low the Lava's Lord |
 4 - Shatter: Formidable Fungi Monster 4 - Shatter: Formidable Fungi Monster |
 5 - Showdown: Apex Adversary 5 - Showdown: Apex Adversary |
|
Other Events and Schedule

Comment
1  Anonymous 11 months
idk why but no matter how hard I try in the first half, it only ever gives me 10 health bars. I want to fight the boss more, I swear...
Author

Extinction: Aeonblight's End Stage 1 Guide
Please participate in our site
improvement survey
03/2026
improvement survey
03/2026
Would you assist in
improving Game8's site?
improving Game8's site?

×
We are listening to our users' valuable opinions and discussing how to act on them.
The information collected through this survey will be used for the purpose of improving our services. In addition, the information will only be disclosed a part of a statistic in a format that will not allow identification of personal information.
Begin Survey
Not Now
×
Please rate each item regarding Game8.co's Advertisements.
Amount of Ads
Very Dissatisfied
Somewhat Dissatisfied
Fine
Somewhat Satisfied
Highly Satisfied
Placement of Ads
Timing of Ad Display
Ad Loading Speed
Safeness of Ads
Content of Ads
×
Please rate each item regarding Game8.co's Quality of Articles.
Amount of information
Very Dissatisfied
Somewhat Dissatisfied
Fine
Somewhat Satisfied
Highly Satisfied
Frequency of updates
Speed of new information
Accuracy of articles
Understandibility of articles
Readability of sentences
×
Please rate each item regarding Game8.co's Usability of the Site.
Ease of finding information
Very Dissatisfied
Somewhat Dissatisfied
Fine
Somewhat Satisfied
Highly Satisfied
Loading Speed
Use of Color
Font Size
Visibility of Images
Easy to Understand Layout
×
Please rate each item regarding Game8.co's Message Boards, Comments.
Ease of Writing
Very Dissatisfied
Somewhat Dissatisfied
Fine
Somewhat Satisfied
Highly Satisfied
Readability
Ease in Finding Information
Comment Quality
Comment Quantity
Admin Response
×
Please rate each item regarding Game8.co's Site's new design.
Please rate our site's new design
Very Dissatisfied
Somewhat Dissatisfied
Fine
Somewhat Satisfied
Highly Satisfied
Do you think that the website's design change makes the site easier to use?
Has the new design made it easier for you to find information on the site?
Has the new design improved the overall visual appeal of the site?
How would you rate your overall satisfaction with the new design of the site?
×
How likely are you to recommend Game8 to someone you know?
Very Unlikely
0
1
2
3
4
5
6
7
8
9
10
Very Likely
If you have other opinions regarding potential improvement to the website, please share them with us. We would appreciate your honest opinion.
Note: This is a free response section, so you can proceed without entering anything.
Note: Please be sure not to enter any kind of personal information into your response.
Note: Please be sure not to enter any kind of personal information into your response.
×
Thank You
×
Thank you for participating in our survey! Your answers will help us to improve the quality of our website and services.
We hope you continue to make use of Game8.
We hope you continue to make use of Game8.
Close


Rankings
Gaming News


![Monster Hunter Stories 3 Review [First Impressions] | Simply Rejuvenating](https://img.game8.co/4438641/2a31b7702bd70e78ec8efd24661dacda.jpeg/thumb)
Popular Games

Genshin Impact Walkthrough & Guides Wiki
Honkai: Star Rail Walkthrough & Guides Wiki
Umamusume: Pretty Derby Walkthrough & Guides Wiki
Pokemon Pokopia Walkthrough & Guides Wiki
Resident Evil Requiem (RE9) Walkthrough & Guides Wiki
Monster Hunter Wilds Walkthrough & Guides Wiki
Wuthering Waves Walkthrough & Guides Wiki
Arknights: Endfield Walkthrough & Guides Wiki
Pokemon FireRed and LeafGreen (FRLG) Walkthrough & Guides Wiki
Pokemon TCG Pocket (PTCGP) Strategies & Guides Wiki


Recommended Games
Diablo 4: Vessel of Hatred Walkthrough & Guides Wiki
Cyberpunk 2077: Ultimate Edition Walkthrough & Guides Wiki
Fire Emblem Heroes (FEH) Walkthrough & Guides Wiki
Yu-Gi-Oh! Master Duel Walkthrough & Guides Wiki
Super Smash Bros. Ultimate Walkthrough & Guides Wiki
Pokemon Brilliant Diamond and Shining Pearl (BDSP) Walkthrough & Guides Wiki
Elden Ring Shadow of the Erdtree Walkthrough & Guides Wiki
Monster Hunter World Walkthrough & Guides Wiki
The Legend of Zelda: Tears of the Kingdom Walkthrough & Guides Wiki
Persona 3 Reload Walkthrough & Guides Wiki


All rights reserved
Copyright© 2012-2024 HoYoverse — COGNOSPHERE. All Rights Reserved.
The copyrights of videos of games used in our content and other intellectual property rights belong to the provider of the game.
The contents we provide on this site were created personally by members of the Game8 editorial department.
We refuse the right to reuse or repost content taken without our permission such as data or images to other sites.
Press Reset Challenge Progress (the button with the circling arrows) and change difficulty level