
This survey will take about 1 minute.
Your answers will help us to improve our website.
Genshin Impact
Perfect Elemental Vector Stage 3 Guide
✉ Send your thoughts in our Genshin 6.4 Patch Survey!
★ Exclusive: Dive back in time with the Meta History
◆ Hot: Version 6.4, Luna 5 Codes
◆ Builds: Varka, Flins, Skirk, Escoffier
◆ Events: Travelers' Tales, He Who Caught the Wind
◆ Future: Linnea, Version 6.5 Luna VI
Perfect Elemental Vector is stage 3 of the Great Fayz Reaction Debate in Genshin Impact 4.5. Check out the stage 3 Trial Characters, Fayz effect, enemies, how to beat the challenge, and all the rewards here!
| The Great Fayz Reaction Debate Guides | |||
|---|---|---|---|
How to Defeat the Opponents in Perfect Elemental Vector
Fayz Trials Stage 3 Trial Characters
| Stage 3 Trial Characters | |
|---|---|
|
|
|
Use Your Own Characters
If you have your own, fully built Yae Miko or Alhaitham, we suggest using your characters instead of the Trial versions, as you will likely be more familiar with their capabilities!
Using Alhaitham and Yae Miko Effectively
| 1 | Place all three of Yae Miko's Elemental Skill totems in the field. |
|---|---|
| 2 | Use Alhaitham's Elemental Burst to get Dendro Infusion and three Chisel-Light Mirror stacks. |
| 3 | Only use Alhaitham's Elemental Skill or Charged Attack when your Chisel-Light Mirror stack falls to two, or if the raining Projection Attack was procced twice. Managing your Chisel-Light Mirrors is key to mastering Alhaitham! |
| 4 | Use Yae Miko's burst should you wish so, but only do it if you have all three totems in the field (which lets you replace the totems again), and you have Quicken on the enemies. |
Use Normal Attacks or Elemental Skills
Both Yae Miko and Alhaitham can often proc the time dilation effect as Elemental Skills and Normal Attacks are easy to access with their kit. Again, stop all motions to create the Supersense Particle, then position your character in front of it to unleash your special skill!
Alhaitham specifically does both Normal Attacks and Elemental Skill in one attack when you have at least one Mirror. If you attack with his Normal Attack, a Projection Attack will follow, which lets you have two windows of opportunity to activate your special skill.
Prioritize the Focus Foes
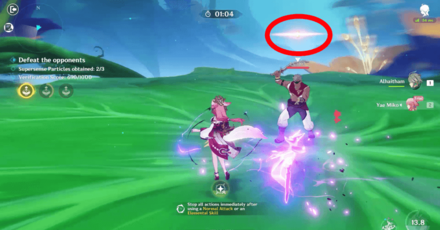
Starting from Stage 3, a Focus target will appear. These enemies grant more Fayz Force, which lets you use the special skill more often. When such enemies appear, prioritize this target as they will become normal enemies after some time has passed!
Focus Foes are indicated when they have a glowing orb above their heads.
Perfect Elemental Vector Domain Details
Stage 3 Supersense Skill Effects
| Prerequisite | When you have enough Fayz Force, use a Normal Attack or Elemental Skill. Then, stop all actions immediately to create Supersense Particles. |
|---|---|
| Supersense Skill Effect | Unleash a shockwave at the character's position, dealing True DMG to nearby opponents and restoring HP to all nearby party members equal to 100% of the character's Max HP. Additionally, all your party members will gain 300 Elemental Mastery for 20s. |
Stage 3 Trial Characters Info
| Character | Trial Build |
|---|---|
|
(Lvl. 80) |
|
|
(Lvl. 80) |
|
Level 8 Talents and 0 Constellations
All Trial Characters in Stage 3 have Talents at Level 8 and 0 Constellations. Their weapons are at level 80, and they have both 2-piece and 4-piece effects of their artifact sets activated.
Fayz Debate Stage 3 Enemies
| Focus Foes | |
|---|---|
| Normal Enemies |
Perfect Elemental Vector Rewards
Fayz Debate Stage 3 Rewards
| Objectives | Rewards |
|---|---|
| Score 100 points |
|
| Obtain Supersense Particles 3 times |
|
| Score 1000 points |
|
Perfect Elemental Vector Info
Part of the Great Fayz Reaction Debate

Perfect Elemental Vector is the third challenge in the Great Fayz Reaction Debate Event. In Stage 3, you'll be up against Sumeru enemies like Fungi, Eremites, and Primal Constructs!
The Great Fayz Reaction Debate Guide
Genshin Impact Related Guides

The Great Fayz Reaction Debate Event Guide
Great Fayz Reaction Debate Stage Guides
| Fayz Debate Stage | Unlock Dates and Characters |
|---|---|
 Fayz Supersense Timing Fayz Supersense Timing |
Unlocks March 22, 2024 |
| Efficacy of Critical Blows |
Unlocks March 22, 2024 |
| Perfect Elemental Vector |
Unlocks March 23, 2024 |
| Induced Stress at Low Temperatures |
Unlocks March 24, 2024 |
| Tempest's Turbulent Airflow |
Unlocks March 25, 2024 |
| Persistent Replicable Stability |
Unlocks March 26, 2024 |
| Residual Repercussions of Rigid Collisions |
Unlocks March 27, 2024 |
| Solid Structure Shattering Shockwave |
Unlocks March 28, 2024 |
Fayz Trial Characters Guide
| List of Trial Characters Guide |
|---|
 All Trial Characters All Trial Characters |
Previous Fayz Trials Event Guides
| Fayz Trials Event Guides | |
|---|---|
 Fayz Trials 3.0 Guide Fayz Trials 3.0 Guide |
 Fayz Trials Hypothesis Guide Fayz Trials Hypothesis Guide |
Fayz Trials Hypothesis 3.7 Stage Guides
Fayz Trials 3.0 Stage Guides
| 3.0 Fayz Trials Stages | ||
|---|---|---|
All Genshin Impact Events
Comment
Author

Perfect Elemental Vector Stage 3 Guide
Please participate in our site
improvement survey
03/2026
improvement survey
03/2026
Would you assist in
improving Game8's site?
improving Game8's site?

×
We are listening to our users' valuable opinions and discussing how to act on them.
The information collected through this survey will be used for the purpose of improving our services. In addition, the information will only be disclosed a part of a statistic in a format that will not allow identification of personal information.
Begin Survey
Not Now
×
Please rate each item regarding Game8.co's Advertisements.
Amount of Ads
Very Dissatisfied
Somewhat Dissatisfied
Fine
Somewhat Satisfied
Highly Satisfied
Placement of Ads
Timing of Ad Display
Ad Loading Speed
Safeness of Ads
Content of Ads
×
Please rate each item regarding Game8.co's Quality of Articles.
Amount of information
Very Dissatisfied
Somewhat Dissatisfied
Fine
Somewhat Satisfied
Highly Satisfied
Frequency of updates
Speed of new information
Accuracy of articles
Understandibility of articles
Readability of sentences
×
Please rate each item regarding Game8.co's Usability of the Site.
Ease of finding information
Very Dissatisfied
Somewhat Dissatisfied
Fine
Somewhat Satisfied
Highly Satisfied
Loading Speed
Use of Color
Font Size
Visibility of Images
Easy to Understand Layout
×
Please rate each item regarding Game8.co's Message Boards, Comments.
Ease of Writing
Very Dissatisfied
Somewhat Dissatisfied
Fine
Somewhat Satisfied
Highly Satisfied
Readability
Ease in Finding Information
Comment Quality
Comment Quantity
Admin Response
×
Please rate each item regarding Game8.co's Site's new design.
Please rate our site's new design
Very Dissatisfied
Somewhat Dissatisfied
Fine
Somewhat Satisfied
Highly Satisfied
Do you think that the website's design change makes the site easier to use?
Has the new design made it easier for you to find information on the site?
Has the new design improved the overall visual appeal of the site?
How would you rate your overall satisfaction with the new design of the site?
×
How likely are you to recommend Game8 to someone you know?
Very Unlikely
0
1
2
3
4
5
6
7
8
9
10
Very Likely
If you have other opinions regarding potential improvement to the website, please share them with us. We would appreciate your honest opinion.
Note: This is a free response section, so you can proceed without entering anything.
Note: Please be sure not to enter any kind of personal information into your response.
Note: Please be sure not to enter any kind of personal information into your response.
×
Thank You
×
Thank you for participating in our survey! Your answers will help us to improve the quality of our website and services.
We hope you continue to make use of Game8.
We hope you continue to make use of Game8.
Close


Rankings
Gaming News


![Monster Hunter Stories 3 Review [First Impressions] | Simply Rejuvenating](https://img.game8.co/4438641/2a31b7702bd70e78ec8efd24661dacda.jpeg/thumb)
Popular Games

Genshin Impact Walkthrough & Guides Wiki
Honkai: Star Rail Walkthrough & Guides Wiki
Umamusume: Pretty Derby Walkthrough & Guides Wiki
Pokemon Pokopia Walkthrough & Guides Wiki
Resident Evil Requiem (RE9) Walkthrough & Guides Wiki
Monster Hunter Wilds Walkthrough & Guides Wiki
Wuthering Waves Walkthrough & Guides Wiki
Arknights: Endfield Walkthrough & Guides Wiki
Pokemon FireRed and LeafGreen (FRLG) Walkthrough & Guides Wiki
Pokemon TCG Pocket (PTCGP) Strategies & Guides Wiki


Recommended Games
Diablo 4: Vessel of Hatred Walkthrough & Guides Wiki
Cyberpunk 2077: Ultimate Edition Walkthrough & Guides Wiki
Fire Emblem Heroes (FEH) Walkthrough & Guides Wiki
Yu-Gi-Oh! Master Duel Walkthrough & Guides Wiki
Super Smash Bros. Ultimate Walkthrough & Guides Wiki
Pokemon Brilliant Diamond and Shining Pearl (BDSP) Walkthrough & Guides Wiki
Elden Ring Shadow of the Erdtree Walkthrough & Guides Wiki
Monster Hunter World Walkthrough & Guides Wiki
The Legend of Zelda: Tears of the Kingdom Walkthrough & Guides Wiki
Persona 3 Reload Walkthrough & Guides Wiki


All rights reserved
Copyright© 2012-2024 HoYoverse — COGNOSPHERE. All Rights Reserved.
The copyrights of videos of games used in our content and other intellectual property rights belong to the provider of the game.
The contents we provide on this site were created personally by members of the Game8 editorial department.
We refuse the right to reuse or repost content taken without our permission such as data or images to other sites.