Torn Page: A Thousand Nights Locations in Sumeru Desert
✉ Send your thoughts in our Genshin 6.4 Patch Survey!
★ Exclusive: Dive back in time with the Meta History
◆ Hot: Version 6.4, Luna 5 Codes
◆ Builds: Varka, Flins, Skirk, Escoffier
◆ Events: Travelers' Tales, He Who Caught the Wind
◆ Future: Linnea, Version 6.5 Luna VI
The Sumeru Desert has new Enigmatic Pages or Torn Pages for A Thousand Nights and Toki Alley Tales. Here are all locations, how to get them, and how to use them!
List of Contents
Torn Page: A Thousand Nights Information
What are Torn Pages?
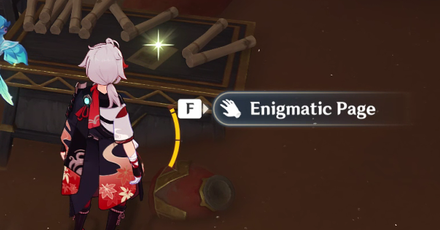
Torn page: A Thousand Nights are individual pages of a craftable book called A Thousand Nights scattered throughout Sumeru. They are similar to the Enigmatic Pages of the Toki Alley Tales series.
Enigmatic Pages Locations in Inazuma Guide
How to Craft Torn Pages
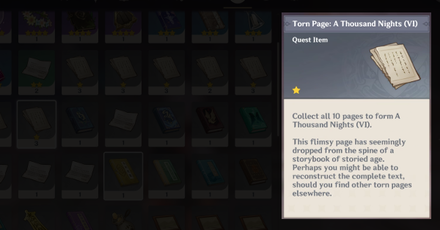
After collecting 10 pages for one book, craft them directly from your bag! Keep in mind that torn pages will be categorized per book and not per page!
Sumeru Desert Torn Page Locations
Desert of Hadramaveth Torn Page Map (I - III)
Torn Page: A Thousand Nights (I)
| Torn Page: A Thousand Nights (I) Locations | |
|---|---|
| 1 | 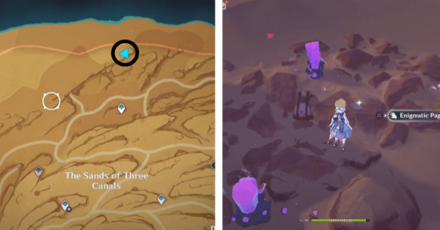 Teleport to the Northernmost Waypoint in The Sands of Three Canals. You can find the page at the edge of the cliff and surrounded by Electro Crystals. |
| 2 | 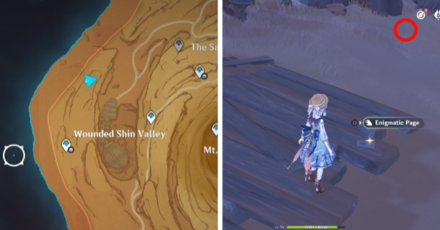 Found on a wooden platform in Wounded Shin Valley. |
| 3 | 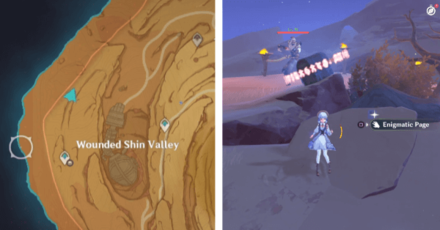 Located near a Common Chest that's guarded by an Eremite - Sunfrost in Wounded Shin Valley. |
| 4 | 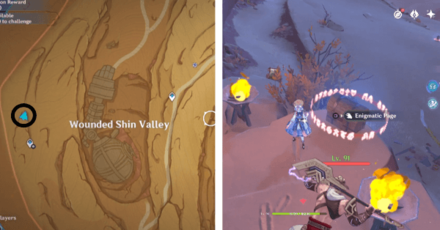 In between two large torches and a Common Chest that's guarded by an Eremite - Daythunder in Wounded Shin Valley. |
| 5 | 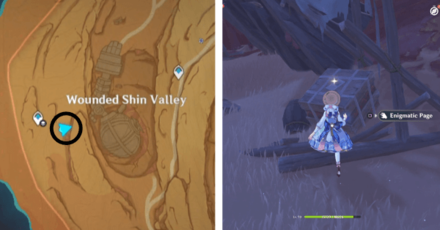 Beside a stage with empty torches and an Exquisite Chest in Wounded Shin Valley. |
| 6 | 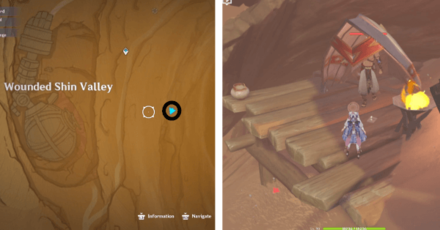 Found in a tent occupied by an Eremite - Daythunder occupying it near Wounded Shin Valley. |
| 7 | 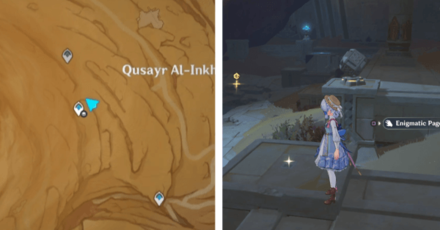 Found underground. This can only be accessed by playing through Dune-Entombed Fecundity Part 1. |
| 8 | 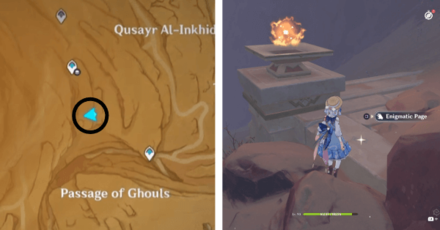 Teleport to the Passage of Ghouls waypoint. It is located beside a huge torch. |
| 9 | 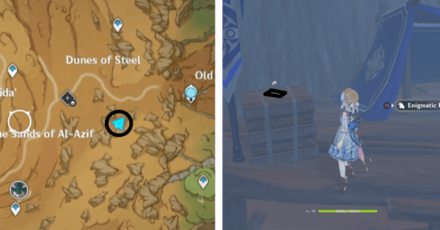 Located in a Fatui Camp in Dunes of Steel. |
| 10 | 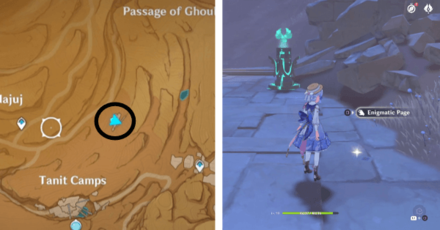 Found in an Anemo Monument puzzle above the Tanit Camps. You must activate all four monuments to access the Enigmatic Page. |
Torn Page: A Thousand Nights (II)
| Torn Page: A Thousand Nights (II) Locations | |
|---|---|
| 1 | 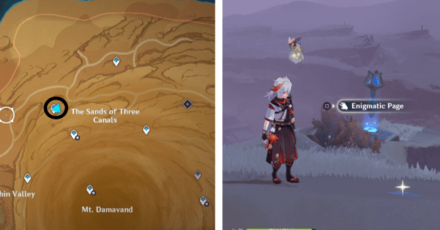 Located nearby the Teleport Waypoint in The Sands of Three Canals. |
| 2 | 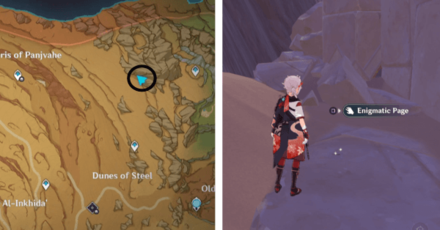 Found at the corner of the Desert of Hadramaveth. There's a staircase that leads to the Enigmatic Page. |
| 3 | 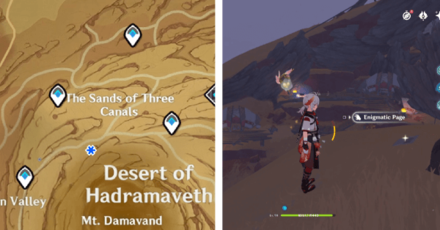 Found nearby an Eremite Camp in The Sands of Three Canals. |
| 4 | 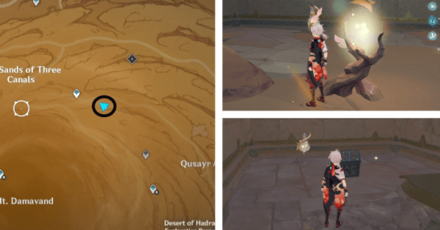 Behind the wall in a Jinn Shrine in The Sands of Three Canals. You must have the Jinni in the Magic Bottle Liloupar and its upgrade from The Falcon’s Hunt Quest. |
| 5 | 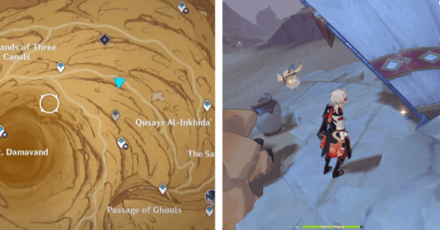 Inside a tent and beside a sleeping Sumpter Beast in Qusayr Al-Inkhida'. |
| 6 | 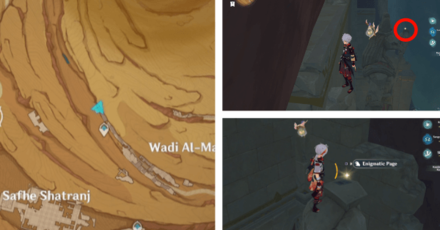 Teleport to the western waypoint in Wadi Al-Majuj to drop down and land on top of the staff of the bird statue. |
| 7 | 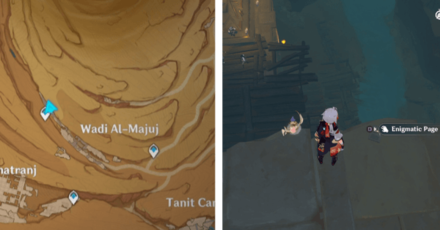 Teleport to the western waypoint in Wadi Al-Majuj to drop down and broken building. |
| 8 | 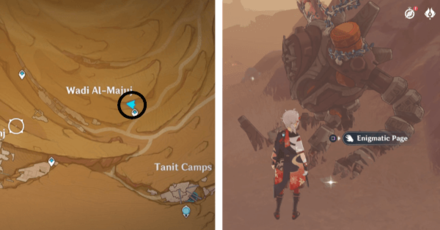 Teleport to the eastern waypoint in Wadi Al-Majuj and go to the broken Ruin Guard. |
| 9 | 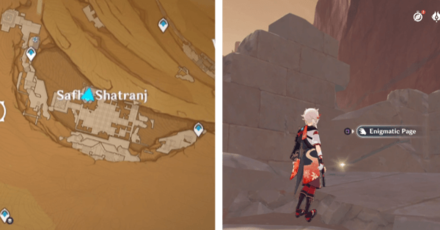 Go to the chessboard in Safha Shatranj and approach the broken debris. |
| 10 | 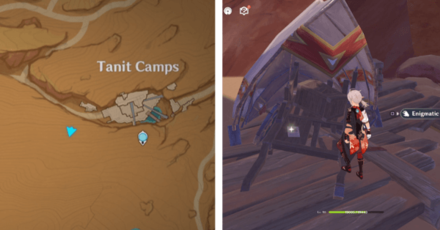 Go west from Tanit Camps and look for a Tent with a broken wheelbarrow. |
Torn Page: A Thousand Nights (III)
| Torn Page: A Thousand Nights (III) Locations | |
|---|---|
| 1 | 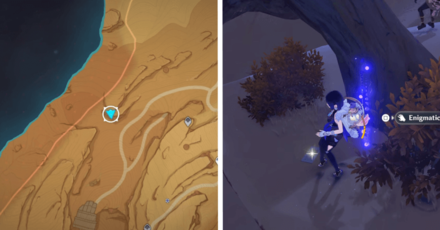 Found in Wounded Shin Valley next to a tree atop a cliff north. |
| 2 | 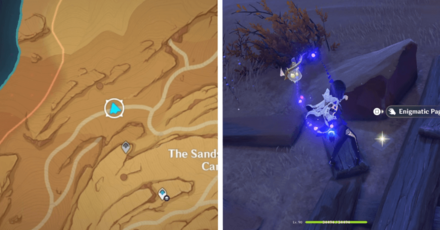 Located along the road north of a Teleport Waypoint in The Sands of Three Canals. |
| 3 | 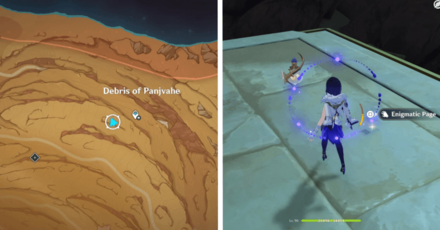 At the top of the temple entrance near the underground waypoint in Debris of Panjvahe. |
| 4 | 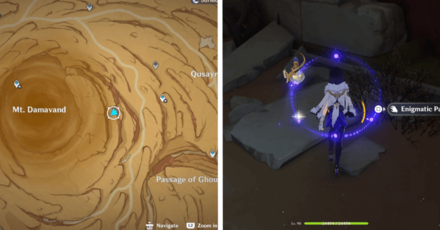 Found in an underground area that can be accessed during The Temple Where Sand Flows Like Tears quest. |
| 5 | 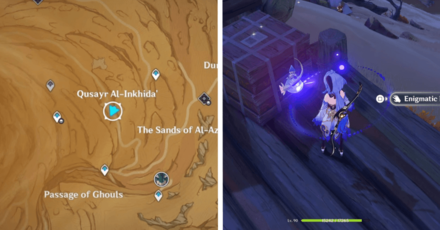 Found in an Eremite camp on Qusayr Al-Inkhida'. |
| 6 | 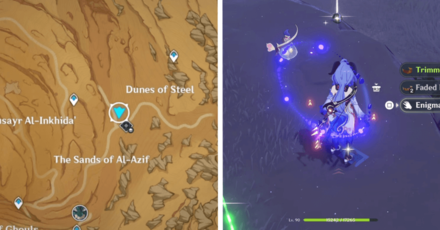 Located in an Eremite camp at an intersection near Dunes of Steel. |
| 7 | 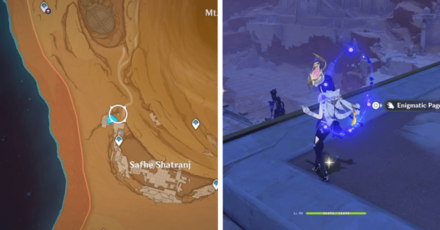 At the top of the temple entrance northwest of Safhe Shatranj.. |
| 8 | 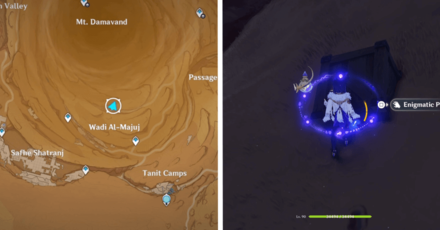 Located in a valley north of Wadi Al-Majuj, on a half-buried crate.. |
| 9 | 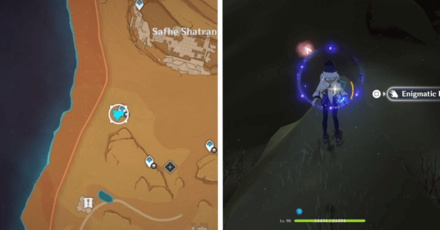 Inside an underground temple accessed during Dune-Entombed Fecundity: Part I, next to an Everlight Cell behind an invisible wall.. |
| 10 | 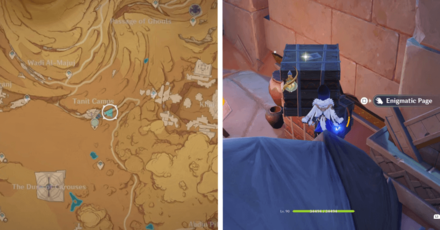 Located in the Tanit Camps, on a crate next to a tent.. |
Sumeru Desert Torn Page Map (IV - VI)
Torn Page: A Thousand Nights (IV)
| Torn Page: A Thousand Nights (IV) Locations | |
|---|---|
| 1 | 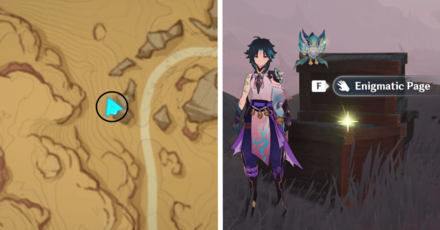 Located just southeast of Caravan Ribat. Just follow the path going to the desert from the Caravan Ribat's waypoint, and stop until you see the Eremite camp on your right. |
| 2 | 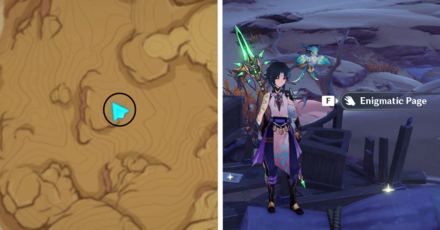 Teleport to the nearest waypoint from The Dune of Carouses, north of the Statue of Seven. From there, go over the cliff across it. You can use the four-leaf sigils to do so. Go straight until you see a Treasure Hoarder camp on your left. |
| 3 | 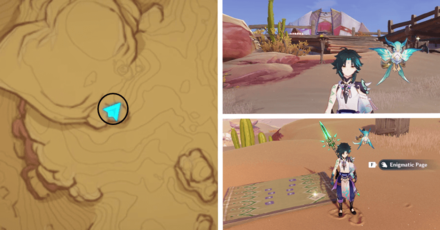 Teleport to the waypoint north of Abdju Pit and northwest of Aaru Village. From there, glide further west, until you see an Eremite camp with a locked Precious Chest. |
| 4 | 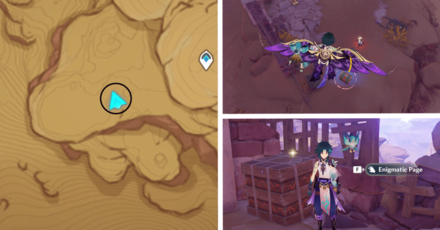 Teleport to the waypoint north of Abdju Pit and northwest of Aaru Village. From there, jump down the cliff--left of the waypoint--and defeat Eremite camp beside the locked Remarkable Chest. |
| 5 | 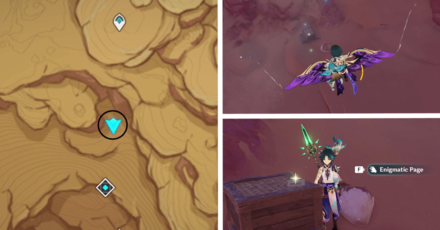 Teleport to the waypoint north of Abdju Pit and northwest of Aaru Village. From there, jump down the cliff--south of the waypoint--and glide down slowly until you see some loose sand piles. The page is atop the crate beside a loose sand pile. |
| 6 | 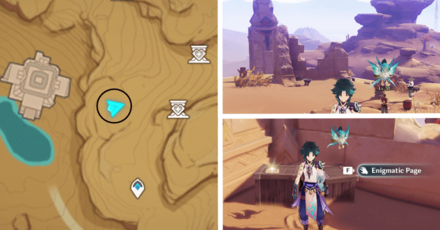 Teleport to the waypoint on the far south of Abdju Pit and walk a little over ahead until you see a group of Pyro monuments. |
| 7 | 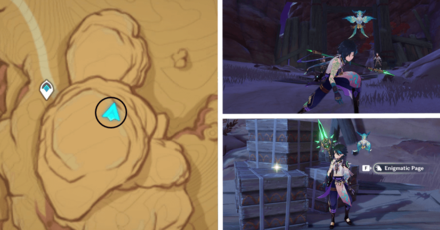 Teleport to the waypoint by the entrance of the Eremite secret base. After passing through the entrance, the page is on top of the crate on your left. |
| 8 | 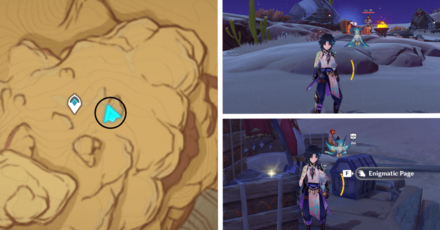 Teleport to the Statue of Seven at the Land of Upper Setekh. Go towards east, on top of the cliff, until you see an Eremite camp with a locked Exquisite Chest. Although the in-game shows that the location is beside a teleport waypoint, this torn page is located aboveground, thus we recommend teleporting to the Statue of Seven instead. |
| 9 | 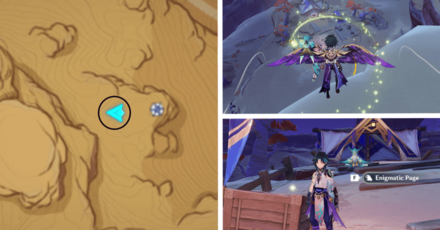 Teleport to the second waypoint from south of Sobek Oasis and glide down the cliff until you see a Fatui Camp with a Dendroculus on top of the tent. The page is on one of the crates in the camp. |
| 10 | 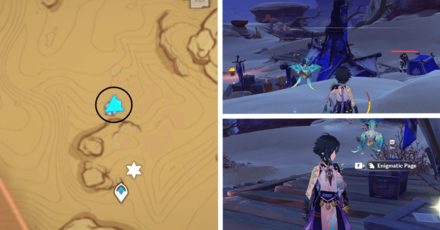 Teleport to the southernmost Waypoint, located in the Valley of Dahri. Walk a few paces north from there until you see a Fatui Camp with a locked Exquisite Chest. The page is beside the chest, on top of a crate. |
Torn Page: A Thousand Nights (V)
| Torn Page: A Thousand Nights (V) Locations | |
|---|---|
| 1 | 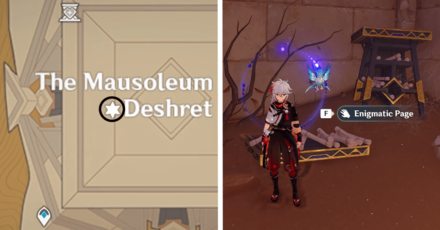 Located at the far end section of chamber inside The Mausoleum of King Deshret, which you can access during the Golden Slumber World Quest, while you're opening one of the coffins. |
| 2 | 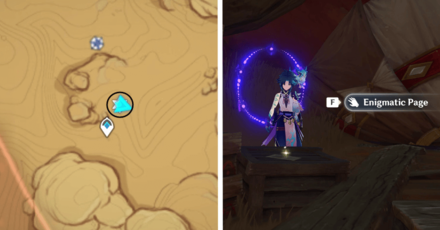 Located in the middle of an Eremite camp, right beside an Eremite Galehunter. You can easily get this page during the Hidden Mercenaries. After unlocking the ruin nearby the Thutmose Base, turn left on the forked road, immediately after the entrance. |
| 3 | 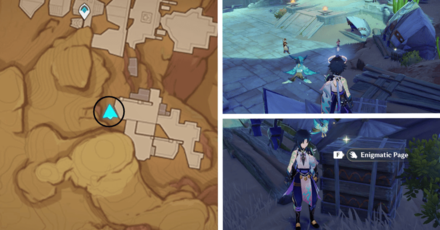 Teleport at the Khaj-Nisut entrance and use the four-leaf sigils to cross over the ledge on the right. There should be an Eremite camp with a locked Exquisite Chest nearby. |
| 4 | 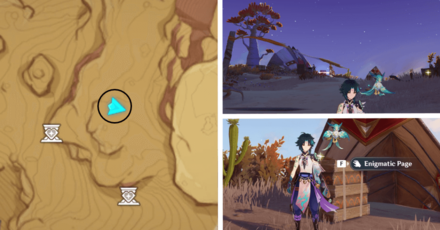 Teleport to the waypoint on the far south of Abdju Pit and walk up north until you reach an Eremite Camp on a slightly elevated plateau. The page is located on top of a crate, few paces away from the Exquisite Chest. |
| 5 | 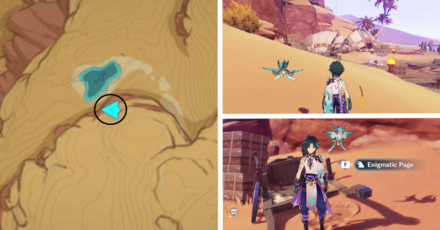 Head over the outside of Thutmose base and walk towards the line of tents by the oasis. The page is located beside the first tent, on a broken cart. |
| 6 | 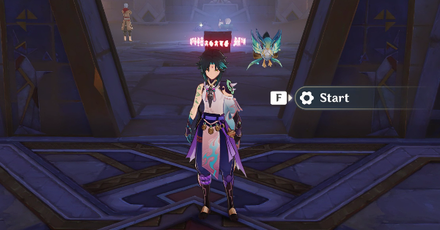 Enter the ruin south of The Dune of Elusion and keep going straight until you see the elevator. Activate the elevator once, then wait for it to go down. Once it stops moving, activate it once more, but immediately get out of the elevator. After it moves up, activate it again to go down the level below. Defeat the Eremite inside the room the head left towards the stairs. 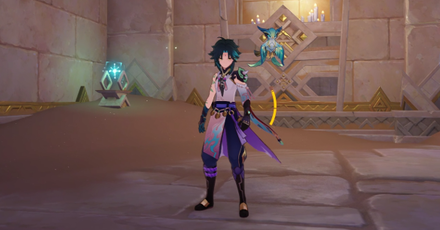 On the corner of the stairs, you'll see a Primal Ember in a Primal Sconce. Release it and guide it towards the room on top. 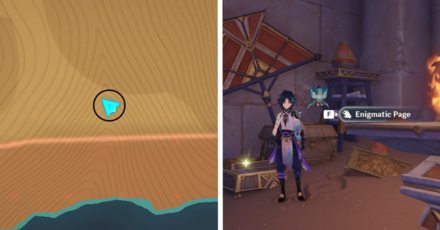 |
| 7 | 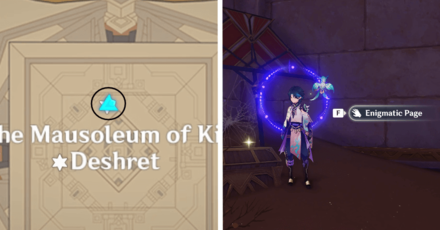 Teleport to the entrance of The Mausoleum of King Deshret and walk straight ahead, just past the Primal Construct: Repulsor enemies. The first time you enter this room after obtaining full clearance, Paimon will you that the path wasn't there before. Go down the hole and go towards the hall with another Primal Construct: Reshaper enemies then go left. The page is on top of a chest. |
| 8 | 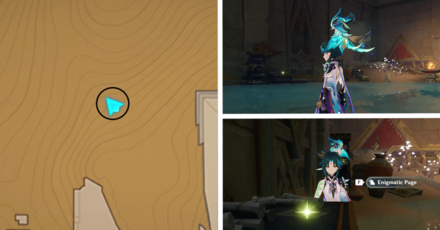 • Teleport to the underground waypoint on The Mausoleum of King Deshret, located at the lower left left of the pyramid. • From there, jump down the cliff, go right, and walk straight ahead until you get to a slightly flooded room. • You will encounter a number of shroom-kin enemies along the way to know that you're in the right path. • Keep in mind that you need to finish The Secret of Al-Ahmar Quest to unlock this. From there, go towards the door on your left, until you see a Primal Construct: Reshaper. The page is on the left side of the room. |
| 9 | 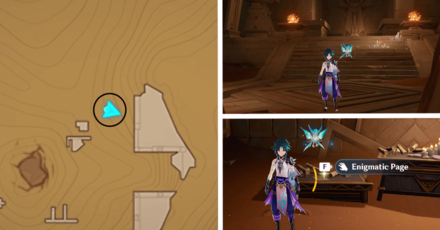 Teleport to the underground waypoint on The Mausoleum of King Deshret, located at the lower left left of the pyramid. From there, jump down the cliff, walk towards the room with the lit torch by its entrance. Go down the flight of stairs and activate the Plinth of the Secret Rites to open the door. The page is located on the partially-buried table, right beside the scrolls. |
| 10 | 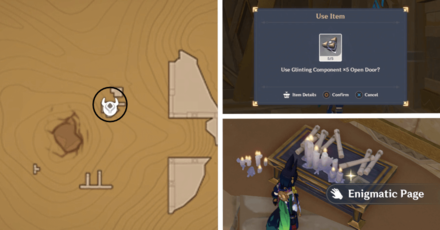 From the same room as above, head towards your left and down the stairs until you see a closed door. Open it using 5 Glinting Components that you can collect while doing the Dual Evidence and Golden Slumber Quests. |
Torn Page: A Thousand Nights (VI)
| Torn Page: A Thousand Nights (VI) Locations | |
|---|---|
| 1 | 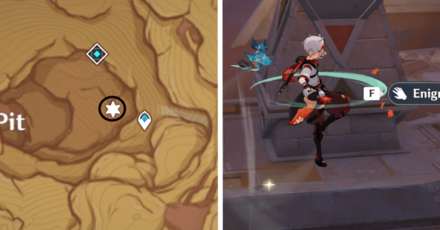 Found right at the entrance of the ruin in Abdju Pit This can be obtained as well during the Golden Slumber World Quest. |
| 2 | 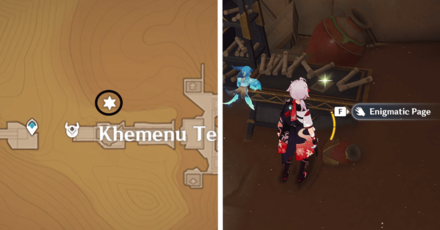 Found inside the Khemenu Temple during the Golden Slumber World Quest. It's among the stack of scrolls. |
| 3 | 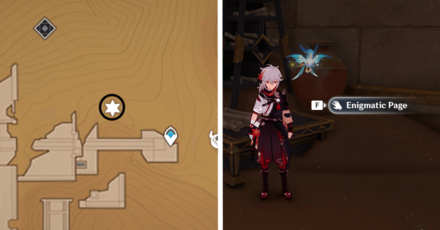 Located on top of the room in the Khemenu Temple which can be unlocked during the Golden Slumber World Quest. Remember to finish the time puzzle first behind the huge stone statue to unleash the four-leaf sigils to reach the location of the page. |
| 4 | 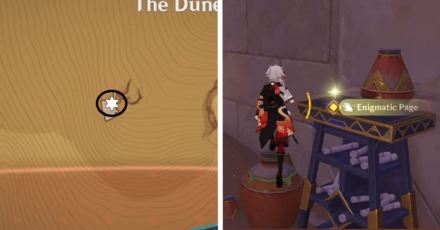 Obtained after guiding the Primal Ember from the adjacent room, right after you enter the ruin. You can enter this ruin after heading South of the Dune of Magma. |
| 5 | 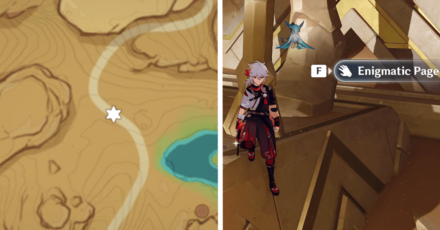 After getting clearance on the Abdju Path, re-explore the Abdju Ruin and head to the chamber that contains the pyro statue puzzle during the Golden Slumber World Quest. The control unit should now be active and use it to operate the elevator to go to the upper room. Once inside, the torn page is on the foot of the giant statue. |
| 6 | 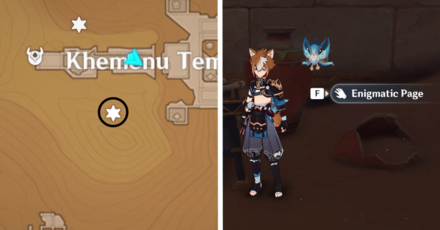 After getting clearance on the Khemenu Temple, from the entrance go to the previously locked door on the left. The control unit should be unlocked by now. Once inside, defeat the Primal Enemy and the torn page is on the right side of the room. |
| 7 | 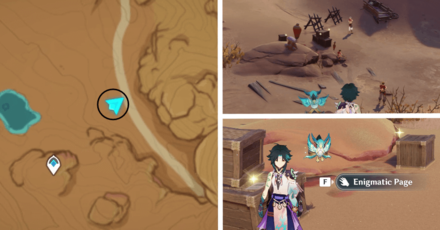 Teleport to the waypoint, northwest of The Dune of Carouses. Walk towards the direction of the coconut tree until you see a group of Eremites. |
| 8 | 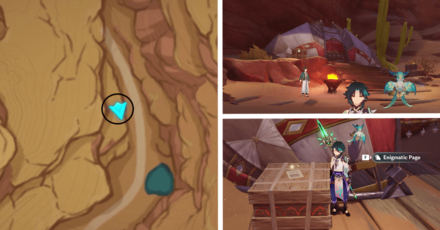 Teleport to the Statue of Seven in Valley of Dahri and glide down until you see Afratu's camp. The page is on top of the crate by the entrance of his tent. |
| 9 | 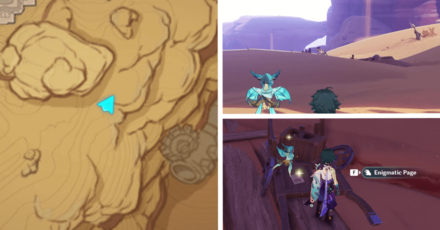 Teleport to the southernmost waypoint in the Valley of Dahri and walk northeast, until you see a group of Eremites. The page is on the broken cart. |
| 10 | 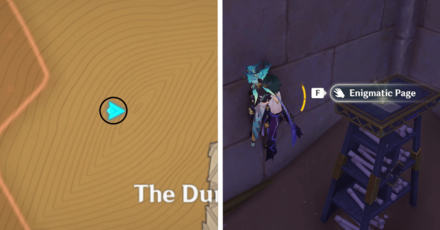 To get this page, you must first complete the puzzle inside the ruin beside The Dune of Magma. After doing so, just keep walking straight until you see a torch by a hole. Glide down and head towards the room at end of the hall. The page is located on the left side of that room. |
Genshin Impact Related Guides

All Lore Related Pages
| The Lore of Teyvat | |
|---|---|
 Characters and Faction Characters and Faction |
 Moon's Remnants Lore Moon's Remnants Lore |
 Fake Sky Fake Sky |
 What is Loom of Fate? What is Loom of Fate? |
 A Thousand Nights Locations A Thousand Nights Locations |
 Mondstadt History and Lore Mondstadt History and Lore |
 Oratrice Mecanique d'Analyse Cardinale Oratrice Mecanique d'Analyse Cardinale |
 What is Project Stuzha? What is Project Stuzha? |
 Who is Roland? Who is Roland? |
|
All Regions & Nations
| Nations of Teyvat | ||
|---|---|---|
 Mondstadt Mondstadt |
 Liyue Liyue |
 Inazuma Inazuma |
 Sumeru Sumeru |
 Fontaine Fontaine |
 Natlan Natlan |
 Nod-Krai Nod-Krai |
||
Comment
Idk why I locked in to find ALL of these. I expected achievment or a generous reward... errr.. okay...
Author
Torn Page: A Thousand Nights Locations in Sumeru Desert
improvement survey
03/2026
improving Game8's site?

Your answers will help us to improve our website.
Note: Please be sure not to enter any kind of personal information into your response.

We hope you continue to make use of Game8.
Rankings
Gaming News
Popular Games

Genshin Impact Walkthrough & Guides Wiki

Honkai: Star Rail Walkthrough & Guides Wiki

Umamusume: Pretty Derby Walkthrough & Guides Wiki

Pokemon Pokopia Walkthrough & Guides Wiki

Resident Evil Requiem (RE9) Walkthrough & Guides Wiki

Monster Hunter Wilds Walkthrough & Guides Wiki

Wuthering Waves Walkthrough & Guides Wiki

Arknights: Endfield Walkthrough & Guides Wiki

Pokemon FireRed and LeafGreen (FRLG) Walkthrough & Guides Wiki

Pokemon TCG Pocket (PTCGP) Strategies & Guides Wiki
Recommended Games

Diablo 4: Vessel of Hatred Walkthrough & Guides Wiki

Cyberpunk 2077: Ultimate Edition Walkthrough & Guides Wiki

Fire Emblem Heroes (FEH) Walkthrough & Guides Wiki

Yu-Gi-Oh! Master Duel Walkthrough & Guides Wiki

Super Smash Bros. Ultimate Walkthrough & Guides Wiki

Pokemon Brilliant Diamond and Shining Pearl (BDSP) Walkthrough & Guides Wiki

Elden Ring Shadow of the Erdtree Walkthrough & Guides Wiki

Monster Hunter World Walkthrough & Guides Wiki

The Legend of Zelda: Tears of the Kingdom Walkthrough & Guides Wiki

Persona 3 Reload Walkthrough & Guides Wiki
All rights reserved
Copyright© 2012-2024 HoYoverse — COGNOSPHERE. All Rights Reserved.
The copyrights of videos of games used in our content and other intellectual property rights belong to the provider of the game.
The contents we provide on this site were created personally by members of the Game8 editorial department.
We refuse the right to reuse or repost content taken without our permission such as data or images to other sites.


![Monster Hunter Stories 3 Review [First Impressions] | Simply Rejuvenating](https://img.game8.co/4438641/2a31b7702bd70e78ec8efd24661dacda.jpeg/thumb)


Whoever took these pictures needs a new job