 Supporting Cast Request Board
 List of All Thespian Tricks
 How to Use Toy Medals
 How to Use Fantasia Flowers
 Unbegun, Unending Story Quest
 Envisaged Echoes
 How to Get Lunar Arcana
 The Dark Side of Dawn
 Dandelion Knight
 Eclipsing Star
 Cat Upon the Eaves
 Icy Resurrection
 Vago Mundo
 Scarlet Leaves Pursue Wild Waves
 Plenilune Gaze
 Windborne Bard
 Flame-Mane
 Plane of Euthymia
 Lonesome Transcendence
 Valley Orchid
 Physic of Purity
 Kreideprinz
 Fleeing Sunlight
 Frostflake Heron
 Pillar of Fortitude
This survey will take about 1 minute.
Your answers will help us to improve our website.
Genshin Impact
Keqing Envisaged Echoes Guide
✉ Send your thoughts in our Genshin 6.4 Patch Survey!
★ Exclusive: Dive back in time with the Meta History
◆ Hot: Version 6.4, Luna 5 Codes
◆ Builds: Varka, Flins, Skirk, Escoffier
◆ Events: Travelers' Tales, He Who Caught the Wind
◆ Future: Linnea, Version 6.5 Luna VI

Driving Thunder is an Envisaged Echoes challenge to acquire Keqing's Echo cosmetic in Genshin Impact! See the best strategies, recommended builds for Keqing, and other information regarding this challenge here!
List of Contents
Driving Thunder Build
Build Summary
| Recommended Weapons |
4.
|
|---|---|
| F2P Option | |
| Recommended Artifacts | |
| Stats to Consider | ATK%, CRIT Rate, CRIT DMG, Energy Recharge |
For Keqing's Envisaged Echoes, you want to build her with as much raw damage as possible, placing full emphasis on ATK% and CRIT stats to ensure that she can potentially one-combo the bigger enemies during Phase 2.
Weapon Recommendations
| Driving Thunder Weapons | |
|---|---|
 Mistsplitter Reforged Mistsplitter Reforged
|
 Primordial Jade Cutter Primordial Jade Cutter
|
 Haran Geppaku Futsu Haran Geppaku Futsu
|
 Lion's Roar Lion's Roar
|
Most of Keqing's best weapon recommendations are made to augment her Elemental DMG in some way, with the exception of Primordial Jade Cutter serving as a stat stick to provide a significant ATK and CRIT boost to Keqing.
Artifact Recommendations
Artifact Sets
| Driving Thunder Artifacts | |
|---|---|
|
|
|
Keqing's best Artifact set for her Envisaged Echoes challenge is a mixture of 2-pc. Thundering Fury and 2-pc. Gladiator's Finale, providing a boost to both her Electro DMG and ATK.
It is worth nothing that Keqing cannot reliably trigger 4-pc. Thundering Fury 100% of the time, so it is much better to invest into raw damage.
Artifact Stats
| Artifact Main Stats | |
|---|---|
| Artifact Sub Stats | ATK, CRIT Rate, CRIT DMG, Energy Recharge |
With most solo Envisaged Echoes challenges, focus on improving Keqing's CRIT Stats and ATK to get her to a place where she can one or two-combo her opponents.
Driving Thunder Strategy
Light the Electro Monuments
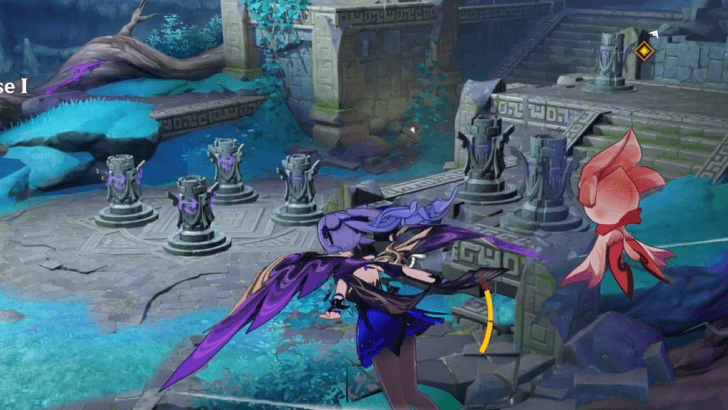
Your objective here is to light 7 Electro monuments that are scattered into groups of four at the center, two at the side, and one far back.
Aim the Lightning Stilleto Into the Center of the 4 Pillars
When starting, aim your Elemental Skill into the center of the 4 pillars and step up the stone ledge using the debris next to the wall.
Wait until the last second, then detonate with a Charged Attack to get 3 - 4 of the Pillars in the center.
Aim the Last Stilleto at the 2-Pillar Pairs
After Charged Attacking, you should have a 2 second cooldown on your Elemental Skill. Aim it at the 2 pillars, then take the teleport to infuse your weapon with Electro.
When that happens, you should have enough time to run over to the last pillar at the top of the stairs to strike it, and one extra pillar back at the center if your first Stilleto missed one.
Defeat Enemies Within Time Limit
|
|
|
|
|
|
You will be given 80 seconds to defeat 6 opponents, featuring 4 Electro Hilichurl Shooters, one Anemo Hilichurl Rogue, and one Ruin Grader.
Periodically, a Fruit of the Vine will spawn and inflict Dendro onto targets, giving Keqing the chance to trigger Quicken against them to make the fight easier. This is not required though, so focus on your own raw damage.
Break 3 of the Fruits to Buff your Damage
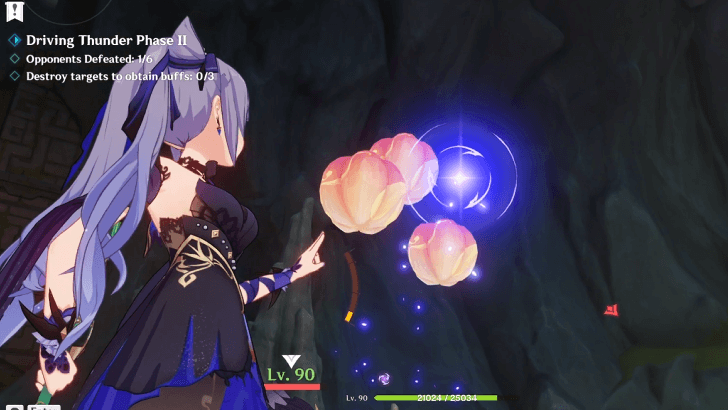
Above the enemies, there will be targets in groups of three floating in the air. Upon breaking these, Keqing will gain bonus Electro DMG Bonus and Elemental Mastery.
The buff lasts 30 seconds, and doing this at the start of the fight will give Keqing enough damage to kill all the Hilichurl Shooters and severely wound or kill the Hilichurl Rogue before needing to buff herself up again.
Combat Rotation
| Keqing Solo Rotation | Elemental Skill (1st) → Elemental Burst → Elemental Skill (Teleport) → Charged Attack(4x) → Elemental Skill (1st and 2nd Part) → Charged Attack(2x) |
|---|
This is Keqing's normal Solo rotation, allowing her to dish out all of her kit's damage in the shortest time.
After using her 2 Charged Attacks at the end, she may not have her Elemental Burst back on time. If this is the case, simply Alternate between using her Elemental Skill Infusion and Charged Attacking until it returns.
Genshin Impact Related Guides

Performance Tour Season 21 Guide
| Performance Tour March 2026 |
|---|
 How to Beat Season 21 (March 2026) How to Beat Season 21 (March 2026) |
Other Gameplay Guides
Envisaged Echoes Stage Guides
Comment
Author

Keqing Envisaged Echoes Guide
Please participate in our site
improvement survey
03/2026
improvement survey
03/2026
Would you assist in
improving Game8's site?
improving Game8's site?

×
We are listening to our users' valuable opinions and discussing how to act on them.
The information collected through this survey will be used for the purpose of improving our services. In addition, the information will only be disclosed a part of a statistic in a format that will not allow identification of personal information.
Begin Survey
Not Now
×
Please rate each item regarding Game8.co's Advertisements.
Amount of Ads
Very Dissatisfied
Somewhat Dissatisfied
Fine
Somewhat Satisfied
Highly Satisfied
Placement of Ads
Timing of Ad Display
Ad Loading Speed
Safeness of Ads
Content of Ads
×
Please rate each item regarding Game8.co's Quality of Articles.
Amount of information
Very Dissatisfied
Somewhat Dissatisfied
Fine
Somewhat Satisfied
Highly Satisfied
Frequency of updates
Speed of new information
Accuracy of articles
Understandibility of articles
Readability of sentences
×
Please rate each item regarding Game8.co's Usability of the Site.
Ease of finding information
Very Dissatisfied
Somewhat Dissatisfied
Fine
Somewhat Satisfied
Highly Satisfied
Loading Speed
Use of Color
Font Size
Visibility of Images
Easy to Understand Layout
×
Please rate each item regarding Game8.co's Message Boards, Comments.
Ease of Writing
Very Dissatisfied
Somewhat Dissatisfied
Fine
Somewhat Satisfied
Highly Satisfied
Readability
Ease in Finding Information
Comment Quality
Comment Quantity
Admin Response
×
Please rate each item regarding Game8.co's Site's new design.
Please rate our site's new design
Very Dissatisfied
Somewhat Dissatisfied
Fine
Somewhat Satisfied
Highly Satisfied
Do you think that the website's design change makes the site easier to use?
Has the new design made it easier for you to find information on the site?
Has the new design improved the overall visual appeal of the site?
How would you rate your overall satisfaction with the new design of the site?
×
How likely are you to recommend Game8 to someone you know?
Very Unlikely
0
1
2
3
4
5
6
7
8
9
10
Very Likely
If you have other opinions regarding potential improvement to the website, please share them with us. We would appreciate your honest opinion.
Note: This is a free response section, so you can proceed without entering anything.
Note: Please be sure not to enter any kind of personal information into your response.
Note: Please be sure not to enter any kind of personal information into your response.
×
Thank You
×
Thank you for participating in our survey! Your answers will help us to improve the quality of our website and services.
We hope you continue to make use of Game8.
We hope you continue to make use of Game8.
Close


Rankings
Gaming News


![Monster Hunter Stories 3 Review [First Impressions] | Simply Rejuvenating](https://img.game8.co/4438641/2a31b7702bd70e78ec8efd24661dacda.jpeg/thumb)
Popular Games

Genshin Impact Walkthrough & Guides Wiki
Honkai: Star Rail Walkthrough & Guides Wiki
Umamusume: Pretty Derby Walkthrough & Guides Wiki
Pokemon Pokopia Walkthrough & Guides Wiki
Resident Evil Requiem (RE9) Walkthrough & Guides Wiki
Monster Hunter Wilds Walkthrough & Guides Wiki
Wuthering Waves Walkthrough & Guides Wiki
Arknights: Endfield Walkthrough & Guides Wiki
Pokemon FireRed and LeafGreen (FRLG) Walkthrough & Guides Wiki
Pokemon TCG Pocket (PTCGP) Strategies & Guides Wiki


Recommended Games
Diablo 4: Vessel of Hatred Walkthrough & Guides Wiki
Cyberpunk 2077: Ultimate Edition Walkthrough & Guides Wiki
Fire Emblem Heroes (FEH) Walkthrough & Guides Wiki
Yu-Gi-Oh! Master Duel Walkthrough & Guides Wiki
Super Smash Bros. Ultimate Walkthrough & Guides Wiki
Pokemon Brilliant Diamond and Shining Pearl (BDSP) Walkthrough & Guides Wiki
Elden Ring Shadow of the Erdtree Walkthrough & Guides Wiki
Monster Hunter World Walkthrough & Guides Wiki
The Legend of Zelda: Tears of the Kingdom Walkthrough & Guides Wiki
Persona 3 Reload Walkthrough & Guides Wiki


All rights reserved
Copyright© 2012-2024 HoYoverse — COGNOSPHERE. All Rights Reserved.
The copyrights of videos of games used in our content and other intellectual property rights belong to the provider of the game.
The contents we provide on this site were created personally by members of the Game8 editorial department.
We refuse the right to reuse or repost content taken without our permission such as data or images to other sites.