To Turn Each Sin Against the Sinner Quest Guide
✉ Send your thoughts in our Genshin 6.4 Patch Survey!
★ Exclusive: Dive back in time with the Meta History
◆ Hot: Version 6.4, 6.4 Codes, Linnea, Version 6.5
◆ Builds: Varka, Flins, Skirk, Escoffier
◆ Events: Travelers' Tales, Sightseeing With Friends
◆ Endgame: Spiral Abyss (March 2026)
To Turn Each Sin Against the Sinner is a World Quest in Nod-Krai for Genshin Impact Luna 4. See how to unlock this quest, how to investigate the Sealing Pillars, its walkthrough, and all its rewards here in this guide!
List of Contents
How to Unlock To Turn Each Sin Against the Sinner Quest Guide
Located Northeast of the Dreadshade Mire Waypoint
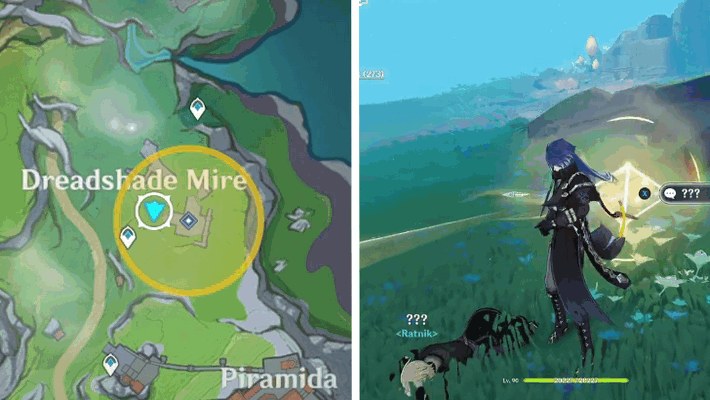
To Turn Each Sin Against the Sinner is a World Quest that can be started after interacting with the Ratnik who is found unconscious northeast of the Dreadshade Mire Waypoint.
After speaking with and rescuing the Ratnik, he will introduce himself as Janusz and enlist your help in imprisoning the evil spirit plaguing Dreadshade Mire.
Can Also be Started by Investigating Other Pillars
The World Quest can also be started prior to meeting Janusz, by simply completing the puzzle and interacting with any of the other Pillars.
To Turn Each Sin Against the Sinner Walkthrough
Investigate the First Sealing Pillar
After saving Janusz, you can begin the quest by investigating the nearby pillar, which requires you to solve puzzles centered around the Kuuvahki Prism, and then defeat enemies after.
Keep in mind that investigating the Pillars can be done in any order, with the progression and rewards at the end remaining the same, regardless of which Pillar you investigate first.
| Objectives | ||
|---|---|---|
| 1 | Solve the puzzle of the Sealing Pillar by finding the Kuuvahki prism near the Dreadshade Mire waypoint, and follow it back to the Pillar. Halfway through, you will be blocked by Abyssal Riftlines, which you will need to destroy using the kuuvahki lightblade. |
|
| 2 | 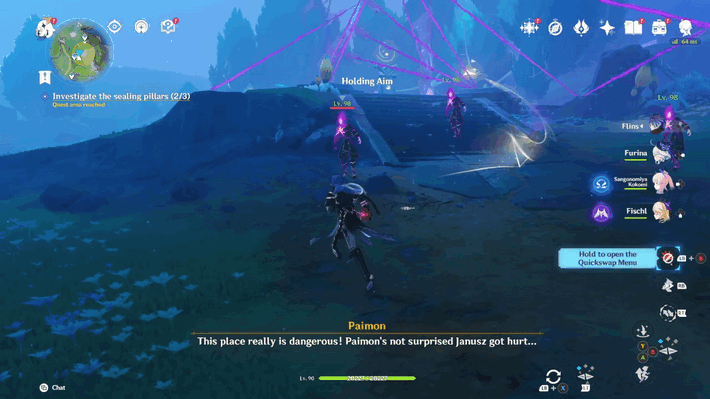 After following the prism, you will be ambushed by Abyssal Entities. Defeat the Three Wilderness Exiles followed by a Wilderness Hunter to proceed. |
|
| 3 | Take the Kuuvahki energy nearby from the flower, and use the lightblade again to clear the Riftlines around the Pillar. After clearing the Riftlines, interact with the Pillar to finish investigating the First Pillar. |
|
Investigate the Second Sealing Pillar
After investigating the first pillar, head to the second Pillar with the Prism imprisoned behind Riftlines.
The Second Sealing Pillar can be investigated by freeing and following the Prism towards the Sealing Pillar.
| Objectives | ||
|---|---|---|
| 1 | Head to the Kuuvahki Prism under the wooden bridge, and follow it towards the Fallowed Flower near the imprisoned Prism. |
|
| 2 | Use the now suffused Flower to obtain the kuuvahki lightblade and use it to destroy the Abyssal Riftlines to free the imprisoned Prism. |
|
| 3 | 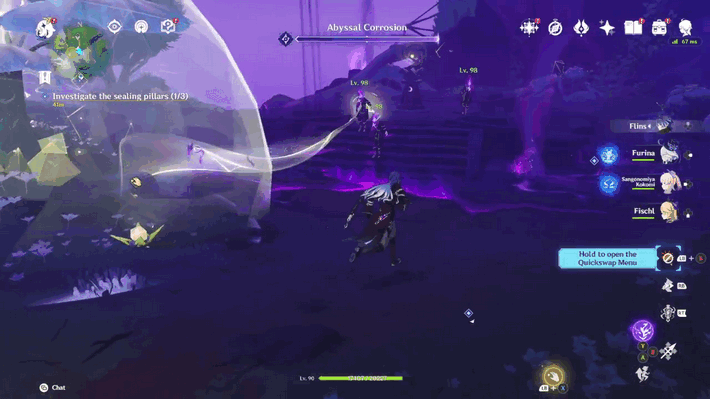 Follow the Second Prism towards the Pillar, where you will be ambushed by Abyssal Entities. Deplete the Abyssal Corrosion bar by defeating the Abyssal Entities to free the Pillar. After defeating the enemies, interact with the Pillar to complete your investigation. |
|
Investigate the Third Sealing Pillar
Defeat the Evil Eyes of Blightseep by reflecting their projectiles back at them using the kuuvahki lightblade.
To reflect the projectiles, release the lightblade when their projectile makes contact with the shield, similar to a perfect parry mechanic. Once defeated, you can interact with the Pillar and complete the investigation.
Defeat the Serpent of All Evils
After all three Sealing Pillars are restored, the barrier will be formed, trapping the Serpent of All Evils inside.
Once the cutscene ends, head to the barrier to fight and defeat the Serpent of All Evils leading to the conclusion of this World Quest.
| Objectives | ||
|---|---|---|
| 1 | After investigating all three pillars, head to the center to fight the Serpent of All Evils. During the First phase of the fight, the Serpent will spawn Abyssal Entities with Riftlines above them. Destroy the Riftlines using the Kuuvahki Lightblade, and then defeat the enemies to deplete the Serpent's HP. |
|
| 2 | After the Serpent becomes downed, the second phase will begin where an empowered Super Sharp Spirebloom will spawn at the center. Take the Empowered Kuuvahki Lightblade to destroy the Riftlines, and use the lightblade to defeat all the summoned Abyssal Entities in one hit until the Serpent's HP reaches zero. |
|
To Turn Each Sin Against the Sinner Rewards
Total Quest Rewards
| Total Quest Rewards |
 Primogem x40 |
 Mora x33500 |
|---|---|---|
 Hero's Wit x4 |
||

Genshin Impact Related Guides

Other Nod-Krai Quest Guides
Author

To Turn Each Sin Against the Sinner Quest Guide


Rankings
Gaming News


![The Liar Princess and the Blind Prince Review [PC] | Lovely to Look at but Tedious to Play](https://img.game8.co/4442586/8d95f5faf05780f1765ce7e0938bd825.jpeg/thumb)
![Marathon Cryo Archive Map Teased as [REDACTED] on Selection Screen](https://img.game8.co/4442236/6357203e58172f6de57f1991e7c39b22.png/thumb)

Popular Games

Genshin Impact Walkthrough & Guides Wiki
Umamusume: Pretty Derby Walkthrough & Guides Wiki
Pokemon Pokopia Walkthrough & Guides Wiki
Honkai: Star Rail Walkthrough & Guides Wiki
Monster Hunter Stories 3: Twisted Reflection Walkthrough & Guides Wiki
Arknights: Endfield Walkthrough & Guides Wiki
Wuthering Waves Walkthrough & Guides Wiki
Zenless Zone Zero Walkthrough & Guides Wiki
Pokemon TCG Pocket (PTCGP) Strategies & Guides Wiki
Monster Hunter Wilds Walkthrough & Guides Wiki


Recommended Games
Diablo 4: Vessel of Hatred Walkthrough & Guides Wiki
Cyberpunk 2077: Ultimate Edition Walkthrough & Guides Wiki
Fire Emblem Heroes (FEH) Walkthrough & Guides Wiki
Yu-Gi-Oh! Master Duel Walkthrough & Guides Wiki
Super Smash Bros. Ultimate Walkthrough & Guides Wiki
Pokemon Brilliant Diamond and Shining Pearl (BDSP) Walkthrough & Guides Wiki
Elden Ring Shadow of the Erdtree Walkthrough & Guides Wiki
Monster Hunter World Walkthrough & Guides Wiki
The Legend of Zelda: Tears of the Kingdom Walkthrough & Guides Wiki
Persona 3 Reload Walkthrough & Guides Wiki


All rights reserved
Copyright© 2012-2024 HoYoverse — COGNOSPHERE. All Rights Reserved.
The copyrights of videos of games used in our content and other intellectual property rights belong to the provider of the game.
The contents we provide on this site were created personally by members of the Game8 editorial department.
We refuse the right to reuse or repost content taken without our permission such as data or images to other sites.
you can find an abandoned fatui camp nearby with a note saying they were investigating the seals