 Treasure Chest Locations
 Time Trial Locations
 Origami Animals Guide
 Constellation Clockwork Devices
 Toy Blocks
 All Paper Frog Puzzles Guide
 All Paper Squirrel Puzzles Guide
 Jocund and Joyous Letters Gadget Guide
 Help the Toy Figure Escape Danger
 Notes Inside a Treasure Chest
 Wind Flower Puzzle
 Graffiti Puzzles Guide
This survey will take about 1 minute.
Your answers will help us to improve our website.
Genshin Impact
Excerpts of Bliss Locations and How to Use
✉ Send your thoughts in our Genshin 6.4 Patch Survey!
★ Exclusive: Dive back in time with the Meta History
◆ Hot: Version 6.4, Luna 5 Codes
◆ Builds: Varka, Flins, Skirk, Escoffier
◆ Events: Travelers' Tales, He Who Caught the Wind
◆ Future: Linnea, Version 6.5 Luna VI
Excerpts of Bliss are collectible items in Genshin Impact 4.8. They can be found as paper origami cranes, within treasure chests, or by completing challenges in Simulanka. See all Excerpts of Bliss Day 3 locations, how to collect them fast, and how to use them to earn rewards!
| Summertide Scales and Tales Guides | |||
|---|---|---|---|
List of Contents
Excerpts of Bliss Locations
| ・Click on the arrow in the upper left corner to access our sidebar to check all other pins and even search for individual pins. ・Pins checked off the map will reflect in the list below. We encourage users to sign up and log in to save your progress with the map. |
| As of Day 3 of the event, travelers can obtain up to 242 Excerpts of Bliss. 93 are found in the Forest of Blessings, 72 are in the Constellation Metropole, while 77 are in the Toytanium Mines. |
Here is the list of all sources of this item:
- Collect the Paper Cranes
- Open All Treasure Chests
- Solve Origami Animal Puzzles
- Complete Time Trial Challenges
- Tinker Clockwork Puzzles
- Help Toys in Other Puzzles
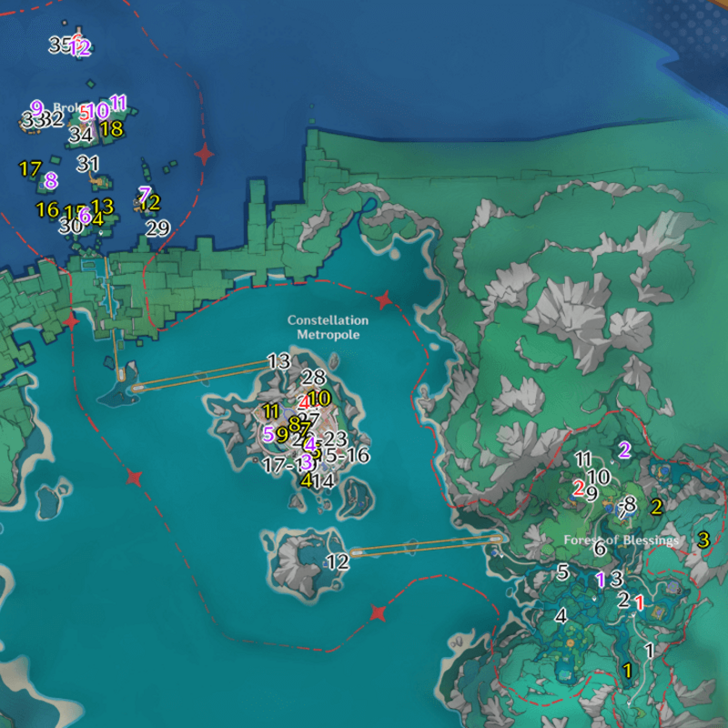
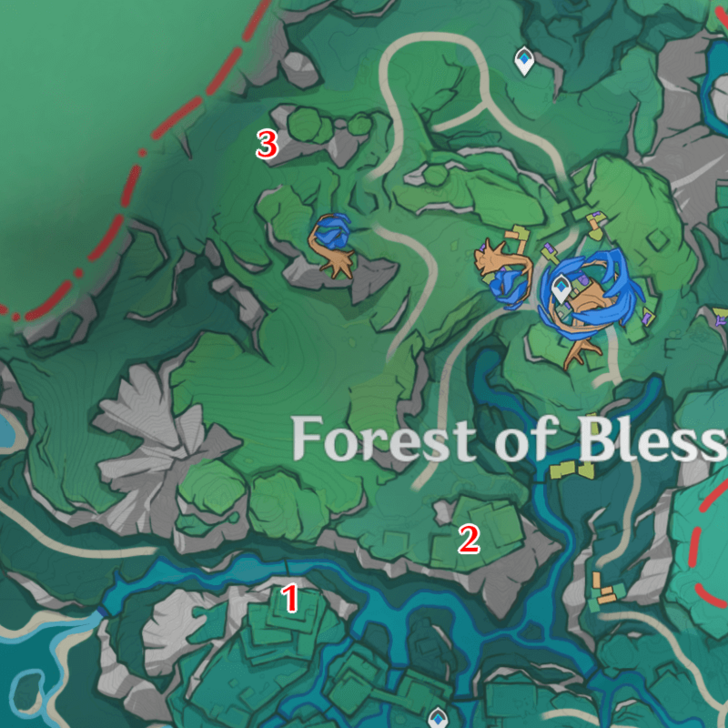
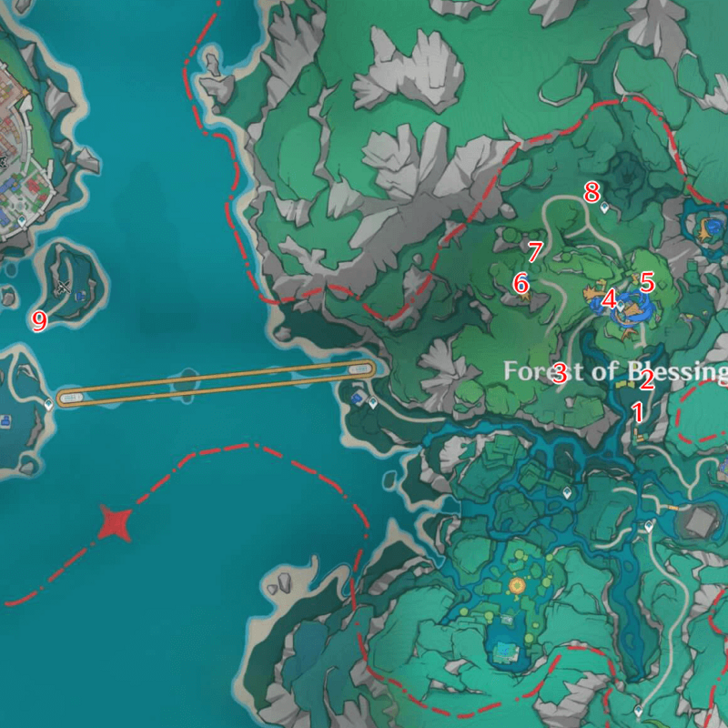
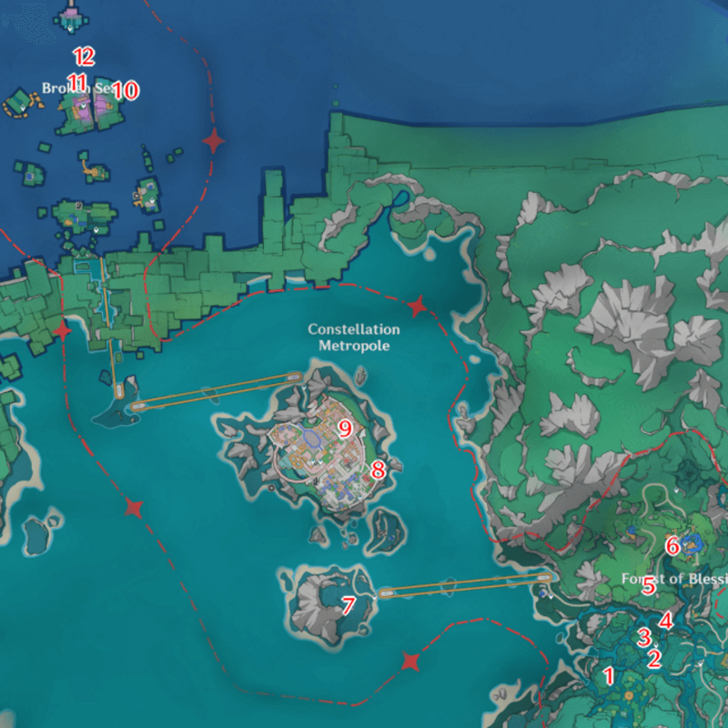
Found as Paper Cranes Floating around Simulanka
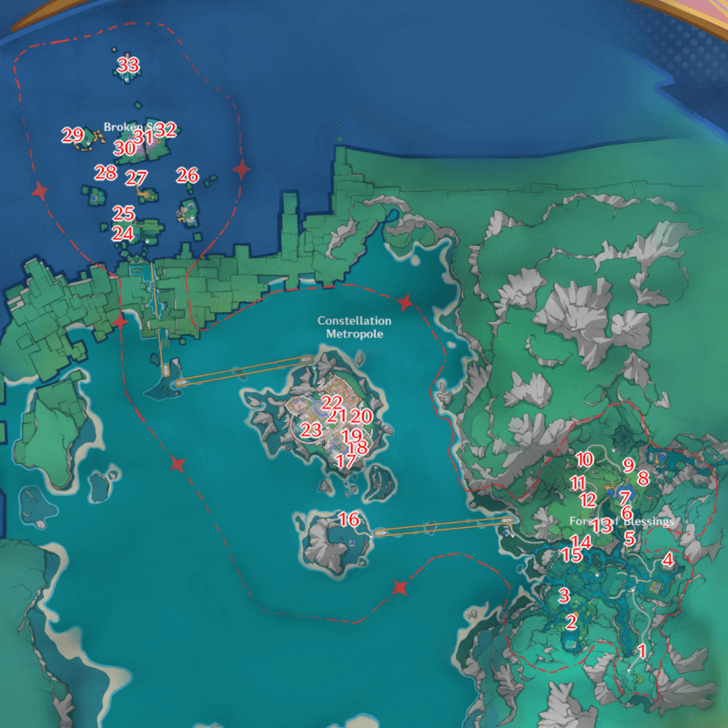
| Click here to open map in new tab! |
There are 33 paper origami cranes available as of Day 3 in the Simulanka map. When exploring the Simulanka, you will come across glowing Origami Cranes; gathering them will reward you with three Excerpts of Bliss.
Excerpts of Bliss, like Oculi, will appear on your mini map when you are nearby.
How to Get Each Paper Origami Cranes
| No. | Image | How to Get |
|---|---|---|
| 1 | 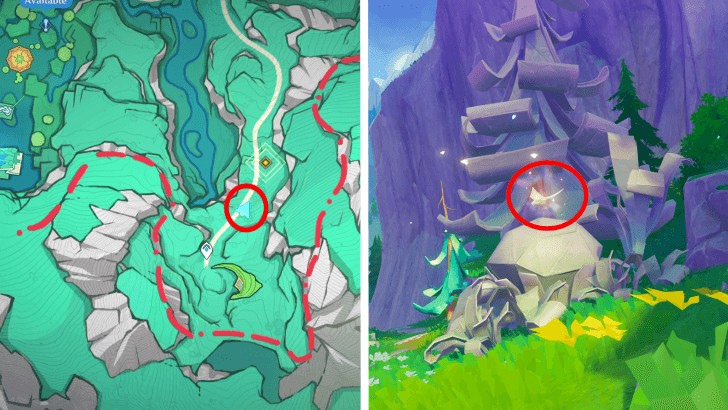 |
Located right along the path when you first enter Simulanka. |
| 2 |  |
Located at the base of the frog monument, south of the Forest of Blessings |
| 3 | 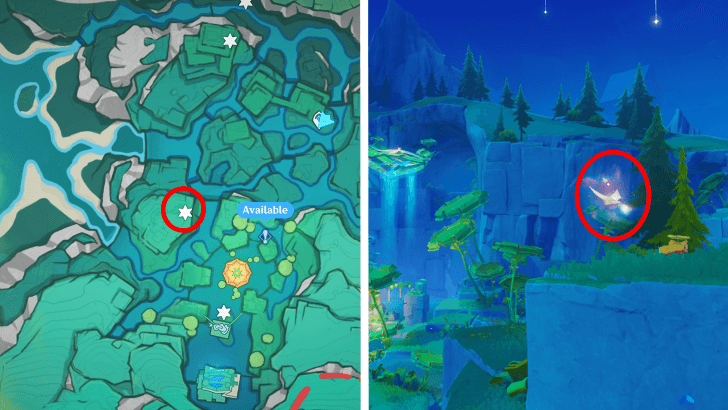 |
On a hill overlooking the frog pond with the monument. |
| 4 |  |
Placed on top of the Hut of Blessings, east of the Forest of Blessings. |
| 5 | 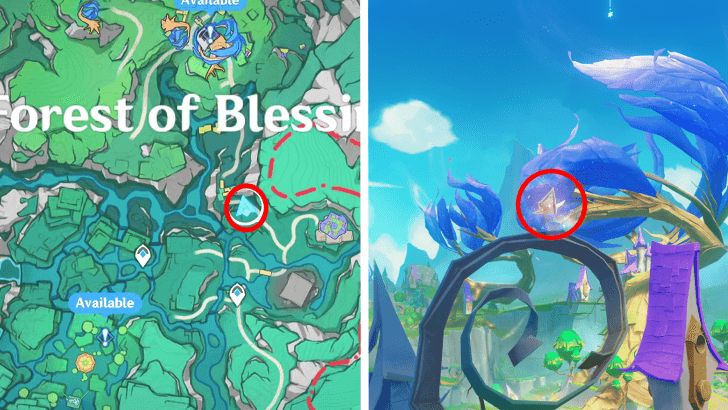 |
Found on top of the swirling plant at the bottom of a set of stairs with buildings along its side. |
| 6 | 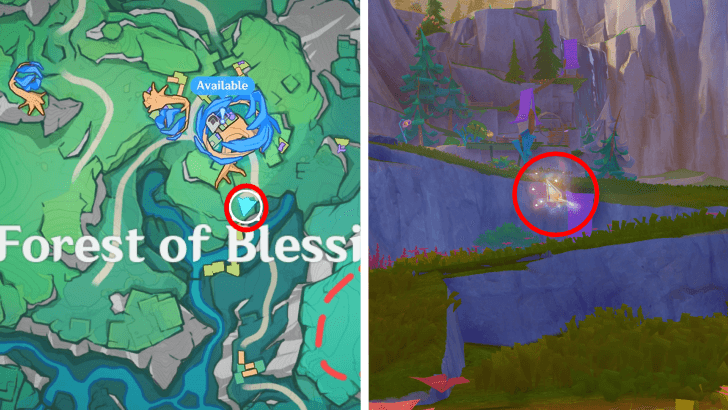 |
On a hilltop next to a swirling plant to the south of the large central tree. |
| 7 | 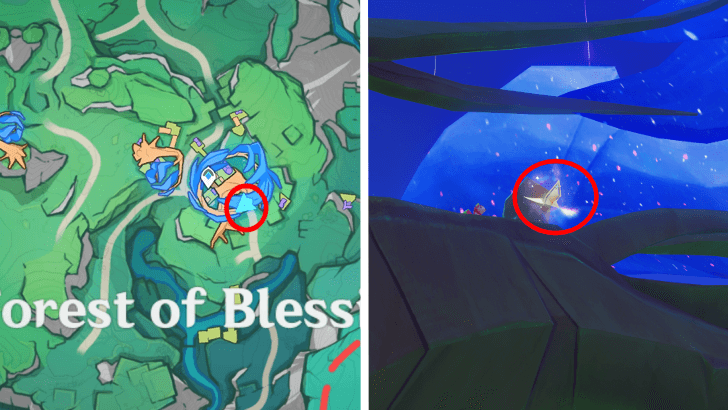 |
Perched on a branch of the huge tree in the center |
| 8 | 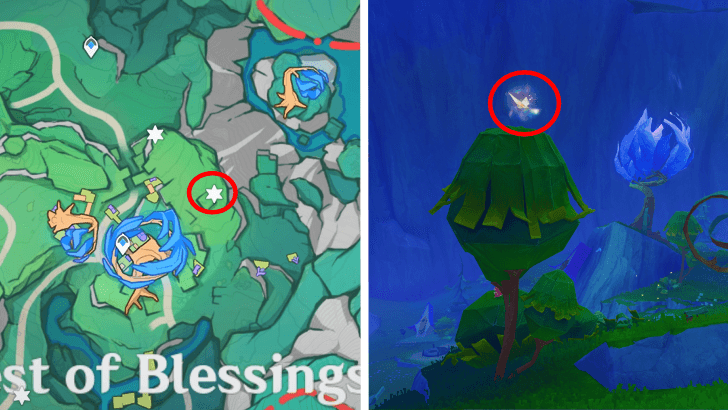 |
Located on top of an origami tree northeast of the Central Tree and southeast of Crane 9. |
| 9 | 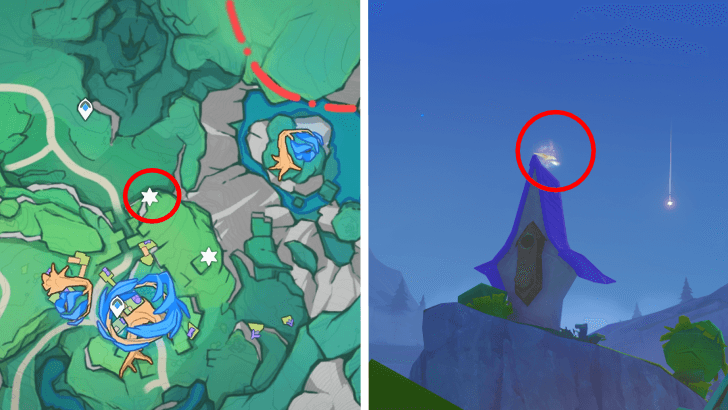 |
Found on the roof of a small house on top of a hill, directly north of the Central Tree. |
| 10 | 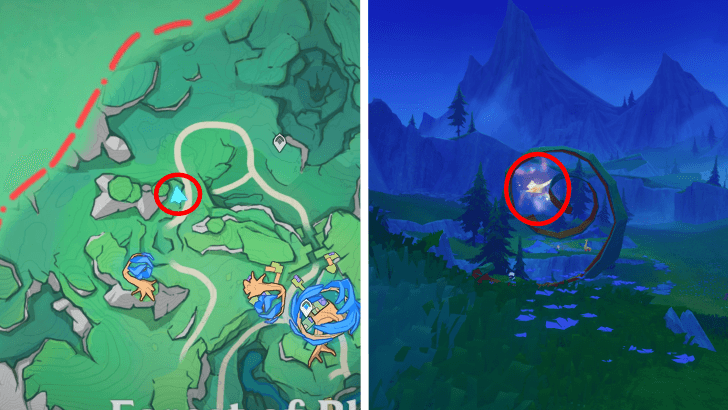 |
Located inside a swirling plant to the northwest of the Central Tree. |
| 11 | 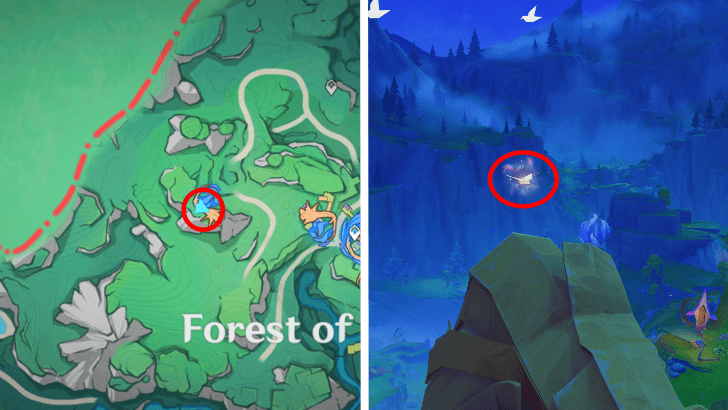 |
Found on a branch of a small tree west of the Central Tree. |
| 12 | 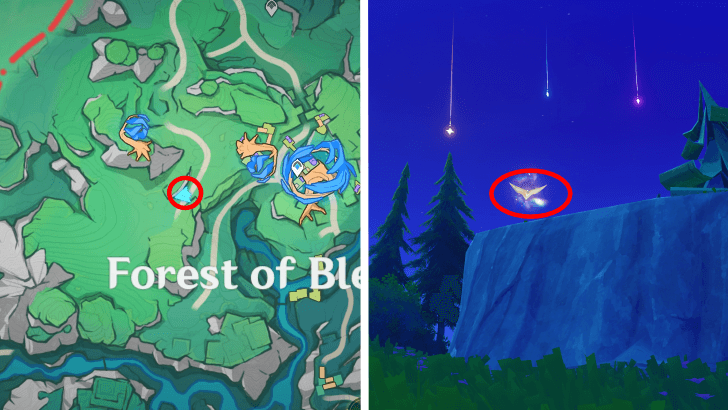 |
Found atop a hill to the west of the Central Tree. |
| 13 | 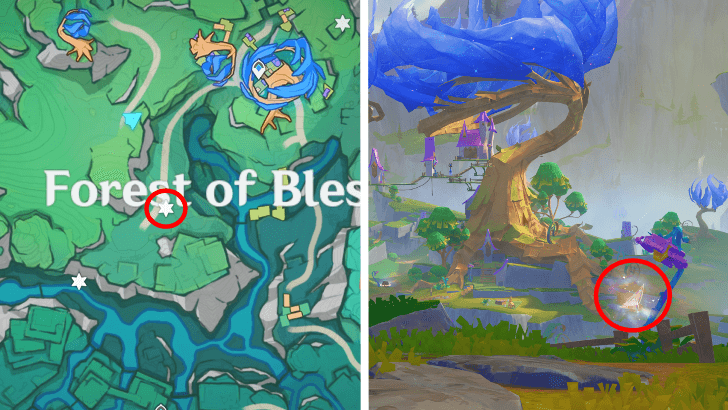 |
Situated by a lamppost along the trail to the huge tree. |
| 14 |  |
Located on the canyon in Forest of Blessings, near to a floating boulder. |
| 15 | 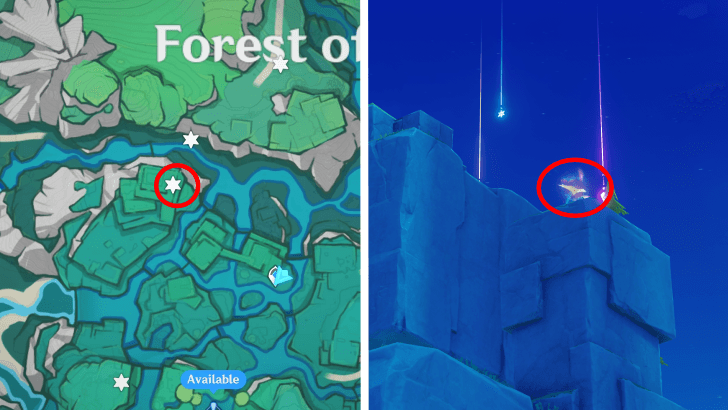 |
On top of the geometric stone blocks overlooking the river. |
| 16 | 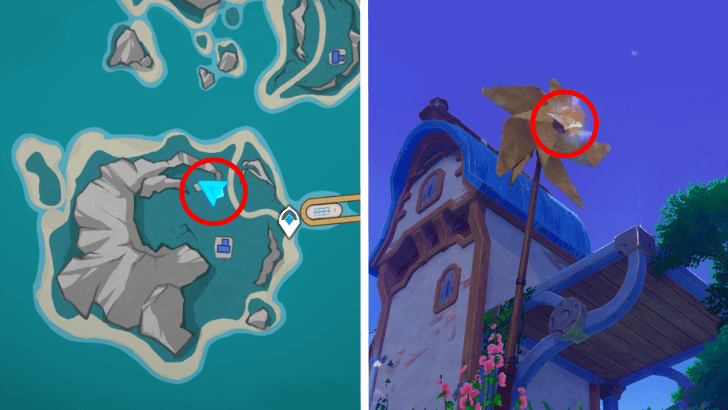 |
Located on the other side of a station, on the pinwheel of a house on a hill. |
| 17 | 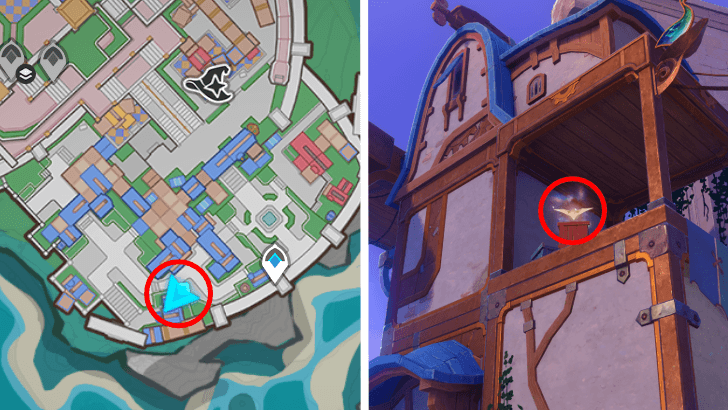 |
Located west of the waypoint, on the upper floor of the building. |
| 18 | 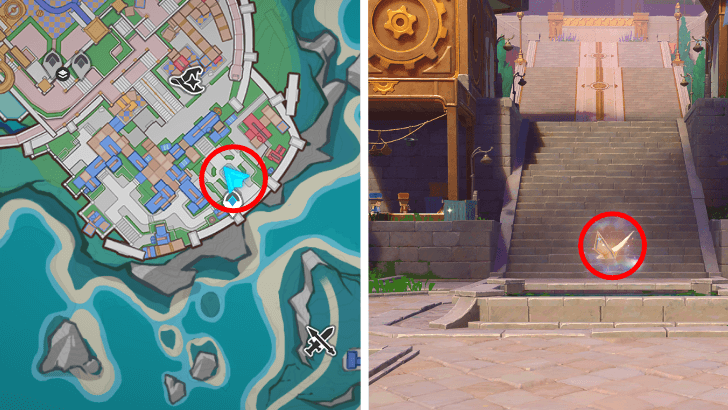 |
Located near the entrance to Metropole. |
| 19 |  |
On top of a building above the staircase from the entrance. |
| 20 | 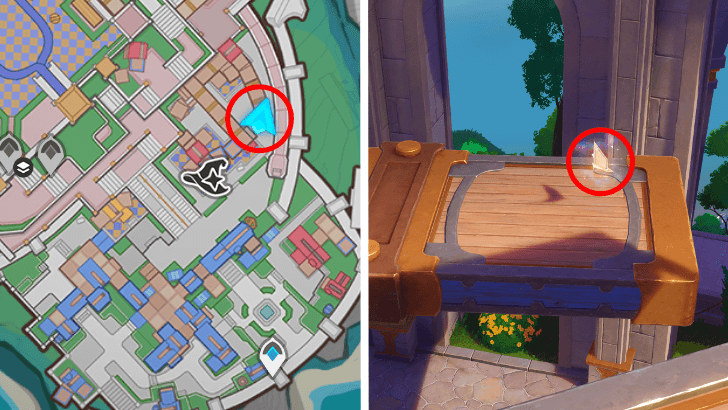 |
This crane can be found on a platform west of the Metropole. Utilize the clockwork elevator to go up the platform. |
| 21 | 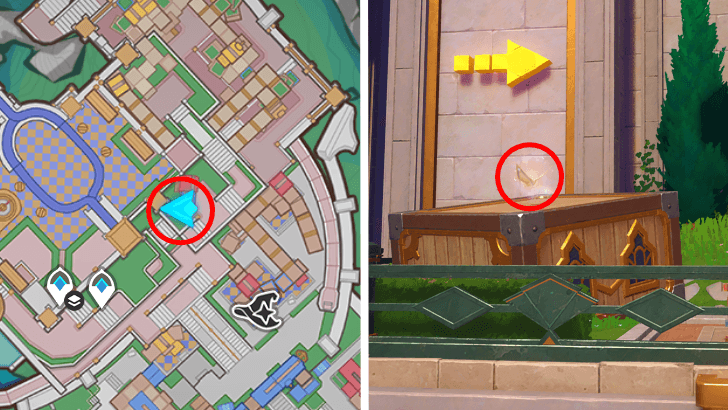 |
Located east from the previous paper crane. Use the clockwork device to get to the other side. The crane is on the lowest structure. |
| 22 | 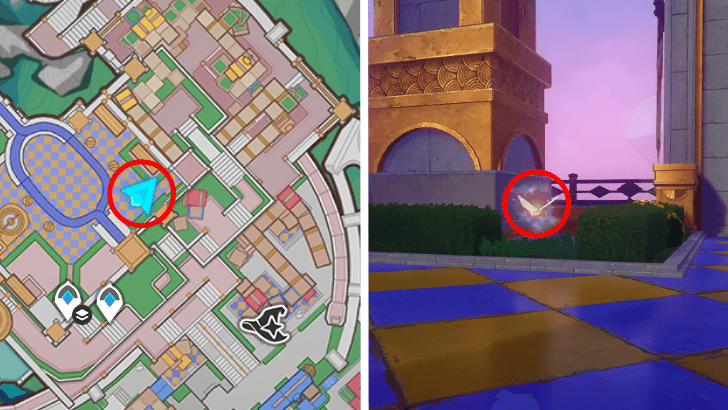 |
Climb all the way up the castle to the Astral Garden, there you'll find the paper crane between the shrub. |
| 23 | 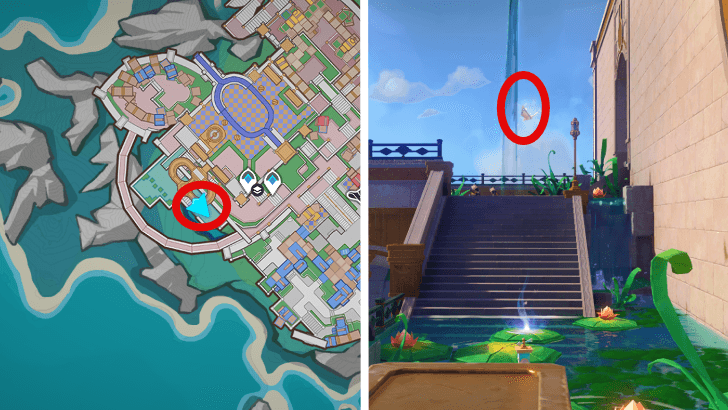 |
Found within the pond in the central section of the castle. Progress the event quest to access the upper floors of the castle. |
| 24 | 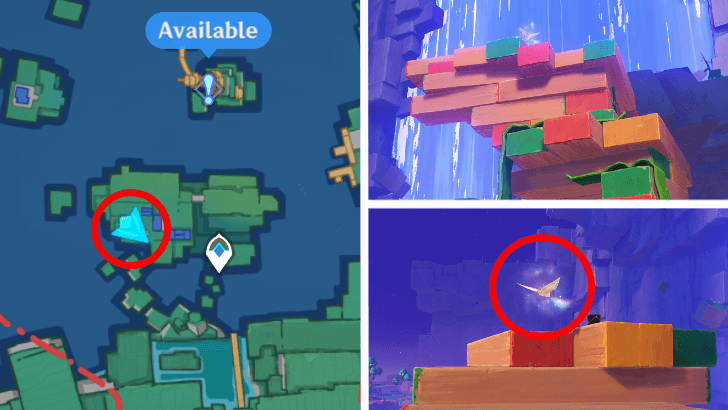 |
Found on top of the wooden planks near the waterfalls. |
| 25 | 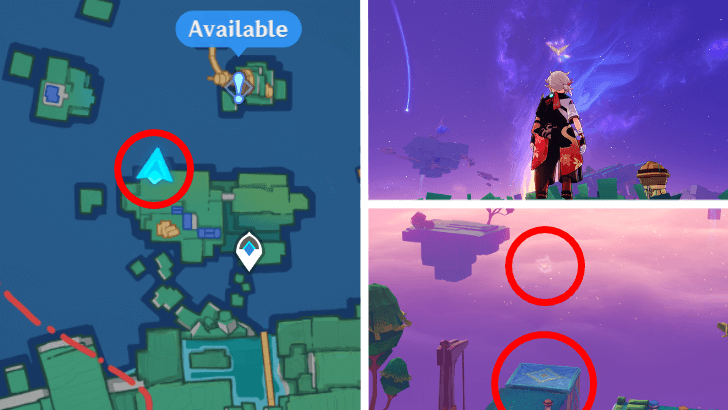 |
On the same island south of the previous paper crane. Jump onto the trampoline to reach it. |
| 26 |  |
Located on an island east of the Broken Sea, past the stone with the circular hole. |
| 27 | 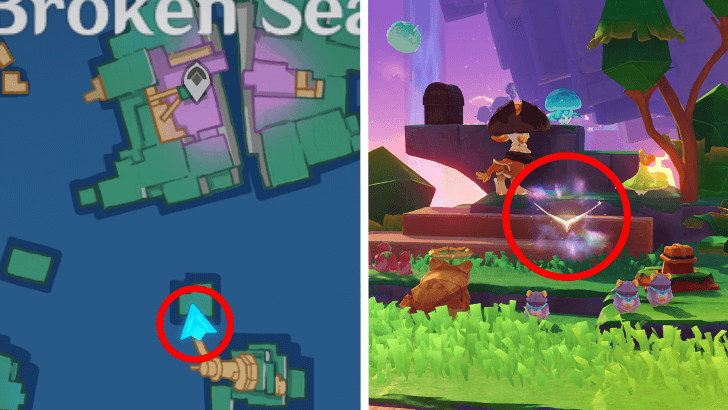 |
Can be found on an island with a tilted lighthouse surrounded by origami animals. |
| 28 | 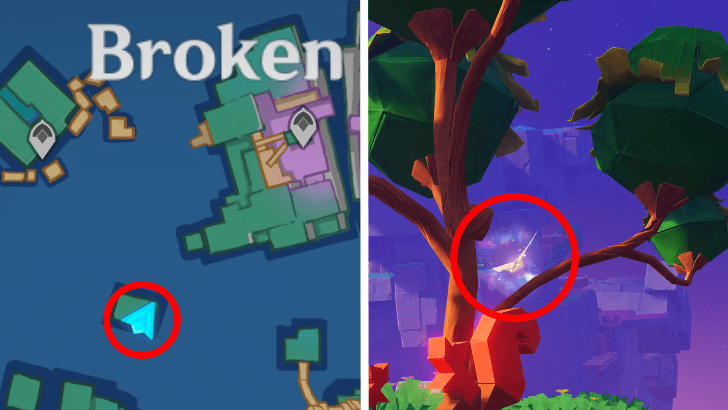 |
From the previous paper crane, use the jumping block nearby and ride the wind currents to reach a small island with a small tree and another paper crane. |
| 29 | 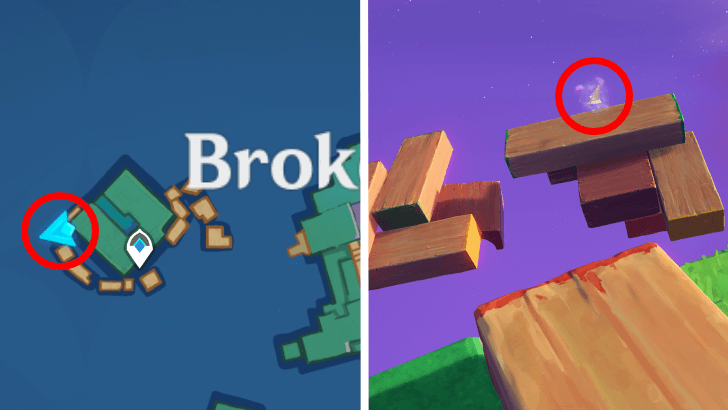 |
Found west of Shattered Toytanium Mines on a wooden plank bridge. |
| 30 | 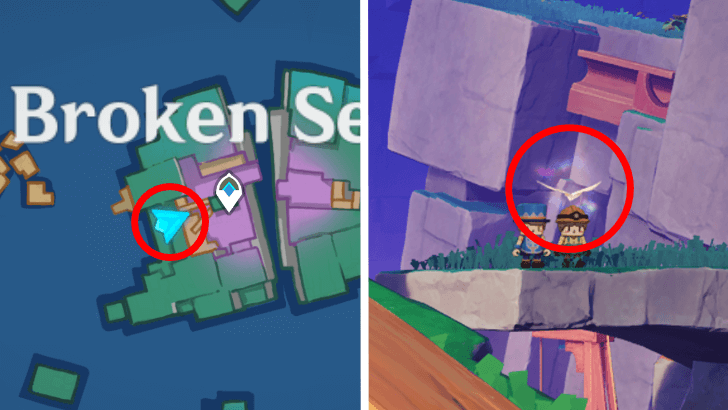 |
Found on Shattered Toytanium Mines, next to two Toy figures. |
| 31 | 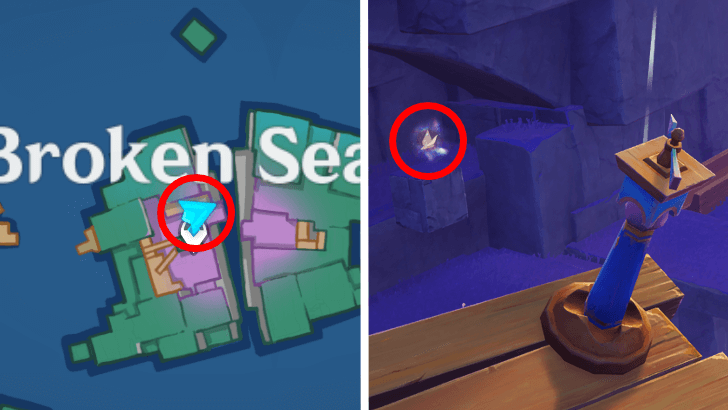 |
On a floating stone block found beneath the waypoint in Shattered Toytanium Mines. |
| 22 | 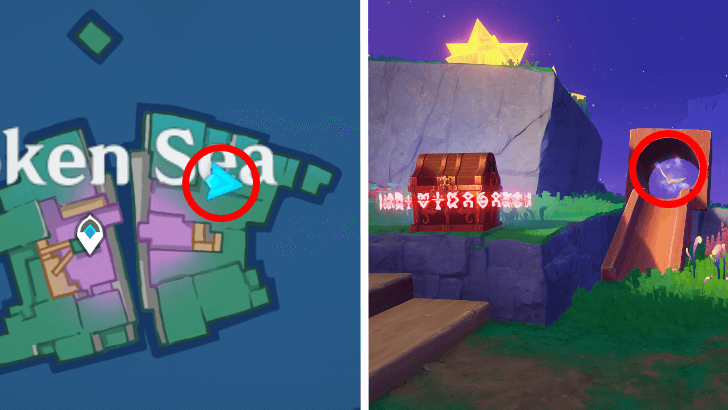 |
In a slide east of the Shattered Toytanium Mines. |
| 33 | 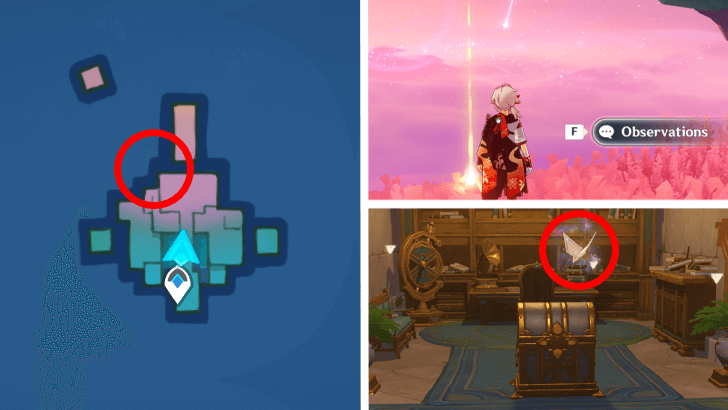 |
North of the Broken Sea, alongside three statues. Floating crystals will appear upon arriving on an island; one of them will lead you to the back of the north statue, where a marker will spawn saying “Observations”. Read the marker then jump off the cliff. You should automatically be in the hidden room. |
Obtain from Treasure Chests
| Click here to open map in new tab! |
Each treasure chest you find in the Simulanka has at least one Excerpt! Grab them as soon as you discover them to get the Execerpts and other rewards like Primogems.
Solve Origami Animal Puzzles
 Paper Frogs |
 Paper Alpaca |
 Flying Squirrels |
|
Origami Animals are the local residents of Simulanka. Assist them in completing various puzzles to earn a chest with Excerpts of Bliss and other rewards!
Complete Time Trial Challenges
| Click here to open map in new tab! |
Time Trial Challenges are also available on the Simulanka map. Completing these, like other Time Trial Challenges, will reward you with a chest, allowing you to obtain more Excerpts of Bliss!
Complete Clockwork Puzzles

In the Constellation Metropole map, you can find Clockwork Puzzles that also give chest rewards that contain these vouchers. These Constellation Clockwork devices requires you to think outside the box to be able to solve them!
Constellation Clockwork Devices Guide
Help Toys in Need

| Click here to open map in new tab! |
Help toys in need from various puzzles and other miscellaneous activities!
How to Help Each Toys
| No. | Image | How to Get |
|---|---|---|
| 1 | 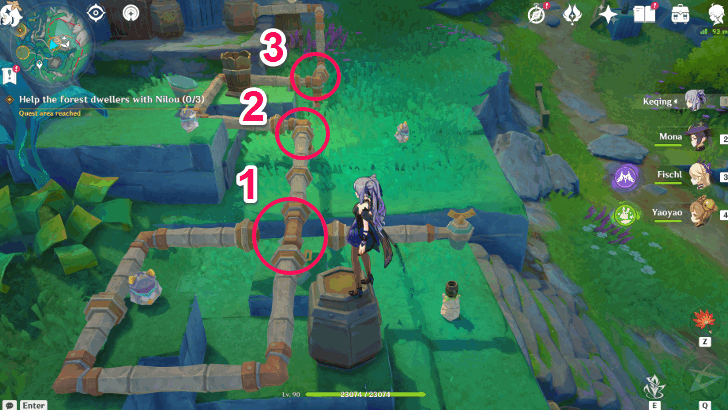 |
Part of the first event quest. Rotate the pipe until the liquid flows into the barrel. |
| 2 | 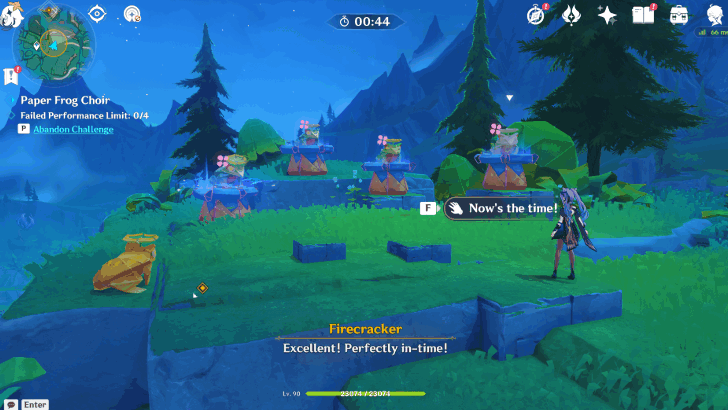 |
Part of the first event quest's Frog Band Rhythm Game Puzzle |
| 3 | 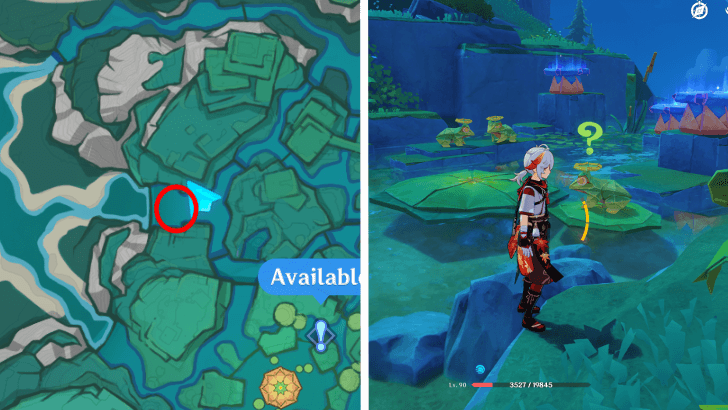 |
Frog Band puzzle west of the middle Teleport Waypoint. |
| 4 | 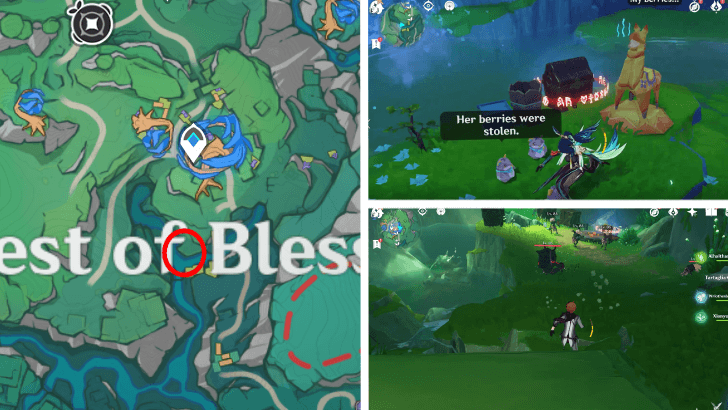 |
By the waterfall. Talk to the Alpaca and follow the Hamsters to a cave, then defeat the enemies and collect the Berries. Return to the Alpaca and place the Berries on the basket. |
| 5-6 | 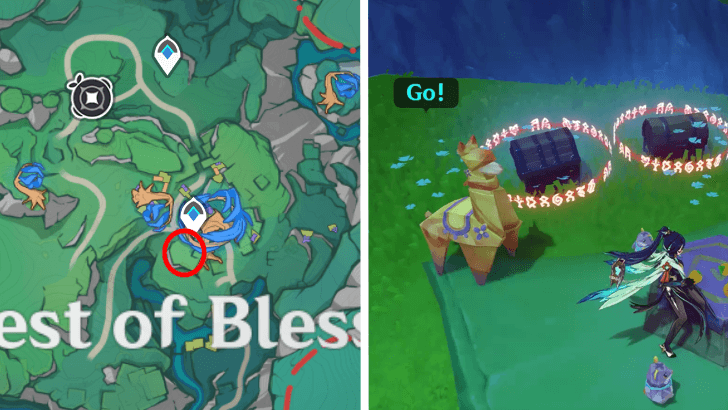 |
Play a minigame with the Alpacas and Hamsters. Only when the Alpaca says go, press and collect the Berry as fast as possible. Play another minigame with the Alpacas and Hamsters. Only when the Alpaca says go, press and collect the Berry as fast as possible. There will be Bulle Fruits which you must avoid. |
| 7 | 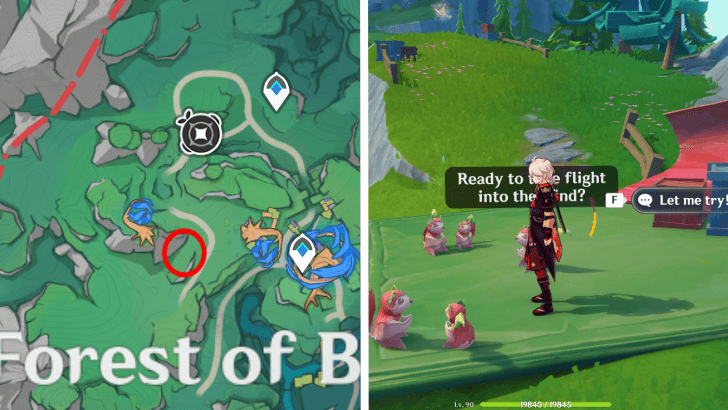 |
Talk to the Flying Squirrels north of Forest of Blessings and chase them all as they fly away. |
| 8 |  |
Only accessible from the Narration Footnotes quest. Chest reward from the Oracle Pillar objective. |
| 9 | 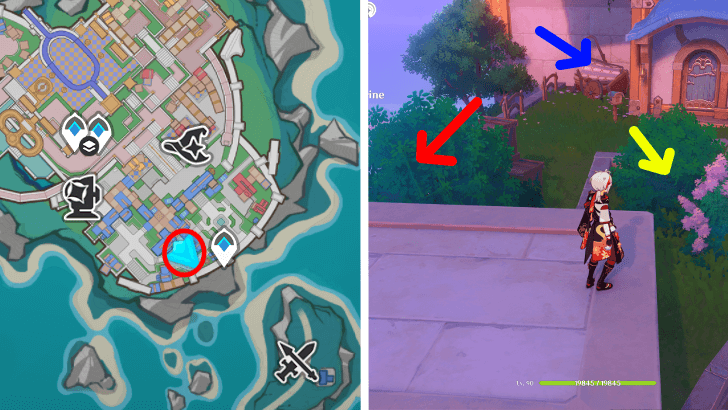 |
Play Hide and Seek with the Toy Figures by the table. Search the bushes and cart on the left to find all three. |
| 10 | 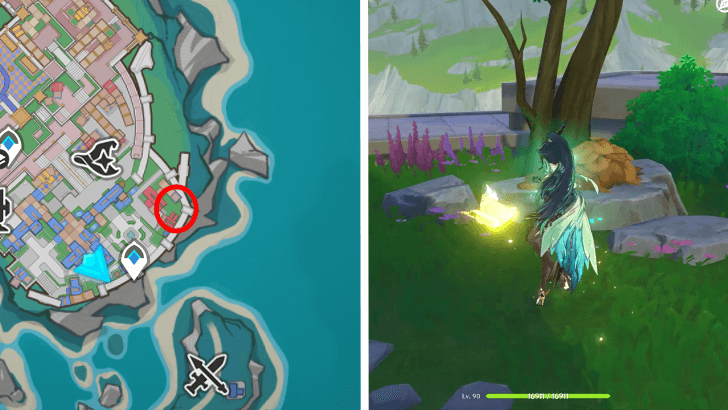 |
Blow the leaves to reveal a Common Chest. |
| 12 |  |
Atop the building. When the Toy Guard turns around, don't move. Keep moving until you touch the toy guard. |
| 13 | 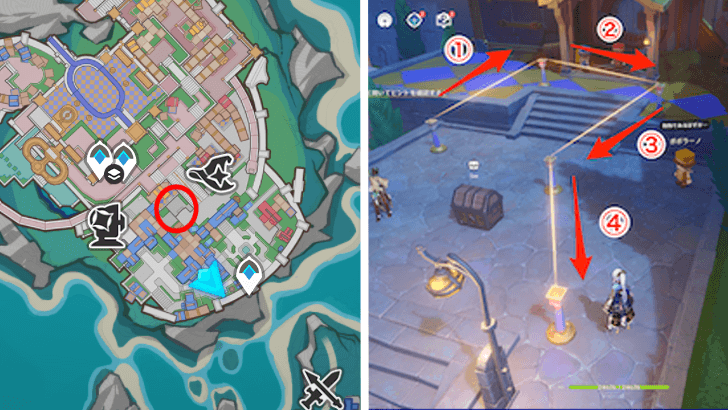 |
Only accessible from the Narration Footnotes quest. Chest reward from the second Oracle Pillar objective. |
| 14 | 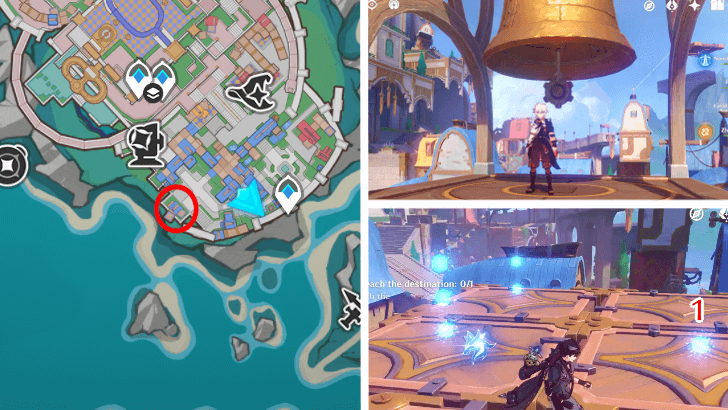 |
Use the zipline to climb-up the bell tower, ring it, then collect all blue orbs in the numerical order. Continue along the zipline until you get to the finish line. |
| 15 | 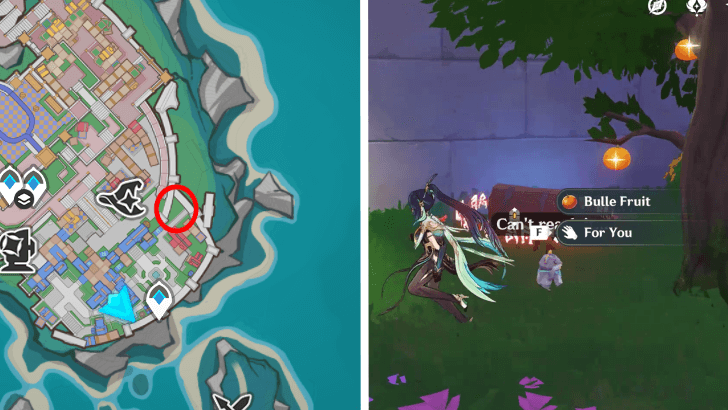 |
Beside a Bulle Fruit tree. Give the Hamster 1 piece of Bulle Fruit. |
| 16 | 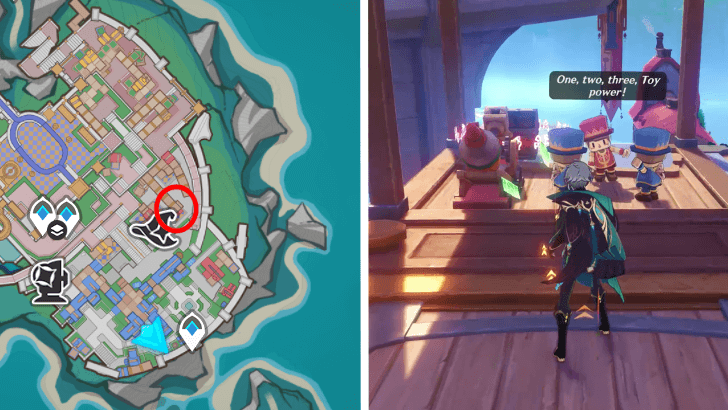 |
Atop a small tower. When the Toy Guard turns around, don't move. Keep moving until you touch the toy guard. |
| 17 |  |
Graffiti patterns by the stairs on the lower area. On the empty circle at the right side, draw a frog. On the left, a flying squirrel. |
| 18 | 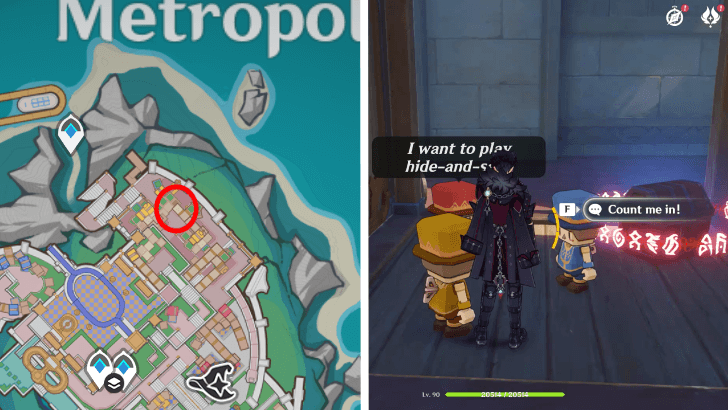 |
On a wooden space of a building. Hide and Seek game. |
| 19 | 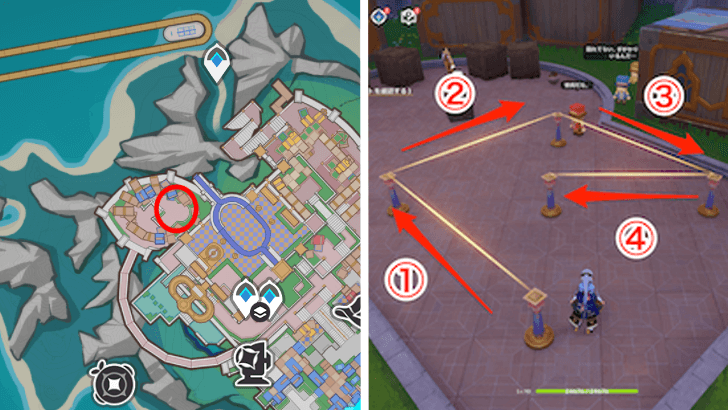 |
Only accessible from the Narration Footnotes quest. Chest reward from the third Oracle Pillar objective. |
| 20 | 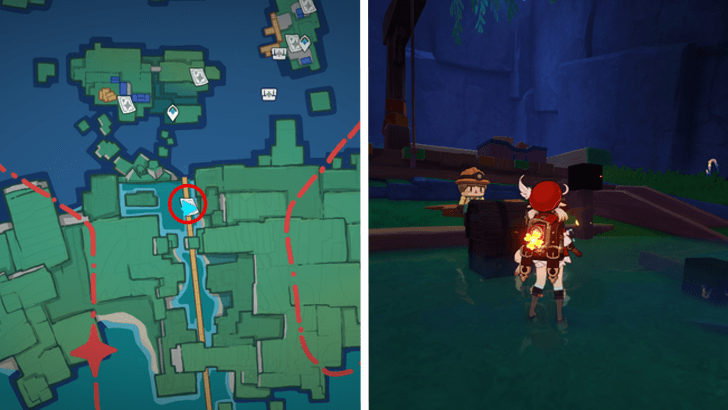 |
Found during the event quest. Place the redblock on top of the stick and ignite it with Pyro attack. |
| 21 | 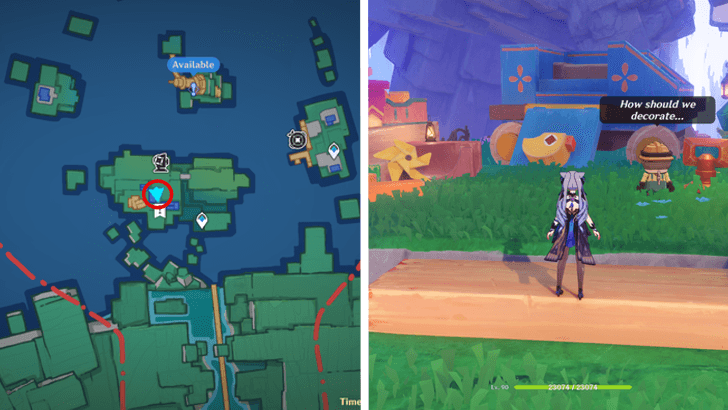 |
Ask the toy miner first, Then, you need to attach the various objects around the area and into the toy train car. Afterwards, ask the toy miner again if it looks good. Awards you with Exquisite Chest. |
| 22 | 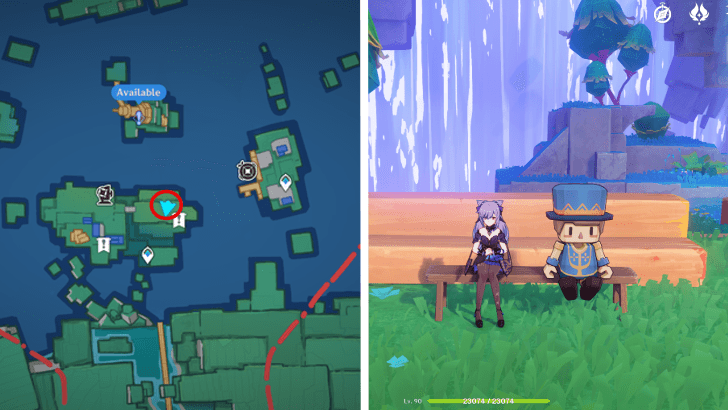 |
Sit beside the citizen that will tell you all about his life. It takes a while, but will reward you with a wooden chest if you stayed long enough to hear his whole story. |
| 23 |  |
Found on a tiny island south of Broken Sea. Press dig to get the chest. |
| 24 |  |
Grab the triangular toy block at the lower platform and attach it to the brown blocks behind the toy miner to replicate a toy boat. |
| 25 | 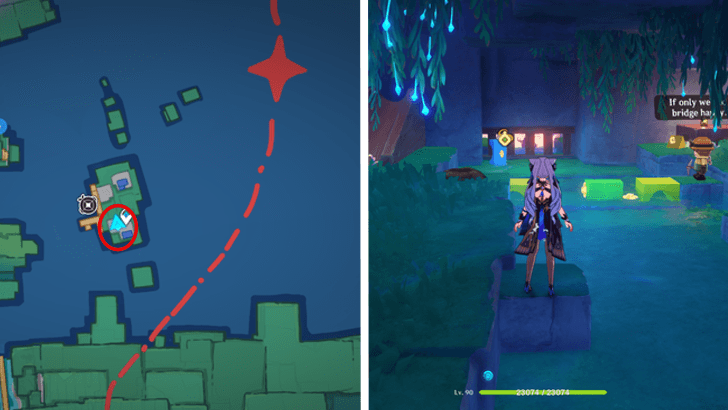 |
Grab the square blue toy block attach it to the broken bridge. Grab the big blue toy block with an arch and attach it t the bridge. Watch as the the toy miner crosses the bridge and use his pickaxe on the ground. |
| 26 | 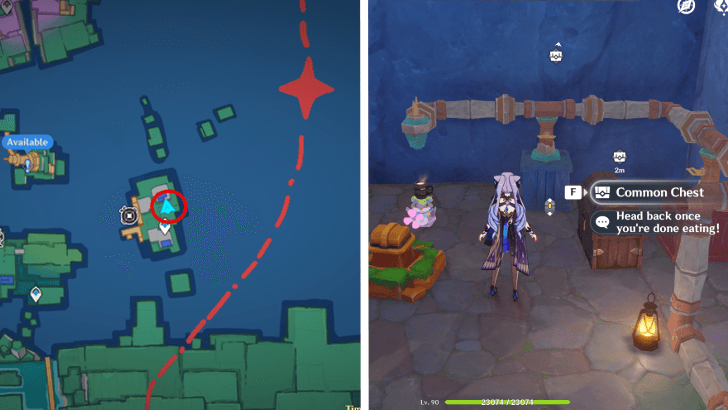 |
Rotate the two pipes so it gets aligned with the rest of them. Talk to the toy miner at the entrance and let the magic flow. |
| 27 |  |
Stack two lines/levels of square blocks. Then stack two triangular block at the top. |
| 28 |  |
Defeat all the enemies. Attach the blue toy block along with other blue ones. Attach the red block to the fish that has a hole in its body. Attach the yellow block to the tail of the other fish. |
| 29 | 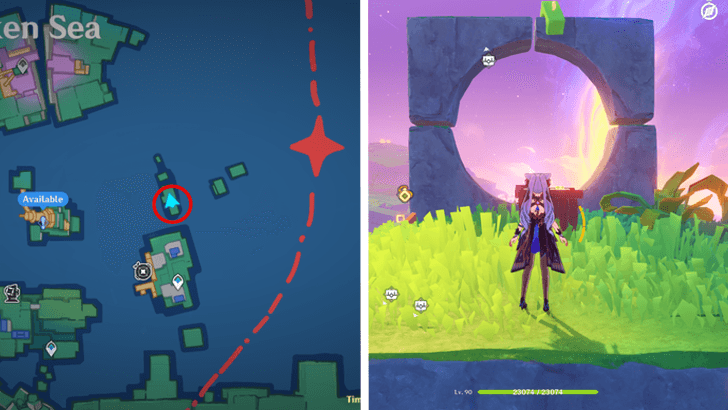 |
Grab the two green toy blocks and place in on top of the wooden box. |
| 30 |  |
Grab the square red block from the other platform by using the oracle pillar. Attach the square red block to the heart beside the flying squirrel. Grab the triangular red block at the edge of the small island and attach it to the big red heart. Talk to the flying squirrel afterwards. |
| 31 | 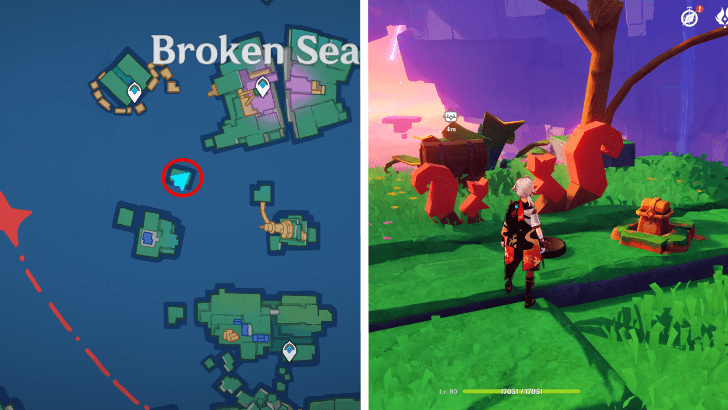 |
Located on a small island south of the Shattered Toytanium Mines. Place a pinecone in front of the squirrel blocks to get the chest. |
| 32 | 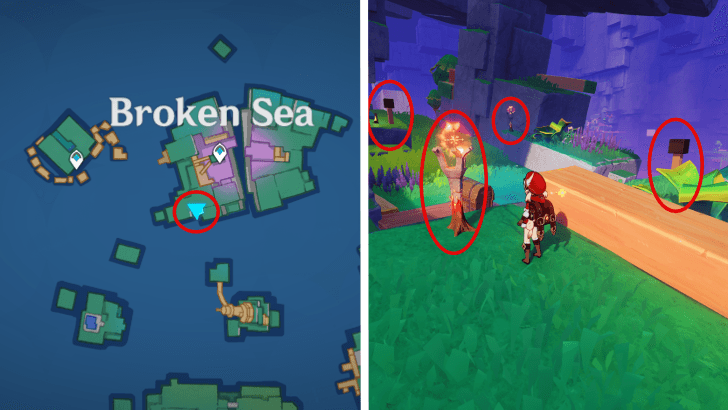 |
Located underground west of the Shattered Toytanium Mines. Get the red blocks nearby and stack them on top of the sticks. Once done, use Pyro Attack to burn all torches, including the red blocks. |
| 33 | 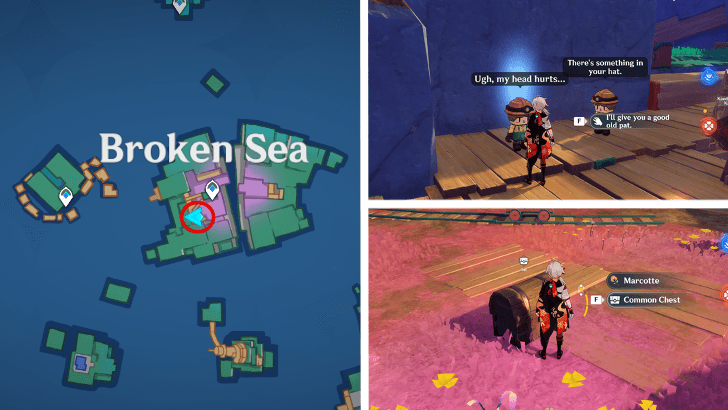 |
Found in Shattered Toytanium Mines, near the waypoint. Interact with the Toy Figure with a glowing blue head, then collect all of the Hydro particles that appear. |
| 34 |  |
Found in Shattered Toytanium Mines, underneath the Toy miner with a headache. For this puzzle, arrange the blocks by color. |
| 35 | 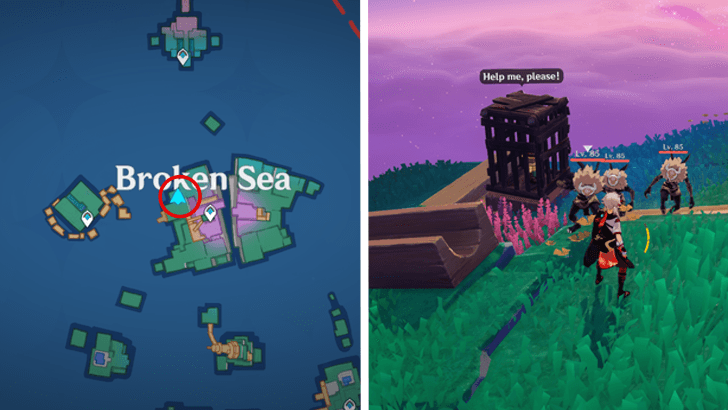 |
Found on the north side of the Shattered Toytanium Mines. Defeat all of the Hilichurls and free the miner to receive the chest. |
| 36 | 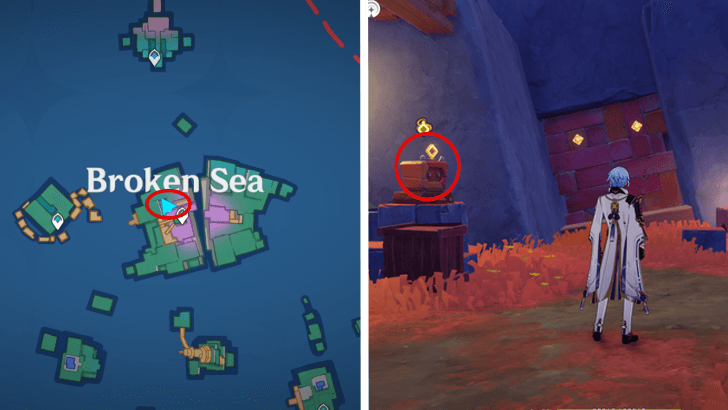 |
Glide down from the previous puzzle to see a red wall. Use the bomb nearby to destroy the wall and get to the chest inside. |
| 37 | 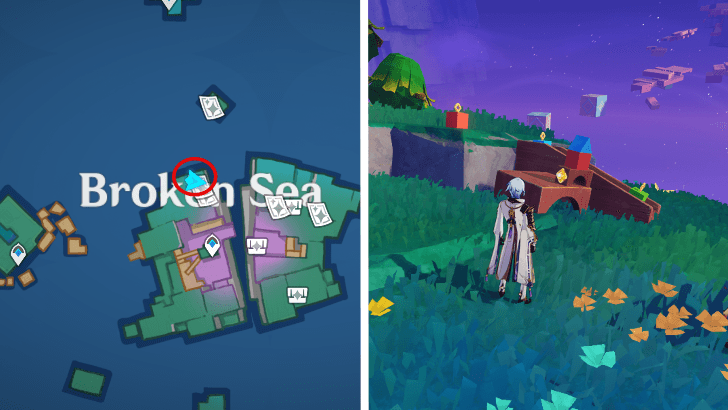 |
Found in Shattered Toytanium Mines, north of the waypoint. Build a house identical to the one on the right. It doesn't matter what color you choose; as long as it's similar, you'll get the chest. |
| 38 | 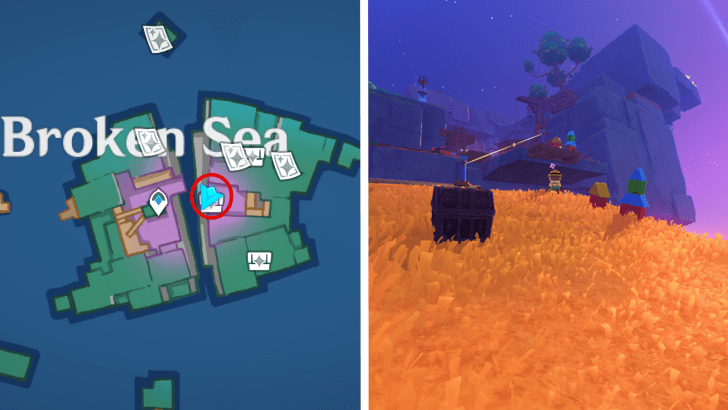 |
Found in in the Shattered Toytanium Mines, west of the waypoint. Finish assembling the blocks and replicate the structure that sits above the platform. |
| 39 | 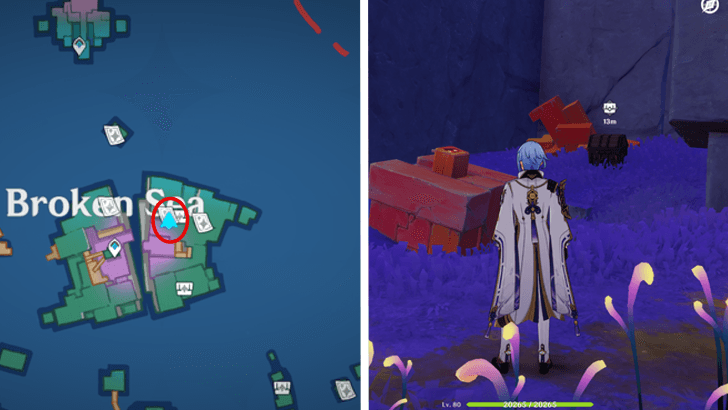 |
Located on the second level of the Shattered Toytanium Mines, west of the waypoint. To get to the chest, destroy all of the red blocks using the bomb. |
| 40 | 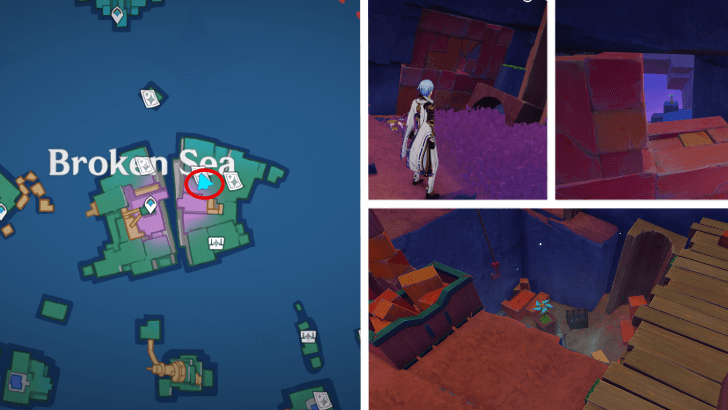 |
Located on the lowest level of the Shattered Toytanium Mines, west of the waypoint. Destroy the red walls and talk to the Toy miners down the hole. Then take the blue flower outside and set it on the box to get the miners out. |
How to Get Excerpts of Bliss Fast
Use Jocund and Joyous Letters to see Map Locations
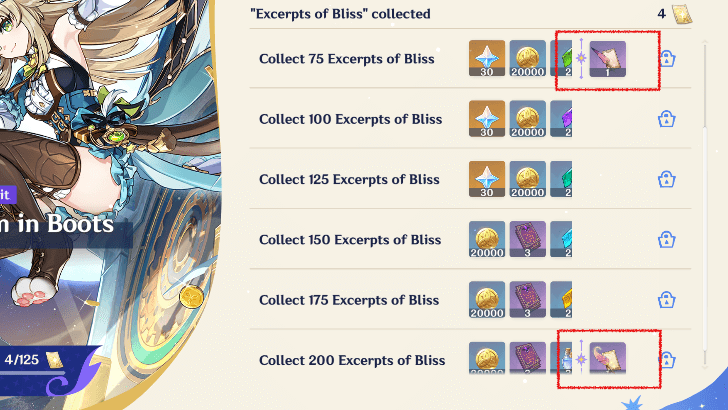
Use the Letters Gadgets to have the map display the locations of all Excerpts nearby.
The gadgets are available under the Summer Gifts section of the event menu. Collect 75 Excerpts of Bliss to obtain the Jocund Letters, and 200 for the Joyous Letters!
Jocund and Joyous Letters Gadget Guide
How to Use Excerpts of Bliss
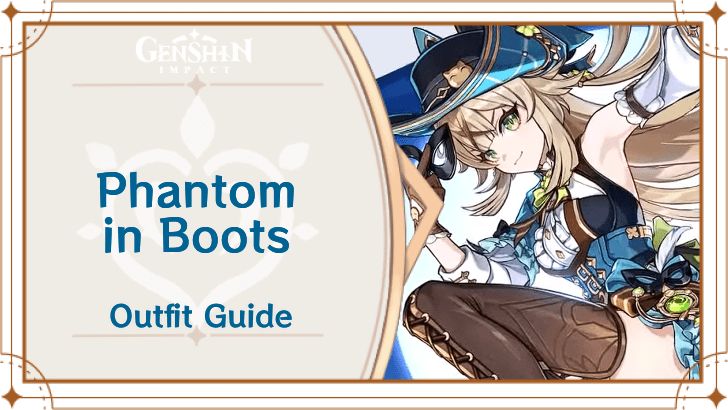
Exchange Excerpts of Bliss to get Kirara Skin
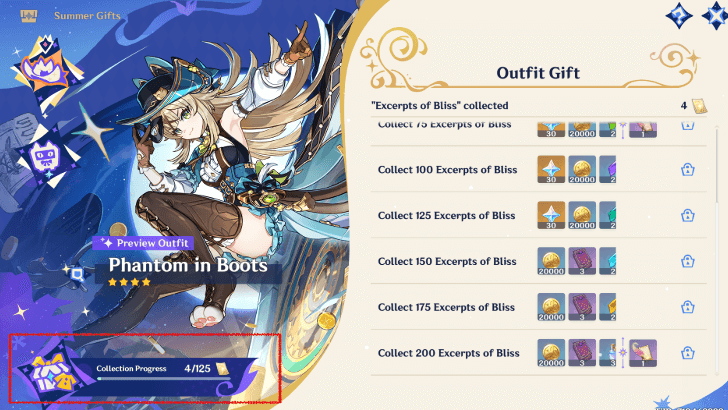
Collect 125 Excerpts of Bliss and use them to get Kirara's free skin, Phantom in Boots!
How to Get Kirara Free Skin in 4.8
Reach Milestones to Obtain Precious Items
In addition to Kirara's skin, you can also get Primogems, the Letters Gadget, and other essential rewards by reaching a certain number of excerpts.
| Vouchers | Rewards |
|---|---|
+ Free Kirara Skin - Phantom in Boots |
|
Genshin Impact Related Guides
Simulanka Events
| Events in Simulanka | |
|---|---|
 Summertide Scales and Tales Summertide Scales and Tales |
 Nilou Skin Nilou Skin |
 Kirara Skin Kirara Skin |
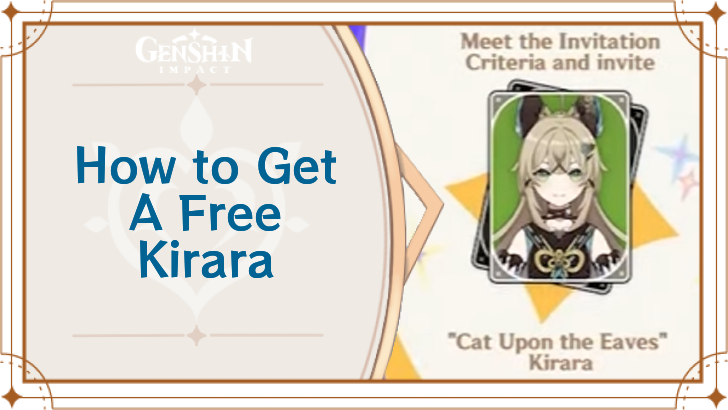 Free Kirara Copy Free Kirara Copy |
Simulanka Puzzles & Features
Simulanka Quest Guides
| Summertide Scales and Tales | |
|---|---|
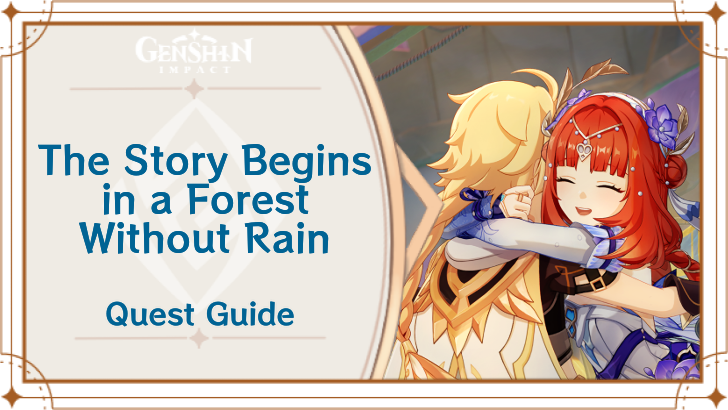 The Story Begins in a Forest Without Rain The Story Begins in a Forest Without Rain |
 They Once Walked the Starry Sky They Once Walked the Starry Sky |
 Until the End of the World Until the End of the World |
 Afterword Afterword |
 Character Locations Character Locations |
|
Simulanka World Quest Guides
All Interactive Map Guides
Comment
5  Anonymous over 1 year
The whole day 1 map has about 96 in total. I played it claimed it all in one day. I completely cleared all of it and even I was suprised.
Author

Excerpts of Bliss Locations and How to Use
Please participate in our site
improvement survey
03/2026
improvement survey
03/2026
Would you assist in
improving Game8's site?
improving Game8's site?

×
We are listening to our users' valuable opinions and discussing how to act on them.
The information collected through this survey will be used for the purpose of improving our services. In addition, the information will only be disclosed a part of a statistic in a format that will not allow identification of personal information.
Begin Survey
Not Now
×
Please rate each item regarding Game8.co's Advertisements.
Amount of Ads
Very Dissatisfied
Somewhat Dissatisfied
Fine
Somewhat Satisfied
Highly Satisfied
Placement of Ads
Timing of Ad Display
Ad Loading Speed
Safeness of Ads
Content of Ads
×
Please rate each item regarding Game8.co's Quality of Articles.
Amount of information
Very Dissatisfied
Somewhat Dissatisfied
Fine
Somewhat Satisfied
Highly Satisfied
Frequency of updates
Speed of new information
Accuracy of articles
Understandibility of articles
Readability of sentences
×
Please rate each item regarding Game8.co's Usability of the Site.
Ease of finding information
Very Dissatisfied
Somewhat Dissatisfied
Fine
Somewhat Satisfied
Highly Satisfied
Loading Speed
Use of Color
Font Size
Visibility of Images
Easy to Understand Layout
×
Please rate each item regarding Game8.co's Message Boards, Comments.
Ease of Writing
Very Dissatisfied
Somewhat Dissatisfied
Fine
Somewhat Satisfied
Highly Satisfied
Readability
Ease in Finding Information
Comment Quality
Comment Quantity
Admin Response
×
Please rate each item regarding Game8.co's Site's new design.
Please rate our site's new design
Very Dissatisfied
Somewhat Dissatisfied
Fine
Somewhat Satisfied
Highly Satisfied
Do you think that the website's design change makes the site easier to use?
Has the new design made it easier for you to find information on the site?
Has the new design improved the overall visual appeal of the site?
How would you rate your overall satisfaction with the new design of the site?
×
How likely are you to recommend Game8 to someone you know?
Very Unlikely
0
1
2
3
4
5
6
7
8
9
10
Very Likely
If you have other opinions regarding potential improvement to the website, please share them with us. We would appreciate your honest opinion.
Note: This is a free response section, so you can proceed without entering anything.
Note: Please be sure not to enter any kind of personal information into your response.
Note: Please be sure not to enter any kind of personal information into your response.
×
Thank You
×
Thank you for participating in our survey! Your answers will help us to improve the quality of our website and services.
We hope you continue to make use of Game8.
We hope you continue to make use of Game8.
Close


Rankings
Gaming News


![Everwind Review [Early Access] | The Shaky First Step to A Very Long Journey](https://img.game8.co/4440226/ab079b1153298a042633dd1ef51e878e.png/thumb)

![Monster Hunter Stories 3 Review [First Impressions] | Simply Rejuvenating](https://img.game8.co/4438641/2a31b7702bd70e78ec8efd24661dacda.jpeg/thumb)
Popular Games

Genshin Impact Walkthrough & Guides Wiki
Honkai: Star Rail Walkthrough & Guides Wiki
Umamusume: Pretty Derby Walkthrough & Guides Wiki
Pokemon Pokopia Walkthrough & Guides Wiki
Resident Evil Requiem (RE9) Walkthrough & Guides Wiki
Monster Hunter Wilds Walkthrough & Guides Wiki
Wuthering Waves Walkthrough & Guides Wiki
Arknights: Endfield Walkthrough & Guides Wiki
Pokemon FireRed and LeafGreen (FRLG) Walkthrough & Guides Wiki
Pokemon TCG Pocket (PTCGP) Strategies & Guides Wiki


Recommended Games
Diablo 4: Vessel of Hatred Walkthrough & Guides Wiki
Fire Emblem Heroes (FEH) Walkthrough & Guides Wiki
Yu-Gi-Oh! Master Duel Walkthrough & Guides Wiki
Super Smash Bros. Ultimate Walkthrough & Guides Wiki
Pokemon Brilliant Diamond and Shining Pearl (BDSP) Walkthrough & Guides Wiki
Elden Ring Shadow of the Erdtree Walkthrough & Guides Wiki
Monster Hunter World Walkthrough & Guides Wiki
The Legend of Zelda: Tears of the Kingdom Walkthrough & Guides Wiki
Persona 3 Reload Walkthrough & Guides Wiki
Cyberpunk 2077: Ultimate Edition Walkthrough & Guides Wiki


All rights reserved
Copyright© 2012-2024 HoYoverse — COGNOSPHERE. All Rights Reserved.
The copyrights of videos of games used in our content and other intellectual property rights belong to the provider of the game.
The contents we provide on this site were created personally by members of the Game8 editorial department.
We refuse the right to reuse or repost content taken without our permission such as data or images to other sites.
Oh wait since I did claim 2 of the additional bliss when i first arrived at the metro you can say i had about 95-94.