Blazing Battle Spirit Day 3 Guide
★ Exclusive: Check out the State of Meta for Nod-Krai!
◆ Hot: Luna 5 Livestream & Luna 5 Livestream Codes
◆ Builds: Columbina, Zibai, Illuga, Ineffa, Neuvillette
◆ Luna 4, Lantern Rite 2026, Moonlit Patrol Exercise
◆ Future: Version 6.4, Varka, Lohen
Blazing Battle Spirit is the third stage of the Peaks and Troughs of Life event in Genshin Impact! Find out how to beat it, the best characters and buff modules, enemies, and details by checking out our guide!
| The Peaks and Troughs of Life Stage Guides | ||
|---|---|---|
 Day 1 Day 1 |
Day 2 |
Day 3 |
| Day 4 |
Day 5 |
|
How to Beat Blazing Battle Spirit
Focused on Pyro and Shields
For Day 3, the Buff Modules are optimized to synergize with Pyro and the usage of shields. Hence, strong Pyro units are called for, as well as formidable shielders like Zhongli.
The first 2 rounds are not heavily inclined towards elements, with mostly Meks standing in your way, but the third one has a Frostarm Lawachurl, which really calls for a good Pyro DPS.
Make Use of the Pressurized Impactor

Much like before, the Pressurized Impactor is one of your main keys to success in this challenge. Remember to use it to activate your Buff Modules, and especially in dire situations when elite enemies start popping up.
Best Teams and Modules for Blazing Battle Spirit
Round 1
| Main-DPS | Sub-DPS | Sub-DPS | Support |
|---|---|---|---|
|
|
|
|
|
| (LVL 2) Shielded characters have their CRIT Rate increased by 20% and CRIT DMG is increased by 40%. (LVL 2) When a character is healed, ATK is increased by 90% for 10s. |
|||
Your first batch of Meks comes in Round 1. Fortunately, the Buff Modules do present a bit of versatility, so one can take advantage of them using any character even if they do not wield Pyro.
Wriothesley's HP mechanic and Diona's shields will work well with one another, especially if you have the former at C1. Diona can negate as much DMG as possible and provide healing should Wriothesley's HP fall lower than the comfortable amount.
Round 2
| Main-DPS | Sub-DPS | Sub-DPS | Support |
|---|---|---|---|
|
|
|
|
|
| (LVL 2) Shielded characters have their CRIT Rate increased by 20% and CRIT DMG is increased by 40%. (LVL 2) When a character's Charged Attack hits an opponent, the character will unleash a shockwave at the opponent's location that deals great True DMG. This effect can be triggered once every 5s. |
|||
Another batch of Meks stands in your way in Round 2, but this time, you're going to be up against large Construction Specialist Meks. Do not hesitate to use your Pressurized Impactor to take them out as quickly as possible!
Neuvillette's Electro-Charged Hypercarry team will work wonders not only for eliminating the larger Meks, but also taking down the surrounding smaller foot soldiers. Be sure to Bring Zhongli along for the Buff Module and for increased resistance to interruption!
Round 3
| Main-DPS | Sub-DPS | Sub-DPS | Support |
|---|---|---|---|
|
|
|
|
|
| (LVL 2) All party members gain a 60% Pyro DMG Bonus. (LVL 2) Shielded characters have their CRIT Rate increased by 20% and CRIT DMG is increased by 40%. |
|||
The third round will pit you against Frostarm Lawachurls, giving your Pyro units their time to shine. Lyney is available as a trial character should you lack a good Pyro DPS.
For this round, pull out all the stops with your Pyro characters and Melt your way through your opponents. Bringing Thoma along is also a good idea if your Pyro DPS is a melee unit like Diluc or Hu Tao.
Blazing Battle Spirit Stage Information
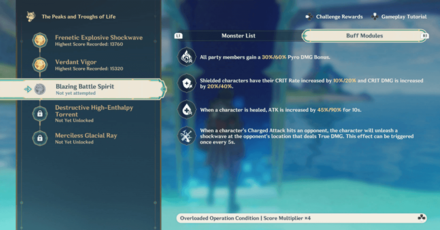
Blazing Battle Spirit Buff Modules
| All Blazing Battle Spirit Buff Modules |
|---|
| All party members gain a 30%/60% Pyro DMG Bonus. |
| When a character is healed, ATK is increased by 45%/90% for 10s. |
| All party members' Elemental Mastery is increased by 120/240. |
| When a character's Charged Attack hits an opponent, the character will unleash a shockwave at the opponent's location that deals True DMG. This effect can be triggered once every 5s. |
Blazing Battle Spirit Enemies
| Blazing Battle Spirit Enemies | |
|---|---|
| Round 1 | |
| Round 2 | |
| Round 3 | |
Part of the Peaks and Troughs of Life Event
Blazing Battle Spirit is the third stage of the Peaks and Troughs of Life, a battle-heavy event in Phase 2 Genshin Impact 4.1.
Inspiration Eruption has 5 stages in total, each of which will unlock on different dates.
The Peaks and Troughs of Life Event Guide
Blazing Battle Spirit Rewards
| All Blazing Battle Spirit Rewards | |
|---|---|
| Reach a testing score of 2,000 | |
| Reach a testing score of 4,000 | |
| Reach a testing score of 8,000 | |
| Reach a testing score of 20,000 | |
Genshin Impact Related Guides

The Peaks and Troughs of Life Event Guide
The Peaks and Troughs of Life Stage Guides
| The Peaks and Troughs of Life Challenge Guides | ||
|---|---|---|
| Frenetic Explosive Shockwave |
Verdant Vigor |
Blazing Battle Spirit |
| Destructive High-Enthalpy Torrent |
Merciless Glacial Ray |
|
All Genshin Impact Events

Comment
Author

Blazing Battle Spirit Day 3 Guide
Premium Articles

Rankings
Gaming News


Popular Games

Genshin Impact Walkthrough & Guides Wiki
Honkai: Star Rail Walkthrough & Guides Wiki
Arknights: Endfield Walkthrough & Guides Wiki
Umamusume: Pretty Derby Walkthrough & Guides Wiki
Wuthering Waves Walkthrough & Guides Wiki
Pokemon TCG Pocket (PTCGP) Strategies & Guides Wiki
Abyss Walkthrough & Guides Wiki
Zenless Zone Zero Walkthrough & Guides Wiki
Digimon Story: Time Stranger Walkthrough & Guides Wiki
Clair Obscur: Expedition 33 Walkthrough & Guides Wiki


Recommended Games
Fire Emblem Heroes (FEH) Walkthrough & Guides Wiki
Pokemon Brilliant Diamond and Shining Pearl (BDSP) Walkthrough & Guides Wiki
Diablo 4: Vessel of Hatred Walkthrough & Guides Wiki
Super Smash Bros. Ultimate Walkthrough & Guides Wiki
Yu-Gi-Oh! Master Duel Walkthrough & Guides Wiki
Elden Ring Shadow of the Erdtree Walkthrough & Guides Wiki
Monster Hunter World Walkthrough & Guides Wiki
The Legend of Zelda: Tears of the Kingdom Walkthrough & Guides Wiki
Persona 3 Reload Walkthrough & Guides Wiki
Cyberpunk 2077: Ultimate Edition Walkthrough & Guides Wiki


All rights reserved
Copyright© 2012-2024 HoYoverse — COGNOSPHERE. All Rights Reserved.
The copyrights of videos of games used in our content and other intellectual property rights belong to the provider of the game.
The contents we provide on this site were created personally by members of the Game8 editorial department.
We refuse the right to reuse or repost content taken without our permission such as data or images to other sites.