Genius Invokation TCG Summons List and How to Use
✉ Send your thoughts in our Genshin 6.4 Patch Survey!
★ Exclusive: Dive back in time with the Meta History
◆ Hot: Version 6.4, Luna 5 Codes
◆ Builds: Varka, Flins, Skirk, Escoffier
◆ Events: Travelers' Tales, He Who Caught the Wind
◆ Future: Linnea, Version 6.5 Luna VI
Summons are supporting allies created by a Character Card in Genius Invokation TCG for Genshin Impact. See how to use Summons in a match and know the list of all Summons here!
List of Contents
List of All Summons
| Summoner | Summon | Effect |
|---|---|---|
| Solar Isotoma | Elemental Skill End Phase: Deals 1 Geo DMG. When you perform "Switch Character" and this Summon is on the field: This switch is considered a Fast Action instead of a Combat Action (Once per Round) Usage(s): 3 |
|
| Ushi | Elemental Skill Summon Active characters will receive 1 less DMG. Usage(s): 1. When the Usage is depleted, this card won't be discarded. Can be triggered once while this is present: When your character takes DMG, Arataki Itto gains Superlative Superstrength. End Phase: Discard this, deal 1 Geo DMG. Superlative Superstrength Status When Itto uses a Charged Attack, Deal +1 DMG. If the Usage is no less than 2, expend 1 less Unaligned. Usage: 1 (Max 3 stacks.) |
|
| Melody Loop | Elemental Skill Summon After the End Phase, heal all your characters for 1 HP and your active character gains Hydro Application. Has 2 usages. |
|
| Cuilein-Anbar | Elemental Burst Summon After the End Phase, deal 2 Dendro DMG. Has 2 usages. |
|
| Fiery Sanctum Field | Elemental Skill End Phase: Deal 1 Pyro Damage. When this Summon is on the field and Dehya is on standby: Decrease damage taken by active character by 1, and deal 1 Piercing Damage to Dehya if she has at least 7 HP. (Once per round) |
|
| Drunken Mist | Elemental Burst Summon After the End Phase, deal 1 Cryo DMG, heal your active character for 2 HP. Has 2 usages. |
|
| Chains of Warding Thunder | Elemental Burst End Phase: Deal 1 Electro DMG. Usage(s): 2 When this Summon is on the field: Your opponent will have to spend 1 additional Elemental Die when performing "Switch Character." (Once per Round) |
|
| Lumidouce Case: Level 1 | Elemental Skill Summon End Phase: Deal 1 Dendro DMG. After you deal Burning reaction DMG. This card levels up to become Lumidouce Case: Level 2. Usage(s): 3 (Can stack. Max 6 stacks.) Lumidouce Case: Level 2 Summon End Phase: Deal 2 Dendro DMG. Usage(s): 3 (Can stack. Max 6 stacks.)" |
|
| Lumidouce Case: Level 3 | Elemental Burst Summon End Phase: Deal 1 Dendro DMG to all opponents. Usage(s): 1 |
|
| Lightfall Sword | Elemental Burst Summon When Eula uses a Normal Attack or Elemental Skill, this card will accumulate 2 Zeal stacks, but Eula will not gain Energy. End Phase: Discard this card and deal 3 Physical DMG. Each Zeal stack adds 1 DMG to this damage instance. (Effects on this card's Usage will apply to Zeal.) |
|
| Dazzling Polyhedron | Elemental Burst End Phase: Deal 1 Anemo DMG. Usage(s): 3 When this Summon is on the field: Opposing character(s) take +1 Anemo DMG. |
|
| Oz | Elemental Skill Summon After the End Phase, deal 1 Electro DMG. Has 2 usages. |
|
| Sacred Cryo Pearl | Elemental Burst Summon After the End Phase, deal 1 Cryo DMG, deal 1 Piercing DMG to all opposing characters on standby. Has 2 usages. |
|
| Elemental Skill Awaken, My Kindred When you play this card or Discard this card: Summon 1 independent Proliferated Organism. Oasis Nourishment When you play Awaken, My Kindred: Spend 1 less Elemental Die. Usage(s): 1 (Up to 3 stacks) |
||
| Dandelion Field | Elemental Burst Summon After the End Phase, deal 2 Anemo DMG, heal your active character for 1 HP. Has 2 usages. |
|
| Turbo Twirly | Elemental Skill Equipment Card When the character to which this is attached is switched out: Consume 1 Nightsoul point, and summon 1 Turbo Twirly: Let It Rip. Turbo Twirly: Let It Rip Summon End Phase: Deal 1 Geo DMG, deal 1 Piercing DMG to the next opposing character on standby. Usage(s): 1 |
|
| Turbo Drill Field | Elemental Burst Combat Status Your Turbo Twirly deals Geo DMG +1, and deals Piercing DMG +1. Usage(s): 3 |
|
| Autumn Whirlwind | Elemental Burst End Phase: Deal 1 Anemo DMG. Usage(s): 3 **After your character or Summon triggers a Swirl reaction: Convert the Elemental Type of this card and change its DMG dealt to the element Swirled. (Can only be converted once before leaving the field). |
|
| Frostflake Seki no To | Elemental Burst Summon After the End Phase, deal 2 Cryo DMG. Has 2 usages. |
|
| Garden of Purity | Elemental Burst Summon: End Phase: Deal 2 Hydro DMG Usage(s): 2 When this summon is on the field: Your characters' Normal Attacks deal +1 DMG. |
|
| Bake-Kurage | Elemental Skill Summon End Phase: Deal 1 Hydro DMG, heal your active character for 1 HP. Usage(s): 2 |
|
| Tengu Juurai: Ambush | Elemental Skill Summon End Phase: Deal 1 Electro DMG, applies Crowfeather Cover to friendly active character. Has 1 usages. Crowfeather Cover: The character with this attached deals +1 Elemental Skill and Elemental Burst DMG. Usage(s): 2 |
|
| Tengu Juurai: Stormcluster | Elemental Burst Summon: End Phase: Deal 2 Electro DMG, applies Crowfeather Cover to friendly active character. Usage(s): 2 |
|
| Shadowsword: Lone Gale | Elemental Skill Summon Deal 1 Anemo DMG after the end phase. Has 2 usages. |
|
| Shadowsword: Galloping Frost | Elemental Skill Summon Deal 1 Cryo DMG after the end phase. Has 2 usages. |
|
| Fontemer Pearl | Elemental Skill When this character takes DMG: Negate 1 DMG. Once per round, usage(s) will not be uses when negating DMG from Summons. Usage(s): 2 When you declare the end of your Round: If the character to which this is attached is the active character, draw 1 card. |
|
| Reflection | Elemental Skill Summon When your active character receives DMG, decreases DMG taken by 1. Has 1 usage. When the Usage is depleted, this card will not be discarded. After the End Phase, discard this card to deal 1 Hydro DMG. |
|
| Shark Missile | Elemental Burst Summon End Phase: Deal 2 Hydro DMG Usage(s): 2 (Can stack, no stack limit) |
|
| Herald of Frost | Elemental Skill Deals 1 Cryo DMG. When this Summon is on the field, after Qiqi uses Normal Attack: Heals your character that took the most DMG for 1 HP. Usage(s): 3 |
|
| Eye of Stormy Judgement | Elemental Skill End Phase: Deal 1 Electro DMG. Usage(s): 3 When this Summon is on the field: Your characters' Elemental Bursts deal +1 DMG. |
|
| Oceanid Mimic | Elemental Skill Summon Ferret: Deal 2 Hydro DMG at the End Phase. 2 Uses. Raptor: Deal 1 Hydro DMG at the End Phase. 3 Uses. Frog: Can block 2 DMG. Once this effect is depleted deal 2 Hydro DMG. |
|
| Talisman Spirit | Elemental Burst End Phase: Deal 1 Cryo DMG. Usage(s): 2 When this Summon is on the field: Opposing character(s) take +1 Cryo DMG and Physical DMG. |
|
| Large Wind Spirit | Elemental Burst Summon After the End Phase, deal 2 Anemo DMG. Has 3 usages. |
|
| Stormeye | Elemental Burst End Phase: Deal 2 Anemo DMG. Your opponent switches to: Character Closest to Your Current Active Character. Usage(s): 2 After your character or Summon triggers a Swirl reaction: Convert the Elemental Type of this card and change its DMG dealt to the element Swirled. (Can only be converted once before leaving the field) |
|
| Guoba | Elemental Skill Summon After the End Phase, deal 2 Pyro DMG. Has 2 usages. |
All TCG Cards in Genius Invokation
How to Use Summons
Summon from Card Skills or Bursts
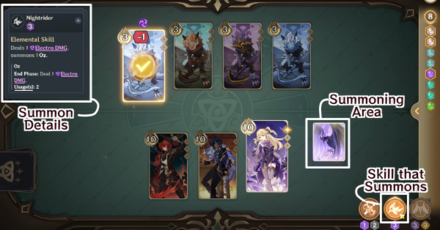
To spawn your Summon, simply use the Character Card's Elemental Skill or Burst tied to that summon. Only Character Cards can use Summons so far, and they naturally require more Elemental Die to use.
Maximum of 4 Summons
You can only create a maximum of 4 Summons on your Summons Zone. However, due to the limited number of cards that use summons, it's unlikely that you'll reach this number unless you have cards that create multiple summons like Rhodeia of Loch.
Attacks at the End Phase
Ending both players' turns triggers the ability of your Summon. For example, Fischl's summon, Oz, strikes the opposing Active Card after the phase has ended, dealing 1 Electro DMG.
Has limited uses
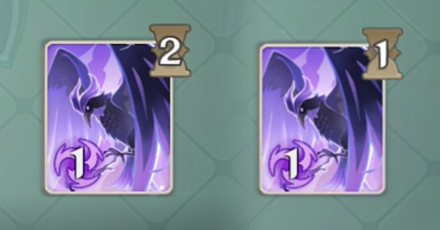
Although useful, Summons can only use their abilities at a limited usage. You can see the number of usages left on the top right corner of your Summon! Once the number decreases to 0, the Summon will disappear from the playing field.
Genshin Impact Related Guides

All Genius Invokation TCG Cards
Genius Invokation Card Lists
| Genius Invokation Card Archive | |
|---|---|
 Character Cards Character Cards |
 Action Cards Action Cards |
 Equipment Cards Equipment Cards |
 Support Cards Support Cards |
 Event Cards Event Cards |
 Enemy Cards Enemy Cards |
 Dynamic Skins Dynamic Skins |
 Card Backs Card Backs |
Genius Invokation Card Gameplay
| Genius Invokation Card Gameplay Guides | |
|---|---|
 How to Get Cards How to Get Cards |
 How to Use Summons How to Use Summons |
 Card Shop Guide Card Shop Guide |
|
Genius Invokation TCG Information
Author
Genius Invokation TCG Summons List and How to Use
improvement survey
03/2026
improving Game8's site?

Your answers will help us to improve our website.
Note: Please be sure not to enter any kind of personal information into your response.

We hope you continue to make use of Game8.
Rankings
- We could not find the message board you were looking for.
Gaming News
Popular Games

Genshin Impact Walkthrough & Guides Wiki

Honkai: Star Rail Walkthrough & Guides Wiki

Umamusume: Pretty Derby Walkthrough & Guides Wiki

Pokemon Pokopia Walkthrough & Guides Wiki

Resident Evil Requiem (RE9) Walkthrough & Guides Wiki

Monster Hunter Wilds Walkthrough & Guides Wiki

Wuthering Waves Walkthrough & Guides Wiki

Arknights: Endfield Walkthrough & Guides Wiki

Pokemon FireRed and LeafGreen (FRLG) Walkthrough & Guides Wiki

Pokemon TCG Pocket (PTCGP) Strategies & Guides Wiki
Recommended Games

Diablo 4: Vessel of Hatred Walkthrough & Guides Wiki

Fire Emblem Heroes (FEH) Walkthrough & Guides Wiki

Yu-Gi-Oh! Master Duel Walkthrough & Guides Wiki

Super Smash Bros. Ultimate Walkthrough & Guides Wiki

Pokemon Brilliant Diamond and Shining Pearl (BDSP) Walkthrough & Guides Wiki

Elden Ring Shadow of the Erdtree Walkthrough & Guides Wiki

Monster Hunter World Walkthrough & Guides Wiki

The Legend of Zelda: Tears of the Kingdom Walkthrough & Guides Wiki

Persona 3 Reload Walkthrough & Guides Wiki

Cyberpunk 2077: Ultimate Edition Walkthrough & Guides Wiki
All rights reserved
Copyright© 2012-2024 HoYoverse — COGNOSPHERE. All Rights Reserved.
The copyrights of videos of games used in our content and other intellectual property rights belong to the provider of the game.
The contents we provide on this site were created personally by members of the Game8 editorial department.
We refuse the right to reuse or repost content taken without our permission such as data or images to other sites.


![Everwind Review [Early Access] | The Shaky First Step to A Very Long Journey](https://img.game8.co/4440226/ab079b1153298a042633dd1ef51e878e.png/thumb)

![Monster Hunter Stories 3 Review [First Impressions] | Simply Rejuvenating](https://img.game8.co/4438641/2a31b7702bd70e78ec8efd24661dacda.jpeg/thumb)


what are the priorities for the summons?