This survey will take about 1 minute.
Your answers will help us to improve our website.
Genshin Impact
How to Get NRE (Menu 30) and Effects | NRE (Menu 30) Locations
✉ Send your thoughts in our Genshin 6.4 Patch Survey!
★ Exclusive: Dive back in time with the Meta History
◆ Hot: Version 6.4, Luna 5 Codes
◆ Builds: Varka, Flins, Skirk, Escoffier
◆ Events: Travelers' Tales, He Who Caught the Wind
◆ Future: Linnea, Version 6.5 Luna VI

NRE (Menu 30) is an Item in Genshin Impact. Learn how to use it and where to find it, its rarity and effects, and everything you need to know about NRE (Menu 30) here!
| Ver. 1.1 Updates | ||
|---|---|---|
 Ver. 1.1 Update Summary Ver. 1.1 Update Summary |
 Resonance Stones Resonance Stones |
 Treasure Compass Treasure Compass |
 Condensed Resin Condensed Resin |
 City Reputation City Reputation |
 Portable Waypoint Portable Waypoint |
 Adepti Seeker's Stove Adepti Seeker's Stove
|
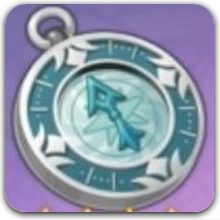
 NRE (Menu 30) NRE (Menu 30)
|
 Wind Catcher Wind Catcher
|
List of Contents
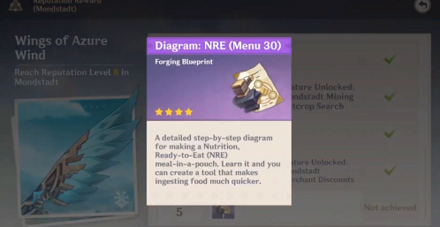
How to Get NRE (Menu 30)
NRE (Menu 30) Locations
| Type | Gadget |
|---|---|
| Location & Source | Reach Lv. 5 Reputation in Mondstadt to unlock the blueprint, then craft it. |
Raise Your Reputation in Mondstadt
To unlock the NRE blueprint, you first need to raise your reputation level in Mondstadt to level 5. You can do this by doing quests, Requests, and Bounties in the Mondstadt area.
Have it Crafted at a Blacksmith
Once you have obtained the NRE blueprint, you can have it crafted at the blacksmith as it is not an item you can craft yourself.
Unlocking it will take around 2 weeks
If you do all your weekly Requests and Bounties in Mondstadt, you'll be able to get 420 Reputation Exp per week. The Exp needed to go up a level seems to increase by 20 Exp per level, so from our calculations, you should be able to unlock the NRE blueprint in roughly two weeks.
How to Craft NRE (Menu 30)
| Output Item | Materials |
|---|---|
 NRE (Menu 30) NRE (Menu 30) |
|
How to Use NRE (Menu 30)
The NRE will allow you to set your cooked food to a hotkey and press that hotkey to eat them on the fly. Players who are weary of navigating to the menu every time you want to use a Food item, the NRE is here for you!
You can store two types of food in it, one for healing and one for reviving characters that got knocked out.
Switches to Revival Food Automatically

If you press the hotkey when a character is dead, it will automatically switch to revival food and resurrect that character, so you don't need to change anything even during battle.
We recommend that you always have food prepared in the NRE so you can battle strong enemies without worries!
Recommended Equipment for Multiplayer
With the ability to instantly use a healing item even during battle, it will be very useful during multiplayer where you can not pause and every second will count.
NRE (Menu 30) Effects and Basic Information
|
NRE (Menu 30)
|
Rarity | 4 |
|---|---|---|
| Type | Gadgets | |
| Effect | Revives the selected character and restores 20% of Max HO, then restores an additional 1500 HP. |
Sucrose's specialty. it looks like some strange alchemical product at first, but Sucrose insists that it is a healthy and nutritious meal, the result of many experiments and painstaking improvements. Its healthy green color comes from a mix of cream and natural vegetable juices... Wait, vegetable juices?
Related Guides

List of Gadgets
Author

How to Get NRE (Menu 30) and Effects | NRE (Menu 30) Locations
Please participate in our site
improvement survey
03/2026
improvement survey
03/2026
Would you assist in
improving Game8's site?
improving Game8's site?

×
We are listening to our users' valuable opinions and discussing how to act on them.
The information collected through this survey will be used for the purpose of improving our services. In addition, the information will only be disclosed a part of a statistic in a format that will not allow identification of personal information.
Begin Survey
Not Now
×
Please rate each item regarding Game8.co's Advertisements.
Amount of Ads
Very Dissatisfied
Somewhat Dissatisfied
Fine
Somewhat Satisfied
Highly Satisfied
Placement of Ads
Timing of Ad Display
Ad Loading Speed
Safeness of Ads
Content of Ads
×
Please rate each item regarding Game8.co's Quality of Articles.
Amount of information
Very Dissatisfied
Somewhat Dissatisfied
Fine
Somewhat Satisfied
Highly Satisfied
Frequency of updates
Speed of new information
Accuracy of articles
Understandibility of articles
Readability of sentences
×
Please rate each item regarding Game8.co's Usability of the Site.
Ease of finding information
Very Dissatisfied
Somewhat Dissatisfied
Fine
Somewhat Satisfied
Highly Satisfied
Loading Speed
Use of Color
Font Size
Visibility of Images
Easy to Understand Layout
×
Please rate each item regarding Game8.co's Message Boards, Comments.
Ease of Writing
Very Dissatisfied
Somewhat Dissatisfied
Fine
Somewhat Satisfied
Highly Satisfied
Readability
Ease in Finding Information
Comment Quality
Comment Quantity
Admin Response
×
Please rate each item regarding Game8.co's Site's new design.
Please rate our site's new design
Very Dissatisfied
Somewhat Dissatisfied
Fine
Somewhat Satisfied
Highly Satisfied
Do you think that the website's design change makes the site easier to use?
Has the new design made it easier for you to find information on the site?
Has the new design improved the overall visual appeal of the site?
How would you rate your overall satisfaction with the new design of the site?
×
How likely are you to recommend Game8 to someone you know?
Very Unlikely
0
1
2
3
4
5
6
7
8
9
10
Very Likely
If you have other opinions regarding potential improvement to the website, please share them with us. We would appreciate your honest opinion.
Note: This is a free response section, so you can proceed without entering anything.
Note: Please be sure not to enter any kind of personal information into your response.
Note: Please be sure not to enter any kind of personal information into your response.
×
Thank You
×
Thank you for participating in our survey! Your answers will help us to improve the quality of our website and services.
We hope you continue to make use of Game8.
We hope you continue to make use of Game8.
Close


Rankings
Gaming News


![Monster Hunter Stories 3 Review [First Impressions] | Simply Rejuvenating](https://img.game8.co/4438641/2a31b7702bd70e78ec8efd24661dacda.jpeg/thumb)
Popular Games

Genshin Impact Walkthrough & Guides Wiki
Honkai: Star Rail Walkthrough & Guides Wiki
Umamusume: Pretty Derby Walkthrough & Guides Wiki
Pokemon Pokopia Walkthrough & Guides Wiki
Resident Evil Requiem (RE9) Walkthrough & Guides Wiki
Monster Hunter Wilds Walkthrough & Guides Wiki
Wuthering Waves Walkthrough & Guides Wiki
Arknights: Endfield Walkthrough & Guides Wiki
Pokemon FireRed and LeafGreen (FRLG) Walkthrough & Guides Wiki
Pokemon TCG Pocket (PTCGP) Strategies & Guides Wiki


Recommended Games
Diablo 4: Vessel of Hatred Walkthrough & Guides Wiki
Cyberpunk 2077: Ultimate Edition Walkthrough & Guides Wiki
Fire Emblem Heroes (FEH) Walkthrough & Guides Wiki
Yu-Gi-Oh! Master Duel Walkthrough & Guides Wiki
Super Smash Bros. Ultimate Walkthrough & Guides Wiki
Pokemon Brilliant Diamond and Shining Pearl (BDSP) Walkthrough & Guides Wiki
Elden Ring Shadow of the Erdtree Walkthrough & Guides Wiki
Monster Hunter World Walkthrough & Guides Wiki
The Legend of Zelda: Tears of the Kingdom Walkthrough & Guides Wiki
Persona 3 Reload Walkthrough & Guides Wiki


All rights reserved
Copyright© 2012-2024 HoYoverse — COGNOSPHERE. All Rights Reserved.
The copyrights of videos of games used in our content and other intellectual property rights belong to the provider of the game.
The contents we provide on this site were created personally by members of the Game8 editorial department.
We refuse the right to reuse or repost content taken without our permission such as data or images to other sites.
It's actually 50 electro crystals, not 20 :(