Spiral Abyss Floor 1 Walkthrough
✉ Send your thoughts in our Genshin 6.4 Patch Survey!
★ Exclusive: Dive back in time with the Meta History
◆ Hot: Version 6.4, Luna 5 Codes
◆ Builds: Varka, Flins, Skirk, Escoffier
◆ Events: Travelers' Tales, He Who Caught the Wind
◆ Future: Linnea, Version 6.5 Luna VI

Spiral Abyss Floor 1 is a domain level in Genshin Impact. Learn about Floor 1 recommended party members, chamber enemies and strategies, obtainable rewards, and other information found in this guide!
List of Contents
Floor 1 Basic Information
Floor 1 Information and Rewards
| Ley Line Disorder | ・Pryo DMG dealt by all party members increased by 75%. ・ Overloaded DMG increased by +200%. |
|---|---|
| Enemy Level | Lv 25 |
| Star Bounty (Earning all 9★) |
|
| Rewards |
Be Over the Recommended Level
Level yourself above 25 before heading in to be on the safe side. The higher your level the easier it'll be to get all 9 stars.
Floor 1 Recommended Party Members
Repeated Runs Option
When building your party, it is recommended to choose 1 DPS, then either 2 Sub-DPS and 1 Support or 1 Sub-DPS and 2 Support, depending on what characters you have available and built.
| Main DPS | |
|---|---|
| Sub-DPS | |
| Support |
Free to Play Option
|
|
|
|
|
| Main/Sub-DPS | Sub DPS | Support | |
Recommended Pyro Characters
| List of Characters | ||
|---|---|---|
|
|
|
|
|
|
|
|
|
|
|
|
|
|
|
|
|
|
|
|
|
|
|
|
|
|
||
Floor 1 increases Pyro damage your team deals by 75% so you want to bring some Pyro characters with you. Having at least two with you will increase your Pyro damage by an additional 25%.
Don't Bring Electro Characters
Floor 1 has a lot of Electro element enemies so you shouldn't bring an Electro character with you. Pyro and Anemo work well together and you can inflict Superconducted to decrease enemy defense if you have a Cryo character.
Floor 1 - Chamber 1 Walkthrough
Chamber Information
| Challenge | Defeat 23 enemies Complete this challenge within 300s |
||||
|---|---|---|---|---|---|
| Goals | ★Remaining challenge time longer than 90 sec. ★Remaining challenge time longer than 150 sec. ★Remaining challenge time longer than 210 sec. |
||||
Enemy Information
 Electro Slime ×17 Electro Slime ×17
|
 Large Electro Slime ×1 Large Electro Slime ×1
|
 Mutant Electro Slime ×5 Mutant Electro Slime ×5
|
Take Them Down With Overloaded
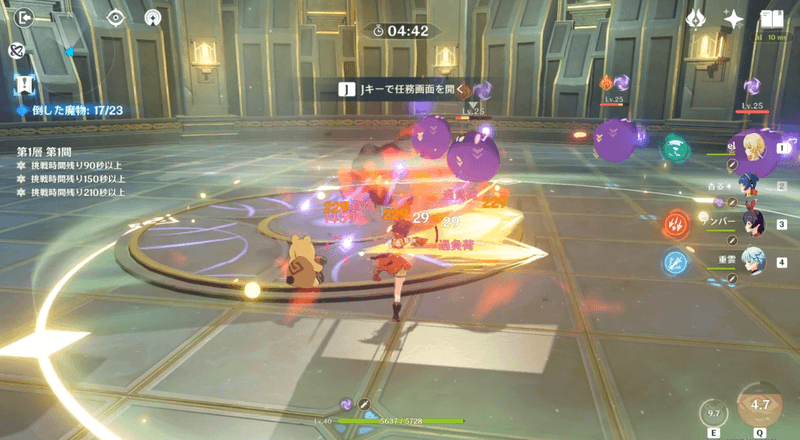
The best way to handle the enemies in Chamber 1 is by inflicting them with Overloaded. Pyro element skills or Amber's charged shot should do the trick.
Prioritize on attacking the Mutant Electro Slimes when they appear, as they can create a chain of ranged lightning when there are Electro Slimes nearby.
Floor 1 - Chamber 2 Walkthrough
Chamber Information
| Challenge | Defeat 22 enemies Complete this challenge within 300s |
||||
|---|---|---|---|---|---|
| Goals | ★Remaining challenge time longer than 90 sec. ★Remaining challenge time longer than 150 sec. ★Remaining challenge time longer than 210 sec. |
Enemy Information
 Hilichurl Shooter ×2 Hilichurl Shooter ×2
|
 Hilichurl Fighter ×3 Hilichurl Fighter ×3
|
 Hilichurl Grenadier ×2 Hilichurl Grenadier ×2
|
 Wooden Shield Hilichurl Guard ×13 Wooden Shield Hilichurl Guard ×13
|
 Blazing Axe Mitachurl ×1 Blazing Axe Mitachurl ×1
|
 Wooden Shield Mitachurl ×1 Wooden Shield Mitachurl ×1
|
Break Shields with Pyro Skills
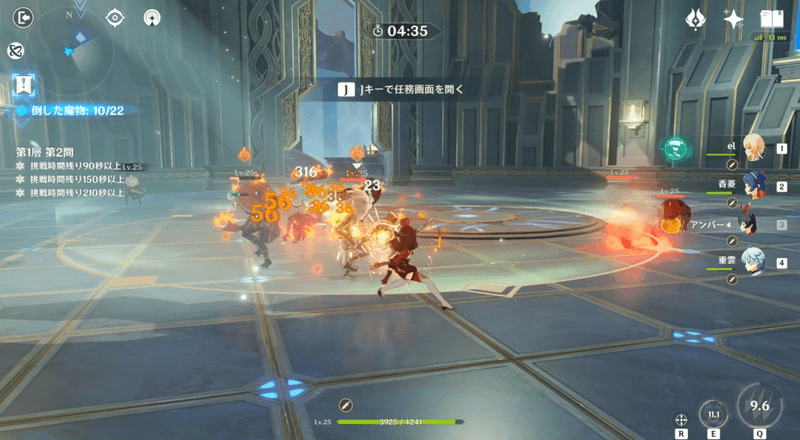
Hilichurls and Mitachurls with woode shields will show up so hit them with Pyro skills to get rid of them quickly. The Mitachurl's shield can be especially annoying so you'll want it gone fast.
Switch to an Anemo character to spread the fire created by Pyro skills for even more damage.
Get Rid of Long Range Enemies
With the clock ticking you don't want to be running back and forth across the battlefield, so go after the Hilichurl Shooters first. Starting with them will cause the rest to follow you rounding them up nicely.
Floor 1 - Chamber 3 Walkthrough
Chamber Information
| Challenge | Defeat 6 enemies Complete this challenge within 300s |
||||
|---|---|---|---|---|---|
| Goals | ★Remaining challenge time longer than 90 sec. ★Remaining challenge time longer than 150 sec. ★Remaining challenge time longer than 210 sec. |
Enemy Information
 Large Electro Slime ×1 Large Electro Slime ×1
|
 Mutant Electro Slime ×1 Mutant Electro Slime ×1
|
 Hilichurl Shooter ×2 Hilichurl Shooter ×2
|
 Wooden Shield Mitachurl ×1 Wooden Shield Mitachurl ×1
|
 Fatui Electro Cicin Mage ×1 Fatui Electro Cicin Mage ×1
|
Prioritize the Fatui Electro Cicin Mage
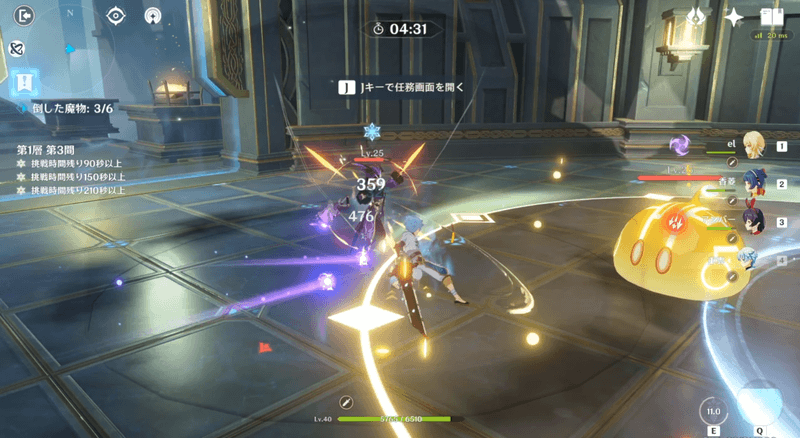
The Fatui Mage will spawn after you have defeated the weaker enemies like Hilichurls and Slimes. Taking her out first will make the field significantly easier to beat.
Floor 1 Clear Rewards
Chamber's Bounty
| Chamber 1 |
|
|---|---|
| Chamber 2 |
|
| Chamber 3 |
|
The Chamber's Bounty is the set of rewards you receive simply for clearing a Chamber for the first time. This can only be received once.
Star's Bounty
| 3★ |
|
|---|---|
| 6★ |
|
| 9★ |
|
The Star's Bounty can only be received if you clear the star requirements displayed during the challenge. Each Chamber has 3 stars each with 1 prize for every 3 earned. These can also only be received once.
Genshin Impact Related Guides
Spiral Abyss Guides

Spiral Abyss Floor Guides
| Spiral Abyss Floors | |||
|---|---|---|---|
 Floor 1 Floor 1 |
 Floor 2 Floor 2 |
 Floor 3 Floor 3 |
 Floor 4 Floor 4 |
 Floor 5 Floor 5 |
 Floor 6 Floor 6 |
 Floor 7 Floor 7 |
 Floor 8 Floor 8 |
 Floor 9 Floor 9 |
 Floor 10 Floor 10 |
 Floor 11 Floor 11 |
 Floor 12 Floor 12 |
Author
Spiral Abyss Floor 1 Walkthrough
improvement survey
03/2026
improving Game8's site?

Your answers will help us to improve our website.
Note: Please be sure not to enter any kind of personal information into your response.

We hope you continue to make use of Game8.
Rankings
Gaming News
Popular Games

Genshin Impact Walkthrough & Guides Wiki

Honkai: Star Rail Walkthrough & Guides Wiki

Umamusume: Pretty Derby Walkthrough & Guides Wiki

Pokemon Pokopia Walkthrough & Guides Wiki

Resident Evil Requiem (RE9) Walkthrough & Guides Wiki

Monster Hunter Wilds Walkthrough & Guides Wiki

Wuthering Waves Walkthrough & Guides Wiki

Arknights: Endfield Walkthrough & Guides Wiki

Pokemon FireRed and LeafGreen (FRLG) Walkthrough & Guides Wiki

Pokemon TCG Pocket (PTCGP) Strategies & Guides Wiki
Recommended Games

Diablo 4: Vessel of Hatred Walkthrough & Guides Wiki

Cyberpunk 2077: Ultimate Edition Walkthrough & Guides Wiki

Fire Emblem Heroes (FEH) Walkthrough & Guides Wiki

Yu-Gi-Oh! Master Duel Walkthrough & Guides Wiki

Super Smash Bros. Ultimate Walkthrough & Guides Wiki

Pokemon Brilliant Diamond and Shining Pearl (BDSP) Walkthrough & Guides Wiki

Elden Ring Shadow of the Erdtree Walkthrough & Guides Wiki

Monster Hunter World Walkthrough & Guides Wiki

The Legend of Zelda: Tears of the Kingdom Walkthrough & Guides Wiki

Persona 3 Reload Walkthrough & Guides Wiki
All rights reserved
Copyright© 2012-2024 HoYoverse — COGNOSPHERE. All Rights Reserved.
The copyrights of videos of games used in our content and other intellectual property rights belong to the provider of the game.
The contents we provide on this site were created personally by members of the Game8 editorial department.
We refuse the right to reuse or repost content taken without our permission such as data or images to other sites.


![Monster Hunter Stories 3 Review [First Impressions] | Simply Rejuvenating](https://img.game8.co/4438641/2a31b7702bd70e78ec8efd24661dacda.jpeg/thumb)


noice