This survey will take about 1 minute.
Your answers will help us to improve our website.
Genshin Impact
Spiral Abyss Floor 4 Walkthrough
✉ Send your thoughts in our Genshin 6.4 Patch Survey!
★ Exclusive: Dive back in time with the Meta History
◆ Hot: Version 6.4, Luna 5 Codes
◆ Builds: Varka, Flins, Skirk, Escoffier
◆ Events: Travelers' Tales, He Who Caught the Wind
◆ Future: Linnea, Version 6.5 Luna VI
Spiral Abyss Floor 4 is a domain level in Genshin Impact. Learn about Floor 4 recommended party members, chamber enemies and strategies, obtainable rewards, and other information found in this guide!
List of Contents
Floor 4 Recommended Party Members
Repeated Runs Option
When building your party, it is recommended to choose 1 DPS, then either 2 Sub-DPS and 1 Support or 1 Sub-DPS and 2 Support, depending on what characters you have available and built.
| Main DPS |
|
|---|---|
| Sub-DPS | |
| Support |
Free to Play Option
|
|
|
|
|
| Main DPS | Sub DPS | Sub DPS | Support |
Recommended Electro Characters
| List of Characters | ||
|---|---|---|
|
|
|
|
|
|
|
|
|
|
|
|
|
|
|
|
|
|
|
|
|
|
|
|
The Ley Line bonuses in this floor allows you to make full use of your Electro characters.
Floor 4 Basic Information
Floor 4 Information and Rewards
| Ley Line Disorder | ・Electro DMG deallt by all party members increased by 75%. ・Electro-Charged DMG increased by 150%, and it's AoE is increased by 100%. |
|---|---|
| Enemy Level | Lv. 50 |
| Star Bounty (All 9★) |
|
| Rewards |
Be Over the Recommended Level
Make sure your characters are above level 50 before heading in to be on the safe side. The higher your level the easier it'll be to get all 9 stars.
Choose Buffs that boost ATK or Elemental Mastery
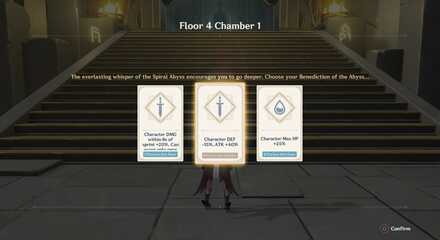
You'll be dealing with huge enemy mobs in this floor, which means that you have to clear them out as quicly as possible. Getting buffs that focus on ATK boosts and Elemental Mastery allows you to maximize the amount of damage you can do in each chamber.
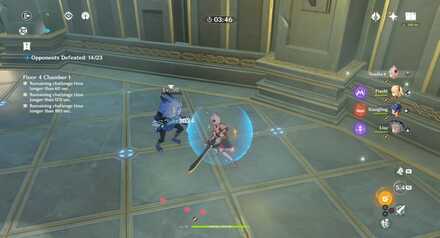
Floor 4 - Chamber 1 Walkthrough
Chamber Information
| Challenge | Defeat 23 Enemies | ||||
|---|---|---|---|---|---|
| Goal | ★Remaining challenge time longer than 60 sec. ★Remaining challenge time longer than 120 sec. ★Remaining challenge time longer than 180 sec. |
||||
Enemy Information
 Hydro Slime ×4 Hydro Slime ×4
|
 Large Hydro Slime ×7 Large Hydro Slime ×7
|
 Hydro Abyss Mage ×2 Hydro Abyss Mage ×2
|
 Hilichurl Fighter ×8 Hilichurl Fighter ×8
|
 Cryo Hilichurl Shooter ×2 Cryo Hilichurl Shooter ×2
|
Make Use of Elemental Reactions Early

Increased Electro damage means that you should maximize using Elemental Reactions like Superconduct and Overload. This willl help you deal high damage early, and handle enemy mobs much better.
Take Out the Hilichurl Shooters Quickly
The presence of Hydro Slime on this chamber is something that the Cryo Hilichurl Shooter will take advantage of. A well-placed shot from them can cause you to freeze, leaving you vulnerable to getting damaged.
Avoidsthis by taking out the Shooters as soon as they spawn!
Use Your Cryo or Electro on Hydro Abyss Mages
Abyss Mages are some of the peskier enemies in the game, and the Hydro Abyss Mage is no exception. They can immobilize you with their bubbles and can freeze you in place if there are still Cryo Hilichurl Shooters nearby.
Save your Elemental Bursts on the Abyss Mages when their Shields are down, and you'll finish them off quicker.
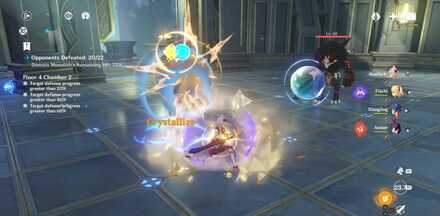
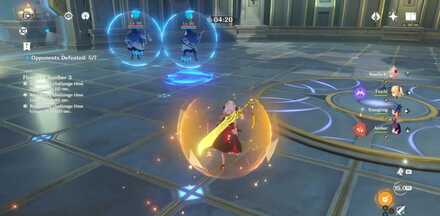
Floor 4 - Chamber 2 Walkthrough
Chamber Information
| Challenge | Defeat 22 Enemies | ||||
|---|---|---|---|---|---|
| Goal | ★Target defense progress greater than 20% ★Target defense progress greater than 40% ★Target defense progress greater than 60% |
||||
Keep Mobs Away
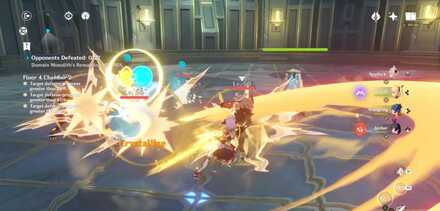
The chamber starts with a mob of enemies spawning all around the Ley Line Monolith. It's important to keep them at bay by using Elemental skills and bursts to keep them as far away as possible.
Enemy Information
|
Hydro Slime ×13
|
Hydro Abyss Mage ×2
|
Hilichurl Fighter ×4
|
 Hilichurl Berserker ×2 Hilichurl Berserker ×2
|
Cryo Hilichurl Shooter ×1
|
 Blazing Axe Mitachurl ×1 Blazing Axe Mitachurl ×1
|
Focus on Ranged Enemies Again
Ranged enemies (Hydro Abyss Mage and Cryo Hilichurl Shooter) will automatically target the Ley Line Monolith as soon as they spawn. Take them out as quikly as you can and get back to attacking the rest of the mob.
Keep your Enemies Focused on Attacking you
Enemies will constantly go straight for the Ley Line Monolith, which means that it can take huge amountds of damage if your're not careful. Make your enemies focus on you, and you can prevent the monolith from getting destroyed!
Floor 4 - Chamber 3 Walkthrough
Chamber Information
| Challenge | Defeat 7 enemies/Complete this challenge within 300 seconds | ||||
|---|---|---|---|---|---|
| Goal | ★Remaining challenge time longer than 60 sec. ★Remaining challenge time longer than 90 sec. ★Remaining challenge time longer than 120 sec. |
||||
Choose the Elemental Mastery Floor Buff
Elemental Reactions are the key to finishing this chamber at the fastest time possible, which is why picking the Elemental Mastery buff is the best choice.
Enemy Information
|
Hydro Abyss Mage ×2
|
Hilichurl Fighter ×2
|
Cryo Hilichurl Shooter ×1
|
 Hydro Samachurl ×1 Hydro Samachurl ×1
|
Blazing Axe Mitachurl ×1
|
Take out the Samachurl and Cryo Shooter First!

The Hydro Samachurl and Cryo Hilichurl Shooter will constantly create Freeze reactions if you're not careful. Make sure you focus on them first before taking out the rest.
Use Cryo or Electro on the Hydro Abyss Mages
Two Hydro Abyss Mages are the last enemies in this chamber. Taking out their Hydro Shield is a must, which is why using Cryo or Electro attacks to destroy those quickly.
The Elemental Mastery chamber buff also comes in handy, as you can create a flurry of reactions that will cause massive damage.
Floor 4 Clear Rewards
Chamber's Bounty
| Chamber 1 |
|
|---|---|
| Chamber 2 |
|
| Chamber 3 |
|
The Chamber's Bounty is the set of rewards you receive simply for clearing a Chamber for the first time. This can only be received once.
Star's Bounty
| 3★ |
|
|---|---|
| 6★ |
|
| 9★ |
|
The Star's Bounty can only be received if you clear the star requirements displayed during the challenge. Each Chamber has 3 stars each with 1 prize for every 3 earned. These can also only be received once.
Receive Collei for Clearing Chamber 3!

For the permanent event, Curtain of Leaves, you will receive Collei upon clearing Floor 4 Chamber 3. She is one of the first Dendro characters released in Version 3.0.
If you've already received her from a wish you can receive one of her Stella Fortuna to upgrade her Constellation instead.
Genshin Impact Related Guides
Spiral Abyss Guides

Spiral Abyss Floor Guides
| Spiral Abyss Floors | |||
|---|---|---|---|
 Floor 1 Floor 1 |
 Floor 2 Floor 2 |
 Floor 3 Floor 3 |
 Floor 4 Floor 4 |
 Floor 5 Floor 5 |
 Floor 6 Floor 6 |
 Floor 7 Floor 7 |
 Floor 8 Floor 8 |
 Floor 9 Floor 9 |
 Floor 10 Floor 10 |
 Floor 11 Floor 11 |
 Floor 12 Floor 12 |
Author

Spiral Abyss Floor 4 Walkthrough
Please participate in our site
improvement survey
03/2026
improvement survey
03/2026
Would you assist in
improving Game8's site?
improving Game8's site?

×
We are listening to our users' valuable opinions and discussing how to act on them.
The information collected through this survey will be used for the purpose of improving our services. In addition, the information will only be disclosed a part of a statistic in a format that will not allow identification of personal information.
Begin Survey
Not Now
×
Please rate each item regarding Game8.co's Advertisements.
Amount of Ads
Very Dissatisfied
Somewhat Dissatisfied
Fine
Somewhat Satisfied
Highly Satisfied
Placement of Ads
Timing of Ad Display
Ad Loading Speed
Safeness of Ads
Content of Ads
×
Please rate each item regarding Game8.co's Quality of Articles.
Amount of information
Very Dissatisfied
Somewhat Dissatisfied
Fine
Somewhat Satisfied
Highly Satisfied
Frequency of updates
Speed of new information
Accuracy of articles
Understandibility of articles
Readability of sentences
×
Please rate each item regarding Game8.co's Usability of the Site.
Ease of finding information
Very Dissatisfied
Somewhat Dissatisfied
Fine
Somewhat Satisfied
Highly Satisfied
Loading Speed
Use of Color
Font Size
Visibility of Images
Easy to Understand Layout
×
Please rate each item regarding Game8.co's Message Boards, Comments.
Ease of Writing
Very Dissatisfied
Somewhat Dissatisfied
Fine
Somewhat Satisfied
Highly Satisfied
Readability
Ease in Finding Information
Comment Quality
Comment Quantity
Admin Response
×
Please rate each item regarding Game8.co's Site's new design.
Please rate our site's new design
Very Dissatisfied
Somewhat Dissatisfied
Fine
Somewhat Satisfied
Highly Satisfied
Do you think that the website's design change makes the site easier to use?
Has the new design made it easier for you to find information on the site?
Has the new design improved the overall visual appeal of the site?
How would you rate your overall satisfaction with the new design of the site?
×
How likely are you to recommend Game8 to someone you know?
Very Unlikely
0
1
2
3
4
5
6
7
8
9
10
Very Likely
If you have other opinions regarding potential improvement to the website, please share them with us. We would appreciate your honest opinion.
Note: This is a free response section, so you can proceed without entering anything.
Note: Please be sure not to enter any kind of personal information into your response.
Note: Please be sure not to enter any kind of personal information into your response.
×
Thank You
×
Thank you for participating in our survey! Your answers will help us to improve the quality of our website and services.
We hope you continue to make use of Game8.
We hope you continue to make use of Game8.
Close


Rankings
Gaming News


![Monster Hunter Stories 3 Review [First Impressions] | Simply Rejuvenating](https://img.game8.co/4438641/2a31b7702bd70e78ec8efd24661dacda.jpeg/thumb)
Popular Games

Genshin Impact Walkthrough & Guides Wiki
Honkai: Star Rail Walkthrough & Guides Wiki
Umamusume: Pretty Derby Walkthrough & Guides Wiki
Pokemon Pokopia Walkthrough & Guides Wiki
Resident Evil Requiem (RE9) Walkthrough & Guides Wiki
Monster Hunter Wilds Walkthrough & Guides Wiki
Wuthering Waves Walkthrough & Guides Wiki
Arknights: Endfield Walkthrough & Guides Wiki
Pokemon FireRed and LeafGreen (FRLG) Walkthrough & Guides Wiki
Pokemon TCG Pocket (PTCGP) Strategies & Guides Wiki


Recommended Games
Diablo 4: Vessel of Hatred Walkthrough & Guides Wiki
Cyberpunk 2077: Ultimate Edition Walkthrough & Guides Wiki
Fire Emblem Heroes (FEH) Walkthrough & Guides Wiki
Yu-Gi-Oh! Master Duel Walkthrough & Guides Wiki
Super Smash Bros. Ultimate Walkthrough & Guides Wiki
Pokemon Brilliant Diamond and Shining Pearl (BDSP) Walkthrough & Guides Wiki
Elden Ring Shadow of the Erdtree Walkthrough & Guides Wiki
Monster Hunter World Walkthrough & Guides Wiki
The Legend of Zelda: Tears of the Kingdom Walkthrough & Guides Wiki
Persona 3 Reload Walkthrough & Guides Wiki


All rights reserved
Copyright© 2012-2024 HoYoverse — COGNOSPHERE. All Rights Reserved.
The copyrights of videos of games used in our content and other intellectual property rights belong to the provider of the game.
The contents we provide on this site were created personally by members of the Game8 editorial department.
We refuse the right to reuse or repost content taken without our permission such as data or images to other sites.