Spiral Abyss Floor 3 Walkthrough
✉ Send your thoughts in our Genshin 6.4 Patch Survey!
★ Exclusive: Dive back in time with the Meta History
◆ Hot: Version 6.4, Luna 5 Codes
◆ Builds: Varka, Flins, Skirk, Escoffier
◆ Events: Travelers' Tales, He Who Caught the Wind
◆ Future: Linnea, Version 6.5 Luna VI
Spiral Abyss Floor 3 is a domain level in Genshin Impact. Learn about Floor 3 recommended party members, chamber enemies and strategies, obtainable rewards, and other information found in this guide!
List of Contents
Floor 3 Recommended Party Members
Repeated Runs Option
When building your party, it is recommended to choose 1 DPS, then either 2 Sub-DPS and 1 Support or 1 Sub-DPS and 2 Support, depending on what characters you have available and built.
| Main DPS | |
|---|---|
| Sub-DPS | |
| Support |
Free to Play Option
| Main DPS | Sub DPS | Sub DPS | Support |
|---|---|---|---|
|
|
|
|
|
Recommended Anemo Characters
| List of Characters | ||
|---|---|---|
|
|
|
|
|
|
|
|
|
|
|
|
|
|
|
|
|
|
|
|
|
|
||
With Floor 3 increasing Anemo damage you'll want to bring a few Anemo characters if possible. Swirl damage and AoE is also increased on this floor making it easier to deal with enemies.
Floor 3 Basic Information
Floor 3 Information and Rewards
| Ley Line Disorder | ・Increases Swirl reaction DMG by 300%, and its AoE by 100%. ・Anemo DMG dealt by all party members increased by 75%. |
|---|---|
| Enemy Level | Lv45 |
| Star Bounty (Earning all 9★) |
|
| Rewards |
Be Over the Recommended Level
Level yourself above 45 before heading in to be on the safe side. The higher your level the easier it'll be to get all 9 stars.
Cause Swirl Reactions
The Ley Line Disorder for this floor increases the damage and AoE of Swirl, making this a great way for quickly taking out enemies.
Choose Buffs That Increase Damage
For your Benediction of the Abyss you should go with whatever buff will increase your damage output. The first and second Chambers specifically have a decent sized buff you can take advantage of so prioritize picking that.
Floor 3 - Chamber 1 Walkthrough
Chamber Information
| Challenge |
Defeat 23 enemies Complete this challenge within 300s |
||||
|---|---|---|---|---|---|
| Goal | ★Remaining challenge time longer than 60 sec. ★Remaining challenge time longer than 120 sec. ★Remaining challenge time longer than 180 sec. |
||||
Enemy Information
 Pyro Slime ×6 Pyro Slime ×6
|
 Large Pyro Slime ×1 Large Pyro Slime ×1
|
 Cryo Slime ×5 Cryo Slime ×5
|
 Large Cryo Slime ×1 Large Cryo Slime ×1
|
 Large Electro Slime ×1 Large Electro Slime ×1
|
 Pyro Hilichurl Shooter ×2 Pyro Hilichurl Shooter ×2
|
 Cryo Hilichurl Shooter ×2 Cryo Hilichurl Shooter ×2
|
 Wooden Shield Hilichurl Guard ×5 Wooden Shield Hilichurl Guard ×5
|
Make Use of Swirl
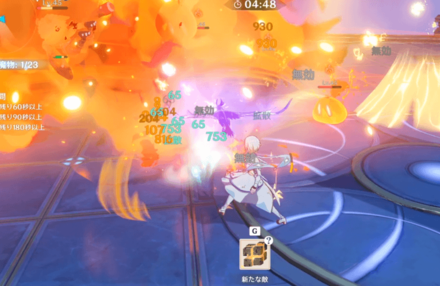
With Swirl's damage boost you should be using it as much as possible. Before causing a Swirl reaction, switch to another character of a different element so it can be spread when Swirl kicks in.
There are also 3 Large Slimes as well so try to get them in the mix as well for the most effective Elemental Reactions.
Knock Enemies Out of the Arena
In the first chamber it's actually possible to knock enemies out of the field, saving time as you won't have to fully deplete their HP. Diluc and the Anemo Traveler are great for knocking enemies back.
Prioritize the Hilichurl Shooters
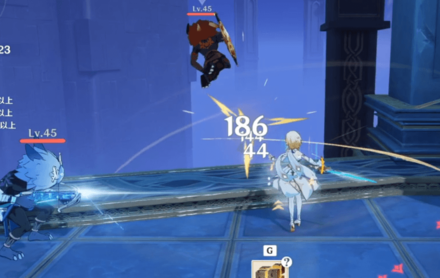
Hilichurl Shooters will stick to the edges of the arena and won't make any attempts to come near you so they should be taken out first. One handed sword users can knock enemies out of the ring with their charge attack.
Floor 3 - Chamber 2 Walkthrough
Chamber Information
| Challenge |
Defeat 17 enemies Complete this challenge within 300s |
||||
|---|---|---|---|---|---|
| Goal | ★Remaining challenge time longer than 60 sec. ★Remaining challenge time longer than 120 sec. ★Remaining challenge time longer than 180 sec. |
||||
Enemy Information
Go Wild With Elemental Bursts

Round up all the enemies and blow them away with Elemental Bursts for maximum efficiency. Depending on your characters stats, clearing this chamber with 180 seconds remaining can be difficult so pull out the stops and go hog wild.
Enemies Can Be Knocked Off the Arena Again
Just like the previous chamber, enemies can be knocked back to their eventual demise with certain attacks. Depending on how you line up your Elemental Bursts, you may be able to knock multiple enemies off at a time.
Floor 3 - Chamber 3 Walkthrough
Chamber Information
| Challenge |
Defeat 2 enemies Complete this challenge within 300s |
||||
|---|---|---|---|---|---|
| Goal | ★Remaining challenge time longer than 60 sec. ★Remaining challenge time longer than 120 sec. ★Remaining challenge time longer than 180 sec. |
||||
Enemy Information
 Ruin Guard ×1 Ruin Guard ×1
|
 Blazing Axe Mitachurl ×1 Blazing Axe Mitachurl ×1
|
Inflict Overloaded or Superconduct
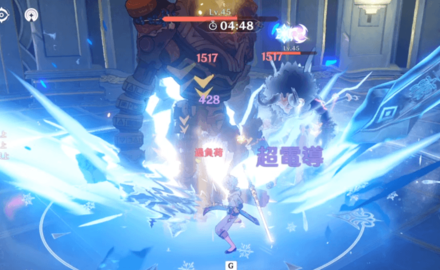
The extra damage that comes with Overloaded reactions or the defense down inflicted by Superconduct will make your life easier here. Apply Pyro, Cryo, or Electro and smack them with a Swirl reaction to take these larger enemies out.
Run Away From the Ruin Guard's Spin Attack
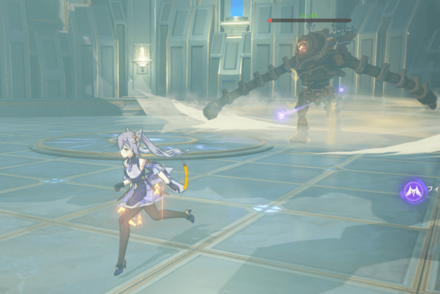
Once the Ruin Guard starts spinning at you keep away from it. If you have good aim with a bow you might be able to hit its weak spot to stun it momentarily, however. If you opt to run away watch your stamina gauge so you don't get caught. You can also use a Shield to mitigate the damage taken.
Floor 3 Clear Rewards
Chamber's Bounty
| Chamber 1 |
|
|---|---|
| Chamber 2 |
|
| Chamber 3 |
x1
|
The Chamber's Bounty is the set of rewards you receive simply for clearing a Chamber for the first time. This can only be received once.
Star's Bounty
| 3★ |
|
|---|---|
| 6★ |
|
| 9★ |
|
The Star's Bounty can only be received if you clear the star requirements displayed during the challenge. Each Chamber has 3 stars each with 1 prize for every 3 earned. These can also only be received once.
Receive Xiangling for Clearing Chamber 3!

For the permanent event, People's Choice, you will receive Xiangling upon clearing Floor 3 Chamber 3. She's an easy to pick up Pyro elemental character so everyone should check this out! If you've already received her from a wish you can receive one of her Stella Fortuna to upgrade her Constellation instead so it's a win-win.
Genshin Impact Related Guides
Spiral Abyss Guides

Spiral Abyss Floor Guides
| Spiral Abyss Floors | |||
|---|---|---|---|
 Floor 1 Floor 1 |
 Floor 2 Floor 2 |
 Floor 3 Floor 3 |
 Floor 4 Floor 4 |
 Floor 5 Floor 5 |
 Floor 6 Floor 6 |
 Floor 7 Floor 7 |
 Floor 8 Floor 8 |
 Floor 9 Floor 9 |
 Floor 10 Floor 10 |
 Floor 11 Floor 11 |
 Floor 12 Floor 12 |
Author
Spiral Abyss Floor 3 Walkthrough
improvement survey
03/2026
improving Game8's site?

Your answers will help us to improve our website.
Note: Please be sure not to enter any kind of personal information into your response.

We hope you continue to make use of Game8.
Rankings
Gaming News
Popular Games

Genshin Impact Walkthrough & Guides Wiki

Honkai: Star Rail Walkthrough & Guides Wiki

Umamusume: Pretty Derby Walkthrough & Guides Wiki

Pokemon Pokopia Walkthrough & Guides Wiki

Resident Evil Requiem (RE9) Walkthrough & Guides Wiki

Monster Hunter Wilds Walkthrough & Guides Wiki

Wuthering Waves Walkthrough & Guides Wiki

Arknights: Endfield Walkthrough & Guides Wiki

Pokemon FireRed and LeafGreen (FRLG) Walkthrough & Guides Wiki

Pokemon TCG Pocket (PTCGP) Strategies & Guides Wiki
Recommended Games

Diablo 4: Vessel of Hatred Walkthrough & Guides Wiki

Cyberpunk 2077: Ultimate Edition Walkthrough & Guides Wiki

Fire Emblem Heroes (FEH) Walkthrough & Guides Wiki

Yu-Gi-Oh! Master Duel Walkthrough & Guides Wiki

Super Smash Bros. Ultimate Walkthrough & Guides Wiki

Pokemon Brilliant Diamond and Shining Pearl (BDSP) Walkthrough & Guides Wiki

Elden Ring Shadow of the Erdtree Walkthrough & Guides Wiki

Monster Hunter World Walkthrough & Guides Wiki

The Legend of Zelda: Tears of the Kingdom Walkthrough & Guides Wiki

Persona 3 Reload Walkthrough & Guides Wiki
All rights reserved
Copyright© 2012-2024 HoYoverse — COGNOSPHERE. All Rights Reserved.
The copyrights of videos of games used in our content and other intellectual property rights belong to the provider of the game.
The contents we provide on this site were created personally by members of the Game8 editorial department.
We refuse the right to reuse or repost content taken without our permission such as data or images to other sites.
 Treasure Hoarders - Pyro Potioneer
 Treasure Hoarders - Hydro Potioneer
 Treasure Hoarders - Gravedigger
 Treasure Hoarders - Cryo Potioneer
 Treasure Hoarders - Crusher
 Treasure Hoarders - Electro Potioneer
 Treasure Hoarders - Pugilist


![Monster Hunter Stories 3 Review [First Impressions] | Simply Rejuvenating](https://img.game8.co/4438641/2a31b7702bd70e78ec8efd24661dacda.jpeg/thumb)


Gonna try the 3rd floor. Hope my Ayaka+Yanfei+Beidou+Mila team works