How to Get the 20th Phantasmal Conch from Mona's Domain
✉ Send your thoughts in our Genshin 6.4 Patch Survey!
★ Exclusive: Dive back in time with the Meta History
◆ Hot: Version 6.4, Luna 5 Codes
◆ Builds: Varka, Flins, Skirk, Escoffier
◆ Events: Travelers' Tales, He Who Caught the Wind
◆ Future: Linnea, Version 6.5 Luna VI

The final Echoing Conch and 20th Phantasmal Conch can be found in Mona's event domain in Genshin Impact 2.8. Check out how to solve all Astral Puzzles to get to the Echoing Conch in the Temple of the Star Latitudes domain and get to the hidden room in this guide!
List of Contents
How to Get the Last Phantasmal Conch
Get from Mona's Domain

You can get the 20th Phantasmal Conch in Mona's domain, Temple of the Star Latitudes, after completing its unlock quest, the Summertime Odyssey: V! After completing the quest, you can go back inside the domain by interacting with the Star Platform item found on Minacious Isle.
Pick the Door with the Cross-like Constellation
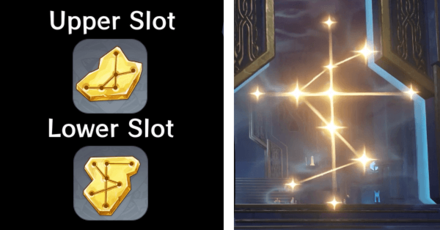
Once you enter the Temple of the Star Latitudes domain, you have to find the door with the constellation shown in the image above to get to the right room, where you have to solve three constellation puzzles to proceed.
How to Solve the Conch Astral Puzzles
All Mona Domain Echoing Conch Puzzle Solutions
| Click to Jump to a Section! | ||
|---|---|---|
| Astral Puzzle 1 | Astral Puzzle 2 | Astral Puzzle 3 |
Astral Puzzle 1 Solution
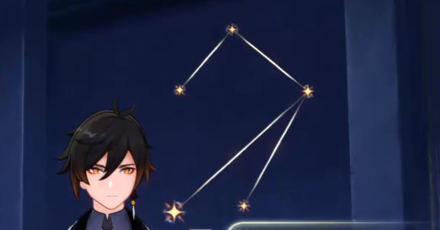
After entering the right door, follow the corridor until you get to a room full of Star Guides. There will be a constellation decorating one of the walls, which will show the pattern you have to follow using the Star Guides.
A good strategy is to light up the Star Guides as soon as you position them, to make sure that you're creating the correct pattern!
Astral Puzzle 1 Walkthrough
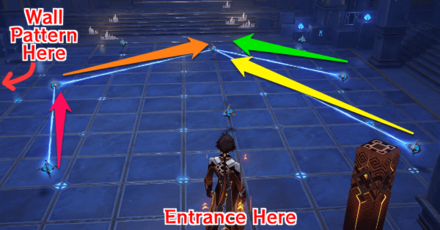
| Objectives | |
|---|---|
| 1 | From the entrance, observe the constellation pattern on the wall to your left. You must copy this pattern with the Star Guides. |
| 2 | Make sure the leftmost Star Guide is pointed towards the Star Guide to its side, further into the room. |
| 3 | Point this second Star Guide to the one near the back of the room at the center. |
| 4 | Point the rightmost Star Guide from the entrance to the same third Star Guide. |
| 5 | Point the Star Guide after this fourth one to the same third Star Guide. |
| 6 | Activate all Star Guides by hitting each of them once. |
Astral Puzzle 2 Solution
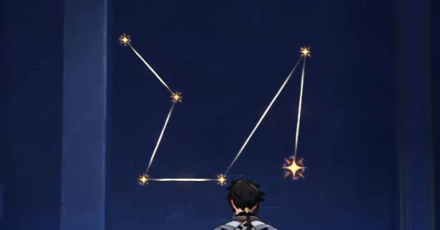
After completing the first puzzle, the pattern on the wall will shift and change into a new constellation. You have to rearrange the Star Guides to recreate this pattern!
Astral Puzzle 2 Walkthrough
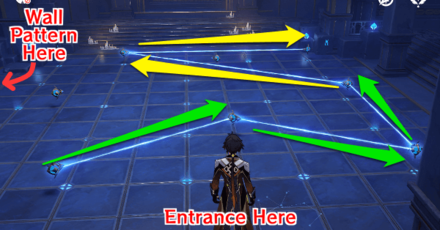
| Objectives | |
|---|---|
| 1 | From the entrance, observe the constellation pattern on the wall to your left. You must copy this pattern with the Star Guides. |
| 2 | Make sure the leftmost Star Guide is pointed towards the Star Guide at the center, closer to the entrance. |
| 3 | Point this second Star Guide to the one on the rightmost corner closest to the entrance.. |
| 4 | Point the rightmost Star Guide from the entrance to the Star Guide in front of it. |
| 5 | Point this fourth Star Guide to the one furthest from it, on the upper left corner of the room from the entrance. |
| 6 | Lastly, point this Star Guide to the one on the rightmost corner. There will be no need to activate this sixth Star Guide. |
| 7 | Activate the other five Star Guides by hitting each of them once. |
Astral Puzzle 3 Solution
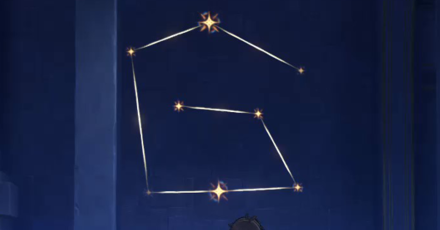
After completing the second puzzle, a third constellation pattern will appear! Once again, you have to rearrange the Star Guides to recreate this pattern.
Astral Puzzle 3 Walkthrough
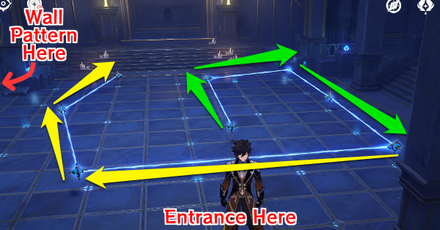
| Objectives | |
|---|---|
| 1 | From the entrance, observe the constellation pattern on the wall to your left. You must copy this pattern with the Star Guides. |
| 2 | Start with the Star Guide at the center, closest to the entrance, and point it to the other center Star Guide further into the room. |
| 3 | Point this second Star Guide to the one on the rightmost corner furthest from the entrance.. |
| 4 | Point the rightmost corner Star Guide towards the Star Guide in front of it. |
| 5 | Point this fourth Star Guide to the one in the rightmost corner closest to the entrance. |
| 6 | This rightmost entrance Star Guide should be pointed to the leftmost Star Guide closest to the entrance. |
| 7 | From here, point the Star Guide to the one next to it, close to the wall with the pattern. |
| 8 | Point this Star Guide to the last one on the upper left corner of the room from the entrance. This final Star Guide must be deactivated. |
| 9 | Activate all the other Star Guides by hitting each of them once if they are not activated already. |
Follow the Arrow Constellation
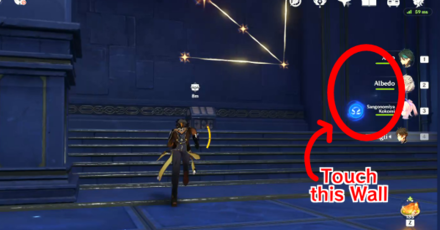
Touch the Wall and Find the Hidden Room
After completing all three constellation puzzles, an Exquisite Chest will spawn and the pattern on the wall will change again. This time the constellation will turn into an arrow pointing to a corner of the room.
Go to this corner and touch the wall to reveal a hidden passageway!
Grab the Echoing Conch in the Corner
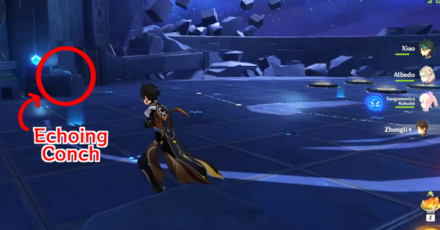
Follow the path until you get to a room with a new puzzle and a locked Precious Chest. This puzzle is part of the exploration of Mona's domain, but is not necessary to collect the Echoing Conch sitting on the left side of the room!
It's best to jump up on the stone where the Echoing Conch is to trigger the interaction prompt for the conch.
Temple of the Star Latitudes Domain
How to Unlock the Mona Domain Conch
Complete Summertime Odyssey V

You must first complete part five of the Summertime Odyssey's main event quest, The Ancient Azure Stars, in order to unlock Mona's domain, the Temple of the Star Latitudes, and find the Echoing Conch inside.
How to Use the Mona Domain Conch
Use to Get Fischl's Skin

You need to find 16 Phantasmal Conches to be able to get Fischl's event-exclusive outfit! Collect all 20 Echoing and Imaging Conches to get all the rewards in the Resonating Visions event.
All Phantasmal Conch Locations
Genshin Impact Related Guides

Resonating Visions Event Guide
Resonating Visions Event Guides
| Resonating Visions Guides | |
|---|---|
 Phantasmal Conch Locations Phantasmal Conch Locations |
 Free Fischl Outfit Reward Free Fischl Outfit Reward |
 Imaging Conch Locations Imaging Conch Locations |
 Echoing Conch Locations Echoing Conch Locations |
 The Photographer's Words The Photographer's Words |
 The Sojourners' Song The Sojourners' Song |
Conch Collecting Guides
| Guides on Collecting Specific Conches | |
|---|---|
 Broken Isle Conch Broken Isle Conch |
 Xinyan Domain Conch Xinyan Domain Conch |
 Mona Domain Conch Mona Domain Conch |
 Kazuha Domain Conch Kazuha Domain Conch |
 Fischl Domain Conch Fischl Domain Conch |
|
Golden Apple Archipelago 2.8 Guide
Comment
I did it and the first puzzle doesn't change to the second. I pointed all how you said but it doesen't work.
Author
How to Get the 20th Phantasmal Conch from Mona's Domain
improvement survey
03/2026
improving Game8's site?

Your answers will help us to improve our website.
Note: Please be sure not to enter any kind of personal information into your response.

We hope you continue to make use of Game8.
Rankings
Gaming News
Popular Games

Genshin Impact Walkthrough & Guides Wiki

Honkai: Star Rail Walkthrough & Guides Wiki

Umamusume: Pretty Derby Walkthrough & Guides Wiki

Pokemon Pokopia Walkthrough & Guides Wiki

Resident Evil Requiem (RE9) Walkthrough & Guides Wiki

Monster Hunter Wilds Walkthrough & Guides Wiki

Wuthering Waves Walkthrough & Guides Wiki

Arknights: Endfield Walkthrough & Guides Wiki

Pokemon FireRed and LeafGreen (FRLG) Walkthrough & Guides Wiki

Pokemon TCG Pocket (PTCGP) Strategies & Guides Wiki
Recommended Games

Diablo 4: Vessel of Hatred Walkthrough & Guides Wiki

Fire Emblem Heroes (FEH) Walkthrough & Guides Wiki

Yu-Gi-Oh! Master Duel Walkthrough & Guides Wiki

Super Smash Bros. Ultimate Walkthrough & Guides Wiki

Pokemon Brilliant Diamond and Shining Pearl (BDSP) Walkthrough & Guides Wiki

Elden Ring Shadow of the Erdtree Walkthrough & Guides Wiki

Monster Hunter World Walkthrough & Guides Wiki

The Legend of Zelda: Tears of the Kingdom Walkthrough & Guides Wiki

Persona 3 Reload Walkthrough & Guides Wiki

Cyberpunk 2077: Ultimate Edition Walkthrough & Guides Wiki
All rights reserved
Copyright© 2012-2024 HoYoverse — COGNOSPHERE. All Rights Reserved.
The copyrights of videos of games used in our content and other intellectual property rights belong to the provider of the game.
The contents we provide on this site were created personally by members of the Game8 editorial department.
We refuse the right to reuse or repost content taken without our permission such as data or images to other sites.


![Everwind Review [Early Access] | The Shaky First Step to A Very Long Journey](https://img.game8.co/4440226/ab079b1153298a042633dd1ef51e878e.png/thumb)

![Monster Hunter Stories 3 Review [First Impressions] | Simply Rejuvenating](https://img.game8.co/4438641/2a31b7702bd70e78ec8efd24661dacda.jpeg/thumb)


it works, you must have done something wrong lol