Flameplume Starflowers Event Guide | How to Smelt Fireworks
✉ Send your thoughts in our Genshin 6.4 Patch Survey!
★ Exclusive: Dive back in time with the Meta History
◆ Hot: Version 6.4, Luna 5 Codes
◆ Builds: Varka, Flins, Skirk, Escoffier
◆ Events: Travelers' Tales, He Who Caught the Wind
◆ Future: Linnea, Version 6.5 Luna VI

Flameplume Starflowers is a fireworks smelting event in Genshin Impact's Fleeting Colors in Flight event. Check out how to play the smelting production challenges, how to get the best quality, and how to modify and launch fireworks here! We also have a list of all rewards from the event.
List of Contents
Flameplume Starflowers Event Information
Event Dates and Details

| Event Start | January 25, 2022 |
|---|---|
| Event End | February 12, 2022 |
| How to Unlock | Reach Adventure Rank 28+ Complete Chapter I: Act 3 Complete Interlude Chapter: Act 1 Complete The Blazing Stars Ring in Fortune |
| Rewards |
Fireworks Event for Fleeting Colors in Flight

Flameplume Starflowers is part of the 2022 Lantern Rite rerun, Fleeting Colors in Flight. It's one of the many sub-events to celebrate the Lantern Rite festival!
Fleeting Colors in Flight Event Guide
How to Unlock Event
Complete The Blazing Stars Rings in Fortune
The Blazing Stars Ring in Fortune event quest is required to complete to access Flameplume Starflowers! After finishing this quest, the Launch Tube is rewarded to your inventory.
The Blazing Stars Ring in Fortune Story Quest
Perfect Quality Guide for Fireworks in Flameplume Starflowers
All Smelting Challenges Guide
| Jump to a section! | ||
|---|---|---|
 Challenge 1 Challenge 1 |
 Challenge 2 Challenge 2 |
 Challenge 3 Challenge 3 |
 Challenge 4 Challenge 4 |
 Challenge 5 Challenge 5 |
 Challenge 6 Challenge 6 |
How to Get the Best Quality for Each Firework
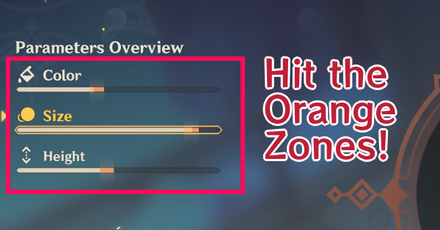
You'll need to reach 3000 points (3 parameters) or 4000 points (4 parameters) to get Perfect Quality by hitting the orange Ideal Zones while smelting fireworks! If you just want to complete all Event Tasks, you'll only need more than 2700 or 3600 points, respectively!
Note that the quality you get for each techniques is random, and you'll sometimes find yourself going over or under the Ideal Zone! Luckily, you can restart the smelting progress and try again!
The Mountain Clouds Let Down Golden Rain
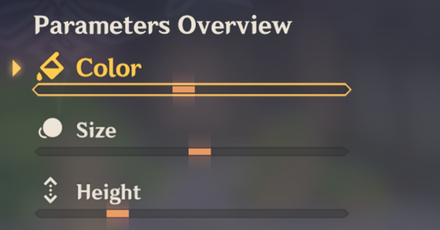 Challenge 1 |
Steps to > 2700 Quality
| Parameter | Smelting Techniques | |
|---|---|---|
| 1 | 2 Nitpicker | |
| 2 | 2 Nitpicker | |
| 3 | 1 Nitpicker |
Steps to Perfect Quality
| Parameter | Smelting Techniques | |
|---|---|---|
| 1 | 2 Nitpicker | |
| 2 | 1 Nitpicker | |
| 3 | 1 Nitpicker + 2 Tactile Sensitivity |
To get Perfect Quality, all Nitpicker smelt attempts on Size and Height must hit a total of 1000 points. You can only get this by chance, so if it goes over or under, you can restart and try again until it hits the Ideal Zone!
The Color parameter may only need 1 Tactile Sensitivity, so adjust accordingly!
Back to All Smelting Challenges ▲
The Silver Night is Full of Stars
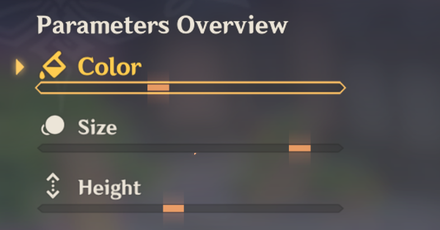 Challenge 2 |
Steps to > 2700 Quality
| Parameter | Smelting Techniques | |
|---|---|---|
| 1 | 2 Meticulousness + 1 Tactile Sensitivity |
Steps to Perfect Quality
| Parameter | Smelting Techniques | |
|---|---|---|
| 1 | 1 Nitpicker + 1 Tactile Sensitivity | |
| 2 | 1 Nitpicker + 1 Tactile Sensitivity or 1 Nitpicker + 2 Tactile Sensitivity |
|
| 3 | 3 Decisive Boldness or 2 Decisive Boldness + 1 Nitpicker + 1 Tactile Sensitivity |
Depending on your luck, you may need to change your techniques to add 1 Tactile Sensitivity on Height and Size! You can only get this by chance, so if it goes over or under, you can restart and try again until it hits the Ideal Zone!
Back to All Smelting Challenges ▲
The Gloom Paints the Cold Blooms
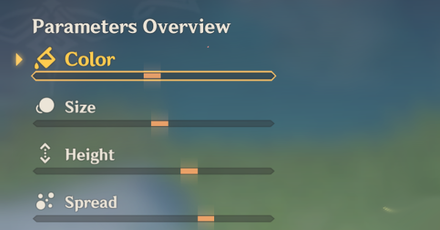 Challenge 3 |
Steps to > 3600 Quality
| Parameter | Smelting Techniques | |
|---|---|---|
| 1 | 1 Meticulousness + 1 Tactile Sensitivity | |
| 2 | 2 Meticulousness | |
| 3 | 1 Tactile Sensitivity |
Steps to Perfect Quality
| Parameter | Smelting Techniques | |
|---|---|---|
| 1 | 1 Meticulousness | |
| 2 | 1 Meticulousness | |
| 3 | 1 Decisive Boldness or 1 Nitpicker + 1 Tactile Sensitivity |
|
| 4 | 1 Nitpicker or 1 Tactile Sensitivity |
|
| 5 | 1 Nitpicker or 1 Tactile Sensitivity |
|
| 6 | 1 Tactile Sensitivity |
This challenge will be trickier with the addition of the new parameter, Spread. You may need to complete Challenge 4 first to get more Endurance and fit at least one more Technique!
Note that hitting the Orange Zone is sometimes only attainable by chance, so if it goes over and under, you can restart and try again!
Steps to Perfect Quality Alternative Solution
| Parameter | Smelting Techniques | |
|---|---|---|
| 1 | 1 Meticulousness | |
| 2 | 1 Raging Flame (to Strong Flame) | |
| 3 | 1 Meticulousness | |
| 3 | 1 Decisive Boldness or 1 Nitpicker |
|
| 4 | 1 Nitpicker or 1 Tactile Sensitivity |
|
| 5 | 1 Nitpicker or 1 Tactile Sensitivity |
If you've unlocked the Flamepower techniques, you can use this to gain or lessen the quality!
Back to All Smelting Challenges ▲
Fireworks Dance Amidst a Snowy Sky
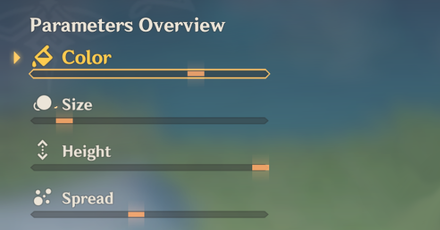 Challenge 4 |
Steps to > 3600 Quality
| Parameter | Smelting Techniques | |
|---|---|---|
| 1 | 1 Tactile Sensitivity | |
| 2 | 2 Raging Fire (to Strong Flame) | |
| 3 | 1 Meticulousness | |
| 4 | 1 Decisive Boldness | |
| 5 | 1 Decisive Boldness | |
| 6 | 1 Nitpicker |
Steps to Perfect Quality
| Parameter | Smelting Techniques | |
|---|---|---|
| 1 | 1 Raging Fire (to Medium Flame) | |
| 2 | 1 Tactile Sensitivity | |
| 3 | 1 Raging Fire (to Strong Flame) | |
| 4 | 1 Meticulousness | |
| 5 | 1 Decisive Boldness | |
| 6 | 1 Decisive Boldness or 1 Decisive Boldness + 1 Tactile Sensitivity |
|
| 7 | 1 Nitpicker or 1 Decisive Boldness |
|
| 8 | 1 Tactile Sensitivity |
Here you will need to manipulate with your Flame Strength to get Perfect Quality. Note that the first Tactile Sensitivity can immediately jump to perfect 1000 points, so Raging Fire as the first step is optional!
Back to All Smelting Challenges ▲
Golden Calendula Swirl
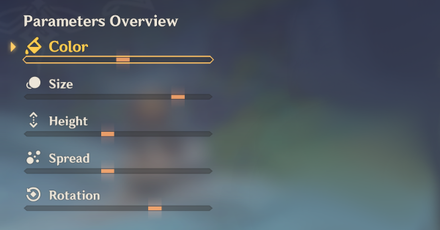 Challenge 5 |
Steps to > 4500 Quality
| Parameter | Smelting Techniques | |
|---|---|---|
| 1 | 2 Meticulousness | |
| 2 | 1 Decisive Boldness | |
| 3 | 2 Decisive Boldness | |
| 4 | 1 Tactile Sensitivity |
Steps to Perfect Quality
| Parameter | Smelting Techniques | |
|---|---|---|
| 1 | 2 Meticulousness | |
| 2 | 1 Raging Fire (to Strong Flame) | |
| 4 | 1 Decisive Boldness | |
| 5 | 1 Decisive Boldness + 1 Nitpicker | |
| 6 | 1 Tactile Sensitivity or 1 Nitpicker |
|
| 7 | 1 Tactile Sensitivity | |
| 8 | 1 Tactile Sensitivity |
You may opt to put the first Raging Fire between the first 2 Meticulousness, but note that you may need to add or remove Tactile Sensitivities on some parameters, so adjust accordingly!
Back to All Smelting Challenges ▲
Kindled Trees by the Moonlit Window
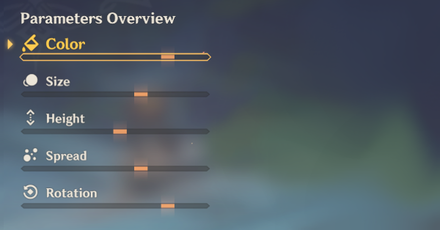 Challenge 6 |
Steps to > 4500 Quality
| Parameter | Smelting Techniques | |
|---|---|---|
| 1 | 2 Meticulousness | |
| 2 | 1 Meticulousness | |
| 3 | 2 Meticulousness | |
| If quality didn't reach > 4500 quality | ||
| 4 | 1 Tactile Sensitivity | |
Steps to Perfect Quality
| Parameter | Smelting Techniques | |
|---|---|---|
| 1 | 1 Raging Fire (to Strong Flame) | |
| 2 | 1 Meticulousness | |
| 3 | 1 Meticulousness | |
| 4 | 1 Meticulousness | |
| 5 | All | 1 Tactile Sensitivity or 1 Nitpicker |
The final production challenge has the highest amount of quality necessary to reach the orange ideal zone, and so using the RNG smelting techniques of Meticulousness is a must in spite of its unreliablity!
If you're stumped, try changing your flame from low to high with Raging Fire or Low-Temperature Processing!
Back to All Smelting Challenges ▲
How to Play Flameplume Starflowers
Flameplume Starflowers Event Guide
| How to Play the Event | |
|---|---|
| 1 | Unlock the Launch Tube with the event quest. |
| 2 | Smelt Fireworks to get their ideal quality. |
| 3 | Use different techniques to increase quality. |
| 4 | Launch fireworks in the open world! |
| 5 | Complete event tasks for rewards! |
How to Unlock the Launch Tube
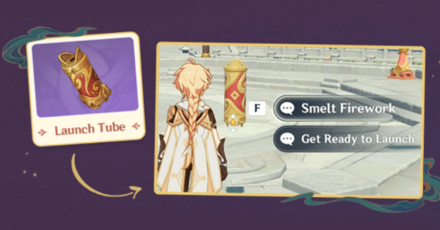
Complete The Blazing Stars Rings in Fortune quest to get the gadget and begin smelting Fireworks! This Launch Tube gadget isn't limited to the event, meaning you can use it even after the Lantern Rite festivities are over!
The Blazing Stars Quest Walkthrough
How to Smelt Fireworks
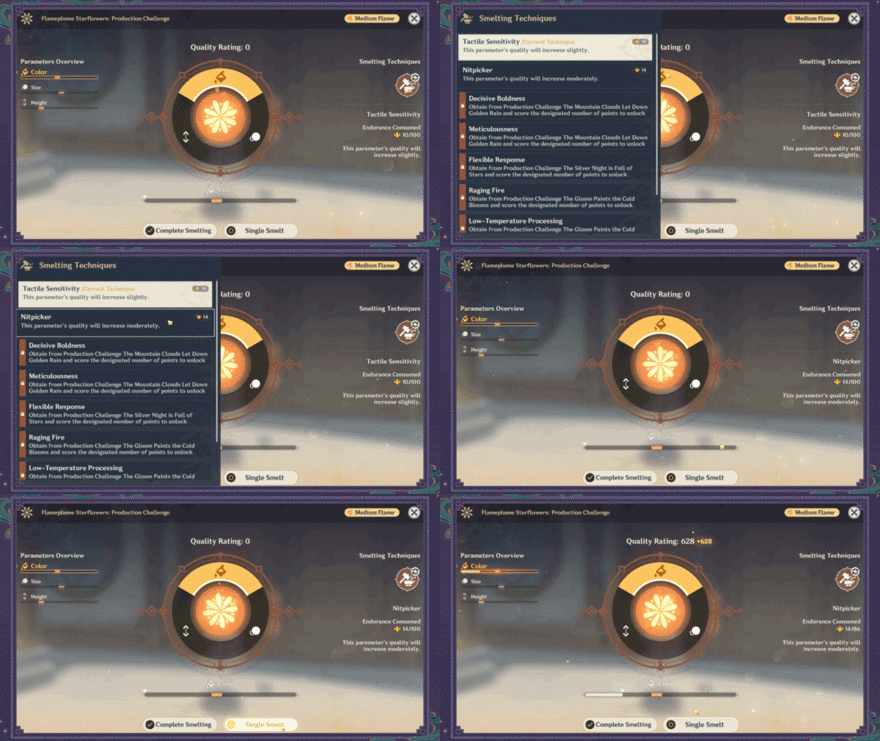
Equip the Launch Tube from your gadget inventory and place it in the open world. It works a bit like the Serenitea Pot.
To start, choose smelt to start the production challenges! You need to smelt Fireworks until their Quality reaches the ideal zone. The closer your Firework is to the ideal zone, the more quality points you get!
Smelting Parameters and Quality Control
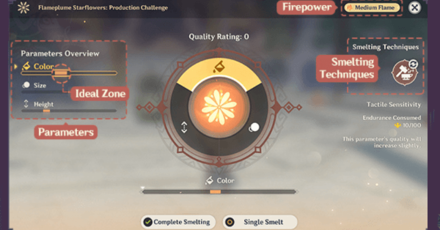
| Aspect | Information on Feature |
|---|---|
| Smelting Technique | The technique used to adjust a Firework's quality. Some Smelting Techniques are only unlocked after you reach a certain score. |
| Firepower | Adjusts the firepower of the Launch Tube. Using Medium and Full Firepower gives a quality bonus depending on which is used. The Launch Tube's Firepower Value is consumed each time you smelt. |
| Endurance | Used to Smelt Fireworks. You use up a certain amount of Endurance depending on the Smelting Technique you use. You get Endurance at the start of each challenge, and you can't continue smelting Fireworks if you run out of this. |
| Curious Efficacy | Curious Efficacy has a chance of occuring when you use specific Smelting Techniques. When this happens, your Firework quality will surely go up to the ideal zone. |
Increase Quality with Smelting Techniques
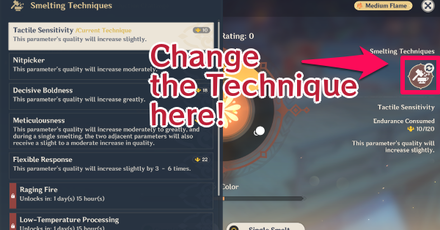
Smelt the color, size, and height of the Firework by trying different Smelting Techniques to achieve perfect quality! You can do this by mixing and matching these techniques until they reach the ideal zone!
List of All Techniques and Effects
| Smelting Technique | Effects | Endurance Cost |
|---|---|---|
| Tactile Sensitivity | This parameter's quality will increase slightly. | 10 |
| Nitpicker | This parameter's quality will increase moderately. | 14 |
| Decisive Boldness | This parameter's quality will increase greatly. | 18 |
| Meticulousness | This parameter's quality will increase moderately to greatly, and during a single melting, the two adjacent parameters will also receive a slight to a moderate increase in quality. | 26 |
| Flexible Response | This parameter's quality will increase slightly by 3 - 6 times. | 22 |
| Raging Fire | The smelting Firepower is increased moderately. | 4 |
| Low-Temperature Processsing | The smelting Firepower is decreased moderately. | 4 |
| Let Fortune Lead | This parameter's quality will increase slightly, and the odds of Curious Efficacy occuring is increased. | 15 |
How to Use Fireworks
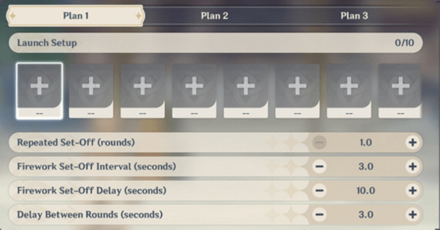
After you've perfected your Firework quality and modified the Fireworks to fit your taste, you can launch them in the open world! Just deploy the Launch Tube and select ''Get Ready to Launch.
During the Ignition Prep screen, you can even determine your Fireworks' type and sequence. Make the fireworks queen, Yoimiya, proud with an awesome Fireworks display!
Flameplume Flowers Event Rewards
Total Event Rewards
| Flameplume Fireworks Rewards | ||
|---|---|---|
|
|
||
|
|
|
|
How to Use the Affluence Talismans
Affluence Talismans are event tokens. You can use them in Afterglow Market 1 event shop during the Fleeting Colors in Flight event.
You also need 1,000 of these Affluence Talismans to claim a free 4-Star character from Liyue from Prosperous Partnerships.
Fleeting Colors Event Shops and Rewards
Breakdown of Total Rewards
| Objective | Rewards |
|---|---|
| Quality reaches 1500 on The Mountain Clouds Let Down Golden Rain |
|
| Quality reaches 2100 on The Mountain Clouds Let Down Golden Rain |
|
| Quality reaches 2700 on The Mountain Clouds Let Down Golden Rain | |
| Quality reaches 1500 on The Silver Night is Full of Stars |
|
| Quality reaches 2100 on The Silver Night is Full of Stars |
|
| Quality reaches 2700 on The Silver Night is Full of Stars | |
| Quality reaches 2000 on The Gloom Paints the Cold Blooms |
|
| Quality reaches 2800 on The Gloom Paints the Cold Blooms |
|
| Quality reaches 3600 on The Gloom Paints the Cold Blooms | |
| Quality reaches 2000 on Fireworks Dance Amidst a Snowy Sky |
|
| Quality reaches 2800 on Fireworks Dance Amidst a Snowy Sky |
|
| Quality reaches 3600 on Fireworks Dance Amidst a Snowy Sky | |
| Quality reaches 2500 on Golden Calendula Swirl |
|
| Quality reaches 3500 on Golden Calendula Swirl |
|
| Quality reaches 4500 on Golden Calendula Swirl | |
| Quality reaches 2500 on Kindled Trees by the Moonlit Window |
|
| Quality reaches 3500 on Kindled Trees by the Moonlit Window |
|
| Quality reaches 4500 on Kindled Trees by the Moonlit Window |
Genshin Impact Related Guides

Fleeting Colors in Flight Event Guide
Main Guides for Fleeting Colors in Flight
| Fleeting Colors in Flight Highlights | |||
|---|---|---|---|
 Flameplume Starflowers Flameplume Starflowers |
 The Great Gathering The Great Gathering |
 Wondrous Shadows Wondrous Shadows |
 Oceanic Defender Oceanic Defender |
 Prosperous Partnerships Prosperous Partnerships |
 The Moon's Comely Brow The Moon's Comely Brow |
 May Fortune Find You May Fortune Find You |
 Flowing Lights & Colors Flowing Lights & Colors |
Fleeting Colors in Flight Quest Guides
| Event Quest Guides | |
|---|---|
 The Blazing Stars Ring in Fortune The Blazing Stars Ring in Fortune |
 Petal-Lit Ships Fish for the Moon Petal-Lit Ships Fish for the Moon |
 The Bright-Windowed Lanterns Hide Their Shadows The Bright-Windowed Lanterns Hide Their Shadows |
 Sky-Grazers, Land-Walkers Sky-Grazers, Land-Walkers
|
 The Stars Inscrible the Year's Wishes The Stars Inscrible the Year's Wishes |
|
Other Fleeting Colors in Flight Guides
| Helpful Event Guides | |
|---|---|
 Event Shops & Tokens Event Shops & Tokens |
 Launch Tube Gadget Launch Tube Gadget |
 Firework Types & Use Firework Types & Use |
 Open-World Character Locations Open-World Character Locations |
Fleeting Colors in Flight Items
Other Lantern Rite Event Runs
| Version | All Lantern Rite Events |
|---|---|
| 4.4 |  Vibrant Harriers Aloft in Spring Breeze Vibrant Harriers Aloft in Spring Breeze |
| 3.4 |  The Exquisite Night Chimes The Exquisite Night Chimes |
| 1.3 |  Lantern Rite Lantern Rite |
Other Genshin Impact Events
Comment
BUG in the game you cannot adjust the flame with a controller.
Author
Flameplume Starflowers Event Guide | How to Smelt Fireworks
improvement survey
03/2026
improving Game8's site?

Your answers will help us to improve our website.
Note: Please be sure not to enter any kind of personal information into your response.

We hope you continue to make use of Game8.
Rankings
Gaming News
Popular Games

Genshin Impact Walkthrough & Guides Wiki

Honkai: Star Rail Walkthrough & Guides Wiki

Umamusume: Pretty Derby Walkthrough & Guides Wiki

Pokemon Pokopia Walkthrough & Guides Wiki

Resident Evil Requiem (RE9) Walkthrough & Guides Wiki

Monster Hunter Wilds Walkthrough & Guides Wiki

Wuthering Waves Walkthrough & Guides Wiki

Arknights: Endfield Walkthrough & Guides Wiki

Pokemon FireRed and LeafGreen (FRLG) Walkthrough & Guides Wiki

Pokemon TCG Pocket (PTCGP) Strategies & Guides Wiki
Recommended Games

Diablo 4: Vessel of Hatred Walkthrough & Guides Wiki

Cyberpunk 2077: Ultimate Edition Walkthrough & Guides Wiki

Fire Emblem Heroes (FEH) Walkthrough & Guides Wiki

Yu-Gi-Oh! Master Duel Walkthrough & Guides Wiki

Super Smash Bros. Ultimate Walkthrough & Guides Wiki

Pokemon Brilliant Diamond and Shining Pearl (BDSP) Walkthrough & Guides Wiki

Elden Ring Shadow of the Erdtree Walkthrough & Guides Wiki

Monster Hunter World Walkthrough & Guides Wiki

The Legend of Zelda: Tears of the Kingdom Walkthrough & Guides Wiki

Persona 3 Reload Walkthrough & Guides Wiki
All rights reserved
Copyright© 2012-2024 HoYoverse — COGNOSPHERE. All Rights Reserved.
The copyrights of videos of games used in our content and other intellectual property rights belong to the provider of the game.
The contents we provide on this site were created personally by members of the Game8 editorial department.
We refuse the right to reuse or repost content taken without our permission such as data or images to other sites.


![Monster Hunter Stories 3 Review [First Impressions] | Simply Rejuvenating](https://img.game8.co/4438641/2a31b7702bd70e78ec8efd24661dacda.jpeg/thumb)


never mind no one says you need to apply the flame change like the other settings via a smelting.