Energy Amplifier Fruition Event Guide
✉ Send your thoughts in our Genshin 6.4 Patch Survey!
★ Exclusive: Dive back in time with the Meta History
◆ Hot: Version 6.4, Luna 5 Codes
◆ Builds: Varka, Flins, Skirk, Escoffier
◆ Events: Travelers' Tales, He Who Caught the Wind
◆ Future: Linnea, Version 6.5 Luna VI
Energy Amplifier Fruition is the Version 2.3 rerun of the Energy Amplifier event in Genshin Impact. Learn how to play Energy Amplifier Fruition, information on all the stages, the enemies in all the Deceitful Domains, total event rewards in this Energy Amplifier guide!
| Fruition Event Guide | ||
|---|---|---|
 Act 1 Guide Act 1 Guide |
 Act 2 Guide Act 2 Guide |
 Act 3 Guide Act 3 Guide |
 Deceitful Domain 1 Deceitful Domain 1 |
 Deceitful Domain 2 Deceitful Domain 2 |
 Deceitful Domain 3 Deceitful Domain 3 |
List of Contents
Energy Amplifier Fruition Event Information

Event Dates and Details
| Event Start | December 24, 2021 |
|---|---|
| Event End | January 3, 2022 |
| Rewards |
|
Energy Amplifier's 2.3 Rerun
This event is the return of the Version 1.5 Energy Amplifier Initiation Event, where players collected Irminsul Fragments for buffs and entered a domain to get a Free Diona!
Energy Amplifier Initiation Event Guide
Can you play Energy Amplifier Fruitition in Co-Op Mode?
Yes, you can play Energy Amplifier Fruition in Co-Op Mode! You can go to Places of Interest or beat the Deceitful Domain with other players. Your friends can also help you by increasing your Motive Force.
If you need help with the event challenges or want more event buddies, check out our Co-Op Boards!
| Genshin Co-Op Boards | ||
|---|---|---|
Energy Amplifier Fruition Stages
All Energy Amplifier Stages
| Unlock | All Energy Amplifier Fruition Stages |
|---|---|
| 12/24 | Quest Guide: I, Researcher Act 1 Guide: West of Wangshu Inn Deceitful Domain: Sea of Wandering Souls |
| 12/26 | Act 2 Guide: Tianqiu Valley Deceitful Domain: Where Bloodhounds Gather |
| 12/28 | Act 3 Guide: Yaoguang Shoal Deceitful Domain: Whirling Judgement |
Deceitful Domains in Energy Amplifier Fruition
All Deceitful Domains and Enemies
| Deceitful Domain | Enemies & Ley Line Disorder |
|---|---|
|
The effects of defeating Expanded Specters are enhanced: the storm will persist until the challenge ends, the watery explosion will heal all opponents, and the rock collapse DMG and AoE are both increased. |
|
|
When a Rifthound's HP is less than or equal to 50%, Rifthound Whelps will enter the Elemental Devourer state. |
|
|
3 Moving Detonation Zones will be present. A Detonation Zone will explode after a character stays in its AoE for 2 seconds, dealing True DMG. |
How to Play Energy Amplifier Fruition
Energy Amplifier Fruition Event Guide
| How to Play the Event | |
|---|---|
| 1 | Complete ''I, Researcher'' for the Energy Amplifier. |
| 2 | Explore Places of Interest for Irminsul Fruit. |
| 3 | Collect Motive Force to equip Fruit Fragments. |
| 4 | Equip Fruit Fragments onto the device for buffs. |
| 5 | Challenge Deceitful Domains with your own settings. |
| 7 | Rack up event points for rewards! |
Energy Amplifier Unlock Quest
Complete ''I, Researcher'' to begin the event
Complete the ''I, Researcher'' Event Quest to get the Energy Amplifier from Hosseini in Liyue and start getting Irminsul Fruit Fragments from Places of Interest!
I, Researcher Quest Guide
How to Explore Places of Interest
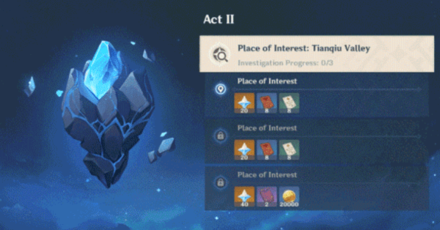
The event is separated into three acts that have three Places of Interest. Following the prompts from the in-game event page will lead you to the challenge area.
Defeat all enemies to complete the challenge
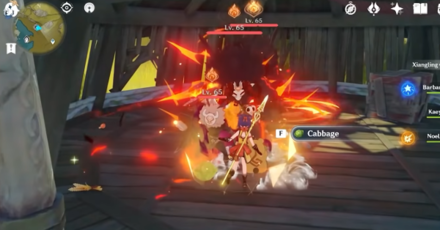
During each challenge, you need to defeat enemies in camps that have an Irminsul Fruit Fragment in them. Afterwards, you can claim a chest reward!
Beware of the Mutation Stones

There are Mutation Stones in the Places of Interest that will massively buff the enemies in the area! Prioritize destroying all Mutation Stones in the area before defeating the enemies.
What is Motive Force?
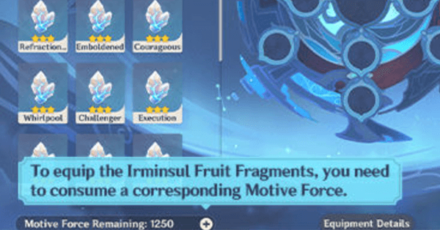
Motive Force is what you consume when you equip an Irminsul Fruit Fragment on the Energy Amplifier! The amount you have is relative to the total level of all your characters.
Needed to equip Fruit Fragments
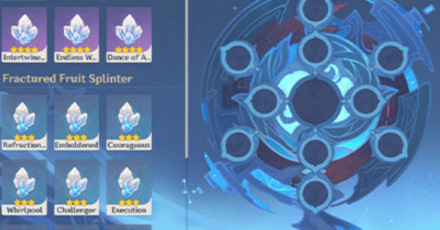
Each Irminsul Fruit Fragment consumes a certain amount of Motive Force. The higher the rarity of the fruit fragment, the more it will consume. The more Motive Force you have, the more you can equip Fruit Fragments!
Get more Motive Force from friends
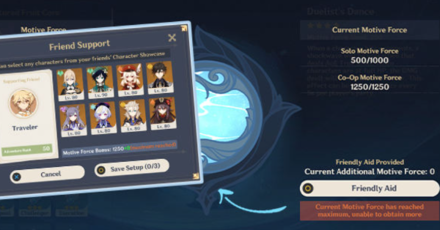
You can also seek aid from three of your friends' characters to gain more Motive Force! Note that only the characters shown in your or your friends showcase can help with this.
Check out our Co-Op Boards to gain more high leveled event buddies!
| Genshin Co-Op Boards | ||
|---|---|---|
How to Use Fruits for Buffs
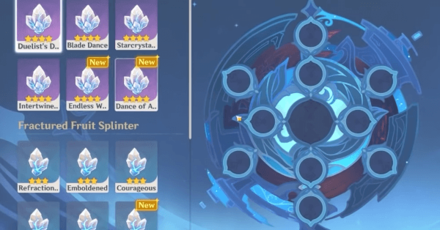
Once you get the Irminsul Fruit Fragments, you can arrange them on the Energy Amplifier for buffs inside the domain! The fruit fragments are divided into the Fractured Fruit Core and Fractured Fruit Splinters.
Irminsul Fruit Fragment Types
| Irminsul Fruit Fragments | ||
|---|---|---|
Jump to List of Fruit Fragments!
Equip on your Energy Amplifier device
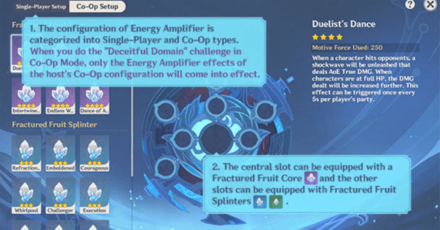
There are two Energy Amplifier devices you need to setup, the Single-Player Setup and the Co-Op Setup! These can have different fruit fragment buffs arranged in them. The central slot is for the Fractured Fruit Core, and the rest can be filled up by either the 3-Star or 2-Star Fractured Fruit Splinters.
Choose the best ones for your party
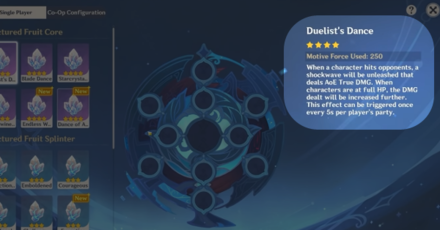
When equipping Irminsul Fruit Fragments, it's best to keep in mind the party you're going to use it for to get the most out of the buffs!
Can only be used in Deceitful Domains
Note that the Energy Amplifier and the fruit fragments buffs can only be used in the Deceitful Domains!
Challenge the Deceitful Domains
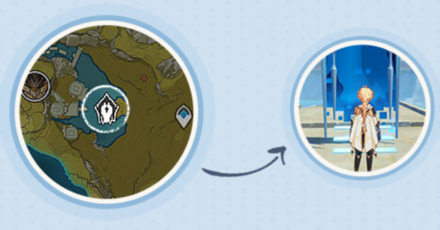
After clearing the Places of Interest of an Act, you can unlock the corresponding Decietful Domain Stage! The domain itself is located in Tianqiu Valley, near the Primo Geovishap.
Adjust the Deceitful Domain Difficulty
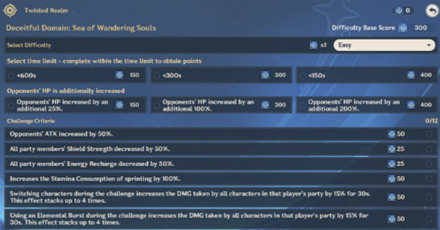
Before entering the domain, you can pick the difficulty and criteria of the challenge. The higher the difficulty, the more points you'll get. This is the same with the criteria, time limit, and opponent HP!
Gain Rewards from Getting Higher Points!
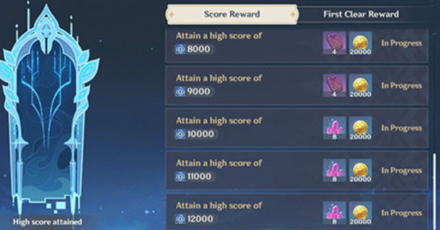
Get high points from beating the domains to get all the rewards!
Irminsul Fruit Fragment List
List of All Available Irminsul Fruit Fragments
Here is a list of Fractured Fruits that can be equipped with the Energy Amplifier device and their Effects.
Fractured Fruit Core
| Name | Effect |
|---|---|
| When a character obtains an Elemental Shard created by a Geo Elemental Reaction, a small shockwave will be unleashed that will deal 500% of that character's ATK as DMG to nearby opponents. Additionally, all characters in the party gain 40% Geo DMG Bonus for 10s after this effect is triggered. These effects can be triggered once every 5s and this CD is shared between all party members. | |
| Characters possess 5 stacks of the Blade Dance effect, and each stack increases the Normal Attack DMG dealt by the character by 15%. Possessing 5 stacks will increase Normal ATK SPD by 15%. When a character takes DMG, they will lose 1 stacks of Blade Dance. A maximum of 1 stacks can be lost every second in this way. A character will gain one stack of Blade Dance for every 10s they are on the field, up to a maximum of 5 stacks. Each character's CDs, stack counts, and their effects are counted independently. | |
| When a character hit opponents, a shockwave will be unleashed that deals AoE DMG. When characters are at full HP, the DMG dealt will be increased further. This effect can be triggered once every 5s per character. | |
| When any party member uses can Elemental Burst, the Elemental Roundabout effect is generated which increases all party members' Elemental Mastery by 100 for 20s, stacking up 3 times. If this effect is triggered again at 3 stacks, a shockwave that deals AoE DMG will be unleashed. | |
| After using an Elemental Burst, all party members on the field will unleash one shockwave that scales on 600% of the ATK of the character that unleashed that shockwave, and which deals DMG to nearby opponents. This effect can occur once every 2s and its CD is shared between all characters in the party. | |
| After using an Elemental Burst, the Elemental Profusion effect will occur, increasing all party members' Elemental Burst DMG by 12% for 15s. Max 5 stacks. When 5 stacks are possessed, Normal ATK SPD is increased by 15%. |
Fractured Fruit Splinter
| Name | Effect |
|---|---|
| When a character obtains an Elemental Shard created by the Crystallize Reaction, they gain 30% Elemental DMG Bonus for 10s. | |
| When a character protected by a shield hits an opponent with a Normal Attack, their ATK is increased by 10%. This effect can stack up to 5 times and lasts for 8s. This effect, its stacks, and its duration are independently calculated for every character. | |
| Increases the Elemental Burst Level of all party members by 1. Maximum upgrade level is 15. | |
| When an opponent is defeated, it will release a shockwave that deals AoE DMG to other opponents. | |
| When an active character triggers Electro-Charged, all of that player's party members' Elemental Burst CDs are decreased by 1s. This can occur once every 1.5s. | |
| For 20s after an Elemental Burst is used, the character who unleashed that Elemental Burst has their Normal Attack DMG increased by 40%. | |
| Defeating opponents with a character's Charged Attack will create a Vacuum Field that pulls nearby opponents in and deals DMG based on 500% of the character's ATK. This effect can be triggered once every 2s, and this effect's CD is shared between all characters in the party. | |
| During combat, when there are no more than 2 opponents near a character, ATK is increased by 20% and DEF is increased by 20%. | |
| When a character's Charged Attacks hit an opponent that is 30% HP, an executioner's blade will descend and deal immense DMG. This effect can be triggered once every 10s and this CD is shared between all party members. | |
| When a character obtains an Elemental Shard created by the Crystallize Reaction, they will regenerate 2 Energy for all members of the party. This effect can be triggered once every 2s and this CD is shared between all party members. | |
| All characters in the party have the DMG dealt by their Normal Attacks increased by 30%. | |
| Elemental Burst DMG dealt by all party members increased by 30%. | |
| All party members receive a 30% Physical DMG Bonus. | |
| All party members' Shield Strength increased by 35%. | |
| All characters in the party have their Elemental Mastery Increased by 100. | |
| All party member's Charged Attack DMG increased by 30%. |
Energy Amplifier Fruition Rewards
Total Rewards from the Event
| All Energy Amplifier Fruition Rewards | ||
|---|---|---|
|
|
|
|
|
|
|
|
|
|
|
|
|
|
|
|
Theses are the total confirmed rewards.
Breakdown of Total Rewards
| Objective | Rewards |
|---|---|
| Act 1 Challenge Rewards: • From ''I, Researcher'' Quest • From Places of Interest |
|
| Act 2 Challenge Rewards: • From Places of Interest |
|
| Act 3 Challenge Rewards: • From Places of Interest |
|
| First Clear Reward for Domain 1 | |
| First Clear Reward for Domain 2 | |
| First Clear Reward for Domain 3 | |
| Attain a high score of 1000 | |
| Attain a high score of 2000 | |
| Attain a high score of 3000 | |
| Attain a high score of 4000 | |
| Attain a high score of 5000 | |
| Attain a high score of 6000 | |
| Attain a high score of 7000 | |
| Attain a high score of 8000 | |
| Attain a high score of 9000 | |
| Attain a high score of 10000 | |
| Attain a high score of 11000 | |
| Attain a high score of 12000 |
You also get BP Points from the event!
After getting a total score of 8,000 points in the various Deceitful Domains, you'll be rewarded with 1,500 Battle Pass points!
What is the Battle Pass?
Genshin Impact Related Guides

Current Events
| Event Guide | Date and Rewards |
|---|---|
 Homeward, He Who Caught the Wind Homeward, He Who Caught the Wind
|
02/27/2026 - 03/16/2026
|
Upcoming Events
| Event Guide | Date and Rewards |
|---|---|
 Sightseeing With Friends Sightseeing With Friends
|
03/16/2026 - 03/26/2026
|
 Operation Stronghold Defense Operation Stronghold Defense
|
03/23/2026 - 04/02/2026
|
 Overflowing Abundance 6.4 Rerun Overflowing Abundance 6.4 Rerun
|
03/30/2026 - 04/06/2026
Weapon and Talent Up Materials
|
Permanent/Recurring Events
| Event Guide | Date and Rewards |
|---|---|
 To Temper Thyself and Journey Far To Temper Thyself and Journey Far
|
02/23/2026 - 05/18/2026
|
 Stygian Onslaught Stygian Onslaught
|
03/04/2026 - 04/07/2026
|
 Travelers' Tales Travelers' Tales
|
Permanently Available after Version 6.0
|
 Repertoire of Myriad Melodies Repertoire of Myriad Melodies
|
Permanently Available
|
 Test Run Test Run
|
Permanently Available
|
 Hangout Events Hangout Events
|
Permanently Available after Version 1.4
|
 Baptism of Song Baptism of Song
|
Permanently Available
+ Free Barbara
|
 Daily Check-In Daily Check-In
|
2021/03/01 - Permanently Available
|
 Stellar Reunion Returnee Event Stellar Reunion Returnee Event
|
Permanently Available
|
Past Events
Comment
I loathe this event. Even when trying to achieve a high score of 2,000, which is one of the lowest achievements in the event, miHoYo puts opponents against me that can heal themselves faster than my strongest characters can damage them. This event simply wasted my time and was not fun at all. I can't even describe it as "challenging" since I couldn't harm the opponents.
Author
Energy Amplifier Fruition Event Guide
improvement survey
03/2026
improving Game8's site?

Your answers will help us to improve our website.
Note: Please be sure not to enter any kind of personal information into your response.

We hope you continue to make use of Game8.
Rankings
- We could not find the message board you were looking for.
Gaming News
Popular Games

Genshin Impact Walkthrough & Guides Wiki

Honkai: Star Rail Walkthrough & Guides Wiki

Umamusume: Pretty Derby Walkthrough & Guides Wiki

Pokemon Pokopia Walkthrough & Guides Wiki

Resident Evil Requiem (RE9) Walkthrough & Guides Wiki

Monster Hunter Wilds Walkthrough & Guides Wiki

Wuthering Waves Walkthrough & Guides Wiki

Arknights: Endfield Walkthrough & Guides Wiki

Pokemon FireRed and LeafGreen (FRLG) Walkthrough & Guides Wiki

Pokemon TCG Pocket (PTCGP) Strategies & Guides Wiki
Recommended Games

Diablo 4: Vessel of Hatred Walkthrough & Guides Wiki

Cyberpunk 2077: Ultimate Edition Walkthrough & Guides Wiki

Fire Emblem Heroes (FEH) Walkthrough & Guides Wiki

Yu-Gi-Oh! Master Duel Walkthrough & Guides Wiki

Super Smash Bros. Ultimate Walkthrough & Guides Wiki

Pokemon Brilliant Diamond and Shining Pearl (BDSP) Walkthrough & Guides Wiki

Elden Ring Shadow of the Erdtree Walkthrough & Guides Wiki

Monster Hunter World Walkthrough & Guides Wiki

The Legend of Zelda: Tears of the Kingdom Walkthrough & Guides Wiki

Persona 3 Reload Walkthrough & Guides Wiki
All rights reserved
Copyright© 2012-2024 HoYoverse — COGNOSPHERE. All Rights Reserved.
The copyrights of videos of games used in our content and other intellectual property rights belong to the provider of the game.
The contents we provide on this site were created personally by members of the Game8 editorial department.
We refuse the right to reuse or repost content taken without our permission such as data or images to other sites.


![Monster Hunter Stories 3 Review [First Impressions] | Simply Rejuvenating](https://img.game8.co/4438641/2a31b7702bd70e78ec8efd24661dacda.jpeg/thumb)


This is my least favorite event of all the events in Genshin. I agree, it's too difficult to fight the opponents, even at the lowest level. And how the heck does the whole Co-op aspect work? I see no option to Co-op??? Confusing and frustrating, really