 under the page's title to be notified of any updates!
This survey will take about 1 minute.
Your answers will help us to improve our website.
Where Winds Meet
Guo Xin Location and How to Beat
03/06: Hexi Map | Chapter 3
★ Unfettered and Everspring Build
☆ Hexi Bosses: Guo Xin | Wandering Ark
✪ Updated: Best Weapon | Best Builds
☆ WWM Game8 Twitter: New tips daily!
Recruit using our Guild Recruitment Board!
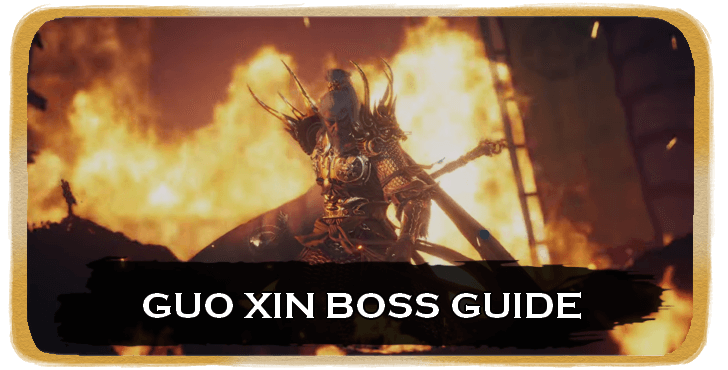
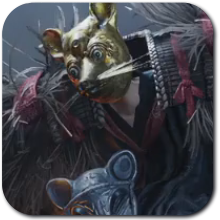
Guo Xin is a Campaign boss that you can find in Jade Gate Pass in Where Winds Meet. Check out how to beat Guo Xin, their movesets and weaknesses, and the rewards and achievements you can claim here!
 Attention! |
We are currently rushing out guides as quickly as possible. More details will be added here soon! |
|---|
List of Contents
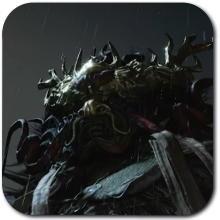
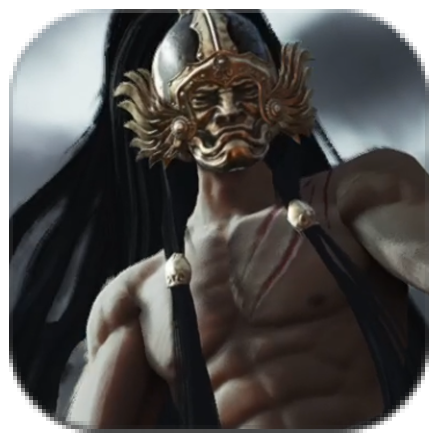
Guo Xin Overview
 Guo Xin Guo Xin |
||
| Difficulty | Weakness | |
|---|---|---|
| ★★★★☆ | None | |
| Recommended Arts | ||
| Martial Arts | ・Everspring Umbrella | |
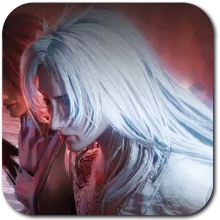
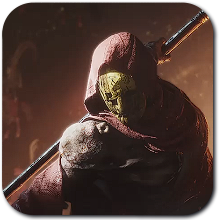
Guo Xin Best Companion
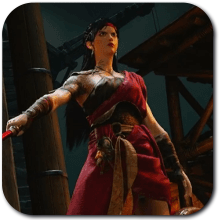
The best companion to bring against Ghost Master would be Yi Dao due to his ability to draw aggro, often drawing the boss’s attention away from you. This creates valuable breathing room to recover stamina, reset positioning, or prepare for incoming red-glint parries, making the fight significantly more manageable.
Yi Dao Location and How to Beat
Guo Xin Location
Found in Whitecrown City Southeast of Jade Gate Pass
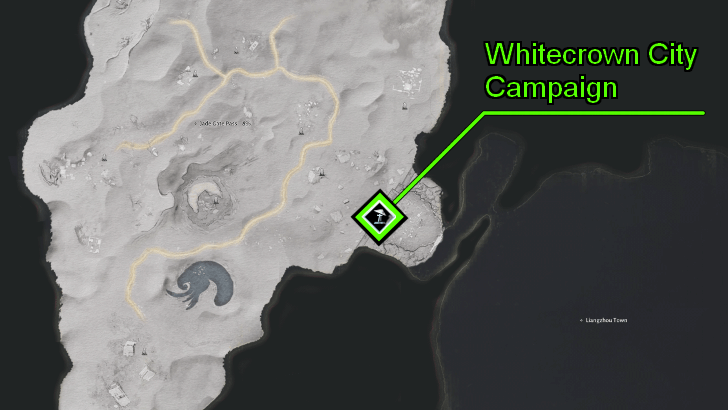
Guo Xin is fought at the end of the Whitecrown City Campaign, which is ultimately accessed through the gate to the city southeast of Jade Gate Pass. You can easily teleport to the gate via the Outside Whitecrown City Boundary Stone.
Once you have finished the quest, you can fight Guo Xin again any time by teleporting to the Campaign location.
How to Beat Guo Xin
|
|
Watch Out for Swapped Red and Yellow Glint Attacks in Combos
Guo Xin's moveset includes combos that combine parriable moves with unblockable ones. While parrying combos, keep an eye on the red or yellow glints that appear as Guo Xin swaps between them in fixed combos.
Some of Guo Xin's ranged attacks may appear difficult to tell if they're unblockable. In that case, you can try standing away from any of those attacks if you can't reliably perform perfect dodges.
Attack During Guo Xin's Recovery Animations
Many of Guo Xin's combos have long recovery animations in between or after moves. While Guo Xin readies his attacks, continue striking him to at least whittle down his HP and Qi, then proceed to parry to take out chunks of his Qi bar.
These long-winded animations tend to be followed by Guo Xin's red-glinted blockable attacks. If the attack happens to be yellow-glinted, it is best to stay away to avoid taking damage.
Parry the Tang Soldier's Attacks to Deplete Guo Xin's Qi
Sometimes, Guo Xin will summon a Tang Soldier to briefly aid him before the soldier disappears. You can deplete Guo Xin's Qi by parrying the soldier's attacks. The soldier will remain active on the field for about 8 seconds.
To do this effectively, it is recommended to distance yourself from Guo Xin so that you can draw the soldier's attention to yourself, allowing you to parry his attacks without interruption.
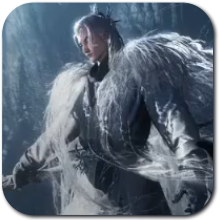
Respect His Aerial Delays in Phase 2
Many of the Iron-Blooded Prince's lightning attacks involve brief pauses mid-air, delayed secondary strikes, or deceptive timing meant to bait early reactions. Do not parry based on when the animation begins. Instead, wait for the moment the hitbox actually descends and commit to the parry only when the strike is about to connect.
Do Not Panic During His Final Lightning Display
When the Iron-Blooded Prince is reduced to a sliver of health, he will teleport away wreathed in lightning and fire a charged arrow into the sky, shattering it in a dramatic display. This is purely cinematic and does not require any defensive action. No need to panic as the fight ends shortly after this sequence finishes.
Guo Xin Movesets
| All Guo Xin Phases | |
|---|---|
| Phase 1 | Phase 2 |
Phase 1 Grand Protector of Anxi Moves
| Moves | Details |
|---|---|
| Cyclone Spear | From a distance, Guo Xin throws an unblockable spinning spear and follows up with two quick slashes. Evade the spear toss by staying out of range or running to the side. You'll need to parry the two slashes after Guo Xin lifts the spear over his shoulder. |
| Lunging Strike | Guo Xin crouches and readies a lunging spear strike. Midway through the lunge, you will see a red glint shine. Parry after you see the glint. |
| Tang Soldier Summon | Guo Xin waves his spear and backsteps, summoning a Tang Soldier to fight alongside him. The soldier fights alongside Guo Xin for about 8 seconds before he disappears. You can parry the soldier's attacks to whittle down Guo Xin's Qi. |
| Banner Slashes to Shockwave | Guo Xin crouches and performs an upward slash followed by two slower slashes and a blockable shockwave attack. The blockable attack has a long start-up animation, but prepare to parry right after the red glint shines. |
| Banner Thrust to Shockwave | Guo Xin performs this attack if you move too far from him. Parry the thrust just before it makes contact, then parry the next upward slash after Guo Xin drags it along the ground. This will be followed by a blockable shockwave, which you must parry after the red glint shines. |
| Unblockable Twin Slash | Guo Xin raises his spear and delivers two quick slashes. Dodge out of the way when the yellow glint shines bright to perform a perfect dodge. Otherwise, you can just backstep away from Guo Xin. |
| Triple Sweep Strikes | Guo Xin performs two sweeping spear strikes followed by a slower third strike. Guo Xin takes a few steps before delivering the first hit, so parry just before the spear makes contact. Parry the second strike after Guo Xin twirls it in his hand. For the third strike, wait until Guo Xin spins before parrying. |
| Quadruple Slash Combo | Guo Xin crouches and prepares to deliver two initial slashes. Parry the first upward slash when Guo Xin drags it along the ground, then parry the spear again after Guo Xin spins in the air. Guo Xin will then ready his blockable attack, which you must parry twice in quick succession after the red glint shines. |
| Whirling Sandstorm | Guo Xin charges up his next attack, summoning a sandstorm. Guo Xin strikes three times, so prepare to parry the first hit after the red glint glows. Parry the next two slashes when they arc toward you. |
| Double Slashes to Unblockable Combo | Guo Xin performs an under- and overhead slash followed by two unblockable moves. Parry the first slash after Guo Xin crouches, then parry the second after he makes the leap above you. Next, dodge out of the way to avoid the unblockable attacks when Guo Xin's silhouette turns yellow. |
| Unblockable Shockwave | This is the unblockable version of Guo Xin's red-glinted shockwave attack. As Guo Xin summons a sandstorm, backstep out of range to avoid the resulting blast. |
| Cavalry Crush | Guo Xin crouches and grabs you before hurling you into the air to be struck by a soldier. You'll see Guo Xin ready this attack when his free hand glows gold. Parry the attack when you see the red glint flash in front of you. |
Phase 2 Iron-blooded Prince Moves
| Moves | Details |
|---|---|
| Lightning Spear Toss | After he transitions to Phase 2, the Iron-blooded Prince will jump and throw a lightning-infused spear. Mid-air, you'll see a golden glint before the Prince throws the spear; dash out of the way to avoid it and the Prince's landing. Make another dodge when the Prince jumps at you with the spear. |
| Leaping Lightning Arrows | The Iron-blooded Prince jumps and fires four lightning-infused arrows. Dash to the side to avoid the first three arrows fired in quick succession, then dash away again after the brief pause where he fires the fourth arrow. |
| Unblockable Arrow | The Iron-blooded Prince dashes forward a bit before firing an unblockable arrow. Dodge out of the way sideways to avoid it. |
| Lightning Spear and Claw | Guo Xin thrusts forward with his spear before following up with a wide, clawing sweep of crackling lightning from his free hand. The spear thrust is easy to parry, but the lightning claw follow-up is much harder to time. Instead of attempting a second parry, it is safer to dodge sideways to avoid the lightning sweep. |
| Iron Heel into Spear | The Iron-Blooded Prince opens with a wide roundhouse kick, follows with a heavy downward stomp, then transitions into a wild spear swing to finish the combo. All three hits can be parried in sequence, making this a full timing check. |
| Stormrage Slam | The Iron-Blooded Prince unleashes a series of spear swings before ending the sequence with a heavy slam that triggers a lightning explosion. You can parry the spear swings, but the lightning blast at the end is harder to time, so it is safer to dodge the explosion instead of attempting a final parry. |
| Thundercharged Spear | The Iron-Blooded Prince leaps into the air, channeling lightning into his spear before crashing down with a powerful strike. Time your parry just as he descends to deflect the blow. |
| Thrust and Thunderbolt | The Iron-Blooded Prince lunges forward with a quick stabbing thrust, then leaps into the air before hurling a thunderbolt towards the player. This is a red-glint attack, so you must parry it to deal Qi damage. However, the impact hits hard if you mistime it, so commit to the parry carefully. |
| Lance and Heel | The Iron-Blooded Prince thrusts forward with his spear before immediately following up with an upward kick. You can safely parry the initial thrust, but the kick's timing is tighter, despite the kick's animation looking slow. Unless you are confident in your parry window, it is safer to dodge the kick instead. |
| Iron Seize | The Iron-Blooded Prince lunges forward in an attempt to grab you. This is a red-glint attack, so parry on reaction to stop the grab and deal Qi damage. The timing is tight, but watch for the moment he surges forward with his fist raised and glowing before committing to the parry. |
| Volley and Cleave | The Iron-Blooded Prince fires three quick arrows in rapid succession before immediately lunging forward with a wild spear swing. All hits are fairly easy to parry, as there is enough spacing between each attack to react comfortably. |
| Skyshatter | The Iron-Blooded Prince leaps into the air and drives both his physical spear and a lightning-forged duplicate into the ground, then immediately follows with a forward thrust toward you. Prepare to parry the downward impact first, then time a second parry for the finishing stab. |
| Stormbreaker Toss | The Iron-Blooded Prince dashes toward you, then leaps into the air and hurls his spear forward in a surge of lightning, following up with an additional aerial strike. This is a red-glint attack, so parry the spear throw to deal Qi damage. The impact hits hard if mistimed, and the delayed follow-up while he remains airborne can easily throw off your timing, so try not get caught offguard! |
| Heavenrend Finale | The Iron-Blooded Prince teleports away wreathed in lightning before firing a lightning-charged arrow into the sky, shattering it in a dramatic display. This sequence only triggers when he has a sliver of health remaining and is purely cinematic. Do not panic or waste resources. The fight concludes shortly after this moment. |
Guo Xin Rewards
Quest Completion Rewards
|
・Echo Jade x50 ・Call of Camps - Tome x1 ・Veteran's Gleaming Cuirass x1 ・Copper Coin Greaves x1 ・Medicinal Tales x1 ・Oscillating Jade x5 ・Hexi Exploration x100 ・Character EXP x37,500 ・Coin x37,500 |
Guo Xin Campaign Drops
| Level 1 |
・Starweave Set or Jadeclasp Set x2 ・Gear Echo - Glint x2 ・Whitecrown City Appearance Chest x1 ・Crimson Leaves Chest x1 (Chance) ・Bamboocut - Dust Tips x2 ・Inner Way Note - Custom Chest x1 ・Attunment Stone - Glint x1 (Chance) ・Oscillating Jade x3 ・Coin x3,200 ・Character EXP x7,560 |
|---|---|
| Level 2 |
・Starweave Set or Jadeclasp Set x2 ・Gear Echo - Glint x2 ・Whitecrown City Appearance Chest x1 ・Crimson Leaves Chest x1 (Chance) ・Bamboocut - Dust Tips x2 ・Inner Way Note - Custom Chest x1 ・Attunment Stone - Glint x1 (Chance) ・Oscillating Jade x3 ・Coin x3,200 ・Character EXP x7,560 |
| Level 3 |
・Starweave Set or Jadeclasp Set x2 ・Gear Echo - Glint x2 ・Whitecrown City Appearance Chest x1 ・Crimson Leaves Chest x1 (Chance) ・Bamboocut - Dust Tips x2 ・Inner Way Note - Custom Chest x1 ・Attunment Stone - Glint x1 (Chance) ・Oscillating Jade x3 ・Coin x3,200 ・Character EXP x7,560 |
| Level 4 |
・Starweave Set or Jadeclasp Set x2 ・Gear Echo - Glint x2 ・Whitecrown City Appearance Chest x1 ・Crimson Leaves Chest x1 (Chance) ・Bamboocut - Dust Tips x2 ・Inner Way Note - Custom Chest x1 ・Attunment Stone - Glint x1 (Chance) ・Oscillating Jade x3 ・Coin x3,200 ・Character EXP x7,560 |
| Level 5 |
・Starweave Set or Jadeclasp Set x2 ・Gear Echo - Glint x2 ・Whitecrown City Appearance Chest x1 ・Crimson Leaves Chest x1 (Chance) ・Bamboocut - Dust Tips x2 ・Inner Way Note - Custom Chest x1 ・Attunment Stone - Glint x1 (Chance) ・Oscillating Jade x3 ・Coin x3,200 ・Character EXP x7,560 |
| Level 6 |
・Starweave Set or Jadeclasp Set x2 ・Gear Echo - Glint x2 ・Whitecrown City Appearance Chest x1 ・Crimson Leaves Chest x1 (Chance) ・Bamboocut - Dust Tips x2 ・Inner Way Note - Custom Chest x1 ・Attunment Stone - Glint x1 (Chance) ・Oscillating Jade x3 ・Coin x3,200 ・Character EXP x7,560 |
| Level 7 |
・Starweave Set or Jadeclasp Set x2 ・Gear Echo - Glint x2 ・Whitecrown City Appearance Chest x1 ・Crimson Leaves Chest x1 (Chance) ・Bamboocut - Dust Tips x2 ・Inner Way Note - Custom Chest x1 ・Attunment Stone - Glint x1 (Chance) ・Oscillating Jade x3 ・Coin x3,200 ・Character EXP x7,560 |
| Level 8 |
・Starweave Set or Jadeclasp Set x2 ・Gear Echo - Glint x2 ・Whitecrown City Appearance Chest x1 ・Crimson Leaves Chest x1 (Chance) ・Bamboocut - Dust Tips x2 ・Inner Way Note - Custom Chest x1 ・Attunment Stone - Glint x1 (Chance) ・Oscillating Jade x3 ・Coin x3,200 ・Character EXP x7,560 |
| Level 9 |
・Starweave Set or Jadeclasp Set x2 ・Gear Echo - Glint x2 ・Whitecrown City Appearance Chest x1 ・Crimson Leaves Chest x1 (Chance) ・Bamboocut - Dust Tips x2 ・Inner Way Note - Custom Chest x1 ・Attunment Stone - Glint x1 (Chance) ・Oscillating Jade x3 ・Coin x3,200 ・Character EXP x7,560 |
| Level 10 |
・Starweave Set or Jadeclasp Set x2 ・Gear Echo - Glint x2 ・Whitecrown City Appearance Chest x1 ・Crimson Leaves Chest x1 (Chance) ・Bamboocut - Dust Tips x2 ・Inner Way Note - Custom Chest x1 ・Attunment Stone - Glint x1 (Chance) ・Oscillating Jade x3 ・Coin x3,200 ・Character EXP x7,560 |
| Level 11 |
・Starweave Set or Jadeclasp Set x2 ・Gear Echo - Glint x2 ・Whitecrown City Appearance Chest x1 ・Crimson Leaves Chest x1 (Chance) ・Bamboocut - Dust Tips x2 ・Inner Way Note - Custom Chest x1 ・Attunment Stone - Glint x1 (Chance) ・Oscillating Jade x3 ・Coin x3,200 ・Character EXP x7,560 |
Upgrading your World Level as you level up and progress will also provide higher quality rewards whenever you take on Campaign Bosses. Make sure to manage your Energy consumption to claim all the rewards you can get from Guo Xin.
Where Winds Meet Related Guides

| All Boss Guides | |
|---|---|
| World Bosses | - |
Campaign Bosses
 Heartseeker Heartseeker
|
 Qianye Qianye
|
 Ye Wanshan Ye Wanshan
|
 The Void King The Void King
|
 Lucky Seventeen Lucky Seventeen
|
 Tian Ying Tian Ying
|
 Dao Lord Dao Lord
|
 Zheng the Frostwing Zheng the Frostwing
|
 Murong Yuan Murong Yuan
|
 God of Avarice God of Avarice
|
 River Master River Master
|
World Bosses
 Puppeteer - Sheng Wu Puppeteer - Sheng Wu
|
 Sleeping Daoist Sleeping Daoist
|
Puppeteer - Curtaincall
|
 Earth Fiend Deity Earth Fiend Deity
|
 Snake Doctor Snake Doctor
|
 Yi Dao Yi Dao
|
 Wolf Maiden Wolf Maiden
|
 Twin Lions Twin Lions
|
 Ghost Master Ghost Master
|
 Nameless General Nameless General
|
 Feng Ruzhi Feng Ruzhi
|
 Drunk Martial Artist Drunk Martial Artist
|
 Coffin Master Coffin Master
|
Quest-related Bosses
 Dalang Dalang
|
 He Yuezhi He Yuezhi
|
 Shen Yiren Shen Yiren
|
Comment
Author

Guo Xin Location and How to Beat
Please participate in our site
improvement survey
03/2026
improvement survey
03/2026
Would you assist in
improving Game8's site?
improving Game8's site?

×
We are listening to our users' valuable opinions and discussing how to act on them.
The information collected through this survey will be used for the purpose of improving our services. In addition, the information will only be disclosed a part of a statistic in a format that will not allow identification of personal information.
Begin Survey
Not Now
×
Please rate each item regarding Game8.co's Advertisements.
Amount of Ads
Very Dissatisfied
Somewhat Dissatisfied
Fine
Somewhat Satisfied
Highly Satisfied
Placement of Ads
Timing of Ad Display
Ad Loading Speed
Safeness of Ads
Content of Ads
×
Please rate each item regarding Game8.co's Quality of Articles.
Amount of information
Very Dissatisfied
Somewhat Dissatisfied
Fine
Somewhat Satisfied
Highly Satisfied
Frequency of updates
Speed of new information
Accuracy of articles
Understandibility of articles
Readability of sentences
×
Please rate each item regarding Game8.co's Usability of the Site.
Ease of finding information
Very Dissatisfied
Somewhat Dissatisfied
Fine
Somewhat Satisfied
Highly Satisfied
Loading Speed
Use of Color
Font Size
Visibility of Images
Easy to Understand Layout
×
Please rate each item regarding Game8.co's Message Boards, Comments.
Ease of Writing
Very Dissatisfied
Somewhat Dissatisfied
Fine
Somewhat Satisfied
Highly Satisfied
Readability
Ease in Finding Information
Comment Quality
Comment Quantity
Admin Response
×
Please rate each item regarding Game8.co's Site's new design.
Please rate our site's new design
Very Dissatisfied
Somewhat Dissatisfied
Fine
Somewhat Satisfied
Highly Satisfied
Do you think that the website's design change makes the site easier to use?
Has the new design made it easier for you to find information on the site?
Has the new design improved the overall visual appeal of the site?
How would you rate your overall satisfaction with the new design of the site?
×
How likely are you to recommend Game8 to someone you know?
Very Unlikely
0
1
2
3
4
5
6
7
8
9
10
Very Likely
If you have other opinions regarding potential improvement to the website, please share them with us. We would appreciate your honest opinion.
Note: This is a free response section, so you can proceed without entering anything.
Note: Please be sure not to enter any kind of personal information into your response.
Note: Please be sure not to enter any kind of personal information into your response.
×
Thank You
×
Thank you for participating in our survey! Your answers will help us to improve the quality of our website and services.
We hope you continue to make use of Game8.
We hope you continue to make use of Game8.
Close
Rankings
- We could not find the message board you were looking for.
Gaming News

![Slay the Spire 2 Review [Early Access] | Still the Deckbuilder to Beat](https://img.game8.co/4433115/44e19e1fb0b4755466b9e516ec7ffb1e.png/show)

![Slay the Spire 2 Review [Early Access] | Still the Deckbuilder to Beat](https://img.game8.co/4433115/44e19e1fb0b4755466b9e516ec7ffb1e.png/thumb)

Popular Games

Genshin Impact Walkthrough & Guides Wiki
Resident Evil Requiem (RE9) Walkthrough & Guides Wiki
Honkai: Star Rail Walkthrough & Guides Wiki
Monster Hunter Wilds Walkthrough & Guides Wiki
Umamusume: Pretty Derby Walkthrough & Guides Wiki
Pokemon TCG Pocket (PTCGP) Strategies & Guides Wiki
Arknights: Endfield Walkthrough & Guides Wiki
Wuthering Waves Walkthrough & Guides Wiki
Zenless Zone Zero Walkthrough & Guides Wiki
Digimon Story: Time Stranger Walkthrough & Guides Wiki


Recommended Games
Fire Emblem Heroes (FEH) Walkthrough & Guides Wiki
Yu-Gi-Oh! Master Duel Walkthrough & Guides Wiki
Super Smash Bros. Ultimate Walkthrough & Guides Wiki
Diablo 4: Vessel of Hatred Walkthrough & Guides Wiki
Pokemon Brilliant Diamond and Shining Pearl (BDSP) Walkthrough & Guides Wiki
Elden Ring Shadow of the Erdtree Walkthrough & Guides Wiki
Monster Hunter World Walkthrough & Guides Wiki
The Legend of Zelda: Tears of the Kingdom Walkthrough & Guides Wiki
Persona 3 Reload Walkthrough & Guides Wiki
Cyberpunk 2077: Ultimate Edition Walkthrough & Guides Wiki


All rights reserved
©1997-2025 NetEase, Inc. All Rights Reserved
The copyrights of videos of games used in our content and other intellectual property rights belong to the provider of the game.
The contents we provide on this site were created personally by members of the Game8 editorial department.
We refuse the right to reuse or repost content taken without our permission such as data or images to other sites.