Triple Arrow Strike Dungeon Guide and Chest Locations
NEW: Hexi Map | Chapter 3 | Flute Mystic Skill
★ Unfettered and Everspring Build
☆ Liangzhou | Cat Fever | Prismatic Essence
✪ Updated: Best Weapon | Best Builds
☆ WWM Game8 Twitter: New tips daily!
Recruit using our Guild Recruitment Board!

Triple Arrow Strike is one of the Divinecraft Dungeons in Where Winds Meet. See a guide on its challenges and chest locations!
List of Contents
Triple Arrow Strike Walkthrough
1st Area Solution
| # | 1st Area Solution |
|---|---|
| 1 | 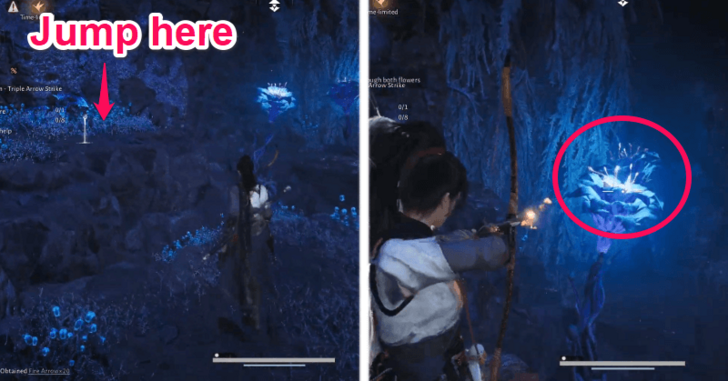 Head to the first left path in the area and jump on the rocks on the other side. From there, position your character where both blue flowers are lined up then shoot a fire arrow to burn both of them, opening a new path further into the dungeon. |
| 2 | 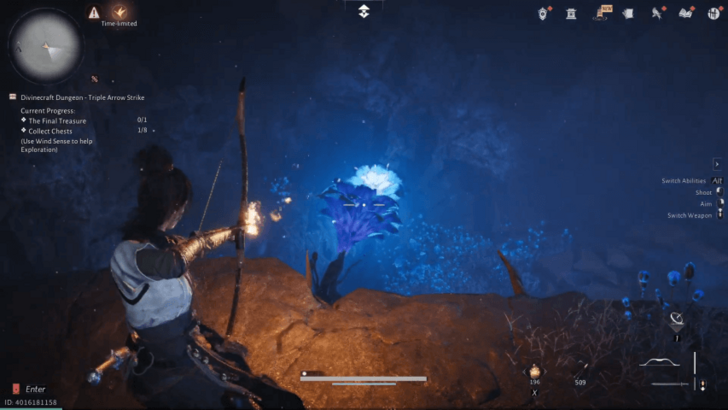 Next, take that new path until you encounter another set of blue flowers. Stay on the ledge and position your character again to hit both blue flowers with one arrow. This will open another path that now leads to the second area. |
2nd Area Solution
| # | 2nd Area Solution |
|---|---|
| 1 | 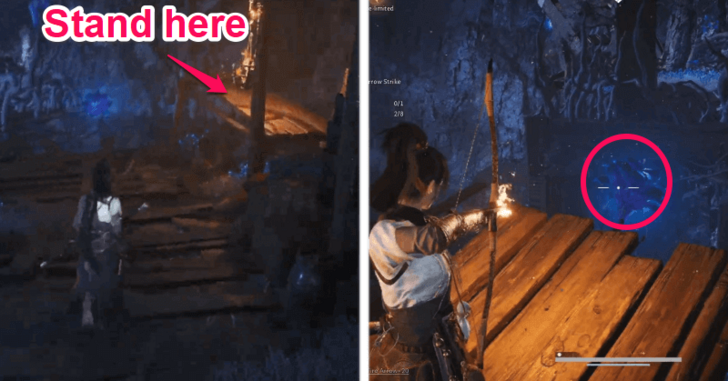 Once you enter the second area, drop down then take the right path until you see a wooden scaffolding. Jump on top of the scaffolding and position your character to hit both blue flowers with one arrow. Afterwards, continue forward and move across to the other side. |
| 2 | 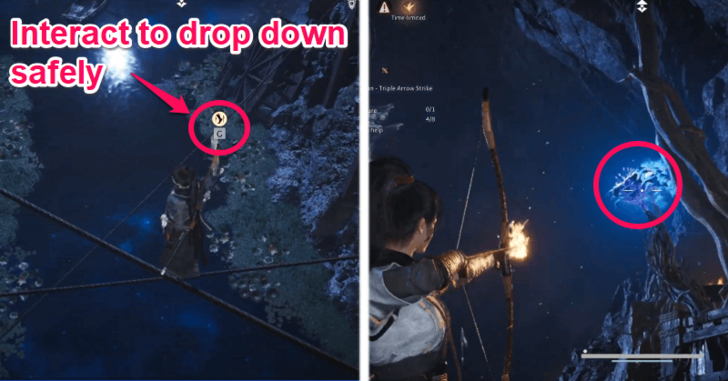 Next, walk on the ropes until you get to the middle then drop down to the lowest rope. You can easily do this by pressing the indicated button/key when a point of interaction popus up on the rope. From there, position your character again to hit both blue flowers with one arrow. This will open a new area onto the third area. If your character falls into the water below the ropes, it will result in an instant death, so be extremely cautious when moving. |
3rd Area Solution
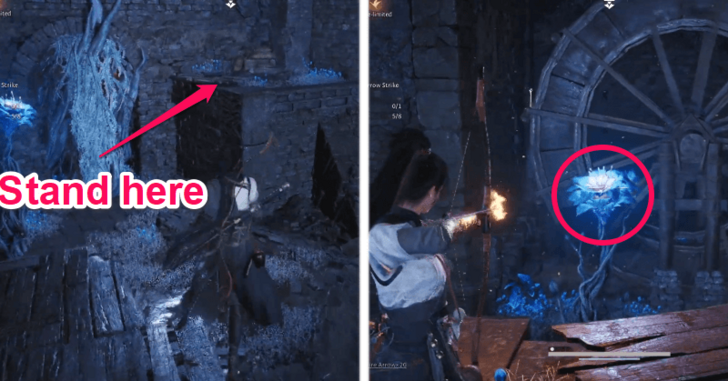
Once you drop down to the third area, go on top of the elevated ground that's facing the spinning wheel. From there, position your character again to hit both blue flowers with one arrow.
This one is a bit tricky since one flower is in front of the wheel while the other one is behind it, so you need to shoot an arrow through one of the holes of the wheel to hit the second flower.
After clearing the blue flowers, enter through the newly opened path — which also leads to the final area.
Final Area Solution
| # | Final Area Solution |
|---|---|
| 1 | 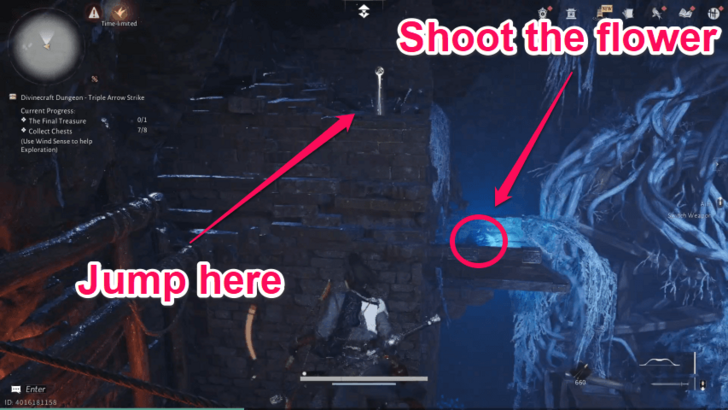 Upon entering the final area, head left, use the lift to go up, then follow the path. Next, walk the rope to move across to the other side of the area then jump onto the stone platform on the right side. From there, shoot the blue flower below. This will allow the wheel to spin. |
| 2 | 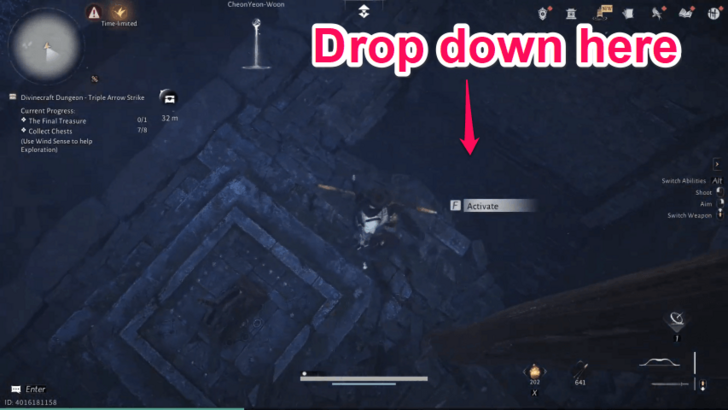 Afterwards, go to the lift and drop down to the area below it. If the lift is there, just pull the lever to make it go up and allow you to drop down to the area below. |
| 3 | 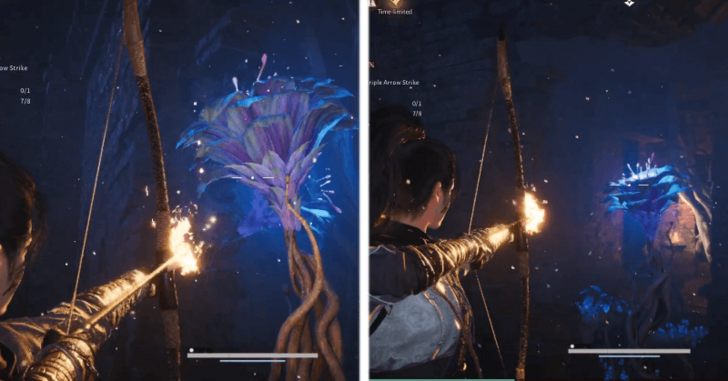 Once below, position your character to hit the first pair of blue flowers with one arrow. This will make another pair of flowers to appear. Do the same thing to the second pair of flowers to clear it. |
| 4 |  Next, take the newly opened path and use the lift at the end of it. From there, you now have to shoot three blue flowers with one arrow, with two flowers being behind a spinning wheel. Get as far away from the spinning wheel and aim at a slight upward angle to line up all the flowers. |
| 5 | 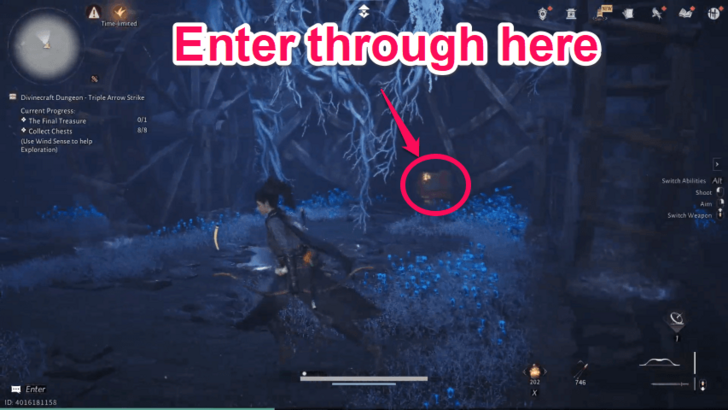 After clearing the final set of blue flowers, move forward to the adjacent room — which is actually the first room of the final area — then enter through the small opening at the foot of the large wheel covered with vines. Just follow the path, and you will reach the final chest of the dungeon. |
Triple Arrow Strike Chest Locations
| Chest 1 | 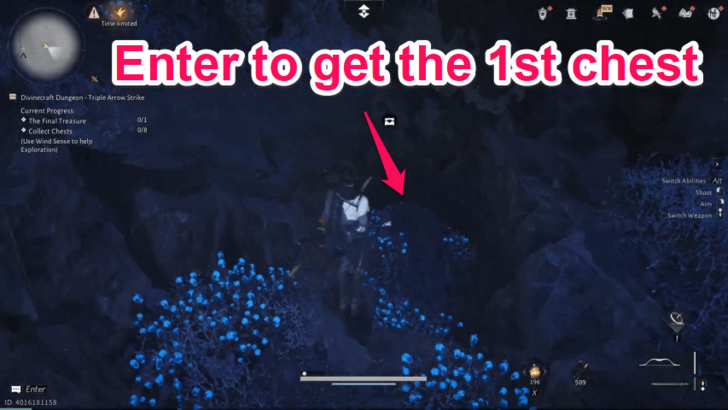 Once you enter the first area, head to the first left path. At the end of the path you'll see a small cave. Just crouch your way through it and grab the first chest inside. |
|---|---|
| Chest 2 |  Once you enter the second area, just drop down, and you will see the second chest. |
| Chest 3 | 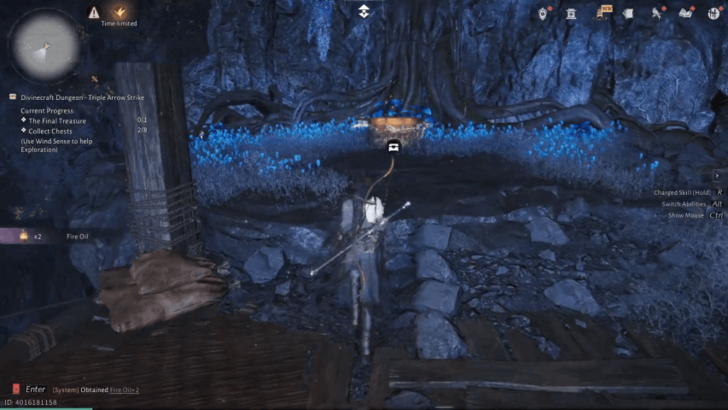 After clearing the first pair of blue flowers in the second area, just move across to the other side, and you'll see the third chest. |
| Chest 4 | 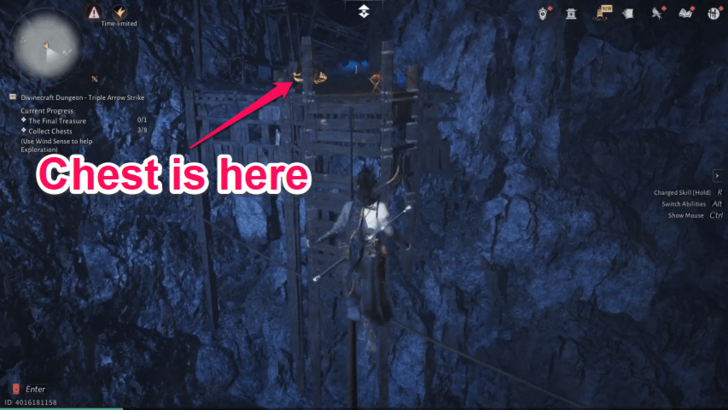 Walk on the rope to get to the far end of the second area. There you can open the fourth chest. |
| Chest 5 | 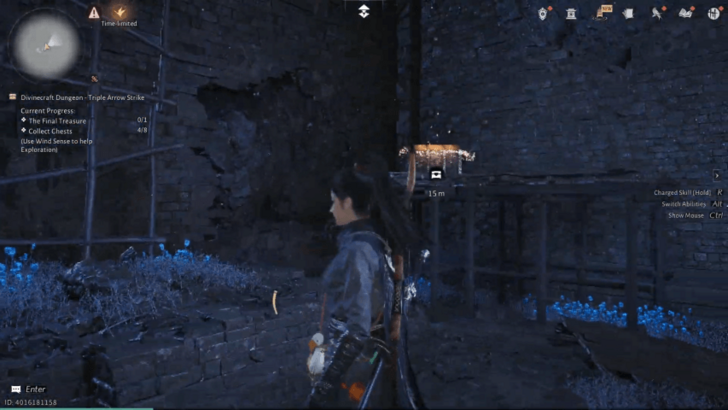 After dropping down to the third area, look to the left, and you'll see the fifth chest on top of a wooden platform. |
| Chest 6 |  After clearing the first pair of blue flowers in the third area, enter through the newly opened path. The sixth chest is just at the end of that path. |
| Chest 7 | 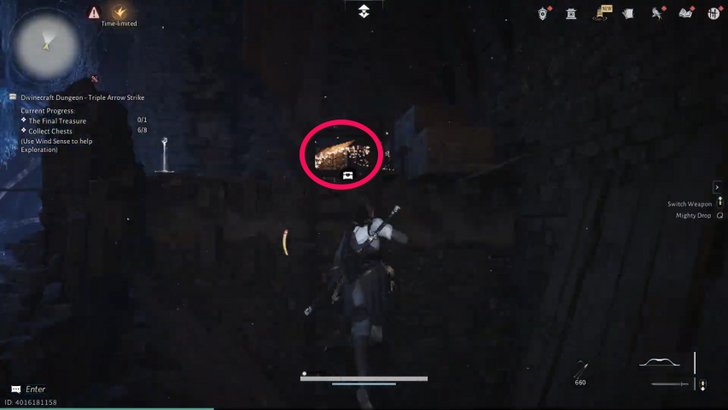 Upon entering the final area, head left and use the elevator to go up. Then just follow that path until you encounter a raised platform. Jump on top of the platform to get the seventh chest. |
| Chest 8 | 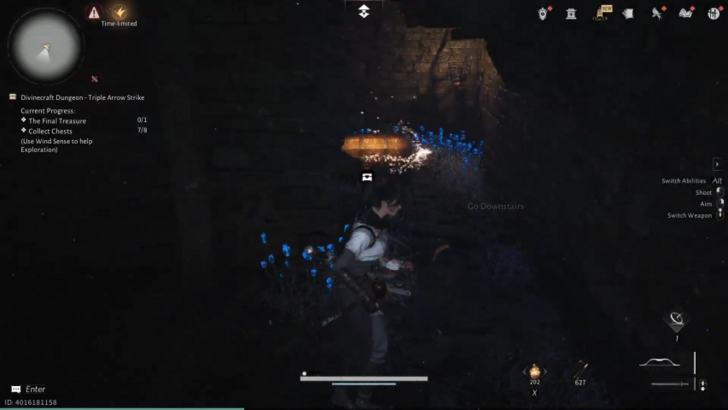 After clearing the last pair of blue flowers in the area below the lift in the final area, take the lift to go up then head left to get the eighth chest. |
| Chest 9 | 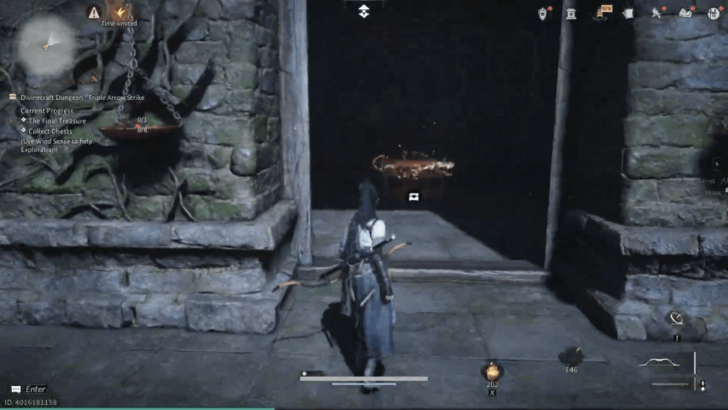 The final chest can be found at the end of the dungeon. |
Triple Arrow Strike Rewards
First Clear Rewards
| ・Warding Chest x1 ・Medicinal Tales x2 ・Echo Jade x25 ・Kaifeng Exploration x25 ・EXP x9000 ・Coin x9000 |
These are the one-time rewards for completing the challenges of Triple Arrow Strike.
Triple Arrow Strike Location
Southwest of Sorrowfield Village and North of Plainfield
The Triple Arrow Strike dungeon is located in the southwest of Sorrowfield Village and north of Plainfield in Kaifeng.
Where Winds Meet Interactive Map
Where Winds Meet Related Guides
All Dungeons
Comment
Author

Triple Arrow Strike Dungeon Guide and Chest Locations
Rankings


Popular Games

Genshin Impact Walkthrough & Guides Wiki
Umamusume: Pretty Derby Walkthrough & Guides Wiki
Pokemon Pokopia Walkthrough & Guides Wiki
Honkai: Star Rail Walkthrough & Guides Wiki
Monster Hunter Stories 3: Twisted Reflection Walkthrough & Guides Wiki
Arknights: Endfield Walkthrough & Guides Wiki
Wuthering Waves Walkthrough & Guides Wiki
Zenless Zone Zero Walkthrough & Guides Wiki
Pokemon TCG Pocket (PTCGP) Strategies & Guides Wiki
Monster Hunter Wilds Walkthrough & Guides Wiki


Recommended Games
Diablo 4: Vessel of Hatred Walkthrough & Guides Wiki
Cyberpunk 2077: Ultimate Edition Walkthrough & Guides Wiki
Fire Emblem Heroes (FEH) Walkthrough & Guides Wiki
Yu-Gi-Oh! Master Duel Walkthrough & Guides Wiki
Super Smash Bros. Ultimate Walkthrough & Guides Wiki
Pokemon Brilliant Diamond and Shining Pearl (BDSP) Walkthrough & Guides Wiki
Elden Ring Shadow of the Erdtree Walkthrough & Guides Wiki
Monster Hunter World Walkthrough & Guides Wiki
The Legend of Zelda: Tears of the Kingdom Walkthrough & Guides Wiki
Persona 3 Reload Walkthrough & Guides Wiki


All rights reserved
©1997-2025 NetEase, Inc. All Rights Reserved
The copyrights of videos of games used in our content and other intellectual property rights belong to the provider of the game.
The contents we provide on this site were created personally by members of the Game8 editorial department.
We refuse the right to reuse or repost content taken without our permission such as data or images to other sites.