Rayquaza Guide: How to Steal and Buffs
☆ Upcoming: Articuno | Meganium | Typhlosion | Feraligatr
★ Latest News: Zapdos | Moltres | Version 1.22.1.5
☆ Popular Pages: Upcoming Pokemon | Tier List
★ Current Seasons: Ranked S34 | Battle Pass S39
☆ Join Game8's Pokemon Discord Server!

Rayquaza is a Boss Pokemon in Pokemon UNITE. Read on to know what buff Rayquaza gives, its spawn time, spawn locations, the effective strategy to take Rayquaza, as well as the limited-time Shiny Rayquaza!
List of Contents
Shiny Rayquaza Comes to UNITE!
On a post from Pokemon UNITE's official X (formerly known as Twitter) account, Shiny Rayquaza will appear in the game starting from February 22 to March 7, 2024. The Pokemon will spawn as usual during the last two (2) minutes of the game.
| Note: Shiny Rayquaza is the same as the regular Rayquaza and does not give any new effects when defeated. |
Rayquaza Wild Pokemon Information
| Rayquaza | |
|---|---|
 |
Points Generated: 30 / 15 pts Wild Pokemon Type: Boss |
| Effects / Description | Appears during the Final Stretch (2:00). Grants a shield to the allied team that negates damage, protects the Pokemon from getting interrupted when scoring, and reduces the charge time by half. As Rayquaza appears, air currents appears in fixed areas of the map that grants movement speed increase. The number of air currents depends on the number of goal zones destroyed. |
| Spawn Time / Conditions | 2:00 |
| Map Availability |
Theia Sky Ruins
|
Rayquaza Spawn Details
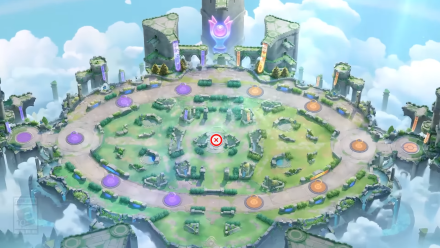
Rayquaza Detailed Spawn Location
| Theia Sky Ruins | |
|---|---|
 See Full Image |
|
| Spawns at the center of the map. | |
Rayquaza Spawn Time
| Spawn Time | 2:00 |
|---|
Rayquaza spawns at the center of the map at the two-minute (2:00) mark of the match.
Rayquaza Respawn Details
| Respawn Time | N/A |
|---|
Rayquaza does not respawn when it is defeated. It will only spawn once.
Rayquaza Buffs and Rewards
| Points | 30 |
|---|---|
| Effect | Grants a shield to the allied team that negates damage and protects the Pokemon from getting interrupted when scoring. Reduces the charge time by half. Stacks with Goal-Getter. As Rayquaza appears, air currents appears in fixed areas of the map that grants movement speed increase. The number of air currents depends on the number of goal zones destroyed. |
Increases Goal Scoring Speed

Taking a Rayquaza increases your team's goal scoring speed while the buff is active. Make sure to take it to your opponent's goals to not waste it!
Provides A Shield

In addition, Rayquaza's buff also provides a shield that not only provides a general shield for the Pokemon but also protects them from being hit while scoring. This partnered with the goal scoring speed buff would make scoring easier!
You know you still have the shield when a green orb still surrounds your Pokemon.
Shields ONLY Deplete with Damage
Once your team receives the bonus shields, they will stay with you for the rest of the match until it is depleted by damage.
Effects are Active as Long as the Shield is Present
Protection from scoring goals and faster score time will only take effect if the shields from Rayquaza are still intact. So, it is best to focus on scoring goals once you secure Rayquaza to get the most value out of the effect.
Knowing that the shield only depletes with damage, players may maintain the shield throughout the remaining minutes to retain the effects.
Rayquaza Spawns Air Currents
| Air Current Spawn Locations | |
|---|---|
 See Full Image |
|
| Spawns in that location when Rayquaza appears at 2:00. | |
| Will only spawn if the Goal Zone is destroyed. | |
As Rayquaza spawns in the map, it will also randomly spawn air currents in fixed locations around the map. The number of air currents depends on the number of destroyed goal zones. The air currents ALWAYS appear in the same location as a destroyed goal zone!
Full Points Only Given to Final Hit
The full 30-points carried by Rayquaza is only given to the player who dealt the final hit. On top of that, allied Pokemon will also be given 15 points.
However, if that player's Aeos Energy is at full capacity when it defeats Rayquaza, the points are dropped instead and can be picked up by other players.
Strategy to Beat Rayquaza
Basic Rayquaza Strategy
| Timestamp | Suggested Strategy |
|---|---|
| 3:00~ | • Reserve Unite Moves in preparation for the Rayquaza fight. • Avoid committing to other objectives unless your team has a significant lead in EXP and points. |
| 2:15~ | • Group with your allies near the center of the map. Position ranged allies at a safe distance. • Take out at least one enemy before grouping if you can, but only if they overextend and have no backup. |
| 2:00~ | When team is winning • Try to avoid Rayquaza's attacks to preserve HP. • Do not use moves towards Rayquaza. Instead, focus on using them to knock down an opponent if they get too close to Rayquaza for a chance to burst them down. • If your team manages to defeat the majority of the enemy team, quickly turn your focus on Rayquaza and capture it. This way, you will cut off any opportunity for the opposing team to bounce back. |
| When team is losing • Wait in the Tall Grass near the Rayquaza's spawn location until allies are gathered. • Use camera controls to observe Rayquaza. When its HP drops in half, rally your team and give everything you got to defeat the opposing Pokemon. • Only fight Rayquaza when at least two or three opponents have yet to respawn. |
Adjust Offense Based on Attack Range

Once the match reaches the two-minute (2:00) mark, the wall above Rayquaza's spawn location will rise. This significantly hinders your targetting as the only point of entry will be in front of the boss Pokemon. It is best to approach the situation depending on your Pokemon's attack type so you can get the best value out of your attacks while also protecting you from unnecessary damage.
Face Directly with Melee Attacks

For melee Pokemon, your only entry point to Rayquaza will be the opening in front of the boss area. If your Pokemon has dash moves, you can jump over the walls to get in range quicker. For most situations, it is best not to get aggressive early on and rely on your ranged allies to provide suppressing fire.
On that note, Rayquaza also deals damage using two close range attacks. If you see a circle on the ground, try dashing out of them before Rayquaza drops the move.
Kite From Behind using Ranged Attacks

Cinderace positions itself behind the wall then attacks Rayquaza from long range.
For ranged Pokemon, it is best to position them behind Rayquaza. This way, they will have full knowledge of Rayquaza's HP throughout the battle while also keeping them from getting flanked. They can then change targets on the fly, depending on the situation. Moreover, they will be able to kite down or even steal Rayquaza when they need to.
The only Rayquaza attack that ranged attackers need to think about is the tornado-like Twister move. You'll know that you're being targeted if a small circle appears on where you are. Thankfully, it is fairly easy to avoid!
Optimize Your Attack Controls
You can set your attack controls to Advanced Attack Controls, which allows you to separate your basic attacks for opponents and Wild Pokemon. This ensures that all your attacks will be focused on either Rayquaza or an opponent when the situation demands it.
Targeting and Aim Assist: How to Aim Well
How to Steal Rayquaza
Rayquaza is situated inside walls that have a small opening at the front. Since contesting Rayquaza is a team effort, expect most of the enemy team to be present during the fight.
Snipe Down From Long Range
| Move | Pokemon | Strategy |
|---|---|---|
|
|
 Decidueye Decidueye
|
Take advantage of Spirit Shackles multiple charges to deplete the objective's health. When its HP is low enough, shoot them down with a fully charged shot for a clean steal. |
|
|
 Cinderace Cinderace
|
Bombard the objective with Standard Attacks. When its HP is low enough, shoot them down with a Pyro Ball. It is best to aim for getting Blaze stacks first before using Pyro Ball. |
|
|
 Duraludon Duraludon
|
Position Duraludon behind Rayquaza and away from the clash. Plop down and keep attacking with Flash Cannon. Since attacks from the move are considered as Standard Attacks, you may be able to deal high amounts of damage with critical hits! |
Easy Secure With Burst Moves
| Move | Pokemon | Strategy |
|---|---|---|
|
|
 Dragonite Dragonite
|
Cycle between Boosted Attacks and Dragon Dance to charge up Hyper Beam to the max before bursting down the objective. |
|
or |
 Talonflame Talonflame
|
Utilize Brave Bird's long range to target the objective from afar and let the enemy do all the work. When the objective's HP is low enough, activate Brave Bird to swoop down and steal the objective. |
|
|
 Venusaur Venusaur
|
Maneuver around the objective and constantly deal Standard Attacks. Once the objectives HP is low enough, burst them down with a Solar Beam. You can also line up the shot to hit the enemy team to get more value. |
|
|
 Mew Mew
|
Like with Venusaur, Mew's Solar Beam functions the same way. We suggest dropping Light Screen first before shooting the beam to amplify the damage. |
Increase the Chance to Secure with AoE Moves
| Move | Pokemon | Strategy |
|---|---|---|
|
|
 Sylveon Sylveon
|
When the objective's HP falls low, activate Hyper Voice behind Rayquaza. The move's range will be enough to reach the target over the wall. The constant ticks of damage may be enough to get the last hit. |
|
|
 Tyranitar Tyranitar
|
Sand Stream's wide area is perfect for both pressuring the enemy team and increasing your chance to steal Rayquaza. Position Tyranitar in the middle of the fight and use moves to keep the triggering Sand Stream. |
|
|
 Delphox Delphox
|
Position Delphox away from the fight and activate Fanciful Fireworks when Rayquaza's HP falls low. Make place the move in the middle of the fight which will pressure melee enemies. |
Disable Opponents with Crowd Control Unite Moves
| Move | Pokemon | Strategy |
|---|---|---|
|
|
 Snorlax Snorlax
|
Soak up all the damage you can to protect your allies. Then, get in the middle of the battle near and position near the Rayquaza opening. Activate Power Nap to stun nearby enemies while also blocking their path for your allies to focus their attacks on Rayquaza. |
|
|
 Mr. Mime Mr. Mime
|
Jump in the middle of the clash and activate Showtime! and stun melee opponents. This will open them up for your allies to knock down and take them out of the fight. |
|
|
 Blastoise Blastoise
|
Position Blastoise in the middle of the fight and activate Hydro Typhoon to effectively reset the battlefield. Additionally, the blast can serve as a burst move for getting the last hit on Rayquaza. |
When to Take Rayquaza
Bounce Back From a Losing Match

If your team is behind in points during the final stretch of the match, securing Rayquaza should be a top priority. Defeating Rayquaza, combined with the double bonus points bonus in the last 2 minutes, is a great way to turn the tides of a match!
Ambush the Opposing Team
When the enemy team is contesting Rayquaza, capitalize on it by ambushing them from behind. Their moves will most likely be on cooldown and their HP is likely to have sustained damage. This will be the perfect time for your team to take them out of the battle and secure Rayquaza!
Additionally, When you see Rayquaza's HP almost depleted, you can swoop down with a move and hopefully get the final hit! Overall, stealing Rayquaza reward and effect is worth falling in battle for, especially if your team is behind.
Rayquaza Moves
Melee Attack
If a Pokemon gets close, Rayquaza may swipe down and deal damage to them. Although this attack may not deal significant damage, taking too many hits can be dangerous if you are not careful.
Twister
Rayquaza picks up to three (3) targets and launches hurricanes on their location. Getting hit by these will deal a significant amount of damage while also knocking up the Pokemon in place.
Draco Meteor
Rayquaza charges and rains down meteors in an area. Pokemon that are hit by the attack are dealt damage and stunned for a short amount of time.
Dragon Ascent
Rayquaza flies up then slams the ground, dealing damage to neraby Pokemon while also knocking them up for a short amount of time.
Pokemon UNITE Related Guides
Theia Sky Ruins Wild Pokemon
| Boss Pokemon | |||||
|---|---|---|---|---|---|
 Groudon Groudon |
 Regieleki Regieleki |
 Regidrago Regidrago |
|||
 Regirock Regirock |
 Regice Regice |
 Registeel Registeel |
|||
| Jungle Buff Pokemon | |||||
 Accelgor Accelgor |
 Escavalier Escavalier |
||||
| Normal Pokemon | |||||
 Swablu Swablu |
 Altaria Altaria |
 Xatu Xatu |
|||
 Bunnelby Bunnelby |
 Indeedee Indeedee |
 Baltoy Baltoy |
|||
| Evolved Pokemon | |||||
 Diggersby Diggersby(from Bunnelby) |
 Claydol Claydol(from Baltoy) |
||||
Mer Stadium Wild Pokemon
| Boss Pokemon | |||||
|---|---|---|---|---|---|
 Zapdos Zapdos |
 Drednaw Drednaw |
 Rotom Rotom |
|||
| Jungle Buff Pokemon | |||||
 Ludicolo Ludicolo |
 Bouffalant Bouffalant |
||||
| Normal Pokemon | |||||
 Audino Audino |
 Combee Combee |
 Vespiquen Vespiquen |
|||
 Lillipup Lillipup |
 Corphish Corphish |
 Aipom Aipom |
|||
| Evolved Pokemon | |||||
 Herdier Herdier(from Lillipup) |
 Crawdaunt Crawdaunt(from Corphish) |
 Ambipom Ambipom(from Aipom) |
|||
Auroma Park Wild Pokemon
| Boss Pokemon | |||||
|---|---|---|---|---|---|
 Regigigas Regigigas |
|||||
| Normal Pokemon | |||||
 Abra Abra |
 Dewpider Dewpider |
 Araquanid Araquanid |
|||
 Ledyba Ledyba |
 Sunkern Sunkern |
 Venomoth Venomoth |
|||
| Evolved Pokemon | |||||
 Ledian Ledian(from Ledyba) |
 Sunflora Sunflora(from Sunkern) |
||||
Shivre City Wild Pokemon
| Boss Pokemon | |||||
|---|---|---|---|---|---|
 Avalugg Avalugg |
|||||
| Normal Pokemon | |||||
 Snom Snom |
 Alolan Meowth Alolan Meowth |
 Electrode Electrode |
|||
| Evolved Pokemon | |||||
 Frosmoth Frosmoth(from Snom) |
 Alolan Persian Alolan Persian(from Alolan Meowth) |
||||
Author
Rayquaza Guide: How to Steal and Buffs
improvement survey
03/2026
improving Game8's site?

Your answers will help us to improve our website.
Note: Please be sure not to enter any kind of personal information into your response.

We hope you continue to make use of Game8.
Rankings
- We could not find the message board you were looking for.
Gaming News
Popular Games

Genshin Impact Walkthrough & Guides Wiki

Honkai: Star Rail Walkthrough & Guides Wiki

Umamusume: Pretty Derby Walkthrough & Guides Wiki

Pokemon Pokopia Walkthrough & Guides Wiki

Resident Evil Requiem (RE9) Walkthrough & Guides Wiki

Monster Hunter Wilds Walkthrough & Guides Wiki

Wuthering Waves Walkthrough & Guides Wiki

Arknights: Endfield Walkthrough & Guides Wiki

Pokemon FireRed and LeafGreen (FRLG) Walkthrough & Guides Wiki

Pokemon TCG Pocket (PTCGP) Strategies & Guides Wiki
Recommended Games

Diablo 4: Vessel of Hatred Walkthrough & Guides Wiki

Fire Emblem Heroes (FEH) Walkthrough & Guides Wiki

Yu-Gi-Oh! Master Duel Walkthrough & Guides Wiki

Super Smash Bros. Ultimate Walkthrough & Guides Wiki

Pokemon Brilliant Diamond and Shining Pearl (BDSP) Walkthrough & Guides Wiki

Elden Ring Shadow of the Erdtree Walkthrough & Guides Wiki

Monster Hunter World Walkthrough & Guides Wiki

The Legend of Zelda: Tears of the Kingdom Walkthrough & Guides Wiki

Persona 3 Reload Walkthrough & Guides Wiki

Cyberpunk 2077: Ultimate Edition Walkthrough & Guides Wiki
All rights reserved
©2021 Pokémon. ©1995–2021 Nintendo / Creatures Inc. / GAME FREAK inc.
©2021 Tencent.
The copyrights of videos of games used in our content and other intellectual property rights belong to the provider of the game.
The contents we provide on this site were created personally by members of the Game8 editorial department.
We refuse the right to reuse or repost content taken without our permission such as data or images to other sites.


![Everwind Review [Early Access] | The Shaky First Step to A Very Long Journey](https://img.game8.co/4440226/ab079b1153298a042633dd1ef51e878e.png/thumb)

![Monster Hunter Stories 3 Review [First Impressions] | Simply Rejuvenating](https://img.game8.co/4438641/2a31b7702bd70e78ec8efd24661dacda.jpeg/thumb)


Movimentos de dano contínuo como o movimento unite de absol e decideye podem ser bons para dar o golpe final em ryquaza. Uma boa ideia é usar um pokemon de longo alcance e desviar dos movimentos de ryquaza assim você evita os danos dele e causa dano nele