Mamoswine Guide: Builds and Best Items
☆ Upcoming: Articuno | Meganium | Typhlosion | Feraligatr
★ Latest News: Zapdos | Moltres | Version 1.22.1.5
☆ Popular Pages: Upcoming Pokemon | Tier List
★ Current Seasons: Ranked S34 | Battle Pass S39
☆ Join Game8's Pokemon Discord Server!

The best guide on how to play Mamoswine in Pokemon UNITE for Nintendo Switch and Mobile. Check here for the best builds, Held and Battle items, movesets, as well as the latest nerfs, buffs, counters, matchups, and more!
| Mamoswine Pokemon Guides | |
|---|---|
 Mamoswine Release Date Mamoswine Release Date |
 Mamoswine Builds Mamoswine Builds |
List of Contents
Mamoswine Latest Buffs and Nerfs (12/4)
| Mamoswine Changes | |
|---|---|
| Stat Buff | • HP increased from 3280–9648 to 3450–9900. • Defense increased from 85–510 → 108–540. • Sp. Def. increased from 65–379 → 96–410. |
|
Icicle Crash |
• Damage decreased by 10%. |
|
Earthquake |
• Stun duration decreased from 1.5s to 1s. |
Mamoswine Stat Changes
| Lvl | HP | Def | Sp. Def. |
|---|---|---|---|
| 5 | 4087 → 4270 (+4.5%) |
139 → 163 (+17.3%) |
105 → 136 (+29.5%) |
| 10 | 6136 → 6344 (+3.4%) |
275 → 302 (+9.8%) |
206 → 237 (+15.0%) |
| 15 | 9648 → 9900 (+2.6%) |
510 → 540 (+5.9%) |
379 → 410 (+8.2%) |
Stat Updates
| 1.3.1.2 | Swinub: Level at Pokemon evolves changed to 5. Pioswine: Level at which move is learned changed to 9 |
|---|---|
| 1.21.1.2 | HP increased from 3280–9648 to 3450–9900. Defense increased from 85–510 → 108–540. Sp. Def. increased from 65–379 → 96–410. |
Thick Fat
| 1.3.1.2 | Bug Fixes |
|---|---|
| 1.11.1.3 | Increased Defense and Sp. Def. amount from + 6 x level to 20 + 10 x level. Increased effect duration from 3s to 5s. (+2s) |
Icicle Crash
| 1.3.1.2 | Level learned changed from lv. 6 to 5. Icicle Crash +: Level learned changed from lv. 12 to lv. 11 |
|---|---|
| 1.5.2.7 | Cooldown reduced from 10s to 8s (-2s) |
| 1.16.2.6 | Damage decreased by 10%. |
| 1.21.1.2 | Damage decreased by 10%. |
Ice Fang
| 1.3.1.2 | Level learned changed from lv. 6 to 5. Ice Fang +: Level learned changed from lv. 12 to lv.11 |
|---|---|
| 1.5.2.7 | Cooldown reduced from 8s to 7s (-1s) |
| 1.8.1.2 | Cooldown reduced from 7s to 6s. (-1s) |
| 1.11.1.3 | Damage increased by 25%. |
High Horsepower
| 1.3.1.2 | Level learned changed from lv. 8 to lv. 7. Earthquake +: Level learned changed from lv. 13 to lv.14 |
|---|---|
| 1.4.1.2 | Move description text changed. |
| 1.14.2.10 | Damage increased by 15%. |
| 1.17.1.2 | Damage decreased by 5%. Earthquake +: Damage decreased by 5%. Movement speed reduction decreased from 40% to 20%. |
| 1.18.2.7 | Cooldown reduced from 7s to 6.5s. |
| 1.19.2.6 | Damage decreased by 10%. |
Earthquake
| 1.3.1.2 | Level learned changed from lv. 8 to lv. 7. Earthquake +: Level learned changed from lv. 13 to lv. 14 |
|---|---|
| 1.11.1.3 | Damage increased by 25%. |
| 1.16.2.6 | Cooldown increased from 7.5s to 9s. |
| 1.21.1.2 | Stun duration decreased from 1.5s to 1s. |
Mammoth Mash
| 1.3.1.2 | Level learned changed from lv. 10 to lv. lv. 9 |
|---|---|
| 1.5.2.7 | Recharge rate increased from 133s to 123s (-10s) |
| 1.11.1.3 | Knock up effect increased from 1s to 1.5s. (+0.5s). Energy required decreased by anout 10%. |
Mamoswine Basic Info
| Mamoswine | ||
|---|---|---|
 |
Role: Defender Attack Type: Melee Damage Type: Physical Difficulty: Intermediate |
|
| "Mamoswine is a high-durability Pokemon with an arsenal of crowd-control moves capable of directing teamfights to its favor." | ||
Mamoswine Best Lanes

|

|

|
Tips & Strategies for Every Lane
Strengths and Weaknesses
| Strengths | Weaknesses |
|---|---|
| ✔︎ Has a lot of strong crowd control moves. ✔︎ Boosted Attacks can freeze targets and triggers every two attacks. ✔︎ Innately high durability. ✔︎ Can increase durability when dealing damage via Thick Fat. ✔︎ Can prolong enemy scoring speed via Thick Fat. |
✖︎ Takes time to get strong. ✖︎ Moves require precision to become effective. |
Best Builds for Mamoswine
| Mamoswine Builds | |
|---|---|
Tank Build
Tank Build

|
Moveset | Held Items | |||
|---|---|---|---|---|---|
| Battle Item | |||||
| Stats from Items (Lv. 40) | Recommended Lane | ||||
|
Defense: +35 Sp. Def: +35 Movement Speed: +175 HP: +805 |
|
||||
| Emblem Color Combination | Target Emblem Stats | ||||
|
|
Positive Stats: • HP Free Negative Stats: • Sp. Atk • Critical-Hit Rate |
||||
| Note: The emblem color and stats here are suggestions only. The builds are still viable even without the suggested emblems. |
|||||
Tank Build Explanation
This build focuses on taking the frontlines to tank damage and disrupt opponents using Icicle Crash and High Horsepower or Earthquake.
- Exp. Share provides Mamoswine with durability and mobility through increased HP and movement speed. It also makes leveling up faster in the early game for Mamoswine and its lane partner.
- Focus Band further improves Mamoswine's durability through increased defenses and acts as a survivability tool in the frontlines.
- Buddy Barrier gives Mamoswine a large HP boost, and it synergizes well with Power Nap, granting the Pokemon a large shield for extra protection.
- Aeos Cookie can be a replacement for Exp. Share, providing Mamoswine with a larger HP in exchange for mobility and support capabilities.
- Tenacity Belt can be a replacement for Focus Band, providing the same defense increase but focusing more on durability due to its effect.
- Vanguard Bell can also be a replacement for Focus Band, allowing Mamoswine to restore HP when it hits opponents with its disabling moves.
- Eject Button allows Mamoswine to quickly reposition and set up its moves.
- X Speed can also work for the build to serve the same purpose.
- The build's Boost Emblem loadout should consist of 6 Brown Emblems for more damage and 6 White Emblems additional HP. This can be achieved by having at least two (2) Emblems that are both Brown and White.
- Equip Emblems that improve HP to further improve Mamoswine's durability.
- Sp. Atk. and Critical-Hit Rate can be freely traded for the other stats.
Tank Build Durability Test
| Items (Level 30) |
HP (@ Lvl 15) |
Sp. Def (@ Lvl 15) Defense (@ Lvl 15) |
|---|---|---|
| Exp. Share + Focus Band + Buddy Barrier |
10338 | 409 540 |
Since the build is centered on tanking damage, equipping items that will maximize Mamoswine's durability is the ideal item combination.
Out of all the item combinations, Exp. Share, Focus Band, and Buddy Barrier will be the best for the build. Although the item combination gives the least HP, it does provide more benefits for Mamoswine in the long run.
As for alternatives, replacing Exp. Share with Aeos Cookie would be the best option. The item combination produced the second highest HP results while maintaining a high Sp. Def and Defense stat score.
The numbers here are taken from the stats data in Practice Mode.
| Note: The numbers in bold are the highest result for a specific test. |
| Items (Level 30) | HP (@ Lvl 15) | Sp. Def (@ Lvl 15) Defense (@ Lvl 15) |
|---|---|---|
| Exp. Share + Focus Band + Buddy Barrier | 10338 | 409 540 |
| Exp. Share + Focus Band + Aeos Cookie (6 stacks) | 11328 | 409 540 |
| Exp. Share + Buddy Barrier + Aeos Cookie (6 stacks) | 11778 | 379 510 |
| Focus Band + Buddy Barrier + Aeos Cookie (6 stacks) | 11538 | 409 540 |
The tests above does not use any Emblems yet so it will scale higher if equipped.
Disabler Build
| Disabler Build | Moveset | Held Items | |||
|---|---|---|---|---|---|
| Battle Item | |||||
| Stats from Items (Lv. 40) | Recommended Lane | ||||
|
Attack: +31.5 Defense: +35 Sp. Def: +35 Attack Speed: +19.20% |
|
||||
| Emblem Color Combination | Target Emblem Stats | ||||
|
|
Positive Stats: • HP • Attack Free Negative Stats: • Sp. Atk • Critical-Hit Rate |
||||
| Note: The emblem color and stats here are suggestions only. The builds are still viable even without the suggested emblems. |
|||||
Disabler Build Explanation
This build utilizes Mamoswine's disabling capabilities via Ice Fang, Earthquake or High Horsepower, and its Boosted Attacks. It's geared towards an offensive gameplay from start to end.
- Muscle Band improves Mamoswine's attacks through increased damage and attack speed.
- Rapid-Fire Scarf provides Mamoswine with a massive attack speed boost, allowing it to build up Boosted Attacks faster and freeze targets more frequently.
- Focus Band boosts Mamoswine's durability to withstand damage in the frontlines. It also acts as as survivability tool.
- Tenacity Belt can be a replacement for Focus Band, providing the same defense increase but focusing more on durability due to its effect.
- Vanguard Bell can also be a replacement for Focus Band, allowing Mamoswine to restore HP when it hits opponents with its disabling moves.
- X Speed gives Mamoswine a mobility tool that can be used offensively and defensively.
- If High Horsepower is learned, Eject Button can be equipped instead to give Mamoswine an additional tool to set up Ice Fang.
- The build's Boost Emblem loadout should consist of 6 Brown Emblems for more damage and 6 White Emblems additional HP. This can be achieved by having at least two (2) Emblems that are both Brown and White.
- Equip Emblems that improve Attack or HP to further improve Mamoswine's damage or durability.
- Sp. Atk. and Critical-Hit Rate can be freely traded for the other stats.
Disabler Build Damage Test
| Items (@Lvl 30) |
Ice Fang (@ Lvl 15) Earthquake (@ Lvl 15) |
Standard Attack (@ Lvl 15) Boosted Attack (@ Lvl 15) |
|---|---|---|
| Muscle Band + Rapid-Fire Scarf |
2224 1377 |
712 980 |
Since the build is centered on disabling opponents with Ice Fang, Earthquake or High Horsepower, and Mamoswine's Boosted Attacks, equipping items that will maximize all of their damage is the ideal item combination. Focus Band is a core item for the build, leaving only two (2) items for consideration.
Out of all the item combinations, Muscle Band and Rapid-Fire Scarf will be the best for the build. The massive attack speed boost from both items allows Mamoswine to quickly build up Boosted Attacks and freeze targets more frequently.
The damage tests are conducted using the Training Dummy in Practice Mode. The results are taken from the Total Damage data.
| Note: The numbers in bold are the highest result for a specific test. |
| Items (@Lvl 30) | Ice Fang (@ Lvl 15) Earthquake (@ Lvl 15) | Standard Attack (@ Lvl 15) Boosted Attack (@ Lvl 15) |
|---|---|---|
| Muscle Band + Razor Claw (Includes effect) | 2232 1382 | 912 1180 |
| Muscle Band + Rapid-Fire Scarf | 2224 1377 | 712 980 |
| Muscle Band + Attack Weight (6 stacks) | 2457 1524 | 790 1040 |
| Muscle Band + Weakness Policy (4 stacks) | 2358 1462 | 757 1015 |
| Razor Claw (Includes effect) + Rapid-Fire Scarf | 2224 1377 | 548 816 |
| Razor Claw (Includes effect) + Attack Weight (6 stacks) | 2457 1524 | 665 915 |
| Razor Claw (Includes effect) + Weakness Policy (4 stacks) | 2358 1462 | 615 873 |
| Rapid-Fire Scarf + Attack Weight (6 stacks) | 2448 1519 | 427 678 |
| Rapid-Fire Scarf + Weakness Policy (4 stacks) | 2349 1456 | 394 652 |
| Attack Weight (6 stacks) + Weakness Policy (4 stacks) | 2610 1621 | 481 719 |
The tests above does not use any Emblems yet so it will scale higher if equipped.
Item Stacker Build
| Item Stacker Build | Moveset | Held Items | |||
|---|---|---|---|---|---|
| Battle Item | |||||
| Stats from Items (Lv. 40) | Recommended Lane | ||||
|
Attack: +21 Defense: +35 Sp. Def: +35 HP: +280 |
|
||||
| Emblem Color Combination | Target Emblem Stats | ||||
|
|
Positive Stats: • HP • Attack Free Negative Stats: • Sp. Atk • Critical-Hit Rate |
||||
| Note: The emblem color and stats here are suggestions only. The builds are still viable even without the suggested emblems. |
|||||
Item Stacker Build Explanation
This is a versatile build centered on increasing Mamoswine's Attack and HP stat via scoring. By default, Icicle Crash and Earthquake will be Mamoswine's primary moveset. However, any combination of moves would work.
- Attack Weight provides Mamoswine a large Attack stat boost, increasing its damage output.
- Aeos Cookie gives Mamoswine a hefty amount of HP, adding more bulk to its innately large HP.
- Focus Band further improves Mamoswine's durability through increased defenses and acts as a survivability tool.
- Buddy Barrier can be a replacement for Focus Band, giving Mamoswine more HP and a teamfight tool.
- Tenacity Belt can also be a replacement for Focus Band, providing the same defense increase but focusing more on durability due to its effect.
- For a more offensive build, Muscle Band can be equipped instead of Focus Band, improving Mamoswine's attacks and giving it a small Attack stat boost.
- Eject Button gives Mamoswine a repositioning tool that can be used to set up its moves or make a quick escape after scoring points.
- X Speed can also work to serve the same purpose.
- The build's Boost Emblem loadout should consist of 6 Brown Emblems for more damage and 6 White Emblems additional HP. This can be achieved by having at least two (2) Emblems that are both Brown and White.
- Equip Emblems that improve Attack or HP to balance out Mamoswine's damage and durability.
- Sp. Atk. and Critical-Hit Rate can be freely traded for the other stats.
Item Stacker Damage and Durability Test
| Items (@Lvl 30) |
HP (@ Lvl 15) |
Sp. Def (@ Lvl 15) Defense (@ Lvl 15) |
|---|---|---|
| Focus Band | 11088 | 409 540 |
Since the build is versatile, equipping items that will maximize Mamoswine's damage or durability or a combination of both is the ideal item combination. Attack Weight and Aeos Cookie are core items for the build, leaving only one (1) item for consideration.
Generally, it's best to go for a defensive item for the build since Mamoswine is a tank. With that, out of all the items tested, Focus Band or Buddy Barrier will be the best for the build.
For a more offensive build, equipping Muscle Band instead would be the best choice.
The damage tests are conducted using the Training Dummy in Practice Mode. The results are taken from the Total Damage data.
As for the durability tests, the numbers here are taken from the stats data in Practice Mode.
| Note: The numbers in bold are the highest result for a specific test. |
| Items (@Lvl 30) | Icicle Crash (@ Lvl 15) Earthquake (@ Lvl 15) | Standard Attack (@ Lvl 15) Boosted Attack (@ Lvl 15) |
|---|---|---|
| Muscle Band | 2178 1524 | 790 1040 |
| Rapid-Fire Scarf | 2167 1519 | 427 678 |
| Razor Claw (Includes effect) | 2178 1524 | 665 915 |
| Weakness Policy (4 stacks) | 2308 1621 | 481 719 |
| Items (@Lvl 30) | HP (@ Lvl 15) | Sp. Def (@ Lvl 15) Defense (@ Lvl 15) |
|---|---|---|
| Focus Band | 11088 | 409 540 |
| Buddy Barrier | 11538 | 379 510 |
| Score Shield | 11538 | 379 510 |
The tests above does not use any Emblems yet so it will scale higher if equipped.
Mamoswine Best Items & Moveset
Best Held Items
| Item | Explanation |
|---|---|
 Attack Weight Attack Weight
|
Attack Weight gives Mamoswine a large Attack stat boost, increasing its damage output. |
 Aeos Cookie Aeos Cookie
|
Aeos Cookie provides Mamoswine with a hefty amount of HP, allowing the Pokemon to tank more damage. |
 Buddy Barrier Buddy Barrier
|
Buddy Barrier provide extra durability and survivability when initiating fights using Mammoth Mash. It also giving teammates extra shielding. |
 Focus Band Focus Band
|
Focus Band improves Mamoswine's durability and survivability, which suits the Pokemon's tank role. |
 Muscle Band Muscle Band
|
For a more damage focused build, Muscle Band works great with Mamoswine's boosted attack, increasing its attack speed which triggers the stun more often. |
 Rapid-Fire Scarf Rapid-Fire Scarf
|
Rapid-Fire Scarf's attack speed buff works incredibly well with Mamoswine's Boosted Attacks, allowing the Pokemon to freeze targets more frequently. |
 Tenacity Belt Tenacity Belt
|
Tenacity Belt provides Mamoswine with a nice amount of Defense and Sp. Def., and its effect works well with the Pokemon's Defender role. |
 Vanguard Bell Vanguard Bell
|
Vanguard Bell provides Mamoswine with a decent amount of HP and the ability to restore its HP when it hits opponents with its hindrances. |
Best Battle Items
| Item | Explanation |
|---|---|
 Eject Button Eject Button
|
Eject Button gives Mamoswine added mobility and an initiation tool to start fights or escape them. |
 X Speed X Speed
|
X Speed gives Mamoswine a versatile mobility tool for pushing the offense or escaping opponents. |
 Potion Potion
|
Potion works well with Mamoswine's large HP, giving the Pokemon a reliable source of healing during fights. |
Best Moveset
| Move | Explanation |
|---|---|
 High Horsepower High Horsepower
|
High Horsepower displaces enemy positions, disrupting their formation. It's effective in isolating targets, defending goal zones, and pinning targets down. |
 Icicle Crash Icicle Crash
|
Icicle Crash is a great crowd control move, dealing decent damage and freezing enemies in an area. |
This moveset is generally better in winning teamfights for Mamoswine due to them being AoE moves. Icicle Crash damages and freezes multiple opponents caught in its area, allowing Mamoswine to set up for its allies. High Horsepower is great for diving in fights and disrupting the opponents' positions. It's also great for isolating specific targets when needed.
Icicle Crash and Ice Fang are Mamoswine's first set of crowd control moves. Both do essentially the same thing, and the the only difference is that Icicle Crash can hit multiple targets while Ice Fang can only hit a single target but deals more damage.
High Horsepower and Earthquake are Mamoswine's second set of crowd control moves. Their use is practically the same as the first moveset, but they are both dash moves, giving Mamoswine some mobility.
Choosing a move combination is entirely up to player prefence since all moves generally have great synergy with each other.
Which Moveset Do You Think is Better for Mamoswine?
Why is it the best? Let us know in the comments!
Previous Poll Result
How to Play Mamoswine
| Jump to Section | |
|---|---|
Disrupt Enemies in the Early Game with Ice Shard
Ice Shard is a great damaging move that disrupts enemy movement, allowing you to stop opponents from stacking items like Attack Weight during the early game. However, you can also use it to make it easier for you to score points and stack items. It also gives you the extra range for sniping down Wild Pokemon from a distance and potentially stealing EXP from opponents.
Start Fights With Your Crowd Control
Mamoswine's access to strong initiating moves like Earthquake or High Horsepower make it the ideal Pokemon for initiating a team fight. All of Mamoswine's moves have some form of Stun or Slow, so once you land your initiating move on opponents you can combo with your attacks and other moves to keep them from running away, giving your team more time to apply damage to your opponents.
Isolate Opponents with Ice Fang
Ice Fang is a great move for isolating targets, enabling you and your team to quickly burst them down. This move can be used for various purposes like getting enemies out of their Goal Zones. It can be used either as a follow-up or as a setup to High Horsepower.
You can use Eject Button to get a better position to cast Ice Fang.
Ice Fang: Mamoswine Move Effect and Cooldown
Target Moves at Icicle Crash
Icicle Crash bombards a target area with ice, leaving one big ice shard at the end that shatters after a short time and freezes opponents near it. Alternatively, you can hit this ice shard with your moves or boosted attacks to shatter it instantly and trigger the freezing effect. To maximize this effect, you'll want to use a move like Earthquake or High Horsepower immediately after Icicle Crash so you can shatter the ice as soon as it drops.
Icicle Crash: Mamoswine Move Effect and Cooldown
Zone Out Enemies from Objectives
Mamoswine excels at keeping enemies in place through crowd-control moves, putting enemies that try to get past you at risk of being repeatedly slowed, stunned, or frozen. With this in mind, you'll want to position yourself between the enemy team and objectives such as Regieleki to make it more difficult for them to contest objectives.
Objectives Guide - Regieleki Vs. Regirock, Regice, Registeel
Take Advantage of Thick Fat's Score-Slowing Effect
| Aeos Energy | Normal | Thick Fat Effect |
|---|---|---|
| 10 | 1.5s | 2s |
| 30 | 3s | 5s |
| 50 | 6s | 8s |
Part of what makes Mamoswine a unique Defender is how it can make scoring goals harder for opponents. Thanks to Thick Fat, using Ice Shard, Icicle Crash, or Ice Fang on an ally Goal Zone creates a freezing area of effect, decreasing the goal-scoring speed of opponents who attempt to score on that Goal Zone. The extra time may be enough to deny aggressive opponents from scoring quick goals. Keep this in mind when you see the enemy pushing a lane!
Thick Fat: Mamoswine Move Effect and Cooldown
Does not Affect Charged Goals
One thing to take note of is that Thick Fat does not activate when an allied Goal Zone is charged from a Regieleki effect. Since the Goal Zone is considered offline during this, using moves on the Goal Zone does not trigger the slow-scoring effect.
Control Movement During Mammoth Mash
Mammoth Mash is a great crowd control and damaging move that can give you a sudden burst of strength to counter or push back opponents. However, since you will need to steer Mamoswine as the move takes effect, it is susceptible to missing targets. Below are some strategies to get the most out of Mamoswine's Unite move!
Get the Most Damage in Choke Points
Activating Mammoth Mash while inside narrow areas increases the chance of hitting targets, ensuring that all your stomps hit and maximizing your damage output.
Trample Opponents when Pushing Lanes
Take advantage of the extra speed you get from the Unite move to lead the charge towards pushing goal zones. Note that each stomp stuns enemies, opening them up for your allies to land the killing blow. Additionally, being unstoppable means that you can avoid being disabled as you push the lanes. Careful not to overextend your reach, however, as you may get caught in the enemy lane flux after the move finishes.
Progression and Leveling Guide
Top and Bottom Guide
Level 1 to 5
- Quickly clear out the Bunnelbies in the lane.
- Keep farming wild Pokemon in the lane to reach level 5 and learn your first move.
- At bottom lane, prioritize taking Indeedees for more exp.
Level 6 to 9
- Keep hunting Wild Pokemon to gain more EXP from farming Altaria and Swablus.
- Once you reach level 7, learn your second move.
- Help allies secure Regice, Registeel, or Regirock when it spawns, otherwise secure Regieleki.
- Upon reaching level 9, learn your Unite Move.
Level 10+
- Stick with allies to hunt targets, secure objectives, and push lanes.
- Reach at least level 13 or max level if possible before or when Groudon spawns for a fully-upgraded moveset.
- Make sure that your Unite Move is available when Groudon spawns.
- Help teammates win a teamfight and secure Groudon.
Mamoswine Combos
Isolating Combos
This set of combos takes advantage of Ice Fang to displace single targets. This makes them easier to pick off with the help of your allies.
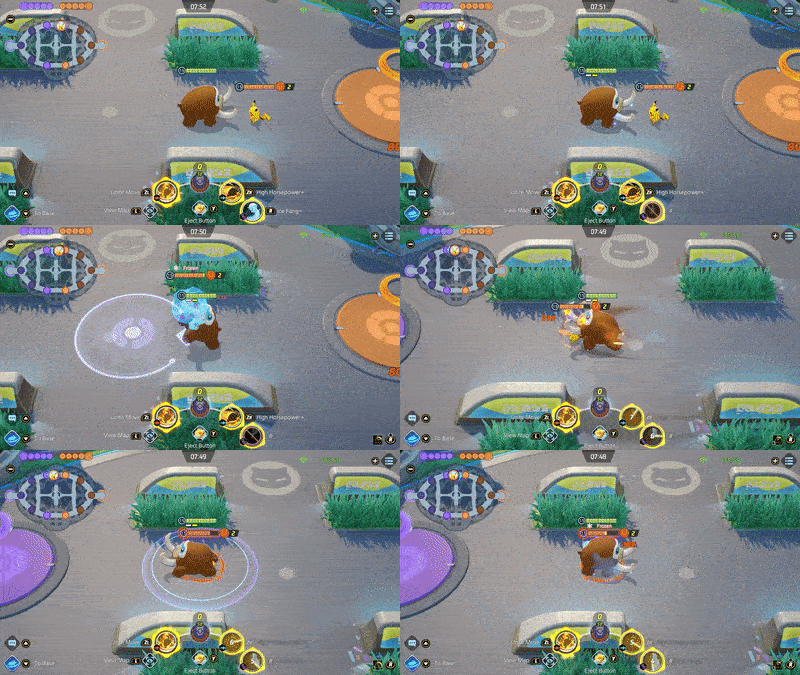
Single-Out Combo (Variation 1)
| Single-Out Combo (Variation 1) | |
|---|---|
 |
|
| When an opponent is within range, use Ice Fang to fling your enemies towards where your team is, and follow it up with High Horsepower to drag the victim towards your team. | |
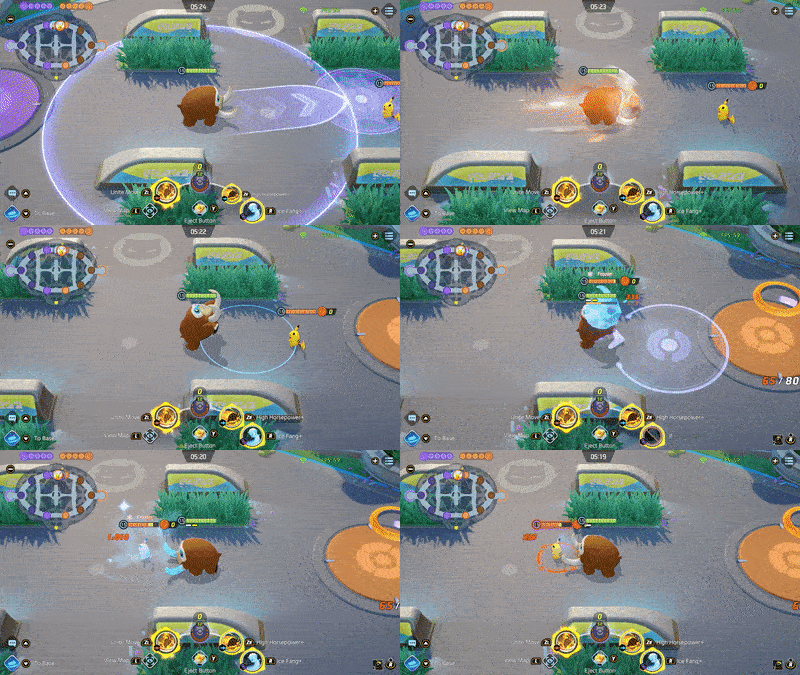
Single-Out Combo (Variation 2)
| Single-Out Combo (Variation 2) | |
|---|---|
 |
|
| While similar to the combo above, switching the order of the combo lets you use High Horsepower to close a good amount of distance to the enemy before flinging them with Ice Fang. If the combo is used in close range, you can drive straight towards the enemy backline and fling the squisher enemies towards the frontlines, making it easier for your teammates to reach them. | |
Crowd Control Combos
This set of combos use Icicle Crash to deal dmage in an area while also freezing opponents who are caught within the icicle's explosion.
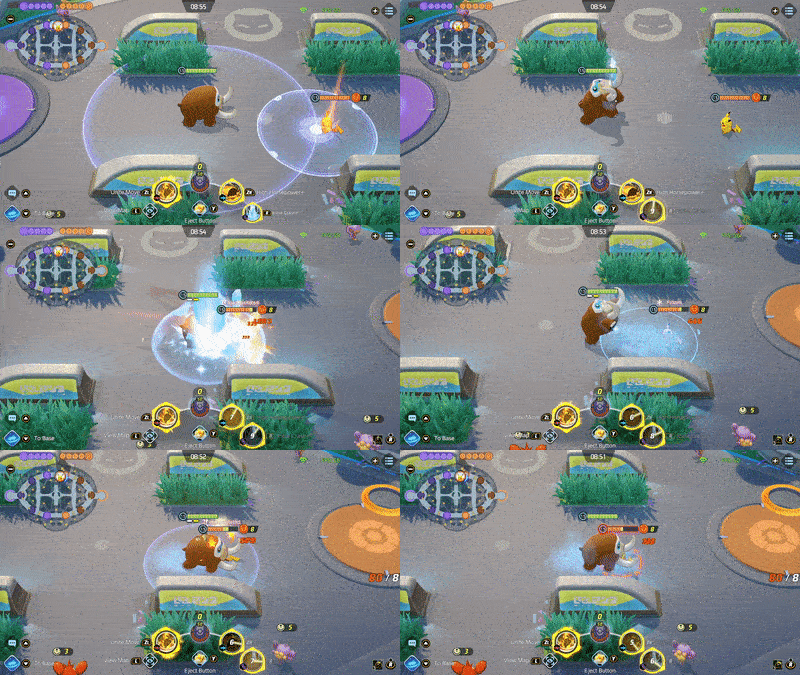
Pillar Crash Combo (Variation 1)
| Pillar Crash Combo (Variation 1) | |
|---|---|
 |
|
| This combo allows you to maximize the damage and crowd control effect of Icicle Crash by shattering the ice shard as soon as it lands. Using Tackle or High Horsepower immediately after Icicle Crash ensures that the ice shard will shatter upon landing, instantly damaging and freezing enemies within the area. | |
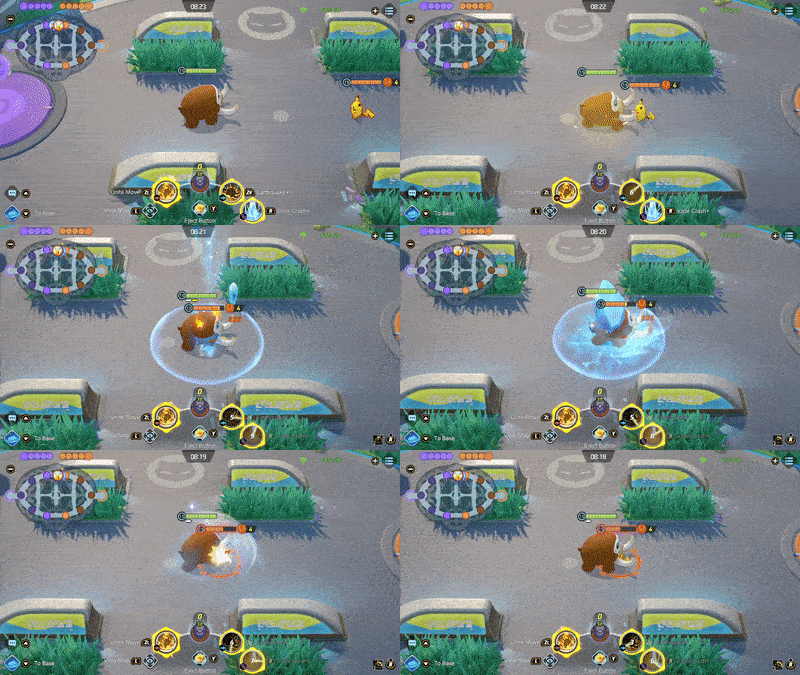
Pillar Crash Combo (Variation 2)
| Pillar Crash Combo (Variation 2) | |
|---|---|
 |
|
| This is another combo with good crowd control and damage output. Earthquake is used to initiate a fight. Once the stun hits a target, follow up with the Icicle Crash to damage and slow nearby opponents, and finish with a boosted attack on the icicle to shatter it and freeze nearby enemies. | |
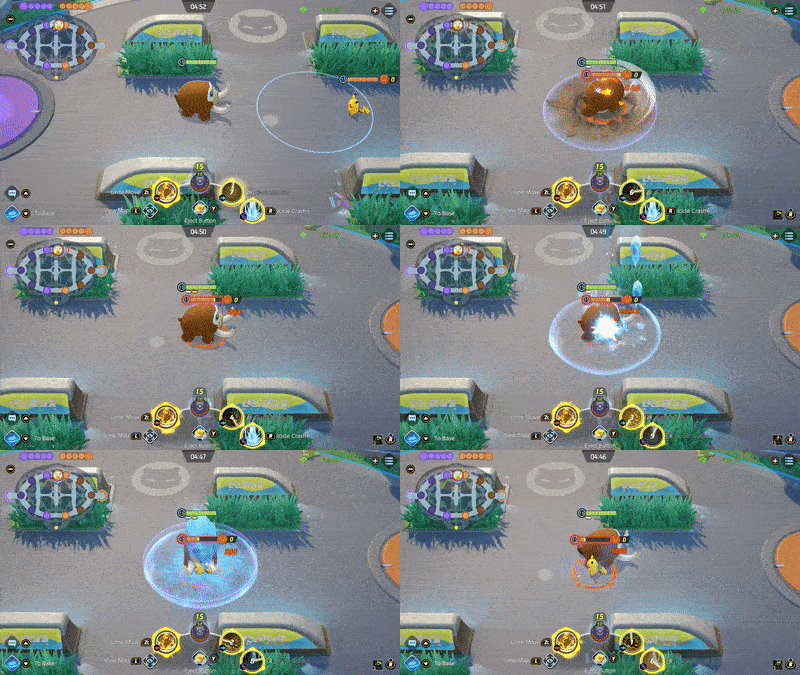
Mammoth Duel Combo
| Mammoth Duel Combo | |
|---|---|
 |
|
Tackle
or
High Horsepower
or
Earthquake
►
Standard Attack
x3►
Ice Shard
or
Icicle Crash
or
Ice Fang
►
Standard Attack
~ |
|
| This combo allows you to maximize your damage in a 1-on-1 duel. First you must close the distance to your opponent with Tackle, Earthquake or High Horsepower. Next, you land 3 standard attacks to trigger the boosted attack and freeze your opponent. Follow it up with an ice type move of your choice, which will then ready your boosted attack instantly thanks to the Thick Fat passive. | |
Matchups & Counters for Mamoswine
Mamoswine Matchups
| Matchup Notes | ||
|---|---|---|
| 1. The chart is based on our own experience playing Mamoswine. 2. Pokemon within each tier are unordered 3. Any Pokemon not shown here are still under investigation. |
||
Hard Counter by Kiting and Disruption
Pokemon that can deal consistent damage and can dodge Mamoswine's moves will be able to pin down Mamoswine. Additionally, Pokemon with just as good - if not better - crowd control moves will be able to disrupt Mamoswine.
Best Counters
| Pokemon | Explanation |
|---|---|
 Cinderace Cinderace
|
Rating: ★★★★★ • Can kite Mamoswine from a long range with rapid attacks. • Can evade Mamoswine's crowd control moves using Feint. • Can disrupt Mamoswine's moves and reposition using Blaze Kick. |
 Mr. Mime Mr. Mime
|
Rating: ★★★★★ • Can counter High Horsepower with Barrier. • Can weaken Mamoswine's damage using Power Swap. • Can disrupt Mamoswine's moves using Showtime!. |
 Leafeon Leafeon
|
Rating: ★★★ • Can quickly deplete Mamoswine's HP using Solar Blade. • Can easily dodge Mamoswine's moves with its fast movement speed and dash moves. |
Even Matchups for Mamoswine
Mamoswine can win against these Pokemon if it can successfully land its moves without interruption.
Use X Speed or Eject Button
| Ranged, Fragile Pokemon with High Damage |
|---|
| How to Beat |
|
• These Pokemon prefer to keep their distance from opponents when fighting. They also have high damage potential that can be dangerous for Mamoswine. However, they can easily get knocked out once they've been disabled. • Use X Speed or Eject Button to get close to them, then use Icicle Crash or Ice Fang and High Horsepower or Earthquake to quickly knocked them out. • As a last resort, use Mammoth Mash to ensure a knockout. |
Disrupt Their Attacks or Combos
| All-Rounders |
|---|
| How to Beat |
|
• These Pokemon excel in close combat and rely mostly on their attacks or combos to deal damage. They are also durable enough to tank Mamoswine's damage. However, they do need to get close to their targets first to deal damage, putting them in range for Mamoswine's moves. • Disrupt their attacks or combos using Icicle Crash or Ice Fang and High Horsepower or Earthquake. • Freeze them constantly with Boosted Attacks. • As a last resort, use Mammoth Mash to cause further disruption. |
Tank Their Damage, Then Retaliate
| High-mobility Pokemon with Burst Damage |
|---|
| How to Beat |
|
• These Pokemon are incredibly agile and deal high burst damage. However, Mamoswine is durable enough to tank their damage and can easily retaliate once they dive in. • Tank or dodge their moves, then quickly retaliate with Icicle Crash or Ice Fang and High Horsepower or Earthquake while they're moves are on cooldown. • Freeze them constantly with Boosted Attacks. • As a last resort, use Mammoth Mash to keep them disabled. |
Utilize Their Numbers
| Supporters |
|---|
| How to Beat |
|
• These Pokemon usually stick with their allies and rarely venture alone. Although they themselves pose no threat to Mamoswine, their support capabilities makes them valuable during fights. • Take advantage of them being in close proximity to each other by using Icicle Crash or Ice Fang, High Horsepower or Earthquake, or Mammoth Mash to force them to scatter. |
Group Up with Allies
| Highly Durable Pokemon |
|---|
| How to Beat |
|
• Much like Mamoswine, these Pokemon are extremely durable, making it difficult for Mamoswine to take them down alone. With that, it's best to group up with allies to bring them down with the help of Mamoswine. • Keep them disabled using Icicle Crash or Ice Fang, High Horsepower or Earthquake, and Boosted Attacks. |
Easy Matchups for Mamoswine
Mamoswine's easy matchups are Pokemon that don't have reliable means of stopping its crowd controls. Mamoswine can also stave off Pokemon that need precise setups thanks to its high durability.
Use X Speed or Eject Button
| Ranged, Fragile Pokemon with High Damage |
|---|
| How to Beat |
|
• These Pokemon prefer to keep their distance from opponents when fighting. They also have high damage potential that can be dangerous for Mamoswine. However, they can easily get knocked out once they've been disabled. • Use X Speed or Eject Button to get close to them, then use Icicle Crash or Ice Fang and High Horsepower or Earthquake to quickly knocked them out. • As a last resort, use Mammoth Mash to ensure a knockout. |
Disrupt Their Attacks or Combos
| All-Rounders |
|---|
| How to Beat |
|
• These Pokemon excel in close combat and rely mostly on their attacks or combos to deal damage. They are also durable enough to tank Mamoswine's damage. However, they do need to get close to their targets first to deal damage, putting them in range for Mamoswine's moves. • Disrupt their attacks or combos using Icicle Crash or Ice Fang and High Horsepower or Earthquake. • Freeze them constantly with Boosted Attacks. • As a last resort, use Mammoth Mash to cause further disruption. |
Tank Their Damage, Then Retaliate
| High-mobility Pokemon with Burst Damage |
|---|
| How to Beat |
|
• These Pokemon are incredibly agile and deal high burst damage. However, Mamoswine is durable enough to tank their damage and can easily retaliate once they dive in. • Tank or dodge their moves, then quickly retaliate with Icicle Crash or Ice Fang and High Horsepower or Earthquake while they're moves are on cooldown. • Freeze them constantly with Boosted Attacks. • As a last resort, use Mammoth Mash to keep them disabled. |
Utilize Their Numbers
| Supporters |
|---|
| How to Beat |
|
• These Pokemon usually stick with their allies and rarely venture alone. Although they themselves pose no threat to Mamoswine, their support capabilities makes them valuable during fights. • Take advantage of them being in close proximity to each other by using Icicle Crash or Ice Fang, High Horsepower or Earthquake, or Mammoth Mash to force them to scatter. |
Group Up with Allies
| Highly Durable Pokemon |
|---|
| How to Beat |
|
• Much like Mamoswine, these Pokemon are extremely durable, making it difficult for Mamoswine to take them down alone. With that, it's best to group up with allies to bring them down with the help of Mamoswine. • Keep them disabled using Icicle Crash or Ice Fang, High Horsepower or Earthquake, and Boosted Attacks. |
Best Teammates for Mamoswine
| Pokemon | Explanation |
|---|---|
 Gardevoir Gardevoir
 Mew Mew
|
High Damaging Snipers |
| These Pokemon have powerful burst attacks and are capable of stunning enemies from a safe distance. Mamoswine can lead the charge for these Pokemon while they deal damage and secure objectives. | |
 Blissey Blissey
 Mr. Mime Mr. Mime
|
Shields and Sustain |
| These Pokemon are capable of providing buffs, shields, and AoE heals during fights. This allows Mamoswine to become sturdier and easily dominate lanes. | |
 Slowbro Slowbro
 Snorlax Snorlax
|
Tanky Disablers |
| As fellow Defenders that have disabling abilities, these Pokemon can lead the charge, soak up damage, and help Mamoswine setup its attacks with their disabling moves. | |
 Absol Absol
 Zoroark Zoroark
|
High Burst Damagers |
| These Pokemon help contribute damage through pinning down enemies with combos and burst attacks. While it's still recommended to go with either a Defender or Supporter ally, Speedsters are a huge help when trying to dominate lanes as early as possible. | |
 Machamp Machamp
 Tsareena Tsareena
|
Hard-hitting Initiators |
| These Pokemon are very dependable allies as they have means to buff or sustain themselves. Whether it's securing objectives or pushing lanes, Machamp and Tsareena are built to initiate clashes, stun enemies, and create openings for their teammates. |
Looking for teammates to synergize with you? Head over to our Friend Request Board to find other trainers to join you in your grind or just to hang out with!
Mamoswine Moves
Move Slot 1 (R)
 Ice Shard Ice Shard
(Lv. 1 or 3) |
Move Type: Area Damage Type: Physical Cooldown: 7s Starting Damage: 735 Damage per shard: 245, Number of shards: 3 Final Damage: 786 Damage per shard: 262, Number of shards: 3 |
|---|---|
| Hurls three chunks of ice at the designated location, dealing damage to opposing Pokemon in the area of effect and decreasing their movement speed for a short time. If an opposing Pokemon is hit by all three chunks, it is left frozen for a short time. | |
 Ice Fang Ice Fang
(Lv. 5) Upgrade Lv. 11 |
Move Type: Hindrance Damage Type: Physical Cooldown: 6s Starting Damage: 1417 Grab damage: 354, Slam damage: 1063 Final Damage: 2142 Grab damage: 535, Slam damage: 1607 |
|
Uses cold-infused fangs to throw opposing Pokemon closest to the user, dealing damage and leaving the Pokemon frozen for a short time. The user can designate a direction to slam the thrown Pokemon forward or backward, dealing damage to opposing Pokemon in the area of effect and leaving them frozen for a short time.
Upgrade: Increases the area of effect in which opposing Pokemon are left frozen after the slam attack. |
|
 Icicle Crash Icicle Crash
(Lv. 5) Upgrade Lv. 11 |
Move Type: Hindrance Damage Type: Physical Cooldown: 8s Starting Damage: 1166 Small icicle damage: 170, Number of small icicles: 3, Big icicle damage: 282, Explosion damage: 374 Final Damage: 1645 Small icicle damage: 242, Number of small icicles: 3, Big icicle damage: 396, Explosion damage: 523 |
|
Drops icicles on the designated location, dealing damage to opposing Pokemon in the area of effect and decreasing their movement speed for a short time. The final icicle shatters after a set amount of time or when hit by the user's other moves or boosted attacks, dealing damage to opposing Pokemon in the area of effect and leaving them frozen. If the icicle is shattered by Tackle or High Horsepower, the ground is covered in ice, which increases the movement speed of ally Pokemon that run over it.
Upgrade: The final icicle leaves the opposing Pokemon it hits unable to act for a short time. |
|
Move Slot 2 (ZR)
 Tackle Tackle
(Lv. 1 or 3) |
Move Type: Dash Damage Type: Physical Cooldown: 8s Starting Damage: 401 Final Damage: 461 |
|---|---|
| Has the user rush recklessly in the designated direction, dealing damage to opposing Pokemon it hits and throwing them. | |
 Earthquake Earthquake
(Lv. 7) Upgrade Lv. 13 |
Move Type: Dash Damage Type: Physical Cooldown: 9s Starting Damage: 987 Final Damage: 1326 |
|
Has the user leap up in the designated direction and then land forcefully, dealing damage to opposing Pokemon in the area of effect and pulling them toward the user.
Upgrade: Decreases the movement speed of opposing Pokemon for a short amount of time when this move hits and increases the move's pulling power. |
|
 High Horsepower High Horsepower
(Lv. 7) Upgrade Lv. 13 |
Move Type: Dash Damage Type: Physical Cooldown: 8s Starting Damage: 972 Knockback damage: 316, Stomp damage: 633 Final Damage: 1272 Knockback damage: 424, Stomp damage: 848 |
|
Has the user rush recklessly in the designated direction, dealing damage to opposing Pokemon it hits and shoving them. The user then stomps its feet, dealing damage to opposing Pokemon in the area of effect and leaving them unable to act for a short time. This stomping deals increased damage to frozen opposing Pokemon.
Upgrade: Increases the reckless rush's speed and length of time opposing Pokemon are left unable to act. |
|
Unite Moves (ZL)
 Mammoth Mash Mammoth Mash
(Lv. 9) |
Move Type: Area Damage Type: Physical Cooldown: 112s Starting Damage: 3098 First stomp damage: 845, Second stomp damage: 563, Third stomp damage: 563, Final stomp damage: 1127 Final Damage: 3824 First stomp damage: 1043, Second stomp damage: 695, Third stomp damage: 695, Final stomp damage: 1391 |
|---|---|
| Has the user jump to the designated location and become immune to hindrances. The user then repeatedly stomps the ground, dealing damage to opposing Pokemon in the area of effect and decreasing their movement speed for a short time with each stomp. The final stomp throws opposing Pokemon in the area of effect. | |
Standard Attack
|
|
Becomes a boosted attack with every third attack, dealing damage to opposing Pokemon and leaving them frozen for a short time when it hits. In addition, the user's basic attacks deal increased damage for a short time to opposing Pokemon it has frozen with one of its moves. |
|---|
Ability (Passive)
 Thick Fat Thick Fat
|
All Evolution Stages
Every time the Pokemon deals damage, its Defense and Sp. Def are increased for a short time (up to three times). When the Pokemon uses Ice Shard, Icicle Crash, or Ice Fang, its next basic attack becomes a Boosted Attack. In addition, if any of these moves creates a freezing area of effect inside an ally Goal zone, it decreases the goal-scoring speed of opposing Pokemon inside that goal zone. |
|---|
Mamoswine Stats & Evolutions
Mamoswine Evolutions
| 1st Evolution | 2nd Evolution | Final Evolution |
|---|---|---|
 Swinub Swinub(Lv. 1) |
 Piloswine Piloswine(Lv. 5) |
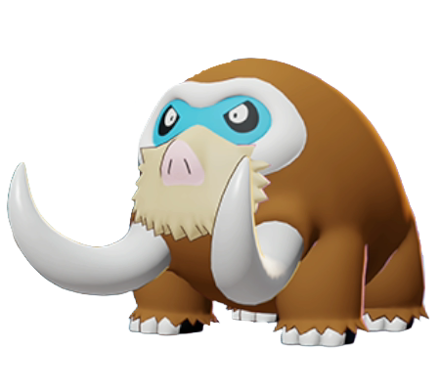 Mamoswine Mamoswine(Lv. 9) |
Mamoswine Stats
| Level | HP | Defense | Special Defense | Attack Damage |
|---|---|---|---|---|
| 1 | 3450 | 108 | 96 | 170 |
| 2 | 3543 | 114 | 101 | 172 |
| 3 | 3654 | 122 | 106 | 175 |
| 4 | 3787 | 131 | 112 | 178 |
| 5 | 4270 | 163 | 136 | 190 |
| 6 | 4462 | 176 | 145 | 195 |
| 7 | 4692 | 191 | 156 | 201 |
| 8 | 4969 | 210 | 170 | 208 |
| 9 | 5946 | 275 | 217 | 231 |
| 10 | 6344 | 302 | 237 | 240 |
| 11 | 6821 | 334 | 260 | 251 |
| 12 | 7395 | 372 | 288 | 265 |
| 13 | 8083 | 418 | 322 | 281 |
| 14 | 8909 | 474 | 362 | 301 |
| 15 | 9900 | 540 | 410 | 325 |
Attack Damage is the damage of the Basic Attack as tested against the Training Dummy.
Mamoswine In-Game Stat Listings
| Offense | Endurance | Mobility | Scoring | Support |
|---|---|---|---|---|

|

|

|

|

|
Mamoswine Skins (Holowear)
| Holowear | |
|---|---|
 Holiday Style Holiday Style
Zirco Trading:
|
 Hip-hop Style Hip-hop Style
Zirco Trading:
|
 Knight Style Knight Style
Event:
Season 3 Rank Reward |
 Practice Style Practice Style
Event:
Peak Condition Exchange |
 Tuxedo Style Tuxedo Style
Zirco Trading:
|
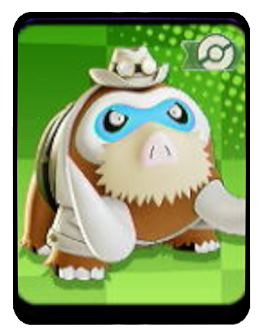 Explorer Style Explorer Style
Event:
UNITE Club Membership |
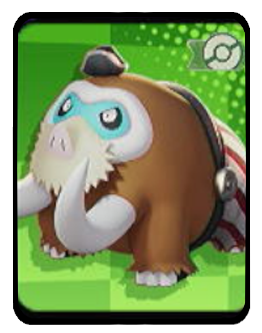 Marine Style Marine Style
Event:
Season 33 Battle Pass |
|
Mamoswine Character Spotlight
Mamoswine Achievements
Icicle Crash Achievement
| Icicle Crash | |
|---|---|
| Pokemon | Move |
 Mamoswine Mamoswine
|
|
| Mission: In a single battle, freeze Pokemon from the opposing team 2 or more times by shattering the icicle dropped by Icicle Crash or Icicle Crash+ (5/10/20 battles total) |
|
| Medals & Points | Rewards |
|
|
|
|
|
|
|
|
|
List of Defender Pokemon Achievements
Pokemon UNITE Related Guides

All Pokemon Guides and Builds
Upcoming Pokemon
 Articuno Articuno(TBA) |
 Meganium Meganium(TBA) |
 Typhlosion Typhlosion(TBA) |
 Feraligatr Feraligatr(TBA) |
Mega Evolutions
| Mega Evolved Pokemon | ||
|---|---|---|
 Mega Charizard X Mega Charizard X |
 Mega Charizard Y Mega Charizard Y |
 Mega Gyarados Mega Gyarados |
 Mega Lucario Mega Lucario |
 Mega Mewtwo X Mega Mewtwo X |
 Mega Mewtwo Y Mega Mewtwo Y |
Pokemon by Role
| All Pokemon Roles | |||||
|---|---|---|---|---|---|
 Attackers Attackers |
 All-Rounders All-Rounders |
 Defenders Defenders |
|||
 Speedsters Speedsters |
 Supporters Supporters |
||||
Pokemon by Characteristics
| Attack Type | |
|---|---|
 Melee Pokemon Melee Pokemon |
 Ranged Pokemon Ranged Pokemon |
 Physical Pokemon Physical Pokemon |
 Special Pokemon Special Pokemon |
| Stat Rankings | |
 HP Ranking HP Ranking |
 Defense Ranking Defense Ranking |
 Sp. Def. Ranking Sp. Def. Ranking |
 Basic Attack Ranking Basic Attack Ranking |
Comment
These builds are so old and not relevant anymore. Ain't no way 90% of these builds on here will get you anywhere in 2026. 😑👌
Author
Mamoswine Guide: Builds and Best Items
Rankings
Gaming News
Popular Games

Genshin Impact Walkthrough & Guides Wiki

Umamusume: Pretty Derby Walkthrough & Guides Wiki

Pokemon Pokopia Walkthrough & Guides Wiki

Honkai: Star Rail Walkthrough & Guides Wiki

Monster Hunter Stories 3: Twisted Reflection Walkthrough & Guides Wiki

Arknights: Endfield Walkthrough & Guides Wiki

Wuthering Waves Walkthrough & Guides Wiki

Zenless Zone Zero Walkthrough & Guides Wiki

Pokemon TCG Pocket (PTCGP) Strategies & Guides Wiki

Monster Hunter Wilds Walkthrough & Guides Wiki
Recommended Games

Diablo 4: Vessel of Hatred Walkthrough & Guides Wiki

Cyberpunk 2077: Ultimate Edition Walkthrough & Guides Wiki

Fire Emblem Heroes (FEH) Walkthrough & Guides Wiki

Yu-Gi-Oh! Master Duel Walkthrough & Guides Wiki

Super Smash Bros. Ultimate Walkthrough & Guides Wiki

Pokemon Brilliant Diamond and Shining Pearl (BDSP) Walkthrough & Guides Wiki

Elden Ring Shadow of the Erdtree Walkthrough & Guides Wiki

Monster Hunter World Walkthrough & Guides Wiki

The Legend of Zelda: Tears of the Kingdom Walkthrough & Guides Wiki

Persona 3 Reload Walkthrough & Guides Wiki
All rights reserved
©2021 Pokémon. ©1995–2021 Nintendo / Creatures Inc. / GAME FREAK inc.
©2021 Tencent.
The copyrights of videos of games used in our content and other intellectual property rights belong to the provider of the game.
The contents we provide on this site were created personally by members of the Game8 editorial department.
We refuse the right to reuse or repost content taken without our permission such as data or images to other sites.
 Exp. Share
 Aegislash
 Alcremie
 Alolan Ninetales
 Alolan Raichu
 Armarouge
 Azumarill
 Blastoise
 Blaziken
 Buzzwole
 Ceruledge
 Chandelure
 Charizard
 Clefable
 Comfey
 Cramorant
 Crustle
 Darkrai
 Decidueye
 Delphox
 Dhelmise
 Dodrio
 Dragapult
 Dragonite
 Duraludon
 Eldegoss
 Empoleon
 Espeon
 Falinks
 Galarian Rapidash
 Garchomp
 Gengar
 Glaceon
 Goodra
 Greedent
 Greninja
 Gyarados
 Ho-oh
Ho-oh Hoopa
Hoopa Inteleon
 Lapras
 Latias
 Latios
 Lucario
 Meowscarada
 Meowth
 Metagross
 Mimikyu
 Miraidon
 Moltres
 Pawmot
 Pikachu
 Psyduck
 Sableye
 Scizor
 Sirfetch'd
 Suicune
 Sylveon
 Talonflame
 Tinkaton
 Trevenant
 Tyranitar
 Umbreon
 Urshifu
 Vaporeon
 Venusaur
 Wigglytuff
 Zacian
 Zapdos
 Zeraora


![The Seven Deadly Sins: Origin [First Impressions] | A Promising Start](https://img.game8.co/4440581/584e0bfb87908f12c4eab6e846eb1afd.png/thumb)
![The Liar Princess and the Blind Prince Review [PC] | Lovely to Look at but Tedious to Play](https://img.game8.co/4442586/8d95f5faf05780f1765ce7e0938bd825.jpeg/thumb)
![Marathon Cryo Archive Map Teased as [REDACTED] on Selection Screen](https://img.game8.co/4442236/6357203e58172f6de57f1991e7c39b22.png/thumb)


Really need to update these builds. Especially every single one that has xp share in them.