Rotom Buff and Spawn Time
☆ Upcoming: Articuno | Meganium | Typhlosion | Feraligatr
★ Latest News: Zapdos | Moltres | Version 1.22.1.5
☆ Popular Pages: Upcoming Pokemon | Tier List
★ Current Seasons: Ranked S34 | Battle Pass S39
☆ Join Game8's Pokemon Discord Server!

This is a guide on the Wild Pokemon Rotom in Pokemon UNITE. Read on to learn Rotom's spawn time, how and when to beat it, what moves it has, what buff and rewards it gives, and more!
List of Contents
Rotom Spawn Time
| Time Remaining | Location |
|---|---|
| 7:00 | 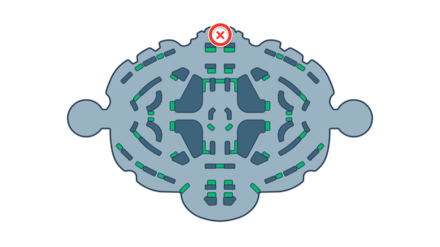 Enlarge Enlarge |
Rotom will spawn at the 7-minute mark of the match. It will appear at the center part of the Top Lane.
Rotom Respawn Time
| Respawn Time |
|---|
| 120 seconds (in-game time) |
Rotom will respawn in exactly 120 seconds (2 minutes) after it is defeated. It will eventually stop respawning when the battle time reaches the last 2:00 minutes of the match.
Rotom Buff and Rewards

| Aeos Energy | 20 |
|---|---|
| Bonus Effect | Fights for your team until it reaches an enemy goal, then charges it for 25 seconds. |
When Rotom charges a goal, the time it will take for you to score will be instantaneous. It's important to accumulate a lot of Aeos Energy, then score big once Rotom reaches a Goal Zone!
Disables Goal Regen and Shield Effect

If Rotom manages to reach a goal zone, it disables the Goal Zone's healing and shield effects, preventing the defending team from recovering HP gaining shields when inside it. As shown above, Machamp does not get healed nor shielded even when standing inside the Goal Zone
Damaging Rotom Decreases Its Points

The number of points Rotom will score decreases as it takes damage from the defending team. As shown above, Rotom's initial 20 points decrease to 16 points when its HP is about 50%.
If the defending team can't defeat Rotom before it reaches the goal, the best option is to deal as much damage as possible to at least lowering the number of points Rotom will score.
Rotom Can Be Pushed to the Next Goal Zone

Rotom can be pushed or knocked back through the use of certain attacks or moves. As shown above, if pushed past the initial goal, Rotom will auto path towards the next one. This stops the enemy from being able to score since the first goal is still up. Utilize Pokemon with shoving or knockback type of moves such as Garchomp or Alolan Ninetales to push Rotom past the goal.
This can be exploited as a defensive tactic. If Rotom is approaching your goal, push it further past it and it'll auto path to the next goal. Once Rotom is in between the 2 goals it'll get slowed down by the lane flux area just like enemy Pokemon. This gives the defending team more time to kill it.
If Rotom does manage to make it to the second goal, it will still score its points. However, the enemy team can't take advantage of the goal that's unlocked because points cannot be scored on a goal before the previous one on the same lane has been destroyed.
Rotom Gains Max HP Over Time
Rotom doesn't regenerate the percent health lost but does gain max HP over time. The longer players wait to defeat it the more health it will have.
How to Beat Rotom

| Basic Rotom Strategy | |
|---|---|
| 10:00~7:30 | • Farm and level up as much as you can to control the Top Lane. • Always keep the first allied Goal Zone in-check and do not let its health get low. |
| 7:30~ | • Even though Drednaw spawns at the Bottom Lane, it is generally better to prioritize capturing it over Rotom. |
| 7:00~6:00 | • The player who stayed at the Top Lane will defend the first Goal Zone at all cost, and will wait until their allies have finished capturing Drednaw. • If the enemy team is contesting Rotom, hide inside the tall grass near spawn area and get the last hit on Rotom. Alternatively, the player can take advantage of their opponents having low HP forn the Rotom fight to finish them off. |
| Captured | By Ally Team • Push forward and attack the nearest enemy Goal Zone. • Alternatively, if the enemy team is committing to stop Rotom, your team can transition to the Bottom lane to score easy goals while the enemy is distracted. |
| By Enemy Team • Fight Rotom while standing inside a Goal Zone to recover HP. • If the first Goal Zone at the top gets destroyed, quickly go to the middle Goal Zone and prevent the enemy team from scoring further. |
|
| Respawns after 2 minutes. | • Defeat Rotom to get ahead in points. However, Drednaw is still the boss Pokemon worth prioritizing first if it is present. |
Go to Rotom after Drednaw Fight
When Rotom and Drednaw spawn at the 7-minute mark, it is best to capture Drednaw first for the EXP and shield bonus before pursuing Rotom. Have one ally keep Rotom in-check while another transition to the Bottom Lane.
After fighting Drednaw, it is finally time to capture Rotom. The ideal flow is to destroy the enemy Goal Zone at the Bottom Lane first if your team captures Drednaw. Otherwise, it is best to head to the Top Lane and get Rotom quickly.
One Ally will Defend the Bottom Lane
When your team is transitioning for Rotom objective, have at least one ally take charge to defend the Bottom Lane. This ensures that the first Goal Zone is secured and protected from unnecessary goals. Note that If the Bottom Lane Goal Zone gets destroyed, your team will be at a disadvantage during the second Drednaw fight.
Bottom Lane Guide: How to Play Bot
Be Wary of Nearby Opponents when Fighting Rotom

Being located along the lane means that Rotom can easily be contested by both teams. Since Rotom has lower HP and damage output compared to Drednaw, it is relatively easy to defeat it by spamming powerful moves.
An All-Rounder will be enough to hold it at bay while it dishes out hard-hitting moves. You must keep Rotom focused on the melee Pokemon while an Attacker helps by dealing ranged damage. Additionally, a Speedster can provide additional quick attacks while surveying the area for any potential ganks. Once captured, a Defender Pokemon can help by safely escorting Rotom to the enemy Goal Zone to get the charge bonus.
Steal Rotom

One good strategy is to ambush opponents when they are trying to take Rotom and deliver the final hit to steal the points and effect! Take advantage of the tall grass near the Rotom area and wait for an opening. You can even set your focus on the opponent if their HP gets too low from Rotom's attacks
Push Rotom Towards Your Team's Side

A great way to make sure that your team gets the final hit on Rotom is to use moves that can push it towards your team's side of the lane. This will make it easier for your teammates to focus their attacks on Rotom while discouraging opponents from over-extending their position.
Stay Behind Rotom when Advancing
When escorting Rotom to an enemy Goal Zone, it is best not to go in front of it. Instead, let it absorb most of the damage when opponents are intercepting its path towards a Goal Zone.
When to Beat Rotom
After Securing Drednaw Objective
Even though Rotom and Drednaw have similar spawn and respawn times, it is generally better to prioritize capturing the latter first because of its superior effects. Rotom may give your team a point advantage, but Drednaw's EXP boost is better for the long run.
Capture Before the Final Stretch (2:00)
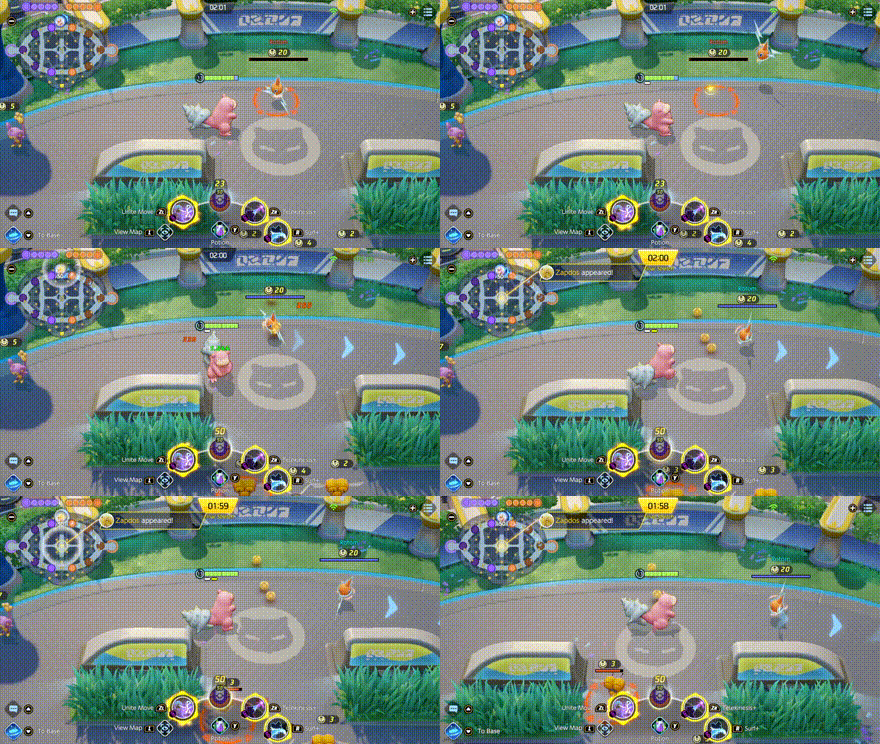
Rotom does not disappear if it is captured before Zapdos spawns. It will still fight for your team and charge a Goal Zone.
This will force the enemy team to defend the Top Lane during the final stretch, allowing you to focus on scoring goals or taking Zapdos while the enemy is distracted! If the enemy team does not defend the Top Lane, it will be an easy 40 points, plus a chance to score instantly because of the Rotom effect.
When it is Captured by the Enemy
If your team fails to capture Rotom in the first fight, it is advised to quickly defend the lane before Rotom reaches a Goal Zone. When it comes across your allies, Rotom will stop to attack them. Make sure to focus on clearing out the enemy Pokemon first as they deal much more damage, then focus on Rotom.
Rotom Moves
Normal Attack
Rotom has fast, melee attacks that can hit multiple Pokemon in quick succession. It is best not to surround it with melee Pokemon.
Ranged Attack
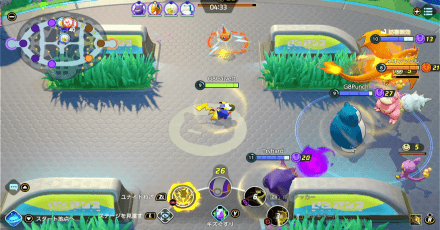
When you are away from melee range, Rotom can shoot balls of electricity at you for as long as you are within its sight. Though it may not have high damage, the attacks could get your HP low enough and leave you vulnerable.
Pokemon UNITE Related Guides
Theia Sky Ruins Wild Pokemon
| Boss Pokemon | |||||
|---|---|---|---|---|---|
 Groudon Groudon |
 Regieleki Regieleki |
 Regidrago Regidrago |
|||
 Regirock Regirock |
 Regice Regice |
 Registeel Registeel |
|||
| Jungle Buff Pokemon | |||||
 Accelgor Accelgor |
 Escavalier Escavalier |
||||
| Normal Pokemon | |||||
 Swablu Swablu |
 Altaria Altaria |
 Xatu Xatu |
|||
 Bunnelby Bunnelby |
 Indeedee Indeedee |
 Baltoy Baltoy |
|||
| Evolved Pokemon | |||||
 Diggersby Diggersby(from Bunnelby) |
 Claydol Claydol(from Baltoy) |
||||
Mer Stadium Wild Pokemon
| Boss Pokemon | |||||
|---|---|---|---|---|---|
 Zapdos Zapdos |
 Drednaw Drednaw |
 Rotom Rotom |
|||
| Jungle Buff Pokemon | |||||
 Ludicolo Ludicolo |
 Bouffalant Bouffalant |
||||
| Normal Pokemon | |||||
 Audino Audino |
 Combee Combee |
 Vespiquen Vespiquen |
|||
 Lillipup Lillipup |
 Corphish Corphish |
 Aipom Aipom |
|||
| Evolved Pokemon | |||||
 Herdier Herdier(from Lillipup) |
 Crawdaunt Crawdaunt(from Corphish) |
 Ambipom Ambipom(from Aipom) |
|||
Auroma Park Wild Pokemon
| Boss Pokemon | |||||
|---|---|---|---|---|---|
 Regigigas Regigigas |
|||||
| Normal Pokemon | |||||
 Abra Abra |
 Dewpider Dewpider |
 Araquanid Araquanid |
|||
 Ledyba Ledyba |
 Sunkern Sunkern |
 Venomoth Venomoth |
|||
| Evolved Pokemon | |||||
 Ledian Ledian(from Ledyba) |
 Sunflora Sunflora(from Sunkern) |
||||
Shivre City Wild Pokemon
| Boss Pokemon | |||||
|---|---|---|---|---|---|
 Avalugg Avalugg |
|||||
| Normal Pokemon | |||||
 Snom Snom |
 Alolan Meowth Alolan Meowth |
 Electrode Electrode |
|||
| Evolved Pokemon | |||||
 Frosmoth Frosmoth(from Snom) |
 Alolan Persian Alolan Persian(from Alolan Meowth) |
||||
Author
Rotom Buff and Spawn Time
Rankings
Gaming News
Popular Games

Genshin Impact Walkthrough & Guides Wiki

Umamusume: Pretty Derby Walkthrough & Guides Wiki

Pokemon Pokopia Walkthrough & Guides Wiki

Honkai: Star Rail Walkthrough & Guides Wiki

Monster Hunter Stories 3: Twisted Reflection Walkthrough & Guides Wiki

Arknights: Endfield Walkthrough & Guides Wiki

Wuthering Waves Walkthrough & Guides Wiki

Zenless Zone Zero Walkthrough & Guides Wiki

Pokemon TCG Pocket (PTCGP) Strategies & Guides Wiki

Monster Hunter Wilds Walkthrough & Guides Wiki
Recommended Games

Diablo 4: Vessel of Hatred Walkthrough & Guides Wiki

Cyberpunk 2077: Ultimate Edition Walkthrough & Guides Wiki

Fire Emblem Heroes (FEH) Walkthrough & Guides Wiki

Yu-Gi-Oh! Master Duel Walkthrough & Guides Wiki

Super Smash Bros. Ultimate Walkthrough & Guides Wiki

Pokemon Brilliant Diamond and Shining Pearl (BDSP) Walkthrough & Guides Wiki

Elden Ring Shadow of the Erdtree Walkthrough & Guides Wiki

Monster Hunter World Walkthrough & Guides Wiki

The Legend of Zelda: Tears of the Kingdom Walkthrough & Guides Wiki

Persona 3 Reload Walkthrough & Guides Wiki
All rights reserved
©2021 Pokémon. ©1995–2021 Nintendo / Creatures Inc. / GAME FREAK inc.
©2021 Tencent.
The copyrights of videos of games used in our content and other intellectual property rights belong to the provider of the game.
The contents we provide on this site were created personally by members of the Game8 editorial department.
We refuse the right to reuse or repost content taken without our permission such as data or images to other sites.


![The Liar Princess and the Blind Prince Review [PC] | Lovely to Look at but Tedious to Play](https://img.game8.co/4442586/8d95f5faf05780f1765ce7e0938bd825.jpeg/show)
![The Liar Princess and the Blind Prince Review [PC] | Lovely to Look at but Tedious to Play](https://img.game8.co/4442586/8d95f5faf05780f1765ce7e0938bd825.jpeg/thumb)
![Marathon Cryo Archive Map Teased as [REDACTED] on Selection Screen](https://img.game8.co/4442236/6357203e58172f6de57f1991e7c39b22.png/thumb)


