Regieleki Guide: How to Steal and Buffs
☆ Upcoming: Articuno | Meganium | Typhlosion | Feraligatr
★ Latest News: Zapdos | Moltres | Version 1.22.1.5
☆ Popular Pages: Upcoming Pokemon | Tier List
★ Current Seasons: Ranked S34 | Battle Pass S39
☆ Join Game8's Pokemon Discord Server!

Regieleki is a Boss Pokemon in Pokemon UNITE. Read on to know what buff Regieleki gives, its spawn time, spawn locations, the effective strategy to take Regieleki, and more!
List of Contents
Regieleki Wild Pokemon Information
| Regieleki | |
|---|---|
 |
Points Generated: 20 pts Wild Pokemon Type: Boss Lanes: Top |
| Effects / Description | Heads towards an enemy goal zone to make it defenseless for 25 seconds. Aids the allied team while pushing. |
| Spawn Time / Conditions | 7:00 |
| Respawn Timer | 3:00 |
| Map Availability |
Theia Sky Ruins
|
Regieleki Spawn Details
Regieleki Detailed Spawn Location
| Theia Sky Ruins | |
|---|---|
 See Full Image |
|
| Spawns at the upper-middle area at the Top Lane. | |
Regieleki Spawn Time
| Spawn Time | 7:00 |
|---|
Regieleki spawns at the upper-middle area at the Top Lane when the match timer reaches the seven-minute (7:00) mark. It spawns at the same time with the tri-Regis at the bottom - Registeel, Regice, or Regirock.
Regieleki Respawn Details
| Respawn Time | 120 seconds |
|---|
Regieleki will respawn 120 seconds after being defeated. It is possible to get up to three (3) objective spawns in one match if you manage to defeat it quickly.
Respawn Timer Starts When Captured
Regieleki's respawn timer will start ticking after it is secured by a team which means the spawn timer counts down even if it is traveling in a lane.
It will eventually stop respawning when the battle time reaches the last 2:00 minutes of the match.
Regieleki Buffs and Rewards
| Points | 20 |
|---|---|
| Effect | Fights for your team until it reaches an enemy goal, then makes it vulnerable for 25 seconds. |
Makes a Goal Zone Vulnerable

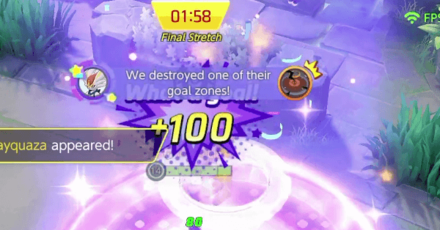
Capturing Regieleki will make it fight for the team that captures it. As it travels to the nearest goal zone, it will attack any opposing Pokemon that it comes in contact with.
Once it reaches a goal zone, it will make it vulnerable for 25 seconds and any scoring of goals during this time will be instant - regardless of how much points are dunked.
Disables Goal Zone HP Recovery and Shields
While the goal zone is vulnerable, HP recovery and shield effects for the goal zone's allied team are disabled. This makes it much harder for the affected team to defend the goal zone for the duration of the effect.
Damaging Regieleki Reduces its Points
The points that Regieleki carries while it pushes a lane can be reduced if it takes too much damage. Fortunately, the time it will make a goal zone vulnerable will not change, even if Regieleki enters a goal zone with low health.
Points Only Given to Final Hit
The points dropped by Regieleki will only be given to the player who deals with the final hit. However, if that player's Aeos Energy is at full capacity when it defeats Regieleki, the points are dropped instead and can be picked up by other players.
Strategy to Beat Regieleki
Play Around its Attacks
Though it is important to maintain aggression and defeat Regieleki as quickly as possible, Regieleki's attacks are powerful enough to pressure your HP easily. Because of this, it is best to contest Regieleki while keeping defense in mind to not get ganked by the enemy team.
Take Note of the Red Reticles

Before Regieleki performs a move, it will telegraph where the attack will hit. Use this to evade its attacks and avoid sustaining damage. Depending on the Pokemon you are using, you should use dash moves to steer clear of any AoE attacks.
Fight Within Range to Maintain Aggro
Like other objectives, Regieleki will go back to its spawn area and regenerate all the HP it sustained when it loses aggression. So, when contesting Regieleki, it is best to maintain a good distance between you and it so it won't revert, especially if you are using a ranged Pokemon.
How to Steal Regieleki
Regieleki is a big and wide target, which makes it easy to hit. However, the objective packs a decent punch, it is still best to rally all your teammates if you want the best chance to secure it.
Snipe Down From Long Ranged
| Move | Pokemon | Strategy |
|---|---|---|
|
|
 Decidueye Decidueye
|
Take advantage of Spirit Shackles multiple charges to deplete the objective's health. When its HP is low enough, shoot them down with a fully charged shot for a clean steal. |
|
|
 Cinderace Cinderace
|
Bombard the objective with Standard Attacks. When its HP is low enough, shoot them down with a Pyro Ball. It is best to aim for getting Blaze stacks first before using Pyro Ball. |
Easy Secure With Burst Moves
| Move | Pokemon | Strategy |
|---|---|---|
|
|
 Dragonite Dragonite
|
Cycle between Boosted Attacks and Dragon Dance to charge up Hyper Beam to the max before bursting down the objective. |
|
|
 Talonflame Talonflame
|
Utilize Brave Bird's long range to target the objective from afar and let the enemy do all the work. When the objective's HP is low enough, activate Brave Bird to swoop down and steal the objective. |
|
|
 Venusaur Venusaur
|
Maneuver around the objective and constantly deal Standard Attacks. Once the objectives HP is low enough, burst them down with a Solar Beam. You can also line up the shot to hit the enemy team to get more value. |
|
|
 Mew Mew
|
Like with Venusaur, Mew's Solar Beam functions the same way. We suggest dropping Light Screen first before shooting the beam to amplify the damage. |
When to Take Regieleki
Always Secure When Up
With how the current meta now shifting to taking Regieleki than taking the Regis in the bottom lane, always be aware of Regieleki's spawn time (and timer that will show in-game) and position yourself near it so your team can take it.
It always spawn at 7:00, then respawns after exactly 120 seconds!
Recapture if Failed the First Time
If your team fails to capture the Regieleki spawn, you may find that your team is missing one goal zone. It is best to prepare for the next Regieleki spawn and try your best to secure it to even out the odds!
Pushing the Top Lane

Having Regieleki fight for your team drastically increases your power when pushing the Top Lane. If you want to get ahead in points in the early game, as well as cut-off benefits that come with goal zones, securing Regieleki can help you and your team achieve that.
Defeat Near Raquaza's Spawn Time
Though the objective's respawn time gets cut off at 2:00 of the match, Regieleki does not disappear if it is captured before Rayquaza spawns. It will still fight for your team and make a goal zone vulnerable if it reaches one.
This strategy can be used as a distraction at the Top Lane during the final stretch, allowing you to focus on scoring goals or taking Rayquaza while giving the opposing team a dilemma!
Regieleki Moves
Ranged Attack
If a Pokemon gets close, Regieleki will shoot it down with a ball of energy. Although this attack may not deal significant damage, taking too many hits can be dangerous if you are not careful.
Electroweb
Regieleki shoots three (3) electric webs in triangular directions, dealing damage and slowing each Pokemon it hits. When dodging this move, it is best to move toward the side of the attack, rather than away from it.
Thunder Cage
Regieleki engulfs an area in electricity that deals damage and stuns Pokemon that are caught within it. Since this move has a wide area, it is best to stop attacking and quickly use a dash move to evade the attack.
Pokemon UNITE Related Guides

Theia Sky Ruins Wild Pokemon
| Boss Pokemon | |||||
|---|---|---|---|---|---|
 Groudon Groudon |
Regieleki |
 Regidrago Regidrago |
|||
 Regirock Regirock |
 Regice Regice |
 Registeel Registeel |
|||
| Jungle Buff Pokemon | |||||
 Accelgor Accelgor |
 Escavalier Escavalier |
||||
| Normal Pokemon | |||||
 Swablu Swablu |
 Altaria Altaria |
 Xatu Xatu |
|||
 Bunnelby Bunnelby |
 Indeedee Indeedee |
 Baltoy Baltoy |
|||
| Evolved Pokemon | |||||
 Diggersby Diggersby(from Bunnelby) |
 Claydol Claydol(from Baltoy) |
||||
Mer Stadium Wild Pokemon
| Boss Pokemon | |||||
|---|---|---|---|---|---|
 Zapdos Zapdos |
 Drednaw Drednaw |
 Rotom Rotom |
|||
| Jungle Buff Pokemon | |||||
 Ludicolo Ludicolo |
 Bouffalant Bouffalant |
||||
| Normal Pokemon | |||||
 Audino Audino |
 Combee Combee |
 Vespiquen Vespiquen |
|||
 Lillipup Lillipup |
 Corphish Corphish |
 Aipom Aipom |
|||
| Evolved Pokemon | |||||
 Herdier Herdier(from Lillipup) |
 Crawdaunt Crawdaunt(from Corphish) |
 Ambipom Ambipom(from Aipom) |
|||
Auroma Park Wild Pokemon
| Boss Pokemon | |||||
|---|---|---|---|---|---|
 Regigigas Regigigas |
|||||
| Normal Pokemon | |||||
 Abra Abra |
 Dewpider Dewpider |
 Araquanid Araquanid |
|||
 Ledyba Ledyba |
 Sunkern Sunkern |
 Venomoth Venomoth |
|||
| Evolved Pokemon | |||||
 Ledian Ledian(from Ledyba) |
 Sunflora Sunflora(from Sunkern) |
||||
Shivre City Wild Pokemon
| Boss Pokemon | |||||
|---|---|---|---|---|---|
 Avalugg Avalugg |
|||||
| Normal Pokemon | |||||
 Snom Snom |
 Alolan Meowth Alolan Meowth |
 Electrode Electrode |
|||
| Evolved Pokemon | |||||
 Frosmoth Frosmoth(from Snom) |
 Alolan Persian Alolan Persian(from Alolan Meowth) |
||||
Author

Regieleki Guide: How to Steal and Buffs
Rankings
- We could not find the message board you were looking for.

Gaming News

![Monster Hunter Stories 3 Review [First Impressions] | Simply Rejuvenating](https://img.game8.co/4438641/2a31b7702bd70e78ec8efd24661dacda.jpeg/show)
![The Liar Princess and the Blind Prince Review [PC] | Lovely to Look at but Tedious to Play](https://img.game8.co/4442586/8d95f5faf05780f1765ce7e0938bd825.jpeg/thumb)
![Marathon Cryo Archive Map Teased as [REDACTED] on Selection Screen](https://img.game8.co/4442236/6357203e58172f6de57f1991e7c39b22.png/thumb)

Popular Games

Genshin Impact Walkthrough & Guides Wiki
Umamusume: Pretty Derby Walkthrough & Guides Wiki
Pokemon Pokopia Walkthrough & Guides Wiki
Honkai: Star Rail Walkthrough & Guides Wiki
Monster Hunter Stories 3: Twisted Reflection Walkthrough & Guides Wiki
Arknights: Endfield Walkthrough & Guides Wiki
Wuthering Waves Walkthrough & Guides Wiki
Zenless Zone Zero Walkthrough & Guides Wiki
Pokemon TCG Pocket (PTCGP) Strategies & Guides Wiki
Monster Hunter Wilds Walkthrough & Guides Wiki


Recommended Games
Diablo 4: Vessel of Hatred Walkthrough & Guides Wiki
Cyberpunk 2077: Ultimate Edition Walkthrough & Guides Wiki
Fire Emblem Heroes (FEH) Walkthrough & Guides Wiki
Yu-Gi-Oh! Master Duel Walkthrough & Guides Wiki
Super Smash Bros. Ultimate Walkthrough & Guides Wiki
Pokemon Brilliant Diamond and Shining Pearl (BDSP) Walkthrough & Guides Wiki
Elden Ring Shadow of the Erdtree Walkthrough & Guides Wiki
Monster Hunter World Walkthrough & Guides Wiki
The Legend of Zelda: Tears of the Kingdom Walkthrough & Guides Wiki
Persona 3 Reload Walkthrough & Guides Wiki


All rights reserved
©2021 Pokémon. ©1995–2021 Nintendo / Creatures Inc. / GAME FREAK inc.
©2021 Tencent.
The copyrights of videos of games used in our content and other intellectual property rights belong to the provider of the game.
The contents we provide on this site were created personally by members of the Game8 editorial department.
We refuse the right to reuse or repost content taken without our permission such as data or images to other sites.
Ataque releki de perto e desvie dos golpes dele pois se ele te perseguir até um certo local ele voltará a o local onde ele apareceu e recuperará HP