Bottom Lane Guide: How to Play Bot
☆ Upcoming: Articuno | Meganium | Typhlosion | Feraligatr
★ Latest News: Zapdos | Moltres | Version 1.22.1.5
☆ Popular Pages: Upcoming Pokemon | Tier List
★ Current Seasons: Ranked S34 | Battle Pass S39
☆ Join Game8's Pokemon Discord Server!

This is a guide to the Bottom Lane of Aeos Island in Pokemon UNITE. Read on to learn how to play Bottom Lane, the best Pokemon to use for the Bottom Lane, the list of all Wild Pokemon in the Bottom Lane, and more!
| All Lane Guides | ||
|---|---|---|
 Top Lane Top Lane |
 Jungle Jungle |
 Bottom Lane Bottom Lane |
List of Contents
How to Play Bottom Lane
| Basic Bottom Lane Strategy | |
|---|---|
| 10:00~9:40 | • Defeat the Bunnelby camps along the lane while moving up to the first goal zone. • Ignore the Xatu in the Jungle Area. |
| 9:40~8:50 | • Contest the Indeedee camps near the Jungle entrance and around the center area of the lane for EXP. • Capture or steal all Wild Pokemon in the area. |
| 8:50~7:20 | • Take the Altaria and Swablu camp in the center of the lane. • Pressure opponent's HP while maintaining a close distance from your Goal Zone. • Continue farming to level up so you can get to your move upgrades. |
| 7:20~7:00 | • Rally teammates to secure the Regice (or Regirock or Registeel objective. |
| 7:00~3:00 | • Capture Regice (or Regirock or Registeel) and push the bottom lane. • Rotate to the Top Lane to capture Regieleki. • Push the lane with Regieleki and score points when it disables a goal zone. • Keep taking objectives, defend goals, and hunt targets. |
| 3:00~2:00 | • Accumulate EXP and level up your Pokemon. • Reserve Unite Move for Rayquaza when near the final stretch. |
| 2:00~ | • Take Rayquaza. • Score as many points as possible before the match ends • Defend goal zones. |
Pick Bottom Path Before the Battle
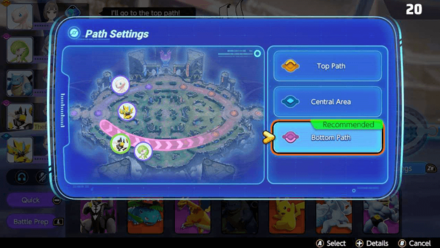
Before the start of the match, it is highly recommended that you pick the Bottom Path path using the Battle Prep. Though not required, this will surely help in relaying your intention and prevent a lane from getting cluttered.
Capture All Wild Pokemon Spawns
| 9:40 (Jungle Entrance) |
9:15 (Bottom-Center) |
8:50 (Center) |
|---|---|---|
 |
 |
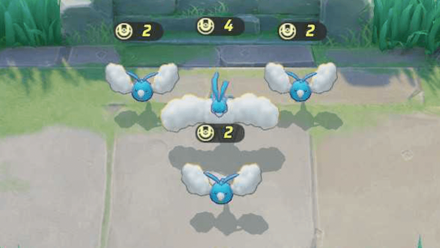 |
It is important that your team captures the extra Indeedee near the entrance of the Jungle and around the center of the lane and the Altaria and Swablu when they spawn. The extra EXP you get will be a huge advantage moving forward.
Since the opponent will surely be doing the same strategy, contesting these camps will always be a battle. Make sure to focus down on the Wild Pokemon and get the final hit.
Keep Goal Zone in Check
While you farm wild Pokemon, be sure to keep an eye on your goal zone so you can quickly defend them when the enemy wants to sneak in points. You can do this by extending your view with the help of the camera mechanic.
Pressure the Opponent's HP
As you farm Wild Pokemon, you will always be engaging in small fights with the enemy as you take control of the lane. Pressure their HP until it gets low enough for them to retreat so you can continue farming.
Do not Overextend
Note that you will be at a major disadvantage when you are fighting opponents near their Goal Zone. Be sure to not overextend your position, and only pursue low HP opponents when you know you can deal with the last hit. You might get caught on the enemy's lane flux which decreases your movement speed, leaving you vulnerable to a knockdown.
Secure the Regi Variant for an Advantage
Taking Regice (or Regirock or Registeel) gives your entire team an advantage. It gives a lot of EXP. that will most likely lead to the team leveling up, which also means they get stronger. It also provides a buff that can help the team win teamfights and push lanes. Using these advantages help the team prepare for the final minutes of the game and secure a win.
Get Help from the Jungler
Having the Jungler help out in taking the objective makes it easier to secure it. It also gives a numbers advantage to help push or defend goal zones. With this, it's important to communicate with the Jungler whether you want to go for a gank, push a goal zone, or take the objective.
Best Pokemon for Bottom Lane
Early Lane Pressure
| Pokemon | Role | Best Lane |
|---|---|---|
 Duraludon Duraludon
|
Attacker | Bot |
| • Great early burst damage with Dragon Pulse. • Can deflect early crowd control with Heavy Metal. |
||
 Gardevoir Gardevoir
|
Attacker | Top / Bot |
| • Can burst down low HP opponents with Psyshock. • Has excellent AoE moves that can help turn around clashes. |
||
 Delphox Delphox
|
Attacker | Top / Bot |
| • Great secure potential with Ember. • Can disrupt enemy movmeent with Fire Spin. |
||
 Espeon Espeon
|
Attacker | Top / Bot |
| • Great early game scaling as it fully evolves at level 4. • Great long range burst damage with Psyshock. |
||
Since the Wild Pokemon in the bottom lane have more EXP than those in the top lane, securing them becomes vital to snowballing the game. Picking a Pokemon that performs well in the early game is a highly recommended option if you want to secure the extra Indeedee camps in the lane and help your team level up.
Great Late Game
| Pokemon | Role | Best Lane |
|---|---|---|
 Charizard Charizard
|
All-Rounder | Bot / Jungle |
| • Fire Blast is great for farming and defending Goal Zones. • Gets a power spike when Seismic Slam is learned. |
||
 Tsareena Tsareena
|
All-Rounder | Any |
| • Excellent dash moves like Trop Kick or Grassy Glide for easy engage. • Becomes a high functioning tank via Queenly Majesty when left unopposed. |
||
 Machamp Machamp
|
All-Rounder | Any |
| • Great for leading early skirmishes with unstoppable moves. • Can dominate a lane when it gets to its disabling moves like Submission or Close Combat. |
||
 Urshifu Urshifu
|
All-Rounder | Any |
| • Gets a power spike at level 5. • Can easily take out the objective with Wicked Blow. |
||
Having access to more EXP means that these Pokemon can evolve or learn their strong moves faster. When left uncontested, they can easily dominate the lane and take on objectives without a problem.
Support Pokemon
| Pokemon | Role | Best Lane |
|---|---|---|
 Blissey Blissey
|
Supporter | Bot |
| • Can buff allies with increased movement speed using Helping Hand and remove debuffs with Safeguard. • Can quickly recover an ally's HP with Soft-Boiled. |
||
 Eldegoss Eldegoss
|
Supporter | Bot |
| • Can buff allies with bonus shields with Cotton Guard. • Synthesis is a great early game heal engine. • Can help farm Wild Pokemon because of ranged basic attack. |
||
 Mr. Mime Mr. Mime
|
Supporter | Top / Bot |
| • Can apply early game pressure with Confusion and Power Swap. • Durable and can initiate teamfights with Showtime. |
||
Supporter Pokemon are great for the small fights in the Bottom lane. They will provide both healing and buffs to keep your teammates alive while they farm up to higher levels for the late game. Moreover, they can also help by hindering opponents from scoring takedowns or goals by impeding their movement by applying crowd control effects.
List of Best Bottom Laners


Wild Pokemon in Bottom Lane
Wild Pokemon
| Pokemon | Timers and Rewards |
|---|---|
 Audino Audino
|
Points Earned: 5 - 7
Spawn Timer: 9:40 Respawn Timer: 1:00 |
 Corphish Corphish
|
Points Earned: 3 - 4
Spawn Timer: 8:45 Respawn Timer: 1:00 |
 Aipom Aipom
|
Points Earned: 2 - 5
Spawn Timer: 9:45 Respawn Timer: 1:00 |
 Ambipom Ambipom
|
Points Earned: 7
Spawn Timer: 2:00 Respawn Timer: 1:00 |
 Bunnelby Bunnelby
|
Points Earned: 2 / 5
Spawn Timer: In-Lane Bunnelby: at Game Start Aggressive Bunnelby: 9:40 Respawn Timer: Aggressive Only: 1:00 |
 Baltoy Baltoy
|
Points Earned: 2
Spawn Timer: 9:45 / 9:40 / 9:00 / 8:40 Respawn Timer: 1:00 |
 Swablu Swablu
|
Points Earned: 2 / 3
Spawn Timer: Top & Bot: 8:50, 7:20, 5:50, 4:20, 2:50, 1:20 Jungle: 8:00 Respawn Timer: Jungle Only: 90 seconds |
 Altaria Altaria
|
Points Earned: 4 / 6
Spawn Timer: Top & Bot: 8:50, 7:20, 5:50, 4:20, 2:50, 1:20 Jungle: 8:00 Respawn Timer: Jungle Only: 90 seconds |
 Diggersby Diggersby
|
Points Earned: 2 / 7
Spawn Timer: 2:00 Respawn Timer: N/A |
 Indeedee Indeedee
|
Points Earned: 5 / 7
Spawn Timer: 9:45 / 9:40 / 9:15 Respawn Timer: 1:00 |
Unlike wild Pokemon found in the Jungle, wild Pokemon found along with both Top and Bottom Lanes do not offer any buffs when defeated.
Boss Pokemon
| Pokemon | Timers and Rewards |
|---|---|
 Drednaw Drednaw
|
Points Earned: 20
Spawn Timer: 7:00 Respawn Timer: 2:00 |
 Regirock Regirock
|
Points Earned: 20
Spawn Timer: 7:00 Respawn Timer: 3:00 |
 Regice Regice
|
Points Earned: 20
Spawn Timer: 7:00 Respawn Timer: 3:00 |
 Registeel Registeel
|
Points Earned: 20
Spawn Timer: 7:00 Respawn Timer: 3:00 |
Regice (or Regirock or Registeel) will spawn at the center part of the Bottom Lane at the 7-minute mark. Defeating them gives your team an experience boost and a buff regardless of where they are on the map.
Pokemon UNITE's Bottom Lane
What is the Bottom Lane?

The Bottom Lane in Pokemon UNITE refers to the path located at the bottom part of the Theia Sky Ruins or Remoat Stadium. It has two (2) Goal Zones present for both teams. It also has more space to manuveur around compared to the Top Lane.
Bottom Lane Objectives
Bottom lane players will constantly clash with the opposing team. While top lane players focus mostly on accumulating points and eventually scoring with Regieleki, Bottom Lane players have to maintain pressure on their opponents by quickly farming Wild Pokemon and stealing Wild Pokemon from the opponents' side, and, most importantly, maintain a lane advantage to capture the Regice (or Regirock or Registeel) objective. This will be important as the Bottom Lane is wider than the top lane, so expect to get into a lot of fights while protecting your goal.
Pokemon UNITE Related Guides

All Lane and Playstyle Roles
| Lane Roles | |||||
|---|---|---|---|---|---|
| Top Lane |
Jungle |
Bottom Lane |
Playstyle Roles | ||
 Attacker Attacker |
 Defender Defender |
All-Rounder |
|||
 Speedster Speedster |
Support |
||||
Author

Bottom Lane Guide: How to Play Bot
Rankings
Gaming News

![Monster Hunter Stories 3 Review [First Impressions] | Simply Rejuvenating](https://img.game8.co/4438641/2a31b7702bd70e78ec8efd24661dacda.jpeg/show)


![Monster Hunter Stories 3 Review [First Impressions] | Simply Rejuvenating](https://img.game8.co/4438641/2a31b7702bd70e78ec8efd24661dacda.jpeg/thumb)
Popular Games

Genshin Impact Walkthrough & Guides Wiki
Honkai: Star Rail Walkthrough & Guides Wiki
Umamusume: Pretty Derby Walkthrough & Guides Wiki
Pokemon Pokopia Walkthrough & Guides Wiki
Resident Evil Requiem (RE9) Walkthrough & Guides Wiki
Monster Hunter Wilds Walkthrough & Guides Wiki
Wuthering Waves Walkthrough & Guides Wiki
Arknights: Endfield Walkthrough & Guides Wiki
Pokemon FireRed and LeafGreen (FRLG) Walkthrough & Guides Wiki
Pokemon TCG Pocket (PTCGP) Strategies & Guides Wiki


Recommended Games
Diablo 4: Vessel of Hatred Walkthrough & Guides Wiki
Cyberpunk 2077: Ultimate Edition Walkthrough & Guides Wiki
Fire Emblem Heroes (FEH) Walkthrough & Guides Wiki
Yu-Gi-Oh! Master Duel Walkthrough & Guides Wiki
Super Smash Bros. Ultimate Walkthrough & Guides Wiki
Pokemon Brilliant Diamond and Shining Pearl (BDSP) Walkthrough & Guides Wiki
Elden Ring Shadow of the Erdtree Walkthrough & Guides Wiki
Monster Hunter World Walkthrough & Guides Wiki
The Legend of Zelda: Tears of the Kingdom Walkthrough & Guides Wiki
Persona 3 Reload Walkthrough & Guides Wiki


All rights reserved
©2021 Pokémon. ©1995–2021 Nintendo / Creatures Inc. / GAME FREAK inc.
©2021 Tencent.
The copyrights of videos of games used in our content and other intellectual property rights belong to the provider of the game.
The contents we provide on this site were created personally by members of the Game8 editorial department.
We refuse the right to reuse or repost content taken without our permission such as data or images to other sites.