Drednaw Buff and Spawn Time
☆ Upcoming: Articuno | Meganium | Typhlosion | Feraligatr
★ Latest News: Zapdos | Moltres | Version 1.22.1.5
☆ Popular Pages: Upcoming Pokemon | Tier List
★ Current Seasons: Ranked S34 | Battle Pass S39
☆ Join Game8's Pokemon Discord Server!

This is a guide on the Wild Pokemon Drednaw in Pokemon UNITE. Read on to learn Drednaw's spawn time, how and when to beat it, what moves it has, what buff and rewards it gives, and more!
List of Contents
Drednaw Catch 'Em Battles Info
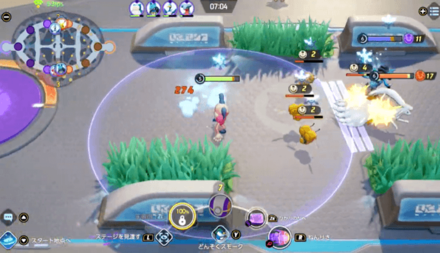
A new game mode called Catch 'Em Battles, allows players to catch Wild Pokemon like Drednaw and use them in battle!
| Catch 'Em Battles Moves and Details | ||
|---|---|---|
|
|
Moves |
|
| Points | 15 | |
| Spawn Details | Spawns at 4:00 or Spawns after Defeating Avalugg (45s Spawn Time) | |
| Spawn Location | Jungle Spawns in the Jungle near the base goals. Replaces Avalugg when defeated. |
|
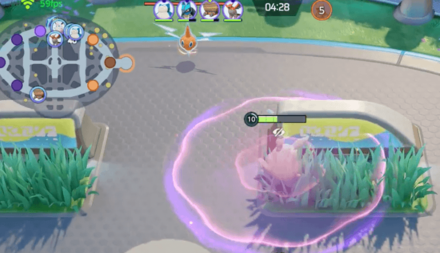
Drednaw Spawn Time

| Time Remaining | Location |
|---|---|
| 7:00 | 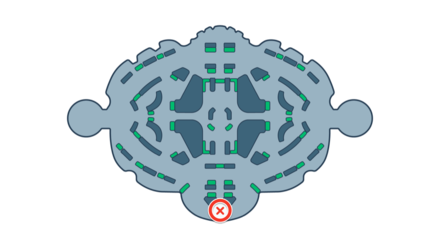 |
Drednaw will spawn in the 7-minute mark of the match. It will appear at the Beach Area located at the center part of Bottom Lane.
Drednaw Respawn Time
| Respawn Time |
|---|
| 120 seconds (in-game time) |
Drednaw will respawn in exactly 120 seconds (2 minutes) after it is defeated. It will eventually stop respawning when the battle time reaches the last 2:00 minutes of the match.
Can Spawn Up to 3 Times in Match
| Drednaw Spawn Timeframe |
|---|
|
・ First Drednaw spawns at 7:00 ・ Defeated at 6:30 ・ Second Drednaw spawns at 4:30 ・ Defeated at 4:15 ・ Third Drednaw spawns at 2:15 |
Assuming that Drednaw is defeated as soon as it spawns, a team can potentially capture Drednaw at least 3 times in one game. The third spawn may occur, but it will be close to the final stretch of the match, so it is best to fight it with all your powerful moves to defeat it on time.
Disappears When Zapdos Spawns

It is important to note that Drednaw will disappear as soon as Zapdos spawns at the Legendary Pit. Depending on how the match will play out, Drednaw may respawn when there are only a few seconds away from the 2-minute mark. Unless your team is powerful enough, it is best to just prepare for the final stretch of the match than risk not being able to defeat Drednaw on time.
Drednaw Buff and Rewards
| Aeos Energy | 20 |
|---|---|
| Bonus Effect | Grants EXP and shields to the allies. |
Grants EXP to all Teammates
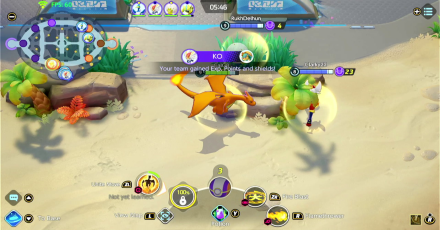
Defeating Drednaw will grant exp to all team members, regardless of where you are positioned in the map. The amount of EXP is close to 1 full level up. This is great for giving your teammates who are behind in EXP a chance to level up and evolve their Pokemon!
Capture Multiple Times to get Level Advantage
Note that Drednaw's bonus effect will still be the same each time it spawns. This means you can defeat it multiple times to get an EXP advantage over your opponents. Consistently capturing Drednaw will give your team a huge level advantage that will be key in controlling the late game!
Grants Bonus Shields

Aside from the additional EXP, defeating Drednaw gives you and your teammates bonus shields, regardless of where they are in the map. The effect will last for 60 seconds, but can be destroyed before it runs out when you take too much hits.
Great for Destroying Goal Zones
The bonus shields will be extremely useful for attacking Goal Zones. Use it to finish off opponents, or at least push them back further, to open the Goal Zones for scoring. Capturing Drednaw early in the game ensures that the first Bottom Lane Goal Zone will easily be destroyed.
Damage Reduction to Zapdos Fixed!NEW

Rumors have been circulating that defeating Drednaw has a side-effect of decreasing damage to Zapdos. We did a test to verify if this is true, and found that defeating Drednaw just before Zapdos spawns decreases the team's damage against Zapdos by about 50% for 90 seconds.
However, as of patch 1.2.1.7, we have tested it again and saw that the damage reduction bug is fixed! This was not mentioned in any previous patch notes, so it is unclear when the fix took effect. Still, it is good to see that the issue is resolved.
Damage Reduction Test Before Patch
| During the Effect | After the Effect | |
|---|---|---|
| Electro Ball | 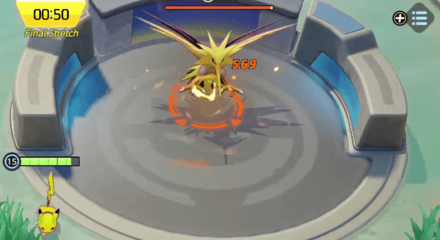 Damage: 569 |
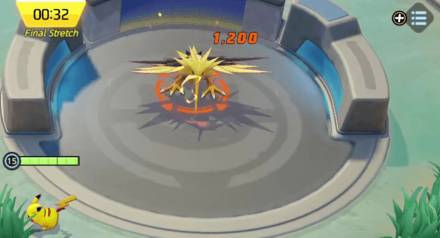 Damage: 1200 |
| Pyro Ball | 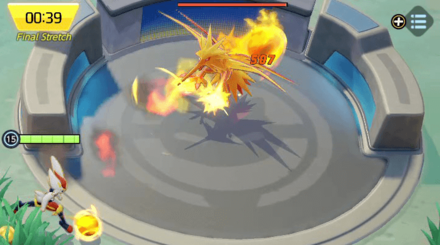 Damage: 507 |
 Damage: 1125 |
For this test, we used Pikachu in the Practice Area. We defeated Drednaw at around 02:07, then proceeded to Zapdos. To check for the damage reduction, we first cast Electro Ball on Zapdos just seconds after defeating Drednaw, Pikachu dealt 569 damage to Zapdos. At around 00:32, we cast Electro Ball again, and true enough, the damage now is 1,200, which is the original damage.
We did another test, but used Cinderace and his Pyro Ball move instead. We followed the same procedure as the previous test. When Pyro Ball was cast just seconds after defeating Drednaw, it dealt 507 damage to Zapdos. At around 00:32, we cast Pyro Ball again, but this time it dealt 1125 damage, which is the original damage.
How to Beat Drednaw: Strategy

| Basic Drednaw Strategy | |
|---|---|
| 7:30~ | Bottom Lane • Try to gain EXP as fast as possible so you can learn new moves for the Drednaw fight later. • Prevent your opponents from farming wild Pokemon from your side of the lane. |
| Top Lane • Level up as much as you can so you can be powerful enough to help taking down Drednaw. • Be sure to leave the Top Lane with at least one ally to defend the Goal Zone. |
|
| 7:00~ | Fighting Drednaw
• When opponents are nearby, try to knock them down first, or at least lower their HP enough so you can freely fight Drednaw. |
| Protecting Drednaw • Block opponents from coming near Drednaw with the use of Defender or All-Rounder Pokemon, while two other allies focus of Drednaw. • Be careful of Ranged opponents as they might fire a move that can steal Drednaw! |
|
| Stealing Drednaw • Hide near the Tall Grass and wait for Drednaw's HP to drop low enough for you to steal it! |
|
| Captured by ally team. | • Destroy the opponent's lower Goal Zone. |
| Respawns after 2 minutes. | • When Drednaw respawns, you can repeat the process! |
7: 30 ~ Prepare for Drednaw Fight
Gather Your Teammates
When the game time reaches 7:30, It is best to start moving near the beach are to prepare for the Drednaw fight. You can use the Quick Chat mechanic to notify your teammates that you plan to capture Drednaw.
Get Backup from Top Lane
Top lane players should leave at least one team member to defend the Goal Zone. They should also keep Rotom in check so opponents won't easily capture it.
Take note that there may be a level difference, since the Top Lane has fewer Wild Pokemon to farm. If the situation in the Top Lane is a bit dire, your team must reconsider if you can pull out an ally in the Top Lane.
Take Down Nearby Enemies

It can be tempting to go straight for Drednaw once it spawns. However, the enemy team may have the same plan too. It is best not to take any chances and take down your opponents first, or at least get their HP low enough to make them retreat so you can freely fight Drednaw without worrying about getting ambushed!
Get Extra EXP from Wild Pokemon
Bottom Lane players should take down the remaining wild Pokemon in the area to get additional EXP and level up. Be sure to take out the Combees and Vespiquen that appear just before Drednaw spawns so that they will not be taken by the opponent.
7:00~ Fighting Drednaw

Strength in Numbers
Having a number advantage means that your overall power is good enough to take Drednaw and keep enemies away simultaneously! When the enemy comes and contests Drednaw, you can shift focus and attack the enemy team so they will retreat to their Goal Zone, giving you more time to safely focus your attacks on Drednaw.
It is recommended that a Defender or an All-Rounder Pokemon keeps themselves between Drednaw and the enemy's Goal Zones. This way, they'll be within range of assisting teammates in damaging Drednaw while also being close enough to respond to approaching enemies.
Dogde Drednaw's Attacks

Drednaw will telegraph its strong attacks by showing a meter below. When the meter gets full, it is best to get away from the direction Drednaw is facing to dodge the incoming attack. Successfully avoiding the attack will prevent you from taking unneccessary damage as well as being stunned.
Drednaw's HP Resets When Out of Combat

Careful, being too far away from Drednaw may cause it to lose aggro and return to its spawn location. When this happens, it will be immune to attacks, and will recover HP rapidly. So, it is best to stay in the beach area at all times when fighting Drednaw!
Get Help from Jungler

To make fighting Drednaw easier and faster, you can get help from your team's Jungler. They can help add to the overall damage output. Additionally, this will also give the jungler a chance to score their accumulated Aeos Energy when you manage to defeat Drednaw and gain the bonus shields!
Destroy Enemy Goal Zone After Capturing Drednaw

| Benefits of Destroying Goal Zones |
|---|
| • The opponent's Lane Flux disappears. • Opponents cannot heal or get shields. • The opponent's Yellow Berry will not spawn anymore. |
Successfully defeating Drednaw means your team get the bonus EXP and shields. Use the power surge you get from the level up and shields to your advantage and to go straight for their Goal Zones!
Keep Rotom In-Check
After defeating Drednaw, the enemy team may retaliate by taking the Rotom objective. Be sure to keep close tabs on Rotom's situation on the Top Lane. You can even utilize the level advantage you gained from Drednawto take down Rotom efficiently!
Rotom Guide: How to Beat and Rewards
What to Do When Enemy Captures Drednaw

Whittle Down Their Shields
In addition to the EXP reward the enemy will also gain a one-time shield, so fighting the enemy head on will be difficult. You'll want to chip away at their shields to level the playing field, or fight inside your Goal Zone to gain shields of your own.
Defend the Bottom Lane Goal Zone
If your opponents managed to capture Drednaw, immediately move to the Bottom Goal Zone. At this point the opponent will have a slight level advantage, and could have leveled up to reach their Unite Move!
How to Steal Drednaw
Time Your Moves for the Final Hit

When you see your opponents contesting Drednaw, it may be dangerous to disrupt them when you are alone. Try to hide in the Tall Grass near the beach area first, and wait until Drednaw's HP is low. Then, just when the enemy is about to take down Drednaw, use your strongest combos or moves to get the last hit!
Ranged Moves
| Move | Pokemon | Description |
|---|---|---|
|
|
|
Has the user kick a ball of flame in the designated direction, dealing damage to opposing Pokemon and leaving them burned for a short time when this move hits. |
|
|
|
Has the user unleash a shadowy blob in front of itself, dealing damage to opposing Pokemon it hits and decreasing their movement speed Sp. Def for a short time. If the user then hits the same opposing Pokemon with a move or boosted attack within a set amount of time, it deals additional damage to the opposing Pokemon and leaves them unable to act for a short time. When using this move, if there is a nearby ally Pokemon linked by Trick, this move will also unleash a shadowy blob at the same target from that ally's location. |
|
|
|
Hurls a shadowy blob at the target, decreasing the movement speed and Sp. Def of opposing Pokemon for a short time when it hits. |
|
|
|
Has the user hurl a shadowy blob in the designated direction, dealing damage to opposing Pokemon it touches and applying a mark to them. If the user attacks marked opposing Pokemon, it deals additional damage to them. If the user attacks marked opposing Pokemon, it deals increased damage to them. The fourth time the user attacks marked opposing Pokemon, the mark is removed, but the damage dealt by the attack is further increased and the user recovers HP. After using this move, the user moves a short distance in a designmated direction. |
|
|
|
Blasts a bundled beam of light, dealing damage to opposing Pokemon in the area of effect. |
|
|
|
Has the user blast a bundled beam of light, dealing damage to opposing Pokemon in the area of effect. If this move hits any opposing Pokemon, the user gains one additional boost counter. |
Using Ranged moves are an efficient way to steal Drednaw from the enemy, since you do not have to get near Drednaw at all. Moves like Solar Beam or Pyro Ball do not require a target to activate, so you can just aim it where Drednaw is positioned. Note that these moves can also deal damage to the opponent if they are caught in its path!
Dash Moves
| Move | Pokemon | Description |
|---|---|---|
|
|
|
Removes any hindrances applied to the user and greatly increases the user's movement speed. After a short time, the movement speed increase weakens and stays that way for a set amount of time. The effect duration is increased if the user is in combat with Pokemon from the opposing team. When this move is boosted with Aeos energy, the user's movement speed is further increased, and the user is also granted a shield. |
|
|
|
Has the user perform a quick dash and increases the user's basic attack speed for a short time afterward. |
|
|
|
Makes the user immune to hindrances and charges its sprint gauge. Afterward, the user's movement speed increases for a short time, and its sprint gauge charges faster. |
|
|
|
Agility Has the user move quickly in the designated direction, increasing its movement speed for a short time. A maximum of two uses can be kept in reserve for this move. |
|
|
|
Has the user fly up into the sky. If used again, has the user dive to the designated area and attack, dealing damage to opposing Pokemon in the area of effect. When this move hits a Pokemon from the opposing team, its cooldown is reduced. Also makes the user's next basic attack a boosted attack. |
|
|
|
Has the user dash to the designated location and quickly charge an opposing Pokemon with the next basic attack. If the basic attack lands from behind, its damage is increased and this move's cooldown is reduced. |
You can also use Dash moves to quickly get within range of Drednaw to deal the final hit. Moves like Pursuit gets bonus damage when you hit the target from behind, and Fly can be used to swoop down out of nowhere while also dealing AoE damage to other enemies nearby.
Though you may dash right into the enemy, it is alright to fall in battle as long as you do not let your opponents get Drednaw's effect!
Unite Moves
| Move | Pokemon | Description |
|---|---|---|
|
|
|
Deals damage to opposing Pokemon in the area of effect. Opposing Pokemon damaged by this Unite Move have an Extreme Speed mark applied to them. After using this Unite Move, the user's next Power-Up Punch deals increased damage. |
|
|
|
Has the user create a giant ball of flame and kick it toward the designated location. The ball releases a fierce shock wave that deals damage to opposing Pokemon in the area of effect. This Unite Move also increases the user's movement speed for a short time when it hits. |
|
|
|
Has the user unleash a powerful chain attack while dashing forward. The final attack throws opposing Pokemon but also leaves the user unable to act for a short time. |
If you really want to make sure that you will get the final hit you can even use your powerful Unite Move on Drednaw. Moves like Aura Cannon can be used to deal damage to anything in its path, and Livid Outrage can deal a chain of attacks at a specific area.
Optimize Your Attack Controls

Targeting and Aim Assist: How to Aim Well
When to Beat Drednaw
Every Time it Spawns

Taking advantage of Drednaws effect is key if you want to have a level advantage going forwards in the match. It is best to defeat Drednaw as soon as possible each time it appears so it can spawn in the match frequently.
Recapture Drednaw if Failed the First Time

When your team fails to capture Drednaw when it first spawns, be sure to do whatever it takes to defeat it the next time it appears. Losing Drednaw to the enemy team means that they get a level advantage, and could have destroyed a Goal Zone with their added firepower. It is a general rule of thumb that the team who consistently captures Dreadnaw the most will most likely win the match!
Drednaw Moves
Normal Attack

Drednaw has a strong, melee attack that deals a substantial amount of damage. Attackers and Supporter should avoid getting too close as they could easily get knocked down with just a couple of hits.
Water Blast

Drednaw has a Water Blast attack that deals damage to any Pokemon caught in it. You can easily dodge if you time your movement right. If you don't, however, it will deal massive damage and push you back.
Stomp Attack

After the Water Blast attack, Drednaw will use a powerful Stomp Attack that will launch nearby Pokemon in the air dealing damage while also stunning them. It is hard to avoid this attack, so remember to stay back for a bit after the it uses the Water Blast Attack.
Pokemon UNITE Related Guides

Theia Sky Ruins Wild Pokemon
| Boss Pokemon | |||||
|---|---|---|---|---|---|
 Groudon Groudon |
 Regieleki Regieleki |
 Regidrago Regidrago |
|||
 Regirock Regirock |
 Regice Regice |
 Registeel Registeel |
|||
| Jungle Buff Pokemon | |||||
 Accelgor Accelgor |
 Escavalier Escavalier |
||||
| Normal Pokemon | |||||
 Swablu Swablu |
 Altaria Altaria |
 Xatu Xatu |
|||
 Bunnelby Bunnelby |
 Indeedee Indeedee |
 Baltoy Baltoy |
|||
| Evolved Pokemon | |||||
 Diggersby Diggersby(from Bunnelby) |
 Claydol Claydol(from Baltoy) |
||||
Mer Stadium Wild Pokemon
| Boss Pokemon | |||||
|---|---|---|---|---|---|
 Zapdos Zapdos |
 Drednaw Drednaw |
 Rotom Rotom |
|||
| Jungle Buff Pokemon | |||||
 Ludicolo Ludicolo |
 Bouffalant Bouffalant |
||||
| Normal Pokemon | |||||
 Audino Audino |
 Combee Combee |
 Vespiquen Vespiquen |
|||
 Lillipup Lillipup |
 Corphish Corphish |
 Aipom Aipom |
|||
| Evolved Pokemon | |||||
 Herdier Herdier(from Lillipup) |
 Crawdaunt Crawdaunt(from Corphish) |
 Ambipom Ambipom(from Aipom) |
|||
Auroma Park Wild Pokemon
| Boss Pokemon | |||||
|---|---|---|---|---|---|
 Regigigas Regigigas |
|||||
| Normal Pokemon | |||||
 Abra Abra |
 Dewpider Dewpider |
 Araquanid Araquanid |
|||
 Ledyba Ledyba |
 Sunkern Sunkern |
 Venomoth Venomoth |
|||
| Evolved Pokemon | |||||
 Ledian Ledian(from Ledyba) |
 Sunflora Sunflora(from Sunkern) |
||||
Shivre City Wild Pokemon
| Boss Pokemon | |||||
|---|---|---|---|---|---|
 Avalugg Avalugg |
|||||
| Normal Pokemon | |||||
 Snom Snom |
 Alolan Meowth Alolan Meowth |
 Electrode Electrode |
|||
| Evolved Pokemon | |||||
 Frosmoth Frosmoth(from Snom) |
 Alolan Persian Alolan Persian(from Alolan Meowth) |
||||
Author

Drednaw Buff and Spawn Time
Rankings
- We could not find the message board you were looking for.

Gaming News


![The Liar Princess and the Blind Prince Review [PC] | Lovely to Look at but Tedious to Play](https://img.game8.co/4442586/8d95f5faf05780f1765ce7e0938bd825.jpeg/thumb)
![Marathon Cryo Archive Map Teased as [REDACTED] on Selection Screen](https://img.game8.co/4442236/6357203e58172f6de57f1991e7c39b22.png/thumb)

Popular Games

Genshin Impact Walkthrough & Guides Wiki
Umamusume: Pretty Derby Walkthrough & Guides Wiki
Pokemon Pokopia Walkthrough & Guides Wiki
Honkai: Star Rail Walkthrough & Guides Wiki
Monster Hunter Stories 3: Twisted Reflection Walkthrough & Guides Wiki
Arknights: Endfield Walkthrough & Guides Wiki
Wuthering Waves Walkthrough & Guides Wiki
Zenless Zone Zero Walkthrough & Guides Wiki
Pokemon TCG Pocket (PTCGP) Strategies & Guides Wiki
Monster Hunter Wilds Walkthrough & Guides Wiki


Recommended Games
Diablo 4: Vessel of Hatred Walkthrough & Guides Wiki
Cyberpunk 2077: Ultimate Edition Walkthrough & Guides Wiki
Fire Emblem Heroes (FEH) Walkthrough & Guides Wiki
Yu-Gi-Oh! Master Duel Walkthrough & Guides Wiki
Super Smash Bros. Ultimate Walkthrough & Guides Wiki
Pokemon Brilliant Diamond and Shining Pearl (BDSP) Walkthrough & Guides Wiki
Elden Ring Shadow of the Erdtree Walkthrough & Guides Wiki
Monster Hunter World Walkthrough & Guides Wiki
The Legend of Zelda: Tears of the Kingdom Walkthrough & Guides Wiki
Persona 3 Reload Walkthrough & Guides Wiki


All rights reserved
©2021 Pokémon. ©1995–2021 Nintendo / Creatures Inc. / GAME FREAK inc.
©2021 Tencent.
The copyrights of videos of games used in our content and other intellectual property rights belong to the provider of the game.
The contents we provide on this site were created personally by members of the Game8 editorial department.
We refuse the right to reuse or repost content taken without our permission such as data or images to other sites.