This survey will take about 1 minute.
Your answers will help us to improve our website.
Path of Exile 2 (PoE 2)
PoE 2 0.4 Druid Leveling Build - Lightning Wyvern
Latest: 0.5.0 Release Date
☆ Fate of the Vaal ▶︎ The Last of the Druids
┗ Bonded Mods | 0.4 Mystery Box
★ Druid: Class Overview | Builds
☆ NEW: Disciple of Varashta Ascendancy!
★ Best Class | Best Builds | Leveling Builds
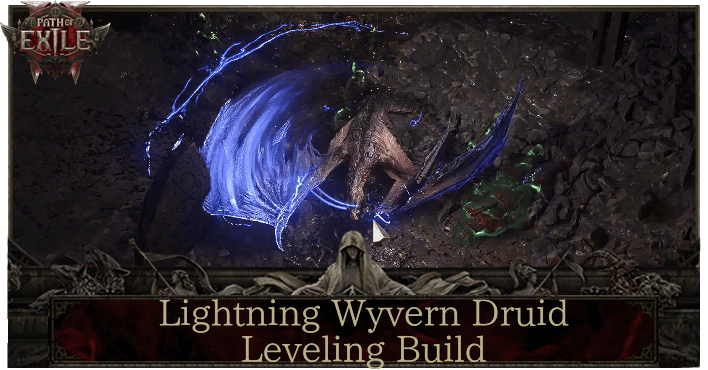
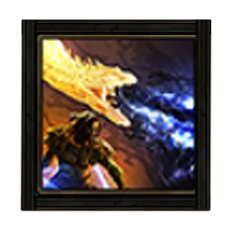
This is a Druid leveling build that focuses on Lightning damage using the Wyvern transformation in Path of Exile 2 (PoE 2)'s The Last of the Druids Update. Check out this Druid Dragon leveling build, including its progression, equipment, socketables, skills, playstyle, and recommended builds!
 Attention! Attention! |
This 0.4.0 leveling build is only up until Interludes and ends at Level 65. If you want to see a build for mapping and Atlas, check out our Endgame Builds! |
|---|
Lightning Wyvern Druid Build Summary
Druid Leveling Build Overview
| Build Setup | |
|---|---|
 Lightning Wyvern Druid Lightning Wyvern Druid |

 Herald of Thunder While active, killing Shocked enemies with Attack damage, will cause subsequent Attack hits to release lightning bolts which deals Attack damage to all surrounding enemies.
 Lingering Illusion Creates a short-lived illusory copy of yourself whenever you dodge roll. The copy can be damaged by enemies, and copies that are destroyed by an enemy will grant you a Power Charge.
 Elemental Weakness Curse all targets in an area after a short delay, lowering their Elemental Resistances.
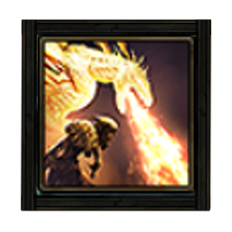 Flame Breath Shapeshift into a Wyvern and take to the skies, immolating enemies with a jet of fire. Channelling ends after a short amount of time but can be prolonged by spending Rage. Consumes a Power Charge if possible to Empower the Skill, Gaining extra Lightning damage and spending Rage more slowly.
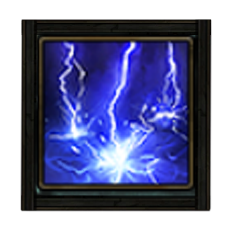 Thunderstorm Conjure a thunderstorm which causes lightning strikes and torrential rain in an area. Enemies in the area are Drenched, causing them to become Shocked or Frozen more easily. Plants in the area become Overgrown.
 Barkskin While active, taking Hit damage from enemies to your Energy Shield causes you to gain Armour for a short duration. Armour gained from multiple Hits can stack. The total Armour gained from this Skill cannot exceed the Item Armour on your Equipped Armour Items.
|
|
|
|
This Druid leveling build is designed around applying the Shock status with Lightning-centric Spells and using the Wyvern Form's use of Power Charges with both Rend and Flame Breath to turn its Fire affinity to Lightning instead. Check out the damage on a Lightning-resistant boss with the showcase above!
| Date | Changes Made |
|---|---|
| 12/16/2025 | ・Updated up to Act 4 and Interludes |
| 12/14/2025 | ・Updated for Act 3 |
| 12/14/2025 | ・Updated for Act 2 |
| 12/13/2025 | ・Lightning Wyvern Druid Build Created. |
Lightning Wyvern Druid Equipment
※ The affixes shown below are arranged based on descending priority.
| Gear | Affixes |
|---|---|
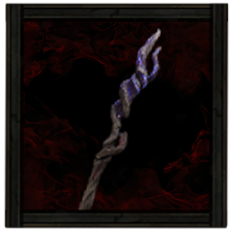 Voltaic Staff Voltaic Staff Voltaic Staff Stats:
Requirements: None (Weapon Set 1) |
・Gain % of Damage as Extra Lightning Damage
・+ Level to All Lightning Spell Skills ・% Increased Spell Damage ・Cast Speed |
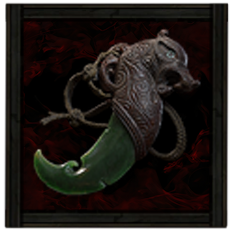 Lumbering Talisman Lumbering Talisman Lumbering Talisman Stats:
Damage - 71-107 Critical Chance - 5% Attacks Per Second - 1.10 Requirements: Level - 52 Strength - 60 Intelligence - 43 (Weapon Set 2) |
・% Increased Elemental Damage With Attacks
・+ Add Lightning Damage ・+ Level to all Melee Skills ・+ % Increased Attack Speed ・+ % Increased Physical Damage ・Gain Life per Enemy Killed |
 Inquisitor Crown Inquisitor Crown Inquisitor Crown Stats:
Armor - 123 Energy Shield - 43 Requirements: Level - 59 Strength - 46 Intelligence - 46 |
・+ Armour
・+ Maximum Energy Shield ・% Increased Armour and Energy Shield ・+ Maximum Life ・Any Attribute ・+% of Armour Also Applies to Elemental Damage |
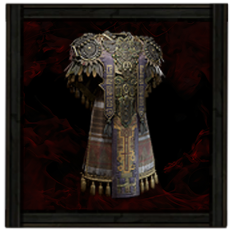 Heartcarver Mantle Heartcarver Mantle Heartcarver Mantle Stats:
Armor - 195 Energy Shield - 68 Requirements: Level - 62 Strength - 54 Intelligence - 54 |
・+ Spirit
・+ Armour ・% Increased Armour and Energy Shield ・+ Maximum Life ・+% of Armour Also Applies to Elemental Damage ・Any Elemental Resistances |
 Verisium Cuffs Verisium Cuffs Verisium Cuffs Stats:
Armor - 48 Energy Shield - 17 Requirements: Level - 45 Strength - 32 Intelligence - 32 |
・% Increased Armour and Energy Shield
・+ Maximum Life ・+% of Armour Also Applies to Elemental Damage ・+ Level to Melee Skills ・Any Attribute ・Any Elemental Resistances |
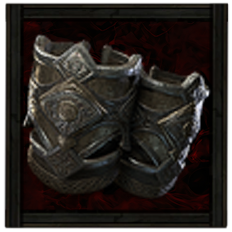
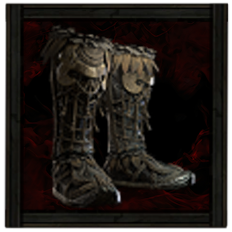 Weaver Leggings Weaver Leggings Weaver Leggings Stats:
Armor - 73 Energy Shield - 26 Requirements: Level - 45 Strength - 34 Intelligence - 34 |
・Increased Movement Speed
・% Increased Armour and Energy Shield ・+ Maximum Life ・+% of Armour Also Applies to Elemental Damage ・Any Attribute ・Any Elemental Resistances |
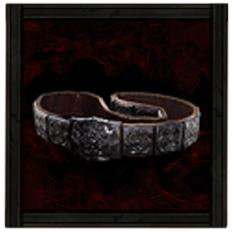 Plate Belt Plate Belt Plate Belt Requirements:
Level - 24 Implicit:+100-140 to Armour |
・Maximum Life
・+ Armour ・Maximum Mana ・Increased Recovery from Flasks ・Any Attribute ・Any Elemental Resistances |
 Stellar Amulet Stellar Amulet Stellar Amulet Requirements:
Level - 24 Implicit:+5-7 to all Attributes |
・+ Spirit
・Maximum Energy Shield ・Maximum Life ・Armor ・Any Attribute ・Any Elemental Resistances |
 Prismatic Ring Prismatic Ring Prismatic Ring Requirements:
Level - 35 Implicit:7-10% to all Elemental Resistances |
・Add Lightning Damage to Attacks
・Maximum Life ・Attributes ・Any Elemental Resistances |
|
Prismatic Ring Prismatic Ring Requirements:
Level - 35 Implicit:7-10% to all Elemental Resistances |
・Add Lightning Damage to Attacks
・Maximum Life ・Any Attribute ・Any Elemental Resistances |
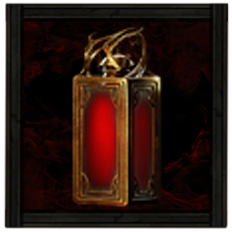 Ultimate Life Flask Ultimate Life Flask Ultimate Life Flask Stats:
Flask Type - Life Recovered Life - 920 Charge Per Use - 10 Total Charges - 75 Duration - 3 sec. |
・Gain Charges per Second
・Increased Recovery Rate |
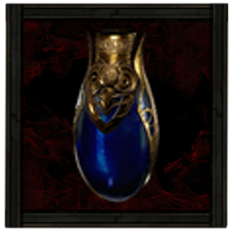 Ultimate Mana Flask Ultimate Mana Flask Ultimate Mana Flask Stats:
Flask Type - Mana Recovered Mana - 310 Charge Per Use - 10 Total Charges - 75 Duration - 3 sec. |
・Gain Charges per Second
・Increased Amount Recovered |
Weapons
Talisman
Your main damage will revolve around both Rend and Flame Breath, which primarily scales off of Physical stats and Attack Speed. The Lumbering Talisman provides the highest best weapon damage and a decent enough attack speed!
You should prioritize getting the "Increased Elemental Damage With Attacks" as this is massively increases the damage of this build when you empower all of your attacks with Power Charges.
The second priority would be Attack Speed so you can quickly stack up Rage Charges with Rend. Attempt to have modifiers to Physical and Lightning Damage, as well as your Level of Melee Skills to strengthen the clear of Rend.
Staff
Your Staff is mainly there for support and is mainly used for casting Thunderstorm and Elemental Weakness to set up your damage. That being said, get a Voltaic Staff with solid modifiers on Lightning and Spell Damage, and a decent enough cast speed to get your set up up and running!
Armor and Accessories
Seeing as this build is heavily focused on close-ranged combat, the main damage mitigation of this build revolves around both Armour and Energy Shields. Get the "Armour also applies to Elemental Damage" to further utilize the amount of Armour you have for this build.
Take note to always prioritize Maximum Life modifiers and boots with higher Movement Speed modifiers as this can help you traverse the early acts faster and also make evading enemy attacks easier.
As for your Accessories, equip a Stellar Amulet to help meet the attribute requirements of most of the skills this build slots in as there is a mix between all of them. Prismatic Rings will help increase the build's resistance and allow you to survive when you transition to mapping.
Alternative Unique Armor
| Unique | Benefits |
|---|---|
 Horns of Bynden Rusted Greathelm Horns of Bynden Rusted Greathelm Horns of Bynden Rusted Greathelm Stats:
Armor - 29 Requirements: None Fixed Modifiers: ・ 5-15% increased Rarity of Items found ・ +20-30 to Strength ・ Gain 1 Rage on Melee Hit ・ Every Rage also grants 1% increased Armour ・ +20 to Armour |
・5-15% increased Rarity of Items found
・+20-30 to Strength ・Gain 1 Rage on Melee Hit ・Every Rage also grants 1% increased Armour ・+20 to Armour |
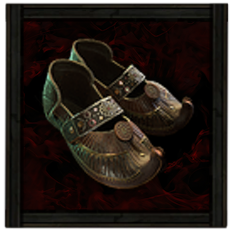 Wanderlust Wrapped Sandals Wanderlust Wrapped Sandals Wanderlust Wrapped Sandals Stats:
Energy Shield - 22 Requirements: Level - 11 Intelligence - 17 Fixed Modifiers: ・ 20% increased movement Speed ・ +10-20 to maximum Energy Shield ・ +5 to Dexterity ・ Your speed is unaffected by slows |
・20% increased movement Speed
・+10-20 to maximum Energy Shield ・+5 to Dexterity ・Your speed is unaffected by slows |
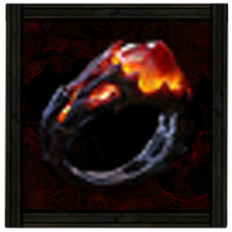 Cracklecreep Ruby Ring Cracklecreep Ruby Ring Cracklecreep Ruby Ring Requirements:
Level - 8 Implicit:+20-30% to Fire Resistance Fixed Modifiers: ・ 20-30% increased Fire Damage ・ 3.1-6 Life Regeneration per second ・ 20-30% increased Mana Regeneration Rate ・ Ignites you inflict spread to other Enemies that stay within 1.5 metres for 2 seconds |
・20-30% increased Fire Damage
・3.1-6 Life Regeneration per second ・20-30% increased Mana Regeneration Rate ・Ignites you inflict spread to other Enemies that stay within 1.5 metres for 2 seconds |
While the build does not struggle with Rage gain, the Horns of Bynden Rusted Greathelm allows you to essentially not think about your meter whilst increasing both your damage and survivability. However, this will fall off, especially when you need more defenses to survive enemy hordes!
The Wanderlust Wrapped Sandals is a solid alternative when you want to traverse maps quicker, allowing you to reach the endgame faster! Lastly, the Cracklecreep Ruby Ring flat out increases the potency of this build's main damage with Fire Breath.
| List of Rings | List of Amulets |
| List of Armors | |
Belts and Charms
| Belt Modifiers | |||||
|---|---|---|---|---|---|
|
Plate Belt Plate Belt Requirements:
Level - 24 Implicit:+100-140 to Armour |
・Any Elemental Resistances
・+ Armour ・Maximum Life ・Maximum Mana |
||||
| Charm Options | |||||
 Breath of the Mountains Sapphire Charm Breath of the Mountains Sapphire Charm Breath of the Mountains Sapphire Charm Stats:
Flask Type - Charm Charge Per Use - 20 Total Charges - 40 Duration - 4 sec. |
 Topaz Charm Topaz Charm Topaz Charm Stats:
Flask Type - Charm Charge Per Use - 20 Total Charges - 40 Duration - 4 sec. |
 Thawing Charm Thawing Charm Thawing Charm Stats:
Flask Type - Charm Charge Per Use - 40 Total Charges - 40 Duration - 3 sec. |
|||
Equip a Plate Belt to increase your overall Armour, which gives you solid defense and scales your Elemental Damage better. The Breath of the Mountains Sapphire Charm naturally synergizes with the build as Power Charges are the main source of this build's damage. Slotting this charm in allows you to essentially have an extra means of fuel!
If you do not have the previously mentioned charm, make sure to equip either a Sapphire Charm to help you survive against Count Geonor in Act 1 or the Topaz Charm for Jamanra. The Thawing Charm is also included as getting Frozen is an instant death sentence.
| List of Belts | List of Charms |
Runes, Soul Cores, and Idols
| Equipment | Sockets |
|---|---|
| Weapon | |
| Gloves | |
| Armor |
We recommend slotting in Storm Runes on the talisman to add more Lightning Damage, but Iron Runes are also great as most of your damage also scales on Physical damage.
Specifically for the gloves, the Boar Idol lets you build up Rage faster for your Flame Breath! As for your general Armor runes, use the Elemental Runes to reach the cap for all your resistances as you progress through the acts.
| All Runes | All Soul Cores | All Idols |
Lightning Wyvern Druid Skills
※ The Support Gems' priority are arranged in a descending order. The first one being the most important and the last being the least crucial.
Acts 1-3
Act 4 - Interludes
| Skill | Support Gems |
|---|---|
| Rend Rend | Concentrated Area Supports any skill with an area of effect, causing that area to be smaller but any area damage it deals to be higher. Rage I Supports Melee Attacks, causing them to grant Rage on Hit. Magnified Area I Supports any skill with an area of effect, making it larger. |
 Oil Barrage Oil Barrage Oil Barrage Shapeshift into a Wyvern and spit Oil at enemies, creating Oil Ground where the Projectiles land. Consumes Power Charges if possible to instead Channel a sustained barrage of electrified Oil that does not create Oil Ground. Projectiles are fired in sequence, allowing multiple Projectiles to Hit the same target. | Burgeon I Supports Channeling Skills you use yourself, causing them to deal more damage the longer they have been chanelled. Elemental Armament II Supports Attacks, causing them to deal more Elemental damage. Concentrated Area Supports any skill with an area of effect, causing that area to be smaller but any area damage it deals to be higher. |
| Elemental Weakness Elemental Weakness Curse all targets in an area after a short delay, lowering their Elemental Resistances. | Focused Curse Supports Curse skills, causing them to Curse enemies more quickly after being cast. Heightened Curse Supports curse skills, magnifying their power. Prolonged Duration II Supports any skill that has a duration, making that duration longer. |
| Thunderstorm Thunderstorm Conjure a thunderstorm which causes lightning strikes and torrential rain in an area. Enemies in the area are Drenched, causing them to become Shocked or Frozen more easily. Plants in the area become Overgrown. | Prolonged Duration II Supports any skill that has a duration, making that duration longer. Magnified Area I Supports any skill with an area of effect, making it larger. Prolonged Duration II Supports any skill that has a duration, making that duration longer. |
| Herald of Thunder Herald of Thunder While active, killing Shocked enemies with Attack damage, will cause subsequent Attack hits to release lightning bolts which deals Attack damage to all surrounding enemies. | Magnified Area I Supports any skill with an area of effect, making it larger. Lightning Attunement Supports attacks, causing them to gain Lightning Damage but deal less Cold and Fire Damage. Living Lightning Supports Skill which cause Damaging Hits. Living Lightning Minions are created when dealing Lightning damage with Supported Skills - bundles of living electricity that target nearby enemies with Chaining Attacks. Enemies will not directly engage the Minions, and can pass through them. Does not modify skills used by Minion. |
| Lingering Illusion Lingering Illusion Creates a short-lived illusory copy of yourself whenever you dodge roll. The copy can be damaged by enemies, and copies that are destroyed by an enemy will grant you a Power Charge. | Charge Profusion I Supports skills that can generate Charges, giving them a chance to generate and additional Charge when they do so. Harmonic Remnants II Supports Skills which create Remnants, allowing those Remnants to be collected from further away, with a chance to create an additional Remnant. Herbalism I Supports Persistent Buff skills, causing you to gain increased Life recovery from Flasks while the skill is active. |
| Barkskin Barkskin While active, taking Hit damage from enemies to your Energy Shield causes you to gain Armour for a short duration. Armour gained from multiple Hits can stack. The total Armour gained from this Skill cannot exceed the Item Armour on your Equipped Armour Items. | Prolonged Duration II Supports any skill that has a duration, making that duration longer. |
| Skill | Support Gems |
|---|---|
| Rend Rend | Lightning Attunement Supports attacks, causing them to gain Lightning Damage but deal less Cold and Fire Damage. Rage III Supports Melee Attacks, causing them to grant Rage on Hit. Supported Skills have signficantly higher Attack speed while you are not at maximum Rage. Rapid Attacks II Supports Attacks, causing them to Attack faster. Magnified Area II Supports any skill with an area of effect, making it larger at the cost of damage. |
| Flame Breath Flame Breath Shapeshift into a Wyvern and take to the skies, immolating enemies with a jet of fire. Channelling ends after a short amount of time but can be prolonged by spending Rage. Consumes a Power Charge if possible to Empower the Skill, Gaining extra Lightning damage and spending Rage more slowly. | Burgeon II Supports Channelling Skills you use yourself, causing them to deal more damage the longer they have been Channelled. Elemental Armament II Supports Attacks, causing them to deal more Elemental damage. Rapid Attacks II Supports Attacks, causing them to Attack faster. Magnified Area II Supports any skill with an area of effect, making it larger at the cost of damage. |
| Elemental Weakness Elemental Weakness Curse all targets in an area after a short delay, lowering their Elemental Resistances. | Focused Curse Supports Curse skills, causing them to Curse enemies more quickly after being cast. Heightened Curse Supports curse skills, magnifying their power. Prolonged Duration II Supports any skill that has a duration, making that duration longer. |
| Thunderstorm Thunderstorm Conjure a thunderstorm which causes lightning strikes and torrential rain in an area. Enemies in the area are Drenched, causing them to become Shocked or Frozen more easily. Plants in the area become Overgrown. | Shock Conduction II Supports any skill that Hits enemies, giving it a chance to also Shock nearby enemies when you Shock an enemy. Always Shocks enemies which are Drenched. Lightning Exposure Supports any skill that hits enemies, causing it to deal less damage but inflict Lightning Exposure when it shocks and enemy. Potent Exposure Supports Skills which apply Exposure to Enemies, increasing the effect of applied Exposure. |
| Herald of Thunder Herald of Thunder While active, killing Shocked enemies with Attack damage, will cause subsequent Attack hits to release lightning bolts which deals Attack damage to all surrounding enemies. | Magnified Area II Supports any skill with an area of effect, making it larger at the cost of damage. Lightning Attunement Supports attacks, causing them to gain Lightning Damage but deal less Cold and Fire Damage. Living Lightning Supports Skill which cause Damaging Hits. Living Lightning Minions are created when dealing Lightning damage with Supported Skills - bundles of living electricity that target nearby enemies with Chaining Attacks. Enemies will not directly engage the Minions, and can pass through them. Does not modify skills used by Minion. |
| Lingering Illusion Lingering Illusion Creates a short-lived illusory copy of yourself whenever you dodge roll. The copy can be damaged by enemies, and copies that are destroyed by an enemy will grant you a Power Charge. | Charge Profusion I Supports skills that can generate Charges, giving them a chance to generate and additional Charge when they do so. Harmonic Remnants II Supports Skills which create Remnants, allowing those Remnants to be collected from further away, with a chance to create an additional Remnant. Herbalism I Supports Persistent Buff skills, causing you to gain increased Life recovery from Flasks while the skill is active. |
| Barkskin Barkskin While active, taking Hit damage from enemies to your Energy Shield causes you to gain Armour for a short duration. Armour gained from multiple Hits can stack. The total Armour gained from this Skill cannot exceed the Item Armour on your Equipped Armour Items. | Prolonged Duration II Supports any skill that has a duration, making that duration longer. |
This Lightning Wyvern Druid leveling build makes use of Rend and Oil Barrage's use of Power Charge from Acts 2-3, and then transitions to the use of Rend + Flame Breath from Act 4 onwards. As for mobbing during Act 1, the Entangle + Contagion combo allows you to clear fodder quickly during Act 1.
The main concept of this build is to build rage and obtain a Lightning damage buff with Rend, and then use the accumulated rage and power charges to enable either Flame Breath or Oil Barrage.
Thunderstorm is a support spell that guarantees a Shock proc with Shock Conduction II, meaning you will always have the extra damage. Elemental Weakness then further increases the damage you deal during boss fights.
Barkskin allows you to further scale your Armour as your Energy Shield is hit, meaning you will both improve your offense and defense!
Power Charge Generation
This build's current engine of generating Power Charges is Lingering Illusions, but Devour and Wing Blast is used early on during Act 1. This build plans to transition into Critical Hits with the Forced Outcome ascendancy skill, so this can change with the Voll's Protector Plated Vestments!
Dodge whenever you are about to get hit, and Lingering Illusions should provide you with a Power Charge even from significantly far away using Harmonic Remnants.
However, during Act 1 and early Act 2, you can instead use Wing Blast when the boss's stun threshold is about 75% to generate a Power Charge.
Lightning Wyvern Druid Passive Tree
Passive Tree Progression
| # | Step |
|---|---|
| 1 | Focus on increasing your Skill and Attack Damage through Guardian of the Wilds. After that, get Attack Speed from Viciousness. |
| 2 | Use your Weapon Specialization points to allow your Talisman to get the Personal Touch node. The Wand should spec into Spell Damage and Duration through Lasting Incantations for Thunderstorm. You will have to switch forms regularly, so Shifted Strikes allow your melee strikes to deal absurd amounts of damage. |
| 3 | By the time you unlock the Shifted Strikes node, you should easily be able to complete the Trial of the Sekhemas, allowing you to get the Oracle's The Unseen Path ascendancy. This opens a path downwards that increases your Elemental Damage dealt and the Hidden Forms node. |
| 4 | Continue through this path and get both Swift Claw and Sharpened Claw for more Shapeshift Damage, and then grab the Innate Rune to highly increase your Lightning Damage capabilities and make full use of the Lightning Damage modifiers of your equipment. |
| 5 | Get the Draiocht Cleansing and Focused Channel node to increase the damage you deal with Channel skills to directly buff Oil Barrage, and then path to Spirit of the Wyvern and Endlessly Soaring to further maximize Elemental Damage and Spell Duration. |
| 6 | Proceed down to get the Primal Hunger keystone, allowing you to better sustain your Rage at the cost of +30% Damage as you will now transition to Flame Breath. After that, get the Ancient Aegis and Enhanced Barrier notables for additional survivability. |
| 7 | To close out until the end of Interludes, get the Cower Before the First Ones, Impact Force, and then Natural Essence. |
Passive Skill Tree Guide and List of Passives
Ascendancy Options
 Oracle Oracle
|
• Unlocks useful Passive nodes for better build variety. |
As of Patch 0.4, we recommend choosing the Oracle Ascendancy and obtaining The Unseen Path Ascendancy node to unlock the path towards Innate Runes and Hidden Forms.
You have the option to transition to the Shaman at a later stage of the game if you wish to switch to a different build once you reach the endgame.
Lightning Wyvern Druid Playstyle
Boss Rotation
For bossing, you will adopt a setup playstyle by gaining as much Power Charge as possible with Lingering Illusion and Wing Blast, and then bursting down the boss. The rotation is as follows:
- Dodge attacks to gain Power Charges from Lingering Illusions.
- Cast Thunderstorm to inflict Drowsed and Shocked.
- Use Rend to get the Lightning Damage buff for your skills and build Rage.
- Cast Elemental Weakness to lower Lightning Resistance.
- Use Flame Breath to melt the boss while repositioning.
- Rinse and repeat.
Mobbing Rotation
For mobbing, you will adopt a hit-n'-run playstyle by dodging with Lingering Illusion to gain Power Charge for Rend. The rotation is as follows:
- Dodge attacks to gain Power Charges from Lingering Illusions.
- Use enhanced Rend to mow mobs and proc Herald of Thunder.
- Rinse and repeat.
Lightning Wyvern Druid Build Progression
| Jump to an Act! | |||||
|---|---|---|---|---|---|
| Act 1 | Act 2 | Act 3 | |||
| Act 4 | Interludes | ||||
Act 1 Progression
To progress through Act 1 and beat Count Geonor using the Lightning Wyvern Druid leveling build, follow these steps:
| # | Steps |
|---|---|
| 1 | After beating the
|
| 2 | Head for the Mysterious Campsite at Clearfell to get an extra Level 1
|
| 3 | |
| 4 | Defeat
|
| 5 | Find and defeat
Note: Make sure to loot the Witch Hut to get Medium Flasks. |
| 6 | Defeat
|
| 7 | Progress to The Grim Tangle and defeat
|
| 8 | Look for the Haunted Treasure Inside the Tomb of the Consort and defeat the rare enemy to acquire a Level 1 Uncut Support Gem to be used later for Rend. Note: Once you find a Level 3 Uncut Skill Gem, use it to get the Rolling Magma gem, which unlocks the Wyvern Form and its melee attack. |
| 9 | Defeat
|
| 10 | |
| 11 | Start looking for the Dryadic Ritual in the same area to get an extra Level 1 Uncut Support Gem and slot in
|
| 12 | Defeat the
|
| 13 | Complete The Lost Lute at the Ogham Farmlands to obtain a Book of Specialisation for more specialization points.
|
| 14 | Search for the Crop Circle in the same area to defeat
|
| 15 | Proceed to Ogham Village and defeat
Note: Use the Uncut Skill Gem to get |
| 16 | Search and defeat the
|
| 17 | Continue and defeat
Note: Before fighting Geonor, it is recommended to get another Lv. 5 Uncut Skill Gem to get |
Act 2 Progression
To progress through Act 2 and beat Jamanra, the Abomination using the Lightning Wyvern Druid leveling build, follow these steps:
| # | Steps |
|---|---|
| 1 | |
| 2 | Defeat
|
| 3 | Clear Mobs in Keth until you get the
|
| 4 | Defeat
|
| 5 | Clear the Galleria Location for a random Jewel. |
| 6 | Open the Guarded Sarcophagus for an
|
| 7 | Three Elemental Offering Ring choices: Ruby Ring, Sapphire Ring, and Topaz Ring for flame, cold, and lightning resistance respectively. It is recommended to choose the Topaz Ring to prepare for
|
| 8 | Clear The City of Seven Waters for an Uncut Support Gem 2. You can use this to get
|
| 9 | Destroy the Effigy located in the Shrine of Bones for an
|
| 10 | Clear Mobs in The Bone Pits until you get the
|
| 11 | Complete A Theft of Ivory quest for an
|
| 12 | Place both Relics in the Valley of Titans to complete the Ancient Vows quest. Choose the Sun Clan Relic for more Charm charges gained.
|
| 13 | Complete A Crown of Stone quest for an
|
| 14 | Complete the Tradition's Toll quest to get a
|
| 15 | Clear the Forgotten Corpses Location for a
|
| 16 | Activate the
|
Act 3 Progression
To progress through Act 3 and beat Doryani using the Druid leveling build, follow these steps:
| # | Steps |
|---|---|
| 1 | |
| 2 |
Loot the basket found in the Orok Campfire to get a
|
| 3 |
Defeat the
|
| 4 |
Complete The Slithering Dead to get the
|
| 5 |
Interact with the Ravaged Corpse in the Jungle Grave to get a rare Belt. Take the Rawhide Belt for more Life Recovery Flasks. |
| 6 |
Defeat
|
| 7 |
Submit the Tribal Vengeance to get a charm. Choose the
|
| 8 | Complete the Trial of Chaos for more Ascendancy Points. Upon completion, obtain the Furious Wellspring passive to drastically improve your Rage generation. |
| 9 | |
| 10 |
Obtain an
|
| 11 | |
| 12 |
Use the
|
| 13 |
Farm a
|
Act 4 Progression
To progress through Act 4 and beat Tavakai using the Lightning Wyvern Druid build, follow these steps:
| # | Steps |
|---|---|
| 1 |
Get Shark's Fin in Whakapanu Island and submit it to Kaimana in the Tavakai's Ship to get either a
We recommend getting the Uncut Support Gem 4, and then getting one of the required support gems for
|
| 2 |
Defeat
|
| 3 |
Find the Barnacle before the Beckoning Clam event to get
|
| 4 |
Get the Humming Pearl from the Beckoning Clam and exchange it for a
|
| 5 |
Find the Chapel Key and interact with the Goddess of Justice to gain +30% life regeneration from flasks. |
| 6 |
Complete Dark Mists to gain a Book of Specialization and a
|
| 7 |
Get a
|
| 8 | Defeat
|
| 9 |
Release the Beast from its pen in the Isle of Kin and defeat it to gain
|
| 10 |
Complete the Trial of the Ancestors to obtain the following:
・See Navali's Rest to gain a random rune and 5% Increased Maximum Mana ・Pass Ngamahu's Test to get 5% Fire Resistance ・Pass Tawhoa's Test to get 5% Lightning Resistance ・Pass Tasalio's Test to get 5% Cold Resistance ・Gain 2 Weapon Specialization points by talking to The Mother. |
| 11 |
Ring the Morning and Evening Bell in Arastas to receive three
Note: You can use these to either craft a weapon, or trade for solid equipment! |
| 12 |
Get a random Greater Runes in the Meeting House. |
Interludes Progression
To progress through Interludes and set yourself up for mapping using the Lightning Wyvern Druid build, follow these steps:
| # | Steps |
|---|---|
| 1 |
Get a Level 13
|
| 2 |
Buy Greater Runes from the Ferryman in Holten. |
| 3 |
Defeat
|
| 4 | |
| 5 |
Get the Molten One's Gift in Skullmaw Stairway to get a +5% to your Maximum Life. |
| 6 |
Slot in both
|
| 7 |
Defeat
Note: If you were able to succeed, it is recommended to refund Entwined Realities to get The Lesser Harm and Forced Outcome |
| 8 |
Activate one out of Seven Pillars in Qimah based on what you need, you can change this any time. It is generally recommended to get Movement Speed. |
| 9 |
Fill the two Sacred Wells in Qimah Reservoir to get 1
Note: You can use these to either craft a weapon, or trade for solid equipment! |
| 10 |
Interact with the Ancient Monument in Ashen Forest for a Level 14
|
| 11 |
Defeat
|
| 12 |
Defeat
|
| 13 |
Get a free Unique Equipment of your choice from a randomized table from Elder Madox in Kriar Peaks. |
| 14 |
After finishing all three regions, talk to The Hooded One in Kingsmarch to gain another
|
Path of Exile 2 (PoE 2) Related Guides

0.4 Best Endgame Builds
| Rank | Build |
|---|---|
 |
|
 |
|
 |
|
 |
0.4 Leveling Builds
NEW |
NEW |
NEW |
NEW |
NEW |
NEW |
NEW |
NEW |
NEW |
NEW |
- | - |
All Build Guides
| List of Builds by Class | |||||||||||
|---|---|---|---|---|---|---|---|---|---|---|---|
 Huntress Huntress |
 Mercenary Mercenary |
 Monk Monk |
|||||||||
 Witch Witch |
 Sorceress Sorceress |
 Warrior Warrior |
|||||||||
 Ranger Ranger |
 Druid Druid |
- | |||||||||
| Other Build Guides | 0.3 Leveling Builds | How to Make a Good Build | |||||||||
Druid Leveling Builds
NEW |
Herald of Thunder While active, killing Shocked enemies with Attack damage, will cause subsequent Attack hits to release lightning bolts which deals Attack damage to all surrounding enemies.
Lingering Illusion Creates a short-lived illusory copy of yourself whenever you dodge roll. The copy can be damaged by enemies, and copies that are destroyed by an enemy will grant you a Power Charge.
Elemental Weakness Curse all targets in an area after a short delay, lowering their Elemental Resistances.
Oil Barrage Shapeshift into a Wyvern and spit Oil at enemies, creating Oil Ground where the Projectiles land. Consumes Power Charges if possible to instead Channel a sustained barrage of electrified Oil that does not create Oil Ground. Projectiles are fired in sequence, allowing multiple Projectiles to Hit the same target.
Thunderstorm Conjure a thunderstorm which causes lightning strikes and torrential rain in an area. Enemies in the area are Drenched, causing them to become Shocked or Frozen more easily. Plants in the area become Overgrown.
Barkskin While active, taking Hit damage from enemies to your Energy Shield causes you to gain Armour for a short duration. Armour gained from multiple Hits can stack. The total Armour gained from this Skill cannot exceed the Item Armour on your Equipped Armour Items.
Focus: Dragon, Lightning, Shock |
UP |
Herald of Ash While active, enemies you sufficiently Overkill with attacks will cause an explosion that ignites nearby enemies based on the Overkill damage dealt.
Furious Slam Shapeshift into a Bear and Slam the ground with great force, causing a pair of shockwaves. Can spend Rage to create larger shockwaves that leave behind Jagged Ground.
Volcano Uplift a volcano from the earth, damaging enemies standing on it and releasing a spray of molten Projectiles. While the volcano persists, Slamming it will cause another Projectile spray. Channelling this Skill for longer makes the initial eruption more violent, but does not affect subsequent Projectile sprays.
Fury of the Mountain Shapeshift into a Bear and repeatedly pound the ground, creating Molten Fissures that travel randomly in a wide arc in front of you.
Focus: Bear, Fire, Slam |
NEW |
Frost Bomb Creates a pulsing Orb of Frost. Each pulse inflicts Cold Exposure on nearby Enemies. When the Orb's duration ends, it explodes, dealing Cold damage to surrounding Enemies.
Herald of Ice While active, Shattering an enemy with an Attack Hit will cause an icy explosion that deals Attack damage to surrounding enemies.
Overwhelming Presence While active, enemies in your Presence are easier to Stun and inflict Elemental Ailments upon.
Lunar Assault Shapeshift into a Werewolf and swipe with your claws, projecting an arc of moonlight and ice forward in a crescent.
Lunar Blessing Shapeshift into a Werewolf and offer your Rage to the moon to receive a blessing, gaining bonus Cold damage, Attack speed and movement speed for yourself and any Wolf Minions you have from Wolf Pack or Predator's Mark. Spends all Rage to extend the Buff's duration. While the Buff is active, your WerewolfAttacks call down Moonbeams on Hit.
Cross Slash Shapeshift into a Werewolf and leap backwards as you gouge the ground with both claws. Hitting a Marked enemy with both gouges will Activate the Mark and cause an additional shockwave. Ice Fragments will be pulled into the location where the gouges cross and explode immediately. This skill can be used while using other skills to interrupt them.
Thunderstorm Conjure a thunderstorm which causes lightning strikes and torrential rain in an area. Enemies in the area are Drenched, causing them to become Shocked or Frozen more easily. Plants in the area become Overgrown.
Pounce Shapeshift into a Werewolf and leap to a target location, damaging enemies in an area around where you land. Predator's Mark will be Triggered targetting the highest Rarity enemie Hit, or if a Mark gem is socketed into this Skill, that Mark will be Triggered instead. Using this skill allows any Wolf Minions you have to leap immediately.
Focus: Wolf, Cold, Crowd Control |
Druid Class and Ascendancy Guides
| Base Class | |
|---|---|
| Ascendancies | |
Comment
Author

PoE 2 0.4 Druid Leveling Build - Lightning Wyvern
Please participate in our site
improvement survey
03/2026
improvement survey
03/2026
Would you assist in
improving Game8's site?
improving Game8's site?

×
We are listening to our users' valuable opinions and discussing how to act on them.
The information collected through this survey will be used for the purpose of improving our services. In addition, the information will only be disclosed a part of a statistic in a format that will not allow identification of personal information.
Begin Survey
Not Now
×
Please rate each item regarding Game8.co's Advertisements.
Amount of Ads
Very Dissatisfied
Somewhat Dissatisfied
Fine
Somewhat Satisfied
Highly Satisfied
Placement of Ads
Timing of Ad Display
Ad Loading Speed
Safeness of Ads
Content of Ads
×
Please rate each item regarding Game8.co's Quality of Articles.
Amount of information
Very Dissatisfied
Somewhat Dissatisfied
Fine
Somewhat Satisfied
Highly Satisfied
Frequency of updates
Speed of new information
Accuracy of articles
Understandibility of articles
Readability of sentences
×
Please rate each item regarding Game8.co's Usability of the Site.
Ease of finding information
Very Dissatisfied
Somewhat Dissatisfied
Fine
Somewhat Satisfied
Highly Satisfied
Loading Speed
Use of Color
Font Size
Visibility of Images
Easy to Understand Layout
×
Please rate each item regarding Game8.co's Message Boards, Comments.
Ease of Writing
Very Dissatisfied
Somewhat Dissatisfied
Fine
Somewhat Satisfied
Highly Satisfied
Readability
Ease in Finding Information
Comment Quality
Comment Quantity
Admin Response
×
Please rate each item regarding Game8.co's Site's new design.
Please rate our site's new design
Very Dissatisfied
Somewhat Dissatisfied
Fine
Somewhat Satisfied
Highly Satisfied
Do you think that the website's design change makes the site easier to use?
Has the new design made it easier for you to find information on the site?
Has the new design improved the overall visual appeal of the site?
How would you rate your overall satisfaction with the new design of the site?
×
How likely are you to recommend Game8 to someone you know?
Very Unlikely
0
1
2
3
4
5
6
7
8
9
10
Very Likely
If you have other opinions regarding potential improvement to the website, please share them with us. We would appreciate your honest opinion.
Note: This is a free response section, so you can proceed without entering anything.
Note: Please be sure not to enter any kind of personal information into your response.
Note: Please be sure not to enter any kind of personal information into your response.
×
Thank You
×
Thank you for participating in our survey! Your answers will help us to improve the quality of our website and services.
We hope you continue to make use of Game8.
We hope you continue to make use of Game8.
Close
Rankings
- We could not find the message board you were looking for.
Gaming News


![Marathon Review [First Impressions] | Playing The Long Game](https://img.game8.co/4435736/b9b1ec1e9219416dfc2599f85295d6ef.png/thumb)


Popular Games

Genshin Impact Walkthrough & Guides Wiki
Honkai: Star Rail Walkthrough & Guides Wiki
Umamusume: Pretty Derby Walkthrough & Guides Wiki
Pokemon Pokopia Walkthrough & Guides Wiki
Resident Evil Requiem (RE9) Walkthrough & Guides Wiki
Monster Hunter Wilds Walkthrough & Guides Wiki
Wuthering Waves Walkthrough & Guides Wiki
Arknights: Endfield Walkthrough & Guides Wiki
Pokemon FireRed and LeafGreen (FRLG) Walkthrough & Guides Wiki
Pokemon TCG Pocket (PTCGP) Strategies & Guides Wiki


Recommended Games
Fire Emblem Heroes (FEH) Walkthrough & Guides Wiki
Diablo 4: Vessel of Hatred Walkthrough & Guides Wiki
Yu-Gi-Oh! Master Duel Walkthrough & Guides Wiki
Super Smash Bros. Ultimate Walkthrough & Guides Wiki
Pokemon Brilliant Diamond and Shining Pearl (BDSP) Walkthrough & Guides Wiki
Elden Ring Shadow of the Erdtree Walkthrough & Guides Wiki
Monster Hunter World Walkthrough & Guides Wiki
The Legend of Zelda: Tears of the Kingdom Walkthrough & Guides Wiki
Persona 3 Reload Walkthrough & Guides Wiki
Cyberpunk 2077: Ultimate Edition Walkthrough & Guides Wiki


All rights reserved
© 2010 - 2024 Grinding Gear Games
The copyrights of videos of games used in our content and other intellectual property rights belong to the provider of the game.
The contents we provide on this site were created personally by members of the Game8 editorial department.
We refuse the right to reuse or repost content taken without our permission such as data or images to other sites.