Complete Act 2 Walkthrough
Latest: 0.5.0 Release Date
☆ Fate of the Vaal ▶︎ The Last of the Druids
┗ Bonded Mods | 0.4 Mystery Box
★ Druid: Class Overview | Builds
☆ NEW: Disciple of Varashta Ascendancy!
★ Best Class | Best Builds | Leveling Builds
This is a walkthrough for Act 2 in Path of Exile 2. Read on for a guide to finishing Act 2, how to beat the Act 2 bosses, and their rewards here!
| ◀ Previous Act | Next Act ▶ |
|---|---|
| Act 1 Walkthrough | Act 3 Walkthrough |
 Attention! Attention! |
Note that maps in the game are randomly generated, and the sample layouts on this page are meant to serve as a general guide. |
|---|
List of Contents
Act 2 Walkthrough
| Act 2 Main Quests | |
|---|---|
| 1 | Earning Passage ┗ Boss Battle: Rathbreaker |
| 2 | The Trail of Corruption ┗ Boss Battle: Rudja, Dread Engineer ┗ Boss Battle: Balbala, The Traitor ┗ Boss Battle: Jamanra, the Risen King ┗ Boss Battle: Watchful Twins ┗ Boss Battle: Tor Gul, The Defiler ┗ Boss Battle: Jamanra, The Abomination |
| 3 | The City of Seven Waters ┗ Boss Battle: Kabala, Constrictor Queen ┗ Boss Battle: Azarian, The Forsaken Son |
| 4 | A Theft of Ivory ┗ Boss Battle: Iktab, the Deahtlord and Ekbab, Ancient Steed |
| 5 | A Crown of Stone ┗ Boss Battle: Zalmarath, the Colossus |
Earning Passage
| Objectives | |
|---|---|
| 1 | 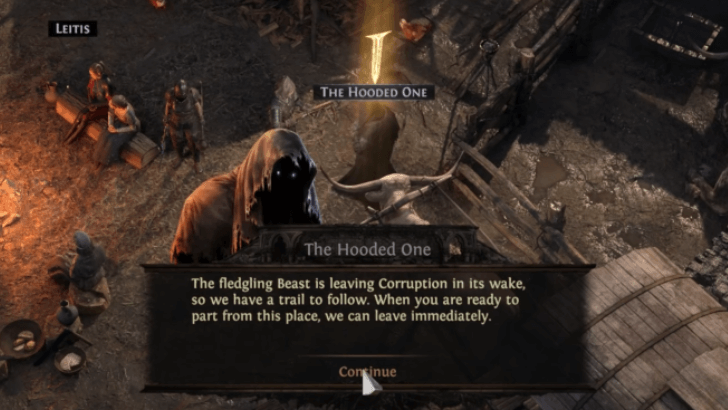 Talk to the Hooded One Talk to the Hooded OneAfter defeating Count Geonor in Ogham Manor, travel to Clearfell Encampment and talk to The Hooded One. Choose the dialogue option "Follow the Beast's trail", which starts a short cutscene. This marks the start of Act 2. |
| 2 |  Talk to Zarka near the Caravan Talk to Zarka near the CaravanAfter talking to The Hooded One, you will automatically teleport to Vastiri Outskirts. Go near the Caravan and talk to Zarka. |
| 3 | 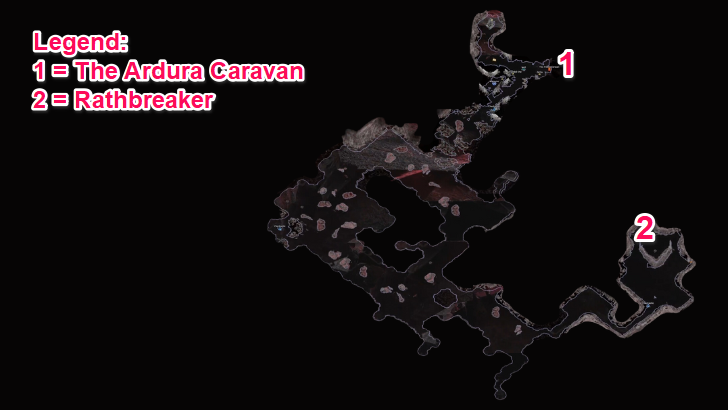 In Vasitri Outskirts, travel to Sun Clan Cliff on the other end of the area and defeat Rathbreaker. Complete the quest by returning to Zarka. |
Earning Passage Quest Walkthrough
The Trail of Corruption
| Objectives | |
|---|---|
| 1 |  Talk to The Hooded One and Sekhema Asala Talk to The Hooded One and Sekhema AsalaAfter defeating Rathbreaker, you may now enter The Ardura Caravan. Talk to The Hooded One and Sekhema Asala. Use the Desert Map to travel and explore Mawdun Quarry. |
| 2 |  Use the Desert Map and look for the pin that says "Click to travel to Mawdun Quarry". Clicking this automatically teleports you to Mawdun Quarry. |
| 3 |  From Mawdun Quarry, look for the entrance to Mawdun Mine on the other end of the area. |
| 4 | 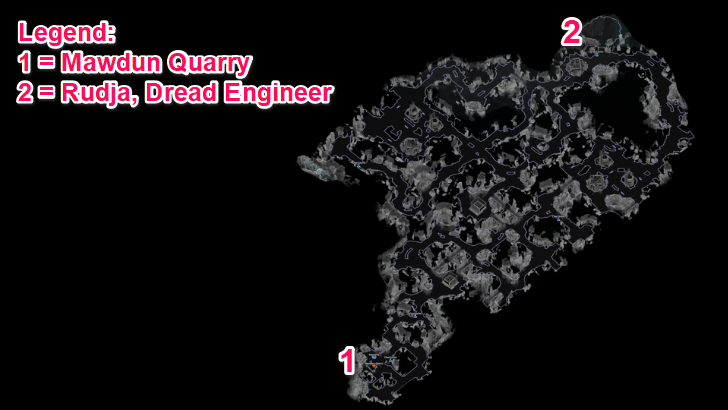 You must find and defeat Rudja, Dread Engineer, found within Mawdun Mine. The boss can be found somewhere on the opposite side of the map. |
| 5 |  Talk to Risu back in The Ardura Caravan
After defeating Rudja, release Risu, Faridun Defector from the cage and talk to her back at the The Ardura Caravan. |
| 6 |  Use the Desert Map, look for the pin that says "Click to travel to The Halani Gates". You will automatically teleport to The Halani Gates upon clicking the pin. |
| 7 | 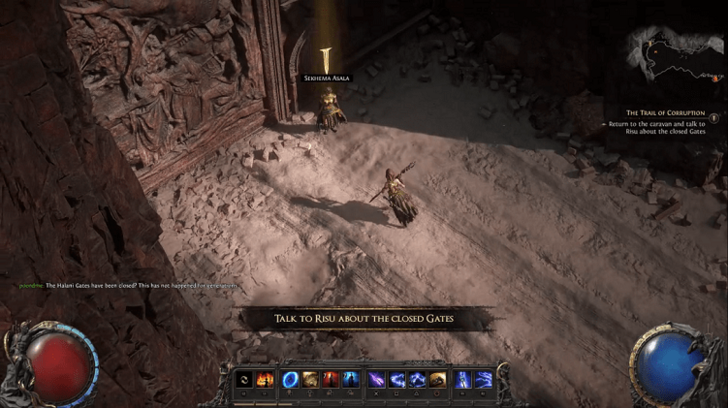 Talk to Sekhema Asala Near the Gate Entrance
Go to the gates, where you can find Sekhema Asala. Finish interacting with Sekhema Asala and go back to The Ardura Caravan. |
| 8 |  Talk to Risu in The Ardura Caravan
Upon returning to The Ardura Caravan, talk to Risu near the front of the caravan. |
| 9 |  Ascend Traitor's Passage and Reach Halani Gates Ascend Traitor's Passage and Reach Halani GatesUsing the Desert Map again, you must click on the same pin as when you went to The Halani Gates. This time, it teleports you to Traitor's Passage. |
| 10 | 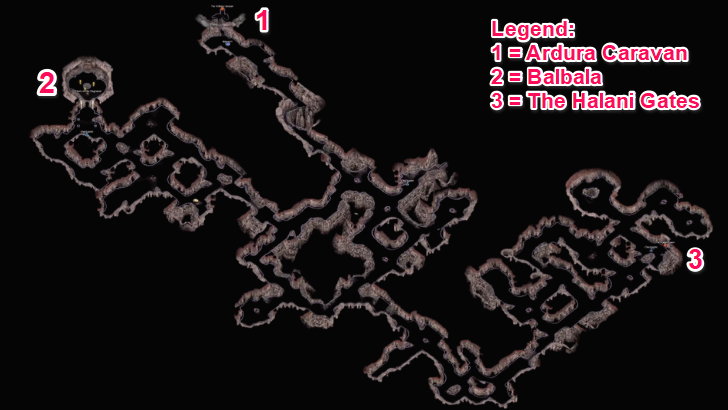 From Traitor's Passage, look for the entrance to The Halani Gates. This area splits off into two, with one end going to The Halani Gates and the other leading to Balbala, the Traitor. |
| 11 | 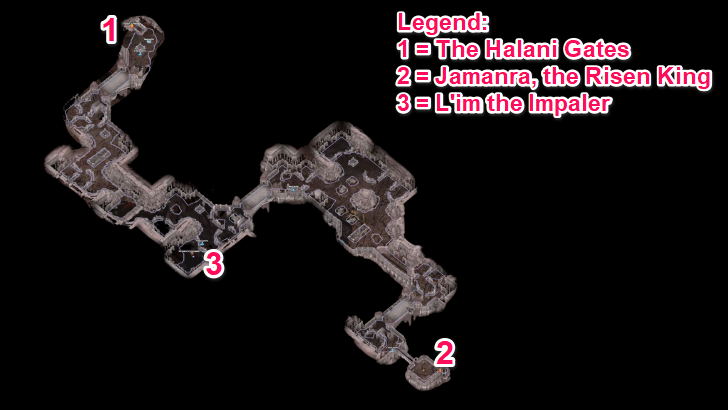 Upon entering The Halani Gates, proceed to the other end of the area to fight Jamanra, the Risen King. He will flee towards a sandstorm area when he reaches around 30% HP. Follow Jamanra into the sandstorm area. |
| 12 |  Return to the Caravan and Complete the Horn of Vastiri Return to the Caravan and Complete the Horn of VastiriReturn to the Caravan and speak with Zarka and Sekhema Asala. Get The Horn of the Vastiri by completing the following quests: The City of Seven Waters, A Theft of Ivory, and A Crown of Stone. Use the Horn at the frontmost part of the caravan past Sekhema Asala to clear the sandstorm and continue with the quest. |
| 13 |  Use the Desert Map to travel to Deshar. Click on the pin that says "Click to travel to Deshar" to automatically teleport to Deshar. |
| 14 |  Go through Deshar and look for the entrance to the Path of Mourning somewhere on the other side of the area's entrance. |
| 15 | 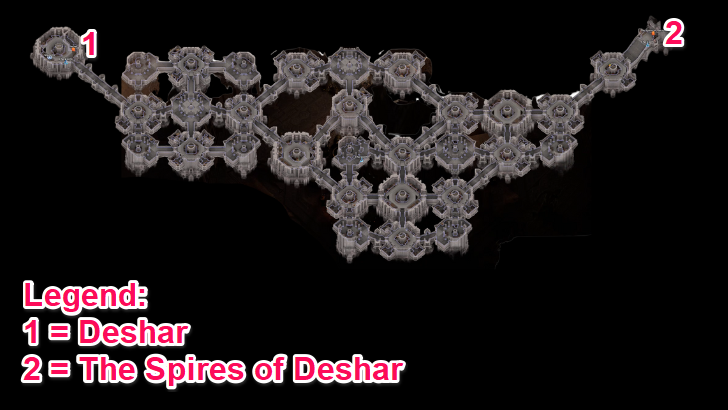 Go through the Path of Mourning and look for the entrance to The Spires of Deshar on the direct opposite end of the area. |
| 16 | 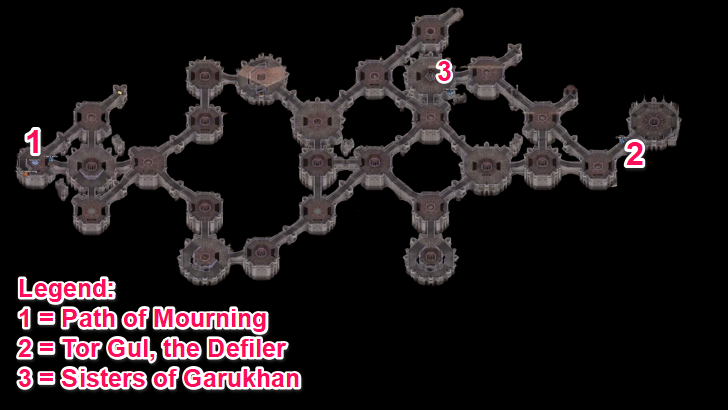 Ascend Deshar to the Path of Mourning and Defeat Tor Gul
Upon reaching The Spires of Deshar, go to the opposite end of the area to find and defeat Tor Gul, The Defiler. |
| 17 | 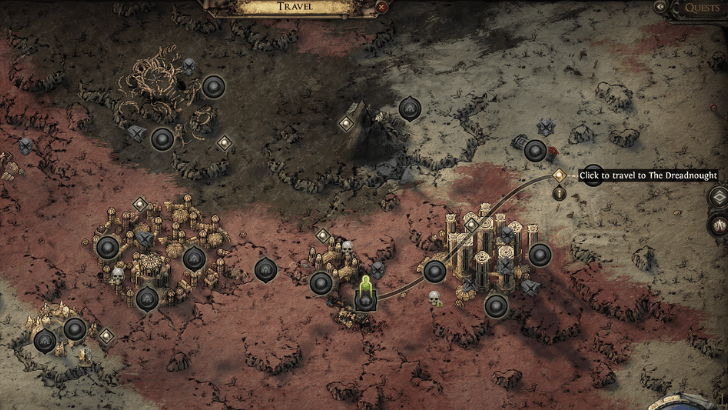 Return to The Ardura Caravan and travel to The Dreadnought using the Desert Map. |
| 18 | 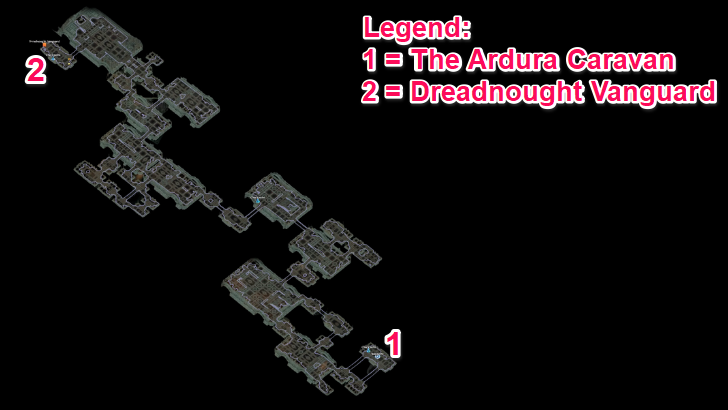 From The Dreadnought, go through the carriages until you reach the end, where you can find the entrance to Dreadnought Vanguard. |
| 19 |  Once in the Dreadnought Vanguard, proceed to the opposite end of the area, where you must defeat Jamanra, the Abomination. This boss has two phases, so get ready for a lengthy fight! |
| 20 |  Return to The Ardura Caravan
Upon defeating Jamanra, The Abomination, complete the quest by returning to The Ardura Caravan and speaking with The Hooded One and Sekhema Asala. This marks the end of Act 2. |
The Trail of Corruption Quest Walkthrough
Optional Boss: Balbala, The Traitor
Balbala, The Traitor is an optional boss found at Traitor's Passage. Balbala, The Traitor can be found at the Ancient Seal area.
Balbala, the Traitor Boss Guide
Optional Boss: L'im the Impaler
L'im the Impaler is an optional boss found at The Halani Gates. L'im the Impaler can be somewhere in the middle of the area, by the Forward Command Tents.
Optional Boss: Watchful Twins
Watchful Twins is an optional boss found at Deshar. Watchful Twins can be found at the Forgotten Corpses area.
Optional Quest: Tradition's Toll
| Objectives | |
|---|---|
| 1 |  Talk to Shambrin in The Ardura Caravan
Within The Ardura Caravan, talk to Shambrin to obtain the quest Tradition's Toll. |
| 2 | Using the Desert Map, look for the pin that says "Click to travel to Deshar". You will automatically be teleported to Deshar upon clicking. |
| 3 |  Within Deshar, you need to look for a Fallen Dekhara. It can most likely be found somewhere near the center of the area. |
| 4 |  Interact with the Fallen Dekhara
Upon interacting with the Fallen Dekhara, a Final Letter will be dropped. It is an item with green text that you can pick up. A green exclamation mark will also appear in your map when it is nearby. It may appear as a simple quest marker when doing the quest in Cruel difficulty. |
| 5 |
Return to Shambrin in The Ardura Caravan Return to The Ardura Caravan and talk to Shambrin to claim your quest rewards. |
Tradition's Toll Quest Walkthrough
The City of Seven Waters
| Objectives | |
|---|---|
| 1 |  Travel to Keth using the Desert Map in The Ardura Caravan. |
| 2 |  Within Keth, look for the entrance to The Lost City, found on the opposite end of the area. |
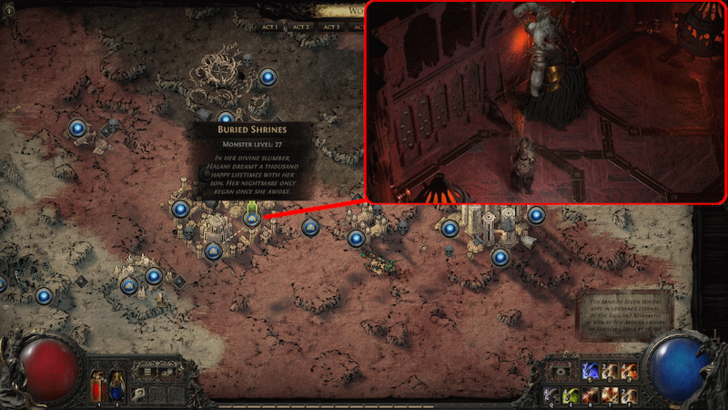
| 3 | 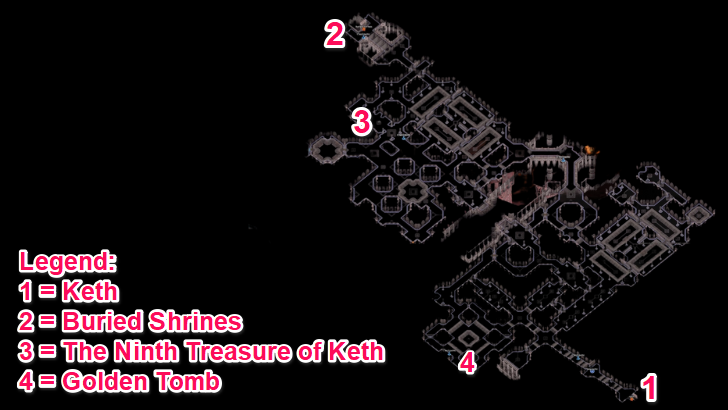 Explore The Lost City and find the entrance to the Buried Shrines on the other side of the map from where you enter. |
| 4 | 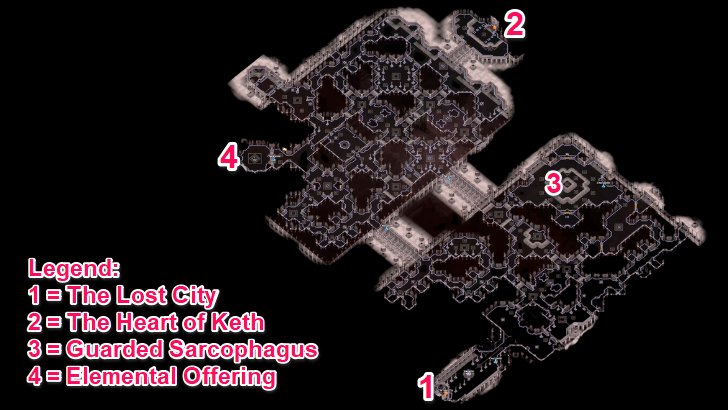 Within Buried Shrines, look for the entrance to The Heart of Keth. This area is divided into two major regions. The entrance to The Heart of Keth can be found on the opposite end of the second major region. |
| 5 |  Defeat Azarian, The Forsaken Son
Within The Heart of Keth, go through the area until you encounter Azarian, The Forsaken Son. Defeat this boss to gain access to the Shrine of the Water Goddess. |
| 6 | 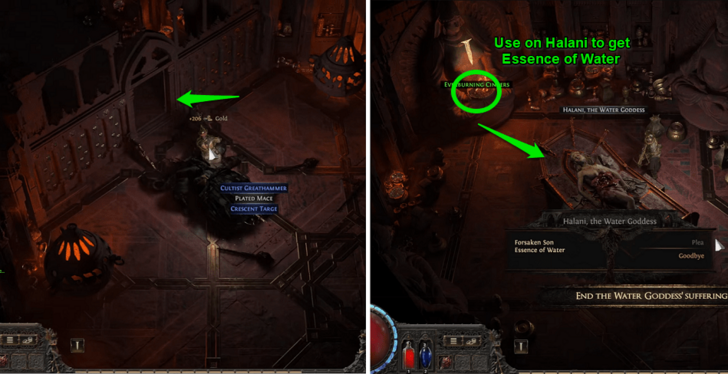 After defeating Azarian, enter the shrine and talk to Halani and use the Everburning Cinders near the statue to ignite her and collect the Essence of Water from her ashes. Complete the quest by returning to Zarka in The Ardura Caravan. |
The City of Seven Waters Quest Walkthrough
Optional Boss: Kabala, Constrictor Queen
Kabala, Constrictor Queen is an optional boss found at Keth. Kabala can be found at the Viper Pit area.
Kabala, Constrictor Queen Boss Guide
Optional Boss: The Ninth Treasure of Keth
The Ninth Treasure of Keth is an optional boss found at The Lost City. This boss roams a specific hallway with a checkpoint nearby.
The Ninth Treasure of Keth Boss Guide
Optional Loot: Golden Tomb
Within The Lost City, a Golden Tomb can be found in a relatively spacious area. Opening it grants you an Uncut Spirit Gem.
Optional Loot: Elemental Offering
Within the Buried Shrines, an Elemental Offering can be found in one of the corners of the map. Here, you may choose one of three offerings to gain additional Lightning Resistance, Cold Resistance, or Fire Resistance.
A Theft of Ivory
| Objectives | |
|---|---|
| 1 |  Travel to Mastodon Badlands Travel to Mastodon BadlandsTravel to Mastodon Badlands using the Desert Map in The Ardura Caravan. |
| 2 | 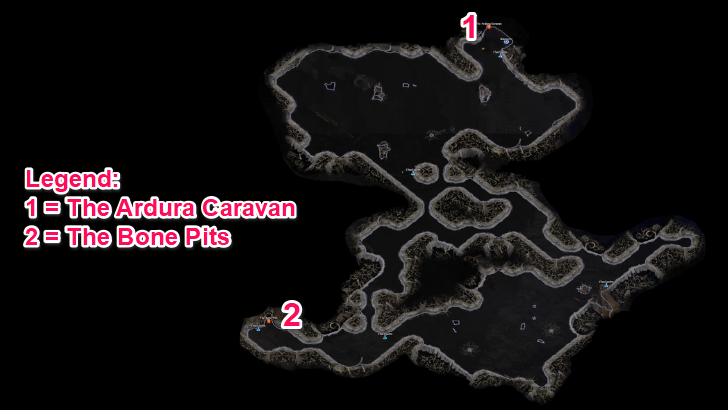 Within Mastodon Badlands, look for the entrance to The Bone Pits somewhere in the opposite side of the map. |
| 3 |  Upon entering The Bone Pits, look for a small dome called the Blackrib Pit near a checkpoint on the other side of the map. |
| 4 |  Defeat Iktab, the Deahtlord and Ekbab, Ancient Steed Defeat Iktab, the Deahtlord and Ekbab, Ancient SteedIn the Blackrib Pit, defeat Iktab, the Deahtlord and Ekbab, Ancient Steed. Collect the Mastodon Tusks after defeating both bosses. |
| 5 |  Return to Zarka Return to ZarkaComplete the quest by returning to The Ardura Caravan and giving the Mastodon Tusks to Zarka. |
A Theft of Ivory Quest Walkthrough
A Crown of Stone
| Objectives | |
|---|---|
| 1 | 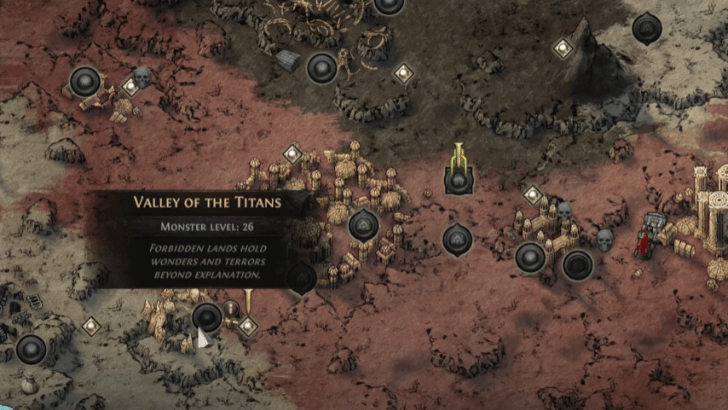 Travel to the Valley of the Titans Travel to the Valley of the TitansTravel to Valley of the Titans using the Desert Map in The Ardura Caravan. |
| 2 | 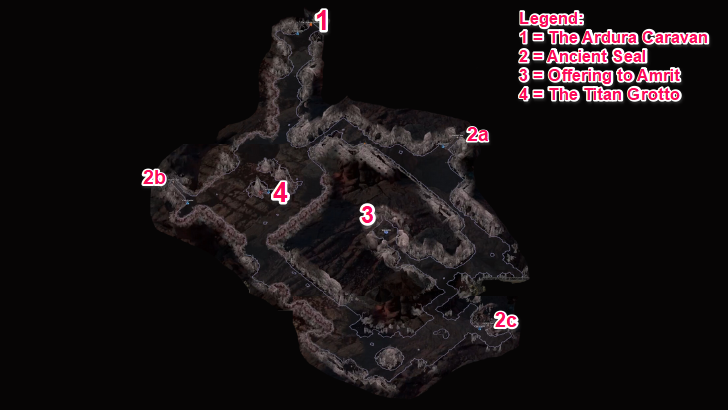 Within the Valley of the Titans, activate 3 Ancient Seals found around the area. Activating all 3 Ancient Seals unlocks the entrance to The Titan Grotto. |
| 3 | 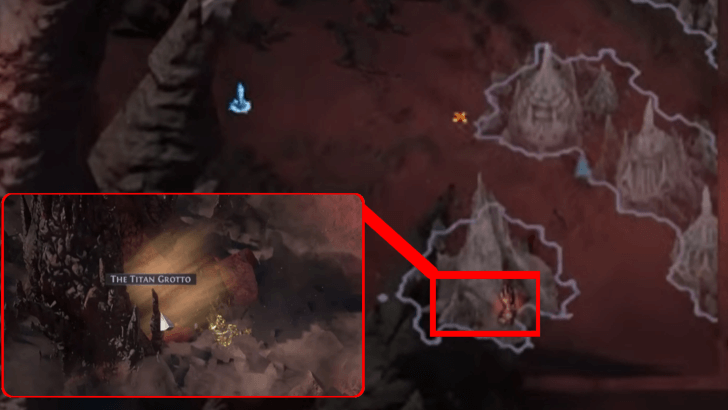 Find and Enter The Titan Grotto Find and Enter The Titan GrottoFollow the Red Quest Marker found in your minimap. The marker will lead you to The Titan Grotto entrance. |
| 4 |  Explore The Titan Grotto to find the Dais of Reckoning. There, defeat Zalmarath, the Colossus and collect the Flame Ruby. |
| 5 |  Return to Zarka at Ardura Caravan Return to Zarka at Ardura CaravanComplete the quest by returning to The Ardura Caravan and giving the Flame Ruby to Zarka. |
A Crown of Stone Quest Walkthrough
Optional Quest: Ancient Vows
| Objectives | |
|---|---|
| 1 |  Obtain a Sun Clan Relic
Look for a Sun Clan Relic, randomly obtained from defeating enemies in The Bone Pits. It will appear as a green text on the ground, so keep your eyes peeled for them so you won't miss them! |
| 2 |  Obtain a Kabala Clan Relic
Look for a Kabala Clan Relic, which can be obtained at Keth. Note that just like the Sun Clan Relic, the Kabala Clan Relic is just a chance drop from these enemies. They would also appear as a green text on the ground. |
| 3 | 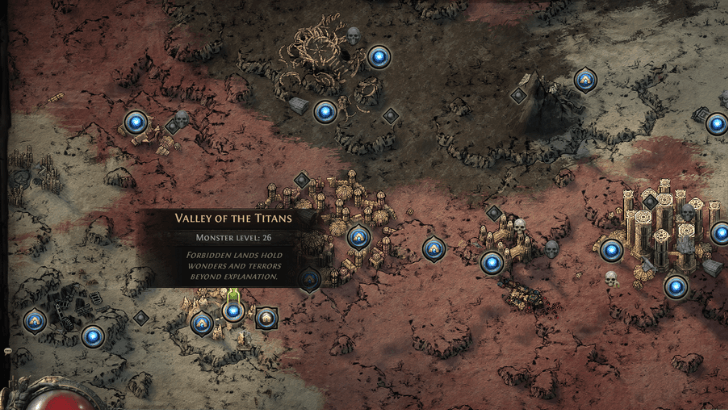 Using the Desert Map, go to the Valley of the Titans. |
| 4 | Within the Valley of the Titans, look for the Offering to Amrit, found near the area's waypoint. |
| 5 |  Interact with the Medallion and place both the Sun Clan Relic and the Kabala Clan Relic. |
| 6 | 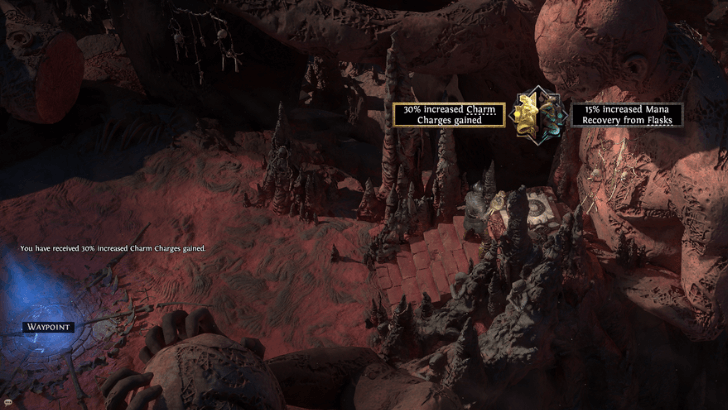 Select the relic with the buff you would like to have. The active relic and buff will be highlighted. |
List of All Locations in Act 2
All Locations in Act 2
Act 2 Boss Guide
Rudja, Dread Engineer
| Rudja, Dread Engineer | |
|---|---|
 |
|
| Boss Type | Main |
| Damage Types | Physical, Fire |
| Resistances | Fire, Physical |
| Weaknesses | Cold |
| Rewards | The Trail of Corruption quest progress |
Rudja's most devastating attack is when she starts charging at you while swinging her weapon. Getting hit by this attack initiates an explosion that will most likely kill you in one hit. Don't try to sneak some damage in when she does this and just keep running away.
Rudja, Dread Engineer Boss Guide
Rathbreaker
| Rathbreaker | |
|---|---|
 |
|
| Boss Type | Main |
| Damage Types | Physical |
| Resistances | None |
| Weaknesses | None |
| Rewards | Earning Passage quest progression |
Rathbreaker is another boss fight that can quickly overwhelm you with hoardes of enemies rushing at you and other enemies throwing their spears from the high ground. Always be ready to throw a quick AoE attack to clear, or at least crowd control, the packs of monsters.
Balbala, The Traitor
| Balbala, The Traitor | |
|---|---|
 |
|
| Boss Type | Optional |
| Damage Types | Physical, Chaos, Fire |
| Resistances | Fire |
| Weaknesses | Cold |
| Rewards | Balbala's Barya - Allows access to the Trial of Sekhemas |
When Balbala disappears then poison gas starts spreading from the center, go around the arena and look for Balbala. Getting closer to the boss makes her slowly lose her invisibility. Getting close enough will make her do a Slam Attack and end this phase.
Balbala, The Traitor Boss Guide
Jamanra, the Risen King
| Jamanra, the Risen King | |
|---|---|
 |
|
| Boss Type | Main |
| Damage Types | Physical |
| Resistances | Physical, Fire, Lightning |
| Weaknesses | Cold |
| Rewards | The Trail of Corruption main quest progress |
Jamanra's unblockable attack creates an explosion in front of him which becomes the safe zone for the follow up explosion. Once Jamanra lights red to prepare for an unblockable attack, stay away from the initial explosion then stay in the small circle in the middle to avoid the next one.
Jamanra, the Risen King Boss Guide
Kabala, Constrictor Queen
| Kabala, Constrictor Queen | |
|---|---|
 |
|
| Boss Type | Optional |
| Damage Types | Physical |
| Resistances | None |
| Weaknesses | Cold |
| Rewards | Book of Specialization - Grants two Weapon Set Passive Skill Points |
When Kabala summons the Bone Walls, she will follow it up with a powerful Slam attack. Find an opening between the Bone Walls and leave the Venom Pit to escape this attack.
Kabala, Constrictor Queen Boss Guide
Zalmarath, the Colossus
| Zalmarath, the Colossus | |
|---|---|
 |
|
| Boss Type | Main |
| Damage Types | Physical, Cold, Fire, Lightning |
| Resistances | Physical, Fire |
| Weaknesses | Cold |
| Rewards | The Flame Ruby (A Crown of Stone quest item) |
When Zalamarth slams and leaves its sword in the center of the arena, it will follow up with a beam that covers the whole area that deals a lot of damage. Use the sword as cover to avoid this attack.
Zalmarath, the Colossus Boss Guide
Tor Gul, the Defiler
| Tor Gul, the Defiler | |
|---|---|
 |
|
| Boss Type | Main |
| Damage Types | Physical, Fire, Chaos |
| Resistances | Fire, Physical |
| Weaknesses | None |
| Rewards | The Trail of Corruption main quest progress;Unlocks the Ascent to Power quest |
With all the AoE attacks that Tor Gul does, it's most dangerous is when it traps you between its arms and sets it on fire with a powerful blast and fire tornadoes. Stick to its arms as much as possible to avoid the powerful hit.
Tor Gul, the Defiler Boss Guide
Ekbab, Ancient Steed
| Ekbab, Ancient Steed | |
|---|---|
 |
|
| Boss Type | Main |
| Damage Types | Physical, Lightning, Fire |
| Resistances | Lightning |
| Weaknesses | None |
| Rewards | Mastodon Tusks (A Theft of Ivory quest item) |
Defeating Iktab first leaves Ekbab for the second phase which is easier to deal with due to its lack of powerful spells. Defeating Ekbab first, though easier, lets Iktab cast stronger spells, but it creates more openings that ranged characters can use to deal damage.
Ekbab, Ancient Steed Boss Guide
Azarian, the Forsaken Son
| Azarian, the Forsaken Son | |
|---|---|
 |
|
| Boss Type | Main |
| Damage Types | Physical, Fire |
| Resistances | Physical, Fire |
| Weaknesses | None |
| Rewards | The City of Seven Waters quest progress |
The braziers at the corners of the arena release Burning Ground when broken, filling that section of the stage with flames. To avoid this, position yourself so Azarian's attacks don't hit and break the braziers. Be mindful of your own attacks as well, as they can also shatter the braziers if misdirected.
Azarian, the Forsaken Son Boss Guide
Watchful Twins
| Watchful Twins | |
|---|---|
| Boss Type | Optional |
| Damage Types | Physical, Lightning, Cold |
| Resistances | Physical, Fire, Cold, Lightning |
| Weaknesses | None |
| Rewards | Djinn Barya |
The Watchful Twins present a challenging fight, especially with their two random monster modifiers. However, you can make the encounter easier by luring them out one at a time. By moving to one side of the arena and approaching their spawn area, only one boss will engage you. Be cautious not to venture too close to the other side, as this will trigger the second boss to join the fight.
Jamanra, the Abomination
| Jamanra, the Abomination | |
|---|---|
 |
|
| Boss Type | Main |
| Damage Types | Physical, Lightning |
| Resistances | Physical, Lightning, Fire |
| Weaknesses | Cold |
| Rewards | The Trail of Corruption quest completion |
During Phase 1, Jamanra can summon a sandstorm which deals damage. Stay behind Asala to get protected from the storm. Asala's storm protection extends all the way to the other end of the boss arena so there's a lot of space to move around to deal with the additional enemies.
Jamanra, the Abomination Boss Guide
Act 2 Rewards
Quest Rewards
| Earning Passage | ・Uncut Buff Skill Gem |
|---|---|
| The Trail of Corruption | ・Unlocks Next Quest |
| The City of Seven Waters | ・Uncut Support Gem |
| A Theft of Ivory | ・Uncut Support Gem |
| A Crown of Stone | ・Uncut Support Gem ・The Horn of the Vastiri |
Path of Exile 2 Related Guides

List of All Acts
| Act 1 | Act 2 |
| Act 3 | Act 4 |
All Points of Interest
Comment
Author

Complete Act 2 Walkthrough
Rankings
- We could not find the message board you were looking for.

Gaming News

![The Liar Princess and the Blind Prince Review [PC] | Lovely to Look at but Tedious to Play](https://img.game8.co/4442586/8d95f5faf05780f1765ce7e0938bd825.jpeg/show)

![Monster Hunter Stories 3 Review [First Impressions] | Simply Rejuvenating](https://img.game8.co/4438641/2a31b7702bd70e78ec8efd24661dacda.jpeg/thumb)
![The Seven Deadly Sins: Origin Review [First Impressions] | A Promising Start](https://img.game8.co/4440581/584e0bfb87908f12c4eab6e846eb1afd.png/thumb)
Popular Games

Genshin Impact Walkthrough & Guides Wiki
Umamusume: Pretty Derby Walkthrough & Guides Wiki
Pokemon Pokopia Walkthrough & Guides Wiki
Honkai: Star Rail Walkthrough & Guides Wiki
Monster Hunter Stories 3: Twisted Reflection Walkthrough & Guides Wiki
Arknights: Endfield Walkthrough & Guides Wiki
Wuthering Waves Walkthrough & Guides Wiki
Zenless Zone Zero Walkthrough & Guides Wiki
Pokemon TCG Pocket (PTCGP) Strategies & Guides Wiki
Monster Hunter Wilds Walkthrough & Guides Wiki


Recommended Games
Fire Emblem Heroes (FEH) Walkthrough & Guides Wiki
Diablo 4: Vessel of Hatred Walkthrough & Guides Wiki
Cyberpunk 2077: Ultimate Edition Walkthrough & Guides Wiki
Yu-Gi-Oh! Master Duel Walkthrough & Guides Wiki
Super Smash Bros. Ultimate Walkthrough & Guides Wiki
Pokemon Brilliant Diamond and Shining Pearl (BDSP) Walkthrough & Guides Wiki
Elden Ring Shadow of the Erdtree Walkthrough & Guides Wiki
Monster Hunter World Walkthrough & Guides Wiki
The Legend of Zelda: Tears of the Kingdom Walkthrough & Guides Wiki
Persona 3 Reload Walkthrough & Guides Wiki


All rights reserved
© 2010 - 2024 Grinding Gear Games
The copyrights of videos of games used in our content and other intellectual property rights belong to the provider of the game.
The contents we provide on this site were created personally by members of the Game8 editorial department.
We refuse the right to reuse or repost content taken without our permission such as data or images to other sites.