 under the page's title to be notified of any updates!
This survey will take about 1 minute.
Your answers will help us to improve our website.
Path of Exile 2 (PoE 2)
PoE 2 0.4 Huntress Leveling Build - Buckler Parry
Latest: 0.5.0 Release Date
☆ Fate of the Vaal ▶︎ The Last of the Druids
┗ Bonded Mods | 0.4 Mystery Box
★ Druid: Class Overview | Builds
☆ NEW: Disciple of Varashta Ascendancy!
★ Best Class | Best Builds | Leveling Builds
This is a leveling build for the Huntress in Path of Exile 2 (PoE 2)'s The Last of the Druids update that uses Parries and its debuffs to activate skill effects for massive burst damage. Check out this Huntress leveling build, including its progression, equipment, socketables, skills, and playstyle!
 Attention! Attention! |
The build is updated for Act 3 of Patch 0.4.0: The Last of the Druids. |
|---|
Buckler Parry Huntress Build Summary
Buckler Parry Huntress Leveling Build
 Buckler Parry Huntress Build Buckler Parry Huntress Build |
 Herald of Ice While active, Shattering an enemy with an Attack Hit will cause an icy explosion that deals Attack damage to surrounding enemies.
 Disengage Jump back as you rupture the earth in front of you with spearpoints, damaging enemies. Consumes the Parried Debuff on Hitting enemies to release a shockwave and grant you a Frenzy Charge. This skill can be used while using other skills, and causes Strikes and Projectiles to miss you while jumping. This skill cannot be Ancestrally Boosted.
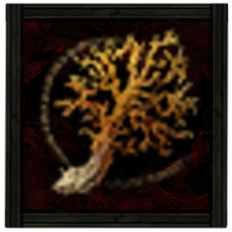
 Fangs of Frost Perform an icy stab that exploits enemies who are already off balance. Hitting a Parried target Consumes the Debuff to cause a nova of frost and leave Chilled Ground.
 Glacial Lance Throw a single lance that leaves icy fragments in its wake. The fragments Chill nearby enemies. Consumes a Frenzy Charge if possible to cause the ice fragments created by the first Projectile to explode outwards after a short duration, peppering enemies with shrapnel.
 Elemental Sundering Plunge your Spear into the ground to emit a pulse that Consumes Freeze, Shock, and Ignite on a number of nearby enemies, Allies and Corpses. The pulse itself deals no damage, but each Ailment Consumed causes an explosion of the corresponding elemental damage type.
 Iron Ward While active, stores a percentage of the Physical damage that is prevented by your Armour or other sources of damage reduction. Using this Skill releases the stored damage as a nova of spikes.
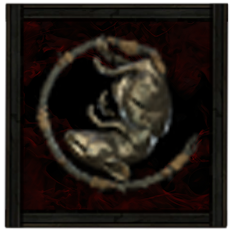
 Parry Ready your Buckler to parry the next Strike or Projectile that would Hit you, Blocking the Hit and retaliating with a quick sweep that leaves enemies off balance, casuing them to take increased Attack damage.
|
|
|
|
This Parry Huntress leveling build makes full use of Fangs of Frost to deal huge burst damage in a wide area. Parry now hits all enemies near the enemy that activates your parry, while Fangs of Frost activates all parry debuffs in the area. This causes a chain reaction of massive ice burst damage, allowing you to clear content efficiently.
You're also able to play the Huntress strength with ranged attacks as the build develops by getting Glacial Lance, which gives us an option to use Disengage after a parry for Frenzy Charges and unleash massive AoE bursts, and lastly, consuming any enemy that still lives while frozen with Elemental Infusion for map-wide clears.
We'll also want to supplement our AoE damage with Iron Ward to supplement our clear speed with additional burst for fast screen-wide clears, as well as Herald of Ice to get freeze effects on enemies outside our Fangs of Frost range.
| Date | Changes Made |
|---|---|
| 12/20/2025 | ・Updates for acts 2 and 3 added. |
| 12/17/2025 | ・Parry Huntress Leveling Build for Act 1 created. |
Buckler Parry Huntress Equipment
※ The affixes shown below are arranged based on descending priority.
| Gear | Affixes |
|---|---|
 Ironhead Spear Ironhead Spear Ironhead Spear Stats:
Damage - 9-12 Critical Chance - 5.00% Attacks Per Second - 1.60 Requirements: Level - 5 Dexterity - 10 |
・Increased Physical Damage
・Add Physical Damage ・Increased Elemental Damage |
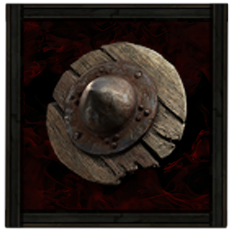 Oak Buckler Oak Buckler Oak Buckler Stats:
Block Chance - 20% Evasion - 79 Requirements: Level - 45 Dexterity - 64 Implicit Skill: Parry |
・Maximum Life
・Stun Threshold% ・Elemental Resistances |
 Cowled Helm Cowled Helm Cowled Helm Stats:
Armor - 62 Evasion - 54 Requirements: Level - 26 Strength - 22 Dexterity - 22 |
・Armour
・Increased Armour ・Maximum Life ・Any Elemental Resistance |
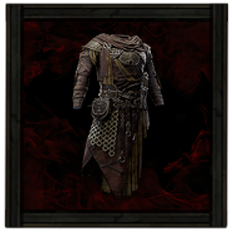 Cloaked Mail Cloaked Mail Cloaked Mail Stats:
Armor - 95 Evasion - 83 Requirements: Level - 26 Strength - 25 Dexterity - 25 |
・Evasion Rating
・Increased Armour ・Maximum Life ・Spirit ・Armour Also Applies to Elemental Damage ・Any Elemental Resistance |
 Tempered Mitts Tempered Mitts Tempered Mitts Stats:
Armor - 40 Requirements: Level - 16 Strength - 22 |
・Add Physical Damage
・Maximum Life ・Armour Also Applies to Elemental Damage ・Any Elemental Resistance |
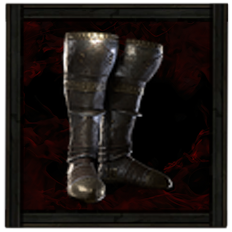 Stacked Sabatons Stacked Sabatons Stacked Sabatons Stats:
Armor - 56 Evasion - 50 Requirements: Level - 33 Strength - 26 Dexterity - 26 |
・Increased Movement Speed
・Increased Armour and Evasion ・Maximum Life ・Armour Also Applies to Elemental Damage ・Any Elemental Resistance |
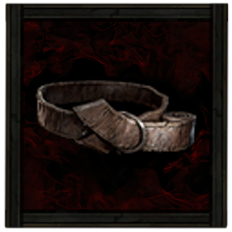 Rawhide Belt Rawhide Belt Rawhide Belt Requirements:
None Implicit:20-30% increased Life Recovery from Flasks |
・Armour
・Strength ・Maximum Life ・Maximum Mana ・Any Elemental Resistance |
 Stellar Amulet Stellar Amulet Stellar Amulet Requirements:
Level - 24 Implicit:+5-7 to all Attributes |
・Increased Evasion Rating
・Increased Rarity of Items ・All Attributes ・All Elemental Resistance ・Increased Mana Regeneration |
 Iron Ring Iron Ring Iron Ring Requirements:
None Implicit:Adds 1 to 4 Physical Damage to Attacks |
・Increased Ice Damage
・Add Physical Damage ・All Attributes ・Any Elemental Resistance |
|
Iron Ring Iron Ring Requirements:
None Implicit:Adds 1 to 4 Physical Damage to Attacks |
・Increased Ice Damage
・Add Physical Damage ・All Attributes ・Any Elemental Resistance |
|
Iron Ring Iron Ring Requirements:
None Implicit:Adds 1 to 4 Physical Damage to Attacks Ritualist Ring |
・Increased Ice Damage
・Add Physical Damage ・All Attributes ・Any Elemental Resistance |
 Gargantuan Life Flask Gargantuan Life Flask Gargantuan Life Flask Stats:
Flask Type - Life Recovered Life - 710 Charge Per Use - 10 Total Charges - 75 Duration - 5 sec. |
・Gain Charges per Second
・Increased Amount Recovered |
 Gargantuan Mana Flask Gargantuan Mana Flask Gargantuan Mana Flask Stats:
Flask Type - Mana Recovered Mana - 185 Charge Per Use - 10 Total Charges - 75 Duration - 2 sec. |
・Gain Charges per Second
・Increased Amount Recovered |
Weapons
During Act 1 you can choose to equip any spear you can obtain with the highest damage. Ideally, any damage bonuses will be beneficial to hasten your clears and bossing.
Once you progress through the acts, you'll continue prioritizing as much damage to ensure you can instantly kill mob groups after a single parry and Fangs of Frost. Supplementing the build with cold damage also works but avoid slotting in too much skill levels to maintain our Mana consumption to a manageable level.
Armour and Accessories
Focus on getting equipment that has Armour and Maximum HP as these are stats that defensively benefit the Huntress best. Additionally, you'll also want maximum life to increase your stun threshold, as well as increasing your stun threshold to avoid getting knocked down when blocking.
Stacking these will let you tank enemies without tumbling down and capitalizing on your buckler's parry debuffs for insane damage output.
| List of Rings | List of Amulets |
| List of Armours | |
Runes and Soul Cores
| Equipment | Sockets |
|---|---|
| Weapon | |
| Armour |
We recommend ignoring Runes until you reach Act 3, since you will be constantly switching gear. However, if you're stuck on a certain area and want to increase your damage output, you can slot in two Iron Runes on your Weapon to give you a 36% Physical Damage boost. As for your Armour Runes, slot in Body Runes for more maximum life or Rebirth Runes for life regeneration if you are having trouble with survivability.
Belt and Charms
| Belt Modifiers | |||||
|---|---|---|---|---|---|
|
Rawhide Belt Rawhide Belt Requirements:
None Implicit:20-30% increased Life Recovery from Flasks |
・Armour
・Strength ・Maximum Life ・Maximum Mana ・Any Elemental Resistance |
||||
| Charm Options | |||||
 Sapphire Charm Sapphire Charm Sapphire Charm Stats:
Flask Type - Charm Charge Per Use - 20 Total Charges - 40 Duration - 4 sec. |
 Topaz Charm Topaz Charm Topaz Charm Stats:
Flask Type - Charm Charge Per Use - 20 Total Charges - 40 Duration - 4 sec. |
 Antidote Charm Antidote Charm Antidote Charm Stats:
Flask Type - Charm Charge Per Use - 20 Total Charges - 40 Duration - 3 sec. |
|||
We recommend equipping the Sapphire Charm to help you combat the cold attacks of Count Geonor at the end of the Act 1. Just make sure to keep dodging his attacks since they can still take a chunk of your health even with the resistance Charm equipped.
For Act 2, your main problem would be Jamanra, the Risen King so make sure to equip the Topaz Charm to help mitigate his attacks. Lastly, equip an Antidote Charm when you reach Act 3 since a lot of the bosses in this Act can deal large amounts of poison damage.
Lastly, make sure to equip a Rawhide Belt to increase the healing you get from using Life Flasks and focus on providing survivability with Armor, Maximum Life, and maxing out your Elemental Resistances.
| List of Belts | List of Charms |
Buckler Parry Huntress Skills
All Active and Persistent Skills
※ The Support Gems' priority are arranged in a descending order. The first one being the most important and the last being the least crucial.
| Skill | Support Gems |
|---|---|
|
Parry Parry |
Rage I Supports Melee Attacks, causing them to grant Rage on Hit.
Retaliate I Supports Melee Attack Skills you use yourself. Supported Skills gain much more damage the closer you are to being Heavily Stunned.
Steadfast II Supports Channelling Skills you use yourself, granting you higher Stun Threshold and Ailment Threshold while Channelling them.
|
|
Fangs of Frost Fangs of Frost Perform an icy stab that exploits enemies who are already off balance. Hitting a Parried target Consumes the Debuff to cause a nova of frost and leave Chilled Ground.
|
Cold Attunement Supports attacks, causing them to gain Cold Damage but deal less Fire and Lightning Damage.
Elemental Armament II Supports Attacks, causing them to deal more Elemental damage.
Ancestral Call I Supports Strikes you use yourself, providing a powerful Ancestral Boost every few seconds. Cannot support Channelled Skills and does not modify Skills used by Minions..
|
|
Disengage Disengage Jump back as you rupture the earth in front of you with spearpoints, damaging enemies. Consumes the Parried Debuff on Hitting enemies to release a shockwave and grant you a Frenzy Charge. This skill can be used while using other skills, and causes Strikes and Projectiles to miss you while jumping. This skill cannot be Ancestrally Boosted.
|
Cold Attunement Supports attacks, causing them to gain Cold Damage but deal less Fire and Lightning Damage.
Close Combat I Supports Attacks, causing them to deal more damage to enemies based on how close they are to you.
|
|
Elemental Sundering Elemental Sundering Plunge your Spear into the ground to emit a pulse that Consumes Freeze, Shock, and Ignite on a number of nearby enemies, Allies and Corpses. The pulse itself deals no damage, but each Ailment Consumed causes an explosion of the corresponding elemental damage type.
|
Cold Attunement Supports attacks, causing them to gain Cold Damage but deal less Fire and Lightning Damage.
Elemental Armament I Supports Attacks, causing them to deal more Elemental damage.
|
|
Fangs of Frost Fangs of Frost Perform an icy stab that exploits enemies who are already off balance. Hitting a Parried target Consumes the Debuff to cause a nova of frost and leave Chilled Ground.
|
Frozen Spite Supports Attack Skills, causing them to create Ice Fragments on killing Frozen Enemies. Cannot Support Totem Skills and does not modify Skills used by Minions.
Elemental Armament II Supports Attacks, causing them to deal more Elemental damage.
Cold Penetration Supports any skill that Hits enemies, making those Hits Penetrate enemy Cold resistance.
|
|
Iron Ward Iron Ward While active, stores a percentage of the Physical damage that is prevented by your Armour or other sources of damage reduction. Using this Skill releases the stored damage as a nova of spikes.
|
Brutality II Supports any skill that deals damage, boosting its physical damage at the expense of all other damage types.
Concentrated Area Supports any skill with an area of effect, causing that area to be smaller but any area damage it deals to be higher.
Deliberation Supports skills that can be used while moving, causing you to move slower while using them, but granting more damage in exchange.
|
|
Herald of Ice Herald of Ice While active, Shattering an enemy with an Attack Hit will cause an icy explosion that deals Attack damage to surrounding enemies.
|
Cold Attunement Supports attacks, causing them to gain Cold Damage but deal less Fire and Lightning Damage.
Elemental Armament I Supports Attacks, causing them to deal more Elemental damage.
|
The Buckler Parry Huntress build primarily focuses on using parries as your main combo starter and applying parry debuff to enemies. From here, you can either continue your combos with Fangs of Frost to commit to a melee fight and consume frozen enemies with Elemental Sundering or Disengaging to gain Frenzy Charges and launch Glacial Lances for ranged clears.
Both options are usable as you progress, as Glacial Lance can easily eliminate ranged enemies without the need to approach them, while Fangs of Frost will be your main damage nuke and mob clear for fast enemies.
Buckler Parry Huntress Passive Tree
Passive Tree Progression
For our parry-focused setup, we want to utilize as much attack damage, elemental damage, cold damage, as well as parry nodes. Couple this with our stat focus and we'll be able to parry enemies without getting stunned to activate our parry-trigger combo to burst mob groups.
Passive Skill Tree Guide and List of Passives
Buckler Parry Huntress Playstyle
Bossing Skill Rotation
When against Bosses, you will adopt a Buckler Parry playstyle that can huge burst damage against Bosses. The rotation is as follows:
- Parry when they start approaching for a normal attack.
- Use Fangs of Frost to activate a big damage.
- If boss is frozen, remove it with Elemental Infusion for big burst damage and let the boss attack again.
Mobbing Skill Rotation
When against large packs of mobs, you will only need to hit multiple enemies with parry and burst them. The rotation is as follows:
- Parry enemies.
- Use Fang of Frost to clear the mobgroup.
- Use Elemental Infusion if there are frozen enemies or stragglers.
- Alternatively, if there are multiple ranged enemies, use Disengage instead.
- Use Glacial Lance to consume the Frenzy Charges from Disengage to snipe ranged foes.
Build Progression
| Jump to an Act! | |||||
|---|---|---|---|---|---|
| Act 1 | Act 2 | Act 2 | |||
Act 1 Progression
To progress through Act 1 and beat Count Geonor using the Buckler Parry Huntress leveling build, follow these steps:
| # | Step by Step Guide to Act 1 Leveling |
|---|---|
| 1 | |
| 2 | Head for the Mysterious Campsite at Clearfell to get a Level 1
Note: If you find another Level 1 Uncut Skill Gem, use this to get |
| 3 | Defeat
|
| 4 | Complete Treacherous Ground to get a Level 1
|
| 5 | Proceed to Grelwood and defeat
Note: Make sure to loot the Witch Hut to get Medium Flasks. |
| 6 | Defeat
|
| 7 | Progress to The Grim Tangle and defeat
|
| 8 | Look for the Haunted Treasure Inside the Tomb of the Consort and defeat the rare enemy to acquire a Level 1 Uncut Support Gem (To be used later). Note: Once you find a Level 3 Uncut Skill Gem, use it to equip |
| 9 | Defeat
|
| 10 | Search and complete your first Ritual in the same area to get a Level 1 Uncut Support Gem and use this to slot in
Note: You can now remove Twister and Whirlwind Slash as your main combo will focus on parry and Fangs of Frost. Spear Throw should be used to poke bosses and ranged enemies. |
| 11 | Start looking for the Dryadic Ritual in the same area to get an extra Level 1 Uncut Support Gem. |
| 12 | Enter Freythorn to defeat
|
| 13 | Complete The Lost Lute at the Ogham Farmlands to obtain a
|
| 14 | Search for the Crop Circle in the same area to defeat
|
| 15 | Proceed to Ogham Village and defeat
|
| 16 | Head for The Manor Ramparts and look for The Gallows to get a free Level 1 Uncut Support Gem and slot in
|
| 17 | Search and defeat the
|
| 18 | Continue and defeat
Note: Make sure you have Medium Flasks since this boss fight has 2 Phases so you will be spending a good amount of time learning and surviving the mechanics. |
Act 2 Progression
To progress through Act 2 and beat Jamanra, the Abomination using the Buckler Parry Huntress leveling build, follow these steps:
| # | Step by Step Guide to Act 2 Leveling |
|---|---|
| 1 | Complete the Earning Passage quest for an
|
| 2 | Defeat
Ascendancy: You can attempt to finish the Sekhema's Trial to get your first Ascendancy Skill: ┗
Choose reduced max mana as our build isn't mana intensive and can live with the reduced mana limit. ┗
|
| 3 | Clear Mobs in Keth until you get the
|
| 4 | Defeat
|
| 5 | Defeat
Note: Make sure to slot in this Jewel in your passive tree as you progress. |
| 6 | Open the Guarded Sarcophagus for an
|
| 7 | Three Elemental Offering Ring choices: Ruby Ring, Sapphire Ring, and Topaz Ring for flame, cold, and lightning resistance respectively. It is recommended to choose the Topaz Ring to prepare for
|
| 8 | Clear The City of Seven Waters for an
|
| 9 | Destroy the Effigy located in the Shrine of Bones for an Uncut Support Gem Level 2 and slot in
|
| 10 | Clear Mobs in The Bone Pits until you get the
|
| 11 | Complete A Theft of Ivory quest for an Uncut Support Gem Level 2 (To be used later).
|
| 12 | Place both Relics in the Valley of Titans to complete the Ancient Vows quest. Choose the Sun Clan Relic for more Mana Flask Recovery.
|
| 13 | Complete A Crown of Stone quest for an Uncut Support Gem Level 2 (To be used later).
|
| 14 | Complete the Tradition's Toll quest to get a
|
| 15 | Defeat the
|
Act 3 Progression
To progress through Act 3 and beat Doryani using the Lightning Huntress leveling build, follow these steps:
| # | Step by Step Guide to Act 3 Leveling |
|---|---|
| 1 | |
| 2 |
Loot the basket found in the Orok Campfire at Sandswept Marsh to get a
Use these on either
|
| 3 | |
| 4 | Complete The Slithering Dead to get the Venom Draught of Stone to provide you with increased Stun Threshold. |
| 5 |
Look for the Jungle Grave and interact with the Ravaged Corpse to summon Servi and get a rare Belt. We recommend taking Rawhide Belt for better survivability. |
| 6 |
Defeat
|
| 7 |
Submit the Tribal Vengeance to get a charm. Choose the Antidote Charm for increased defenses against Poison. |
| 8 |
Defeat
|
| 9 |
Use the Paquate's Mechanism to Corrupt gear or a skill gem. |
| 10 |
Obtain an
|
| 11 | |
| 12 |
Ascendancy: By this time, you can complete the Trial of Chaos to get your third and fourth Ascendancy Point.
┣
┗
|
| 13 |
Use the
Note: If you find an Uncut Support Gem Level 4 in the last Act 3 area, use this to slot in |
Path of Exile 2 (PoE 2) Related Guides

0.4 Best Endgame Builds
| Rank | Build |
|---|---|
 |
|
 |
|
 |
|
 |
0.4 Leveling Builds
NEW |
NEW |
NEW |
NEW |
NEW |
NEW |
NEW |
NEW |
NEW |
NEW |
- | - |
All Build Guides
| List of Builds by Class | |||||||||||
|---|---|---|---|---|---|---|---|---|---|---|---|
 Huntress Huntress |
 Mercenary Mercenary |
 Monk Monk |
|||||||||
 Witch Witch |
 Sorceress Sorceress |
 Warrior Warrior |
|||||||||
 Ranger Ranger |
 Druid Druid |
- | |||||||||
| Other Build Guides | 0.3 Leveling Builds | How to Make a Good Build | |||||||||
Huntress Leveling Builds
Disengage Jump back as you rupture the earth in front of you with spearpoints, damaging enemies. Consumes the Parried Debuff on Hitting enemies to release a shockwave and grant you a Frenzy Charge. This skill can be used while using other skills, and causes Strikes and Projectiles to miss you while jumping. This skill cannot be Ancestrally Boosted.
Whirling Slash Perform a circular slash that kicks up a Whirlwind around you, Slowing enemies and Blinding them in its area of effect. Leaving the area collapses the storm, dealing damage and causing Knockback.
Twister Whip up a twister with a flick of your Spear. The twister moves forward erratically, Blinding and repeatedly Hitting enemies within. If a twister touches a Whirlwind from your other skills, it Consumes the Whirlwind to create additional twisters that deal more damage. Passing over Elemental Ground Surfaces or Consuming an elemental Whirlsind will grant twisters extra damage of that element.
Explosive Spear Hurl a single payload Spear that pierces through enemies and lodges in terrain where it lands. The Spear will explode at the end of its Detonation Time or if Detonated. Consumes a Frenzy Charge if you have one to explode immediately, dealing more damage in a cross-shaped area and creating Ignited Ground.
Rake Dash towards an enemy and perform a lacerating slash, inflicting Bleeding on all enemies struck.
Rapid Assault Perform a series of six rapid stabs. The final stab inflicts Bleeding and leaves a spearhead stuck in the target, Maiming them for a duration. Detonator Skills will cause the stuck spearheads to explode, dealing further damage to the target and other nearby enemies.
Herald of Blood While active, killing an enemy with Blood Loss will cause a bloody explosion that deals Physical Attack damage to surrounding enemies based off the life of the exploded enemy, destroying their Corpse in the process. The explosion also has a chance to aggravate Bleeding.
Focus: AoE, DoT, Bleed |
|
Herald of Thunder While active, killing Shocked enemies with Attack damage, will cause subsequent Attack hits to release lightning bolts which deals Attack damage to all surrounding enemies.
Barrage Ready a volley of arrows or spears, Empowering your next Bow or Projectile Spear Attack to repeat multiple times. Consumes your Frenzy Charges on use to add additional repeats.
Disengage Jump back as you rupture the earth in front of you with spearpoints, damaging enemies. Consumes the Parried Debuff on Hitting enemies to release a shockwave and grant you a Frenzy Charge. This skill can be used while using other skills, and causes Strikes and Projectiles to miss you while jumping. This skill cannot be Ancestrally Boosted.
Lightning Spear Throw a single copy of your spear. When it hits an enemy it bursts, firing secondary lightning bolt Projectiles at multiple other enemies within a large area around it. Consumes a Frenzy Charge if possible to cause the main spear to split into multiple copies on impact, each of which then bursts.
Focus: Burst Damage, Mobbing, AoE |
|
NEW |
Fangs of Frost Perform an icy stab that exploits enemies who are already off balance. Hitting a Parried target Consumes the Debuff to cause a nova of frost and leave Chilled Ground.
Focus: Cold, Burst, Crowd Control |
Huntress Endgame Builds
Herald of Thunder While active, killing Shocked enemies with Attack damage, will cause subsequent Attack hits to release lightning bolts which deals Attack damage to all surrounding enemies.
Barrage Ready a volley of arrows or spears, Empowering your next Bow or Projectile Spear Attack to repeat multiple times. Consumes your Frenzy Charges on use to add additional repeats.
Sniper's Mark Marks a target. The next Critical Hit the target receives consumes the Mark to deal extra damage and grant you a Frenzy Charge.
Combat Frenzy While active, grants you a Frenzy Charge when you Freeze, Electrocute, or Pin an enemy. This can only occur once every few seconds.
Wind Dancer Grants a buff that gives you more Evasion per stage. Being Hit by a Melee Attack while you have this buff consumes all stages to damage and Knock Back enemies around you.
Lightning Spear Throw a single copy of your spear. When it hits an enemy it bursts, firing secondary lightning bolt Projectiles at multiple other enemies within a large area around it. Consumes a Frenzy Charge if possible to cause the main spear to split into multiple copies on impact, each of which then bursts.
Storm Lance Throw an electrified that lodges in the ground and periodically zaps nearby enemies with Lightning bolts. If the Spear is Detonated by another Skill, it immediately unleashes a volley of bolts and expires. Consumes a Frenzy Charge if possible to fire bolts more frequently for a shorter duration, automatically Detonate at the end of its duration, and create Shocked Ground on Detonation.
Thunderous Leap Leap into the air and plunge your Spear into the ground at the target location, emitting a Lightning-charged shockwave.
Rhoa Mount Harnesses a Companion Rhoa that you can ride. While you're mounted on the Rhoa, you can only use Bow, thrown Spear and Mark Skills, you run at full speed when attackin, and Hits against you cause Heavy Stun buildup. While you aren't mounted, the Rhoa attacks your enemies alongside you with its beak, but can be damaged.
Focus: Mobbing, AoE, Lightning, Fast Clear |
|
Barrage Ready a volley of arrows or spears, Empowering your next Bow or Projectile Spear Attack to repeat multiple times. Consumes your Frenzy Charges on use to add additional repeats.
Wind Dancer Grants a buff that gives you more Evasion per stage. Being Hit by a Melee Attack while you have this buff consumes all stages to damage and Knock Back enemies around you.
Vulnerability Curses all targets in an area after a short delay, making Hits against them ignore a portion of their Armour.
Disengage Jump back as you rupture the earth in front of you with spearpoints, damaging enemies. Consumes the Parried Debuff on Hitting enemies to release a shockwave and grant you a Frenzy Charge. This skill can be used while using other skills, and causes Strikes and Projectiles to miss you while jumping. This skill cannot be Ancestrally Boosted.
Twister Whip up a twister with a flick of your Spear. The twister moves forward erratically, Blinding and repeatedly Hitting enemies within. If a twister touches a Whirlwind from your other skills, it Consumes the Whirlwind to create additional twisters that deal more damage. Passing over Elemental Ground Surfaces or Consuming an elemental Whirlsind will grant twisters extra damage of that element.
Bloodhound's Mark Mark a target, making them suffer Heavy Stun build up from Blood Loss. If they suffer enough Blood Loss while Marked, the Mark is consumed and they will release an explosion of blood when killed or Heavy Stunned.The duration doesn't tick while the target is suffering Blood Loss.
Tame Beast Conjure Azmeri wisps to engulf a Rare Beast for a duration, Hindering them. If you defeat the Beast while it is engulfed in wisps, it will be captured by this gem, transforming the gem to instead allow you to summon the Beast as a Reviving Companion.
Whirlwind Lance Throw a Spear with enough force to kick up a Whirlwind where it lands, Slowing enemies and Blinding them in its area of effect. Entering the Whirlwind collapses it, dealing damage and causing Knockback. Consumes a Frenzy Charge if possible to create the Whirlwind with one more than its normal maximum number of stages.
Focus: Mobbing, Single Target, DoT, AoE, Bossing |
|
Wind Dancer Grants a buff that gives you more Evasion per stage. Being Hit by a Melee Attack while you have this buff consumes all stages to damage and Knock Back enemies around you.
Disengage Jump back as you rupture the earth in front of you with spearpoints, damaging enemies. Consumes the Parried Debuff on Hitting enemies to release a shockwave and grant you a Frenzy Charge. This skill can be used while using other skills, and causes Strikes and Projectiles to miss you while jumping. This skill cannot be Ancestrally Boosted.
Spearfield Stab the ground causing multiple spears to burst out of the ground in front of you in a large area. The spears remain for a duration, or explode when enemies touch them, damaging and Maiming them,
Rapid Assault Perform a series of six rapid stabs. The final stab inflicts Bleeding and leaves a spearhead stuck in the target, Maiming them for a duration. Detonator Skills will cause the stuck spearheads to explode, dealing further damage to the target and other nearby enemies.
Thunderous Leap Leap into the air and plunge your Spear into the ground at the target location, emitting a Lightning-charged shockwave.
Bloodhound's Mark Mark a target, making them suffer Heavy Stun build up from Blood Loss. If they suffer enough Blood Loss while Marked, the Mark is consumed and they will release an explosion of blood when killed or Heavy Stunned.The duration doesn't tick while the target is suffering Blood Loss.
Herald of Blood While active, killing an enemy with Blood Loss will cause a bloody explosion that deals Physical Attack damage to surrounding enemies based off the life of the exploded enemy, destroying their Corpse in the process. The explosion also has a chance to aggravate Bleeding.
Blood Boil Corrupted Blood deals X% of slain enemy's maximum Life as Physical DMG per Sec;Blood Boil applies to Non-Unique enemies in your Presence every X sec.;X% more Corrupted Blood on slain enemy;Inflicts a stack of Corrupted Blood on targets within X metres per Blood Boil on slain enemy;Corrupted Blood duration is X sec.
Focus: Poison, Bleed, Burst |
|
Tempest Flurry Perform a series of aggressive Strikes. When used in quick succession, the third use Strikes three times, and the fourth performs a Final strike that calls down a powerful Shocking bolt.
Tempest Bell Build Combo by successfully Striking Enemies with other skills. After reaching maximum Combo, use this skill to cause the Bell on your staff to grow to massive size as you drop it on the ground. The Bell damages enemies on impact and can be Hit by your skills, creating a damaging shockwave. Elemental Ailments applied to the Bell cause its shockwaves to deal extra damage of the corresponding type, and Hits which would have caused Knockback increase the area of effect of the shockwaves.
Wind Dancer Grants a buff that gives you more Evasion per stage. Being Hit by a Melee Attack while you have this buff consumes all stages to damage and Knock Back enemies around you.
Staggering Palm Dash to an enemy and Strike them with an Unarmed Strike, Heavy Stunning an enemy with this Skill grants you a Buff, that causes your Quarterstaff and Unarmed attacks to also fire Projectiles for a short duration. Enemies which are Primed for Stun will instantly be Heavily Stunned. This skill always Strikes with your bare fist, even if you have a Quarterstaff equipped.
Wind Blast Strike enemies at range by generating a gust of wind as you swing. Enemies will be Knocked Back based on how close they are to you.
Berserk While active, strengthens your Rage and grants you Life Leech based on your Rage, but causes you to lose Life while Raging.
War Banner While active, killing enemies with attacks or standing near a Unique enemy generates Valour. using this skill consumes Valour to place an inspiring Banner with an Aura that grants you and nearby allies Attack damage and accuracy while Banner lasts. The Banner cannot gain Valour while placed, and you cannot place a Banner while you already have a Banner placed.
Focus: Attack Speed, Mobility, Wind, Physical, Critical Hit |
|
UP |
Wind Dancer Grants a buff that gives you more Evasion per stage. Being Hit by a Melee Attack while you have this buff consumes all stages to damage and Knock Back enemies around you.
Disengage Jump back as you rupture the earth in front of you with spearpoints, damaging enemies. Consumes the Parried Debuff on Hitting enemies to release a shockwave and grant you a Frenzy Charge. This skill can be used while using other skills, and causes Strikes and Projectiles to miss you while jumping. This skill cannot be Ancestrally Boosted.
Rake Dash towards an enemy and perform a lacerating slash, inflicting Bleeding on all enemies struck.
Blood Hunt Lunge at a target and skewers them. Hitting an enemy that has suffered Blood Loss will cause a blood explosion and also Consume Bleeding. This skill cannot be Ancestrally Boosted.
Bloodhound's Mark Mark a target, making them suffer Heavy Stun build up from Blood Loss. If they suffer enough Blood Loss while Marked, the Mark is consumed and they will release an explosion of blood when killed or Heavy Stunned.The duration doesn't tick while the target is suffering Blood Loss.
Herald of Blood While active, killing an enemy with Blood Loss will cause a bloody explosion that deals Physical Attack damage to surrounding enemies based off the life of the exploded enemy, destroying their Corpse in the process. The explosion also has a chance to aggravate Bleeding.
Focus: Bleed, Burst, Physical Damage |
NEW |
Herald of Ash While active, enemies you sufficiently Overkill with attacks will cause an explosion that ignites nearby enemies based on the Overkill damage dealt.
Herald of Ice While active, Shattering an enemy with an Attack Hit will cause an icy explosion that deals Attack damage to surrounding enemies.
Herald of Thunder While active, killing Shocked enemies with Attack damage, will cause subsequent Attack hits to release lightning bolts which deals Attack damage to all surrounding enemies.
Wind Dancer Grants a buff that gives you more Evasion per stage. Being Hit by a Melee Attack while you have this buff consumes all stages to damage and Knock Back enemies around you.
Blasphemy Turns socketed Curse skills into vile Auras, applying their effects to all nearby enemies.
Elemental Conflux Tap into a current of raw and unpredictable Elemental Power, causing you to deal greatly more damage of a randomly chosen Element. The Element affected changes frequently, though the same Element can be affected multiple times in succession.
Pounce Shapeshift into a Werewolf and leap to a target location, damaging enemies in an area around where you land. Predator's Mark will be Triggered targetting the highest Rarity enemie Hit, or if a Mark gem is socketed into this Skill, that Mark will be Triggered instead. Using this skill allows any Wolf Minions you have to leap immediately.
Savage Fury While active, your Fury builds from Attacking enemies. Using this Skill releases your Fury to send you into a bestial frenzy, gaining damage and Onslaught but constantly losing life and forcing you into animal form. The frenzy ends immediately if you return to human form. You cannot fain Fury while in a frenzy.
Focus: Cold, Fire, Lightning, Burst, AoE |
Huntress Class and Ascendancy Guides
| Base Class | |
|---|---|
| Ascendancies | |
Comment
Author

PoE 2 0.4 Huntress Leveling Build - Buckler Parry
Please participate in our site
improvement survey
03/2026
improvement survey
03/2026
Would you assist in
improving Game8's site?
improving Game8's site?

×
We are listening to our users' valuable opinions and discussing how to act on them.
The information collected through this survey will be used for the purpose of improving our services. In addition, the information will only be disclosed a part of a statistic in a format that will not allow identification of personal information.
Begin Survey
Not Now
×
Please rate each item regarding Game8.co's Advertisements.
Amount of Ads
Very Dissatisfied
Somewhat Dissatisfied
Fine
Somewhat Satisfied
Highly Satisfied
Placement of Ads
Timing of Ad Display
Ad Loading Speed
Safeness of Ads
Content of Ads
×
Please rate each item regarding Game8.co's Quality of Articles.
Amount of information
Very Dissatisfied
Somewhat Dissatisfied
Fine
Somewhat Satisfied
Highly Satisfied
Frequency of updates
Speed of new information
Accuracy of articles
Understandibility of articles
Readability of sentences
×
Please rate each item regarding Game8.co's Usability of the Site.
Ease of finding information
Very Dissatisfied
Somewhat Dissatisfied
Fine
Somewhat Satisfied
Highly Satisfied
Loading Speed
Use of Color
Font Size
Visibility of Images
Easy to Understand Layout
×
Please rate each item regarding Game8.co's Message Boards, Comments.
Ease of Writing
Very Dissatisfied
Somewhat Dissatisfied
Fine
Somewhat Satisfied
Highly Satisfied
Readability
Ease in Finding Information
Comment Quality
Comment Quantity
Admin Response
×
Please rate each item regarding Game8.co's Site's new design.
Please rate our site's new design
Very Dissatisfied
Somewhat Dissatisfied
Fine
Somewhat Satisfied
Highly Satisfied
Do you think that the website's design change makes the site easier to use?
Has the new design made it easier for you to find information on the site?
Has the new design improved the overall visual appeal of the site?
How would you rate your overall satisfaction with the new design of the site?
×
How likely are you to recommend Game8 to someone you know?
Very Unlikely
0
1
2
3
4
5
6
7
8
9
10
Very Likely
If you have other opinions regarding potential improvement to the website, please share them with us. We would appreciate your honest opinion.
Note: This is a free response section, so you can proceed without entering anything.
Note: Please be sure not to enter any kind of personal information into your response.
Note: Please be sure not to enter any kind of personal information into your response.
×
Thank You
×
Thank you for participating in our survey! Your answers will help us to improve the quality of our website and services.
We hope you continue to make use of Game8.
We hope you continue to make use of Game8.
Close
Rankings
- We could not find the message board you were looking for.
Gaming News


![Marathon Review [First Impressions] | Playing The Long Game](https://img.game8.co/4435736/b9b1ec1e9219416dfc2599f85295d6ef.png/thumb)


Popular Games

Genshin Impact Walkthrough & Guides Wiki
Honkai: Star Rail Walkthrough & Guides Wiki
Umamusume: Pretty Derby Walkthrough & Guides Wiki
Pokemon Pokopia Walkthrough & Guides Wiki
Resident Evil Requiem (RE9) Walkthrough & Guides Wiki
Monster Hunter Wilds Walkthrough & Guides Wiki
Wuthering Waves Walkthrough & Guides Wiki
Arknights: Endfield Walkthrough & Guides Wiki
Pokemon FireRed and LeafGreen (FRLG) Walkthrough & Guides Wiki
Pokemon TCG Pocket (PTCGP) Strategies & Guides Wiki


Recommended Games
Fire Emblem Heroes (FEH) Walkthrough & Guides Wiki
Diablo 4: Vessel of Hatred Walkthrough & Guides Wiki
Yu-Gi-Oh! Master Duel Walkthrough & Guides Wiki
Super Smash Bros. Ultimate Walkthrough & Guides Wiki
Pokemon Brilliant Diamond and Shining Pearl (BDSP) Walkthrough & Guides Wiki
Elden Ring Shadow of the Erdtree Walkthrough & Guides Wiki
Monster Hunter World Walkthrough & Guides Wiki
The Legend of Zelda: Tears of the Kingdom Walkthrough & Guides Wiki
Persona 3 Reload Walkthrough & Guides Wiki
Cyberpunk 2077: Ultimate Edition Walkthrough & Guides Wiki


All rights reserved
© 2010 - 2024 Grinding Gear Games
The copyrights of videos of games used in our content and other intellectual property rights belong to the provider of the game.
The contents we provide on this site were created personally by members of the Game8 editorial department.
We refuse the right to reuse or repost content taken without our permission such as data or images to other sites.