This survey will take about 1 minute.
Your answers will help us to improve our website.
Path of Exile 2 (PoE 2)
The Trialmaster Boss Guide
Latest: 0.5.0 Release Date
☆ Fate of the Vaal ▶︎ The Last of the Druids
┗ Bonded Mods | 0.4 Mystery Box
★ Druid: Class Overview | Builds
☆ NEW: Disciple of Varashta Ascendancy!
★ Best Class | Best Builds | Leveling Builds
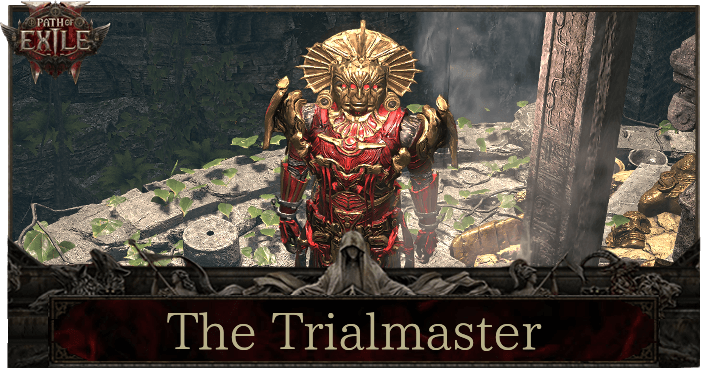
The Trialmaster is the final boss at the Trial of Chaos in Path of Exile 2 (PoE 2). See the location, the drops or rewards, tips on how to beat The Trialmaster, and all his moves here.
List of Contents
The Trialmaster Location
Trial of Chaos - At the End of a 10-Trial Inscribed Ultimatum
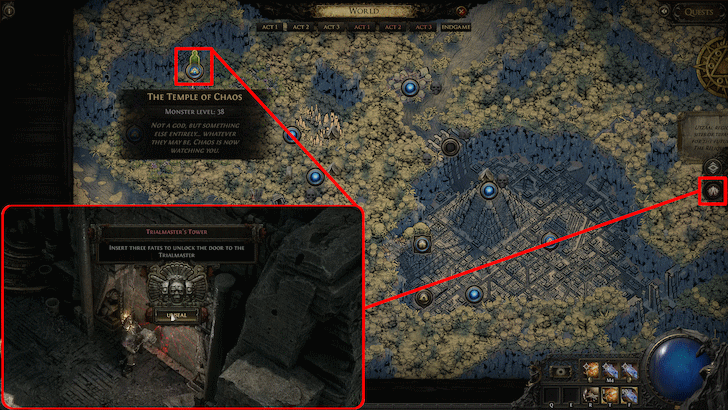
Three different Fate items are required to unlock the door at the end of a 10-trial Inscribed Ultimatum to fight the Trialmaster. Interact with the door and drag one of each Fate item to be able to open the door.
Inscribed Ultimatums of at least level 75 are required for them to have the maximum amount of 10 trials.
Get Fate Items by Defeating the 10th Trial Bosses
| Trialmaster Boss Fight Keys | ||
|---|---|---|
There are 3 key items required to access the Trialmaster boss fight. The Deadly Fate, Cowardly Fate, and Victorious Fate are obtained by defeating the boss at the 10th trial of the Trial of Chaos. Only one of these items will drop at random when defeating the boss.
How to Beat The Trialmaster
| Tips on Beating the Trialmaster |
|---|
|
|
Prepare Your Gear for the Endgame

The Trialmaster is one of the more punishing bosses you’ll face in the early stages of the endgame. Maximizing your defensive and offensive potential, along with knowing how to dodge his attacks, are essential to defeating him.
Start by bolstering your defenses. Maximize your Life, cap your resistances, and invest in either Armor, Evasion, or Energy Shield, depending on your build. Equipping a Stone Charm to gain Stun Immunity also helps for countering the annoying Tethering Hearts.
The Trialmaster Has Around 10 Million Life
The Trialmaster has around 10 million Life, so bringing sufficient damage is key to avoiding a drawn-out battle with more room for mistakes. Other than bringing your damage up with appropriate gear upgrades, also consider items and skills that penetrate or reduce enemy Armor and Resistances to deal significantly more damage.
Don't Worry About the Trial of Chaos Modifiers
The modifiers chosen during the Trial of Chaos do not apply during the Trialmaster battle. This allows you to select modifiers best suited for completing earlier trials without worrying about penalties in the final fight.
Watchout for the Time Stop Moves
The Trialmaster uses two devastating time stop mechanics. In one, he slams his spear into the ground; in the other, he fires multiple projectiles. Both require finding safe zones to avoid taking damage.
Avoid the Cone Areas in Front of the Slams
During melee phases, time stops briefly as the Trialmaster slams his spear, sending earth spikes forward in a cone-shaped pattern. Observe his initial slam position and direction to predict where the spikes will emerge. Move to a safe angle to dodge the spikes.
Dodge the Projectiles' Trajectories
In ranged phases, the Trialmaster fires slow-moving projectiles that split and return after hitting the arena walls. Track their trajectories carefully and reposition to avoid getting caught.
Fight Near the Walls of the Arena During His Melee Phase
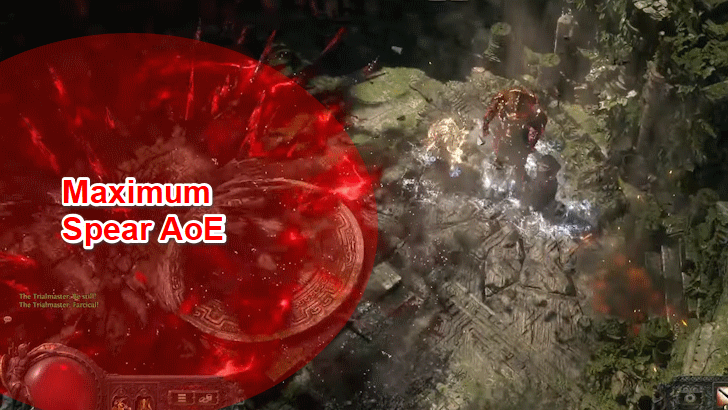
The Trialmaster's lingering spear attack creates an area-denial hazard that grows more dangerous over time. He throws his spear into the arena, causing damaging pulses that expand in radius every second.
To minimize its impact, position yourself near the arena's edge before he uses this attack. This forces the spear's placement away from the center, allowing more space for movement and reducing the fight’s difficulty.
The Trialmaster Moveset
| Melee Phase | Ranged Phase |
Melee (Spear) Phase
| Moves | Details & How to Dodge |
|---|---|
| “Entropy!” or “Ultimatum!” Time Stop Sunder |
Time stops briefly as the Trialmaster slams the ground three times. Spikes erupt from the slam points. Note the initial positions and dodge to a safe zone as the spikes root forward. |
| Sunder | The Trialmaster swings his spear overhead and slams it down, generating spikes across the arena. Watch for the swing motion, then dodge to his sides or behind him. You can be hit multiple times at the location of the slam which can deal a deadly amount of damage. |
| “Shred” Rapid Swings |
A sequence of four spear swings that release blood projectiles. The fourth swing comes faster than the first three—stay ready for the timing shift to avoid it. |
| “Be obliterated!” Spear Slam |
He charges a large AoE attack by slamming the spear into the ground. The wind-up provides ample time to escape. |
| “Chaos aid me!” Lingering Spear |
Throws his spear, transitioning into his no-spear phase. The spear creates periodic, expanding pulses. Force him to throw it near the edge by fighting close to the walls. |
Ranged (No-Spear) Phase
| Moves | Details & How to Dodge |
|---|---|
| “Ultimatum!” Time Stop Projectiles |
Time briefly freezes as the Trialmaster teleports around, firing projectiles. Track their paths and avoid lingering ground effects to stay safe. |
| “Be still!” Heart Tethers |
Summons a heart which tethers to you we you enter its area-of-effect. Moving too far away stuns you, but it explodes after a delay. Exit the area when he isn't pressuring you with other attacks. |
| “Farcical!” Elemental Projectiles |
While the Trialmaster doesn't have his spear, he will regularly fire three elemental projectiles of different elements at you. |
| “Embrace Chaos!” Chaos Bolt |
While the Trialmaster doesn't have his spear, he will regularly throw red projectiles that multiplies and goes back to its origin point when it hits a wall. |
The Trialmaster Rewards
First Time Clear Rewards
| ・4th set of Ascendancy Points |
Defeating The Trialmaster for the first time unlocks the the last set of Ascendancy Points. Other Trials can also reward you with Ascendancy Points.
How to Get Ascendancy Skill Points
Exclusive Unique Drops
| Unique Drops | |
|---|---|
 Mahuxotl's Machination Omen Crest Shield Mahuxotl's Machination Omen Crest Shield
|
 Zerphi's Genesis Heavy Belt Effects Zerphi's Genesis Heavy Belt Effects |
 Hateforge Moulded Mitts Hateforge Moulded Mitts |
 Glimpse of Chaos Tribal Mask Glimpse of Chaos Tribal Mask |
 The Adorned Diamond The Adorned Diamond |
- |
The Trialmaster drops one of several Unique Items when defeated. Some of these Uniques have lower drop rates than others. However, increasing the difficulty affects the drop chances to make the rarer Uniques more likely to drop.
High Variance Uniques
Two of the Trialmaster’s Unique items drop Corrupted and have modifiers with a wide variance in values. The Adorned can roll between 0% to 100% increased effect of Corrupted Magic Jewels while Mahuxotl’s Machination rolls between 333% to 666% increased Armor, Energy Shield, and effect of socketed Runes.
Because of this, you may want to avoid identifying the Diamond Jewel or Omen Crest Shield dropped by the Trialmaster and sell them unidentified, as poorly rolled versions are worth significantly less. Alternatively, you can identify it to practically gamble for a high-rolled version which could fetch for a couple or up to hundreds of Divine Orbs.
The Trialmaster Overview
Basic Info

|
|
| Location | Trial Trialmaster's Tower |
|---|---|
| Resistances |
・ Physical ・ Fire ・ Cold ・ Lightning |
| Weaknesses | ・ None |
| Damage Types |
・ Physical ・ Fire ・ Cold ・ Lightning |
Path of Exile 2 (PoE 2) Related Guides
| All Boss Guides | |
|---|---|
| All Pinnacle Bosses | All Spirit Bosses |
All Act 1 Bosses
All Act 2 Bosses
All Act 3 Bosses
All Interlude Bosses
Trial Bosses
| Bahlak, the Sky Seer | Uxmal, the Beastlord | Chetza, the Feathered Plague |
| Rattlecage, the Earthbreaker | Terracota Sentinels | Ashar, the Sand Mother |
Abyss Bosses
| Tasgul, Swallower of Light | Vandroth, Blackblooded Enslaver | Vessel of Kulemak |
Atziri's Temple Bosses
| Xipocado, Royal Architect | Atziri, the Red Queen |
Pinnacle Bosses
| Zarokh, the Temporal | Xesht, We That Are One | The Arbiter of Ash |
| The Trialmaster | Kosis, the Revelation | Omniphobia, Fear Manifest |
Comment
Author

The Trialmaster Boss Guide
Please participate in our site
improvement survey
04/2026
improvement survey
04/2026
Would you assist in
improving Game8's site?
improving Game8's site?

×
We are listening to our users' valuable opinions and discussing how to act on them.
The information collected through this survey will be used for the purpose of improving our services. In addition, the information will only be disclosed a part of a statistic in a format that will not allow identification of personal information.
Begin Survey
Not Now
×
Please rate each item regarding Game8.co's Advertisements.
Amount of Ads
Very Dissatisfied
Somewhat Dissatisfied
Fine
Somewhat Satisfied
Highly Satisfied
Placement of Ads
Timing of Ad Display
Ad Loading Speed
Safeness of Ads
Content of Ads
×
Please rate each item regarding Game8.co's Quality of Articles.
Amount of information
Very Dissatisfied
Somewhat Dissatisfied
Fine
Somewhat Satisfied
Highly Satisfied
Frequency of updates
Speed of new information
Accuracy of articles
Understandibility of articles
Readability of sentences
×
Please rate each item regarding Game8.co's Usability of the Site.
Ease of finding information
Very Dissatisfied
Somewhat Dissatisfied
Fine
Somewhat Satisfied
Highly Satisfied
Loading Speed
Use of Color
Font Size
Visibility of Images
Easy to Understand Layout
×
Please rate each item regarding Game8.co's Message Boards, Comments.
Ease of Writing
Very Dissatisfied
Somewhat Dissatisfied
Fine
Somewhat Satisfied
Highly Satisfied
Readability
Ease in Finding Information
Comment Quality
Comment Quantity
Admin Response
×
Please rate each item regarding Game8.co's Site's new design.
Please rate our site's new design
Very Dissatisfied
Somewhat Dissatisfied
Fine
Somewhat Satisfied
Highly Satisfied
Do you think that the website's design change makes the site easier to use?
Has the new design made it easier for you to find information on the site?
Has the new design improved the overall visual appeal of the site?
How would you rate your overall satisfaction with the new design of the site?
×
How likely are you to recommend Game8 to someone you know?
Very Unlikely
0
1
2
3
4
5
6
7
8
9
10
Very Likely
If you have other opinions regarding potential improvement to the website, please share them with us. We would appreciate your honest opinion.
Note: This is a free response section, so you can proceed without entering anything.
Note: Please be sure not to enter any kind of personal information into your response.
Note: Please be sure not to enter any kind of personal information into your response.
×
Thank You
×
Thank you for participating in our survey! Your answers will help us to improve the quality of our website and services.
We hope you continue to make use of Game8.
We hope you continue to make use of Game8.
Close
Rankings
- We could not find the message board you were looking for.

Gaming News


![Forza Horizon 6 Review [Preview] | Beautiful Roads With a Whole Lot of Oversteer](https://img.game8.co/4460981/a7254c24945c43fbdf6ad9bea52b5ce9.png/thumb)
Popular Games

Genshin Impact Walkthrough & Guides Wiki
Crimson Desert Walkthrough & Guides Wiki
Umamusume: Pretty Derby Walkthrough & Guides Wiki
Honkai: Star Rail Walkthrough & Guides Wiki
Monster Hunter Stories 3: Twisted Reflection Walkthrough & Guides Wiki
Wuthering Waves Walkthrough & Guides Wiki
The Seven Deadly Sins: Origin Walkthrough & Guides Wiki
Pokemon TCG Pocket (PTCGP) Strategies & Guides Wiki
Pokemon Pokopia Walkthrough & Guides Wiki
Zenless Zone Zero Walkthrough & Guides Wiki


Recommended Games
Monster Hunter World Walkthrough & Guides Wiki
Fire Emblem Heroes (FEH) Walkthrough & Guides Wiki
Pokemon Brilliant Diamond and Shining Pearl (BDSP) Walkthrough & Guides Wiki
Super Smash Bros. Ultimate Walkthrough & Guides Wiki
Diablo 4: Vessel of Hatred Walkthrough & Guides Wiki
Cyberpunk 2077: Ultimate Edition Walkthrough & Guides Wiki
Yu-Gi-Oh! Master Duel Walkthrough & Guides Wiki
Elden Ring Shadow of the Erdtree Walkthrough & Guides Wiki
The Legend of Zelda: Tears of the Kingdom Walkthrough & Guides Wiki
Persona 3 Reload Walkthrough & Guides Wiki


All rights reserved
© 2010 - 2024 Grinding Gear Games
The copyrights of videos of games used in our content and other intellectual property rights belong to the provider of the game.
The contents we provide on this site were created personally by members of the Game8 editorial department.
We refuse the right to reuse or repost content taken without our permission such as data or images to other sites.