This survey will take about 1 minute.
Your answers will help us to improve our website.
Path of Exile 2 (PoE 2)
Complete Act 1 Walkthrough
Latest: 0.5.0 Release Date
☆ Fate of the Vaal ▶︎ The Last of the Druids
┗ Bonded Mods | 0.4 Mystery Box
★ Druid: Class Overview | Builds
☆ NEW: Disciple of Varashta Ascendancy!
★ Best Class | Best Builds | Leveling Builds
This is a complete walkthrough for Act 1 in Path of Exile 2. Read on for a guide to finishing Act 1, how to beat the Act 1 bosses, and their rewards here!
| ◀ Previous Act | Next Act ▶ |
|---|---|
| - | Act 2 Walkthrough |
 Attention! Attention! |
Note that maps in the game are randomly generated, and the sample layouts on this page are meant to serve as a general guide. |
|---|
List of Contents
Act 1 Walkthrough
| Act 1 Main Quests | |
|---|---|
| 1 | Reaching Clearfell ┗ Boss Battle: The Bloated Miller |
| 2 | Secrets in the Dark ┗ Optional Boss Battle: The Brambleghast ┗ Boss Battle: The Rust King |
| 3 | The Mysterious Shade ┗ Optional Boss Battle: The Rotten Druid |
| 4 | Sorrow Among Stones ┗ Boss Battle: Draven, Eternal Praetor ┗ Boss Battle: Asinia, Praetor Consort ┗ Boss Battle: Lachlann of Endless Lament |
| 5 | The Trail of Corruption ┗ Boss Battle: The Executioner |
| 6 | The Mad Wolf of Ogham ┗ Boss Battle: Count Geonor |
Reaching Clearfell
| Objectives | |
|---|---|
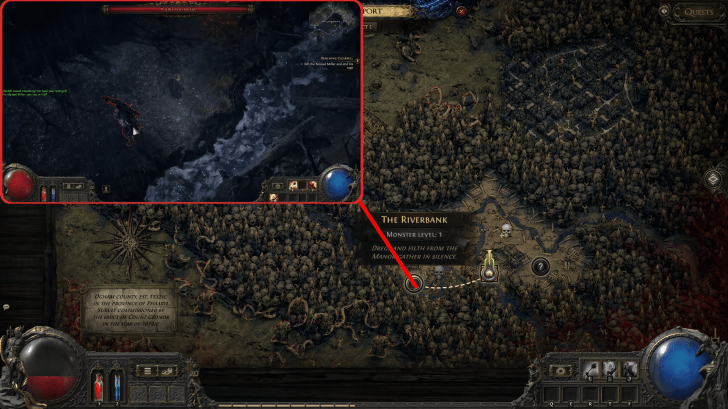
| 1 | 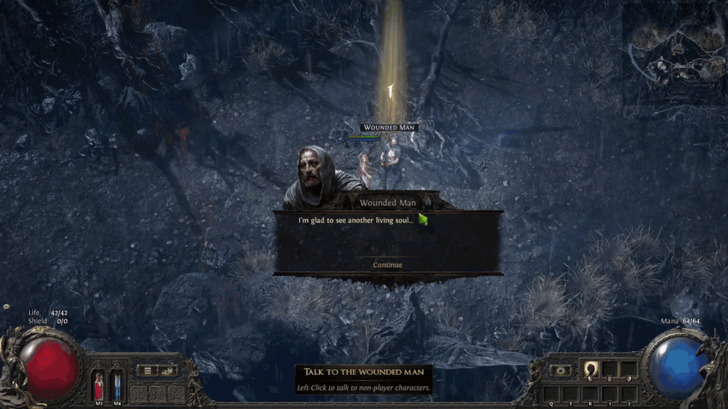 Talk to the Wounded Man Upon finishing Character Creation, you will wake up in The Riverbank. Talk to the Wounded Man nearby to receive the first quest, Reaching Clearfell. |
| 2 |  Pick Up Your Weapon The Wounded Man is attacked and unfortunately passes away. However, he drops a weapon for you to use at the start of your journey. This weapon is based on the class you chose for your character. Note that you may run into Red Walls if you don't equip anything. |
| 3 | 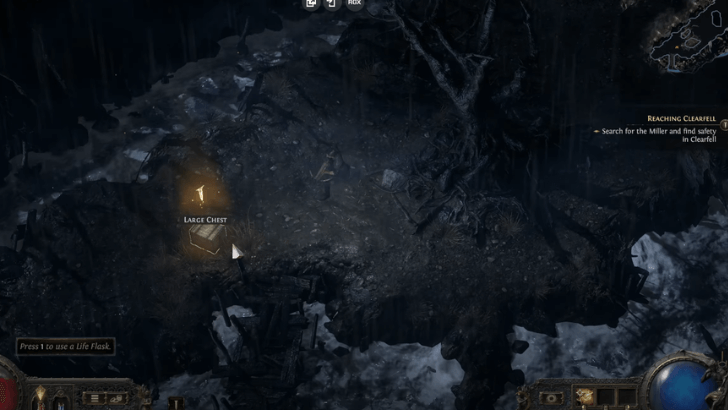 Look for a Large Chest Explore the area further and you will find a Large Chest near a checkpoint. Open the Large Chest to obtain your first Skill Gem. Once the Skill Gem is in your inventory, press G to open your Skills Panel then drag and drop your Skill Gem into one of your Skill Slots (circular icon). To equip the skill, drag the skill (square icon) into your active skills on the bottom right panel. |
| 4 | 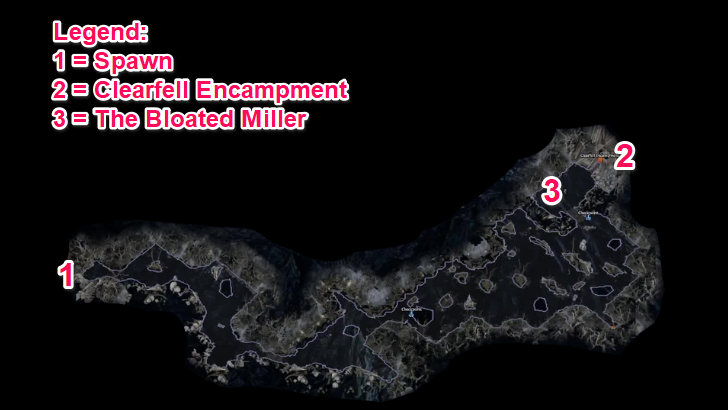 Explore The Riverbank and defeat The Bloated Miller at the Besieged Encampment in order to unlock the next area. To make this boss fight easier, pick up equipment and loot that may increase your damage or stats such as armor and resistances. |
| 5 |
Enter the logging encampment After defeating the boss, enter the Clearfell Encampment just past it. A man, Renly, will remove the large log covering the entrance. You have to wait for the animation to finish before entering the encampment. |
| 6 | 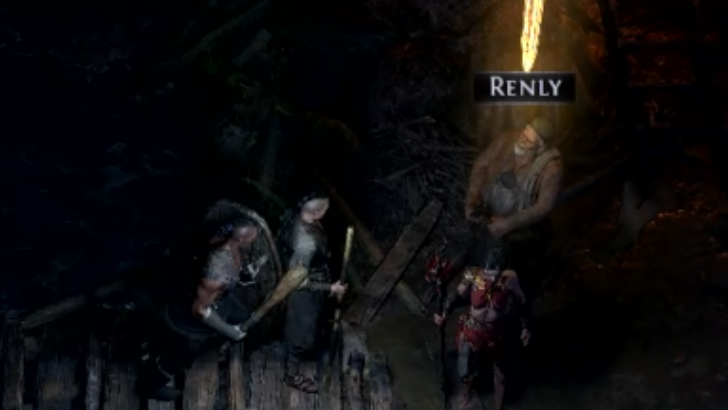 Talk to the Blacksmith Talk to the BlacksmithOnce inside the encampment, talk to Renly just past the bridge by the entrance to complete the quest. Renly is a blacksmith within Clearfell Encampment. You may interact with Renly to buy or sell items you no longer need. |
Reaching Clearfell Quest Walkthrough
Optional Quest: Treacherous Grounds
| Objectives | |
|---|---|
| 1 | 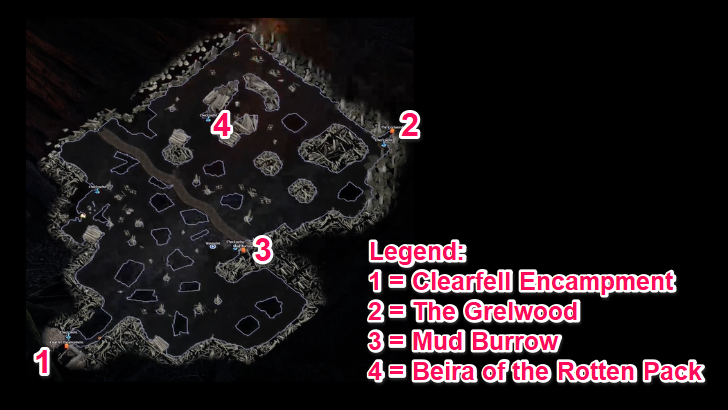 Once you leave the encampment, explore Clearfell and look for the entrance to The Mud Burrow. The entrance to The Mud Burrow can be found right next to Clearfell's waypoint somewhere near the center of the area. |
| 2 |  Once inside Mud Burrow, follow the tunnels and look for The Vile Nest, where you will find The Devourer. You will encounter enemies and checkpoints along the way. |
| 3 | 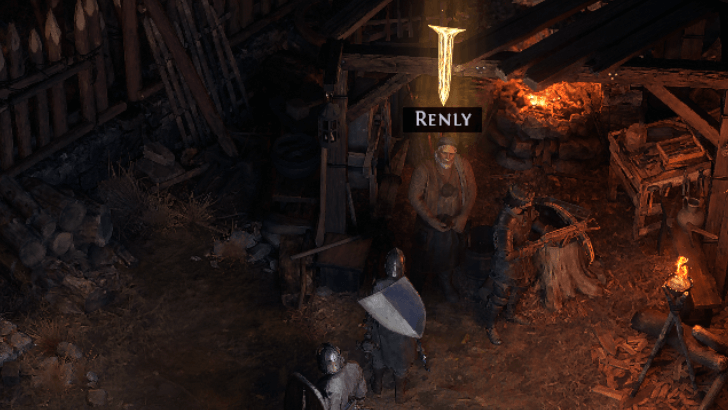 Talk to Renly for Your Reward After killing the Devourer, complete the quest by returning to Clearfell Encampment and talking to Renly to claim your quest rewards. |
Treacherous Ground Quest Walkthrough
Optional Loot: Mysterious Campsite
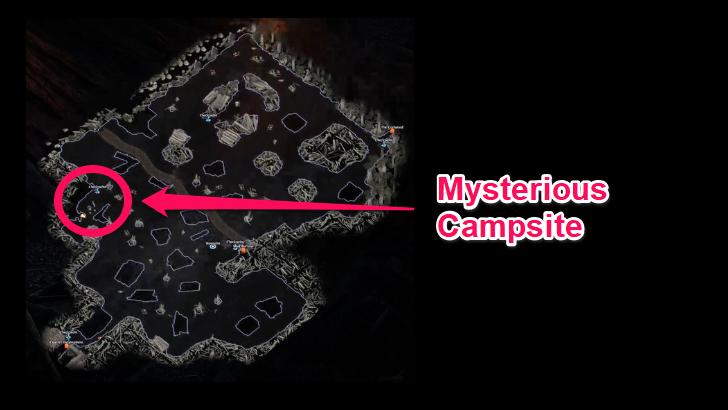
You can find a Mysterious Campsite near a checkpoint within Clearfell. Within the campsite is a chest where you may obtain additional loot.
Secrets in the Dark
| Objectives | |
|---|---|
| 1 | Start the quest by talking to Una at the Clearfell Encampment. Afterwards, head to Clearfell and look for the entrance to The Grelwood. |
| 2 | 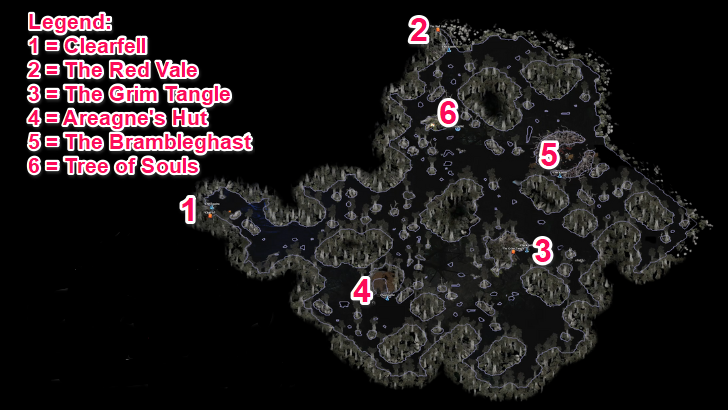 After arriving at the The Grelwood, go to the Tree of Souls near a waypoint and Summon Una next to The Hooded One. |
| 3 | 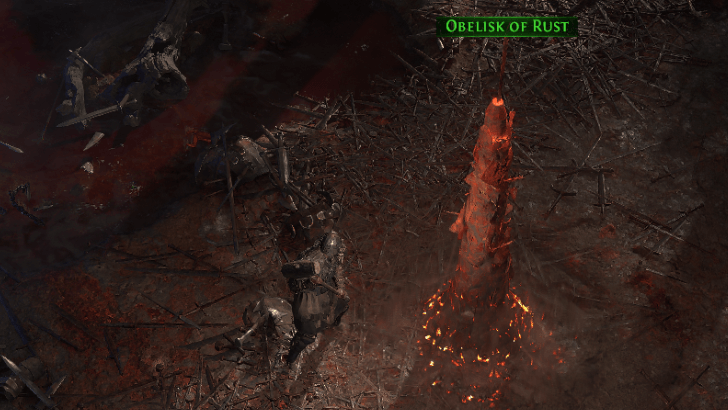 Find the entrance to the Red Vale and Investigate the Obelisks of Rust Find the entrance to the Red Vale and Investigate the Obelisks of RustAfter talking to Una, enter the The Red Vale to find and investigate 3 Obelisks of Rust. |
| 4 |  Once inside The Red Vale, interact with all Obelisks and defeat every enemy summoned. At the third and last Obelisk of Rust, you must defeat The Rust King. Interacting with all Obelisks and defeating all enemies will give you Runed Girdle, Runed Guard, and Runed Skull Cap. |
| 5 | 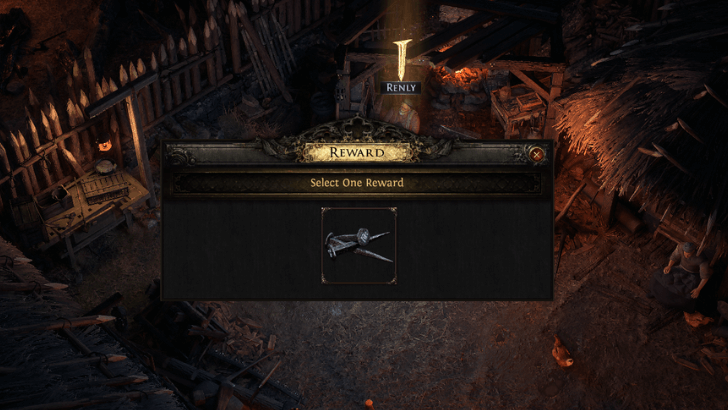 Travel to the Clearfell Encampment and talk to Renly Travel to the Clearfell Encampment and talk to RenlyReturn to Clearfell Encampment and talk to Renly. He will then forge and give you the Runed Spikes quest item. |
| 6 | 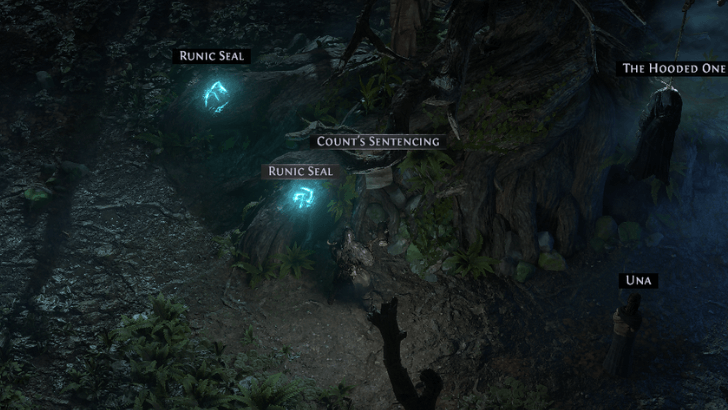 Travel to The Grelwood and stab the Runed Spikes into the Tree of Souls Travel to The Grelwood and stab the Runed Spikes into the Tree of SoulsTeleport back to the The Grelwood and interact with the three Runic Seals surrounding the Tree of Souls to free The Hooded One. Talk to Una afterwards, then return to Clearfell Encampment and talk with Una once again to complete the quest. |
Secrets in the Dark Quest Walkthrough
Optional Quest: The Hunt Begins

After finishing Secrets in the Dark, you can head back to The Grelwood and talk to Delwyn to start the quest The Hunt Begins. This quest serves as an introduction to Azmerian Wisps.
The Hunt Begins Quest Walkthrough
Optional Boss: The Brambleghast
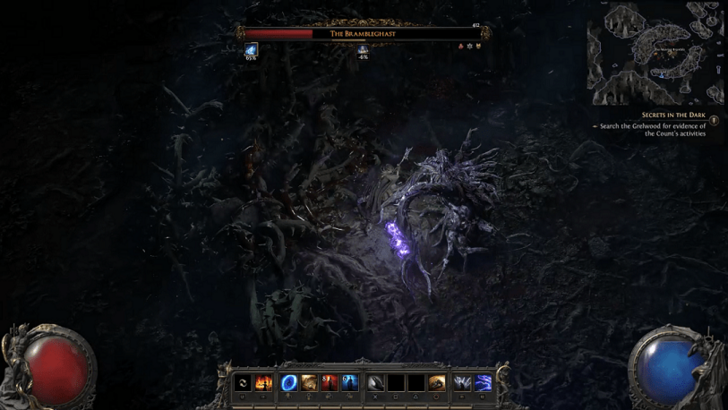
The Brambleghast is an optional boss found at The Grelwood. The Brambleghast can be found at the Moving Bramble area.
Optional Boss and Loot: Areagne, Forgotten Witch
Areagne, Forgotten Witch is an optional boss found at The Grelwood. Areagne can be found at Areagne's Hut. Interact with the cauldron inside Areagne's Hut to obtain two life flasks.
Areagne, Forgotten Witch Boss Guide
The Mysterious Shade
| Objectives | |
|---|---|
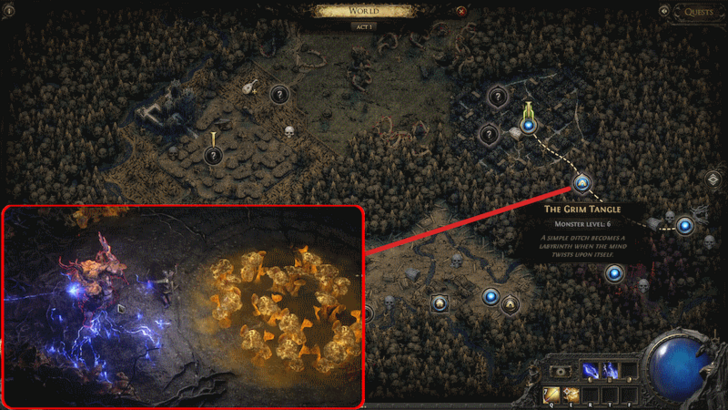
| 1 | Go to The Grelwood and look for the entrance to The Grim Tangle. The entrance to The Grim Tangle can be found near a checkpoint near the center of The Grelwood area. |
| 2 | 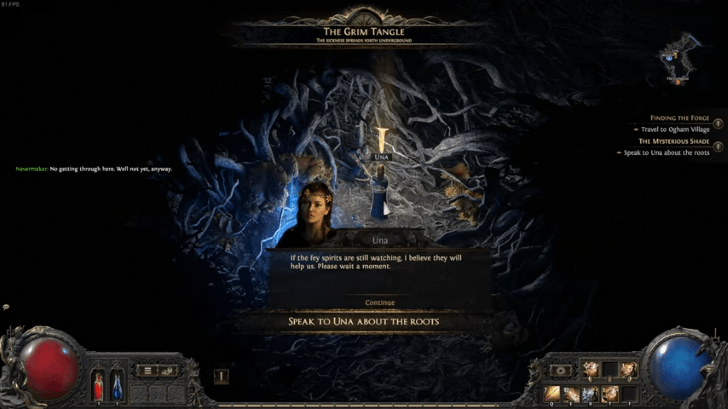 Enter the Grim Tangle and Summon Una. Enter the Grim Tangle and Summon Una.Begin the quest by entering The Grim Tangle. Complete the Secrets in the Dark quest to proceed with this quest. Summon Una to talk to her about the roots. |
| 3 | 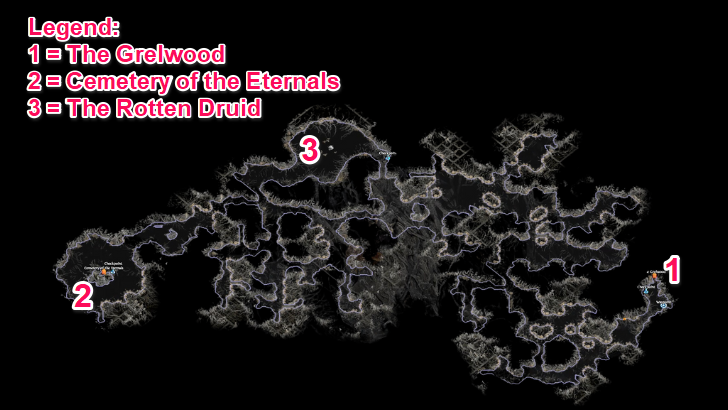 Continue Through the Grim Tangle
Travel to the other side of The Grim Tangle area to find the entrance to the Cemetery of the Eternals. |
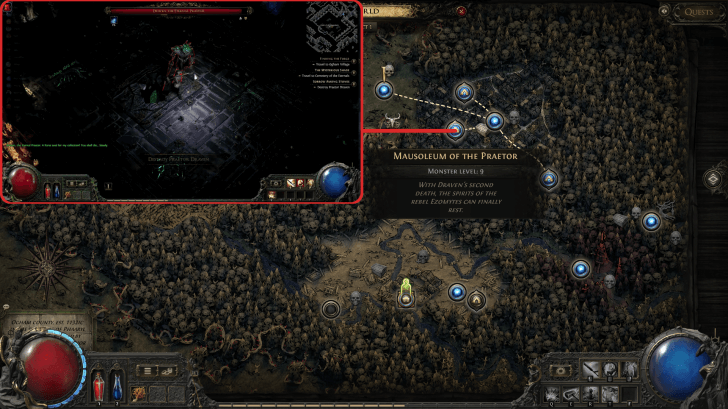
| 4 | 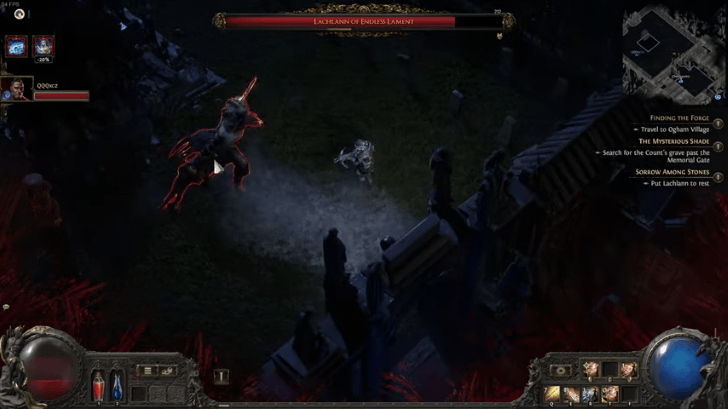 Find the Count's Grave Past the Memorial Gate Find the Count's Grave Past the Memorial GateOnce you've arrived at the Cemetery of the Eternals, unlock the quest Sorrow Among Stones by talking to Lachlann The Lost by the Memorial Gate. Before you can pass through the gate, you need to get two Memorial Key Pieces first. You may obtain the Memorial Key Pieces by defeating Draven, the Eternal Praetor and Asinia, Praetor Consort. |
| 5 | 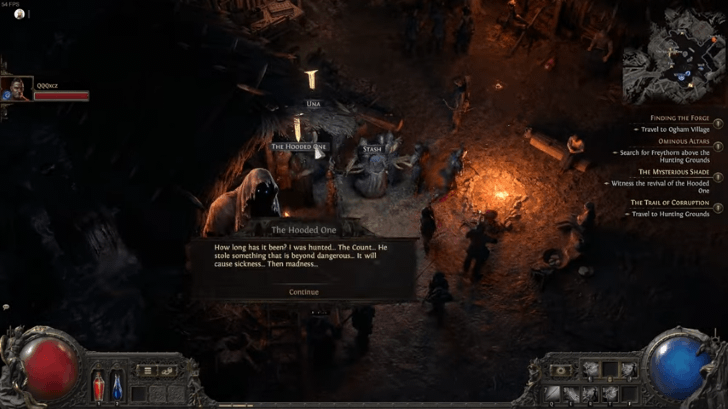 Bring Count Lachlann's Ring to Una Bring Count Lachlann's Ring to UnaUpon entering the Memorial Grave, you must fight and defeat Lachlann of Endless Lament to obtain Count Lachlann's Ring. Collect Count Lachlann's Ring as you complete the Sorrow Among Stones quest. Complete the quest by returning to Clearfell Encampment and talking to Una. |
The Mysterious Shade Quest Walkthrough
Optional Boss: The Rotten Druid
The Rotten Druid is an optional boss found at The Grim Tangle. The Rotten Druid can be found at the Den of the Druid area.
Optional Loot: Ancient Ruin
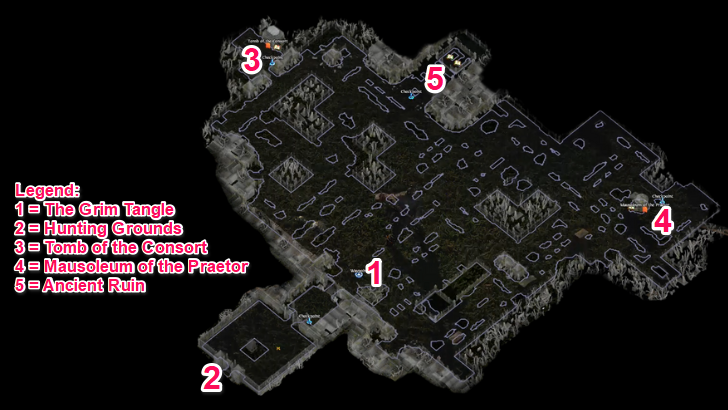
You can find an Ancient Ruin within Cemetery of the Eternals. Open the Sarcophagus to obtain additional loot.
Sorrow Among Stones
| Objectives | |
|---|---|
| 1 | 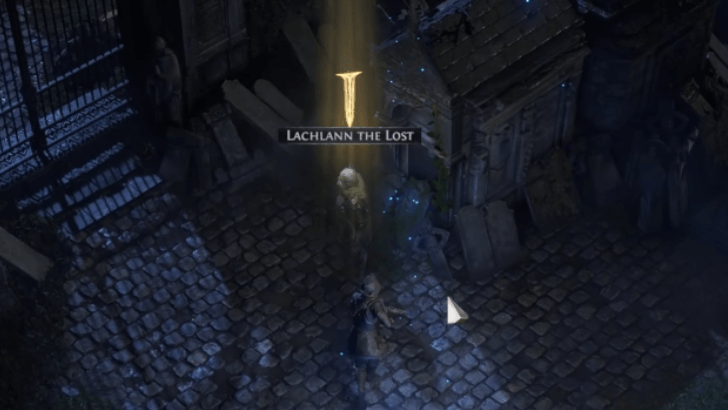 Talk to Lachlann the Lost Talk to Lachlann the LostTalk to Lachlann the Lost near waypoint in Cemetery of the Eternals. |
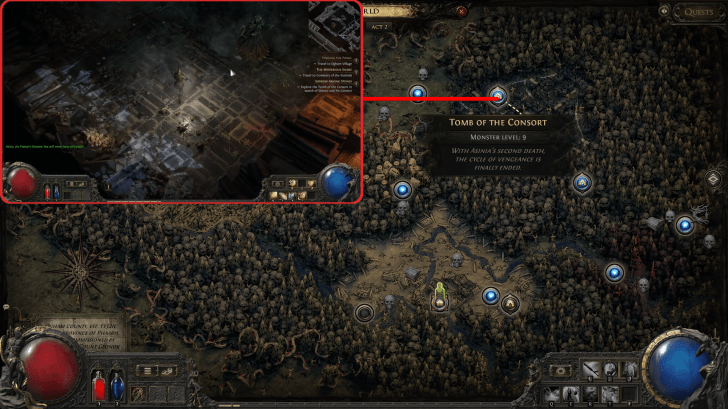
| 2 | Within Cemetery of the Eternals, you must collect Memorial Key Pieces by finding and defeating Draven, the Eternal Praetor and Asinia, Praetor Consort. They can be found in the Mausoleum of the Praetor and the Tomb of the Consort respectively. |
| 3 | 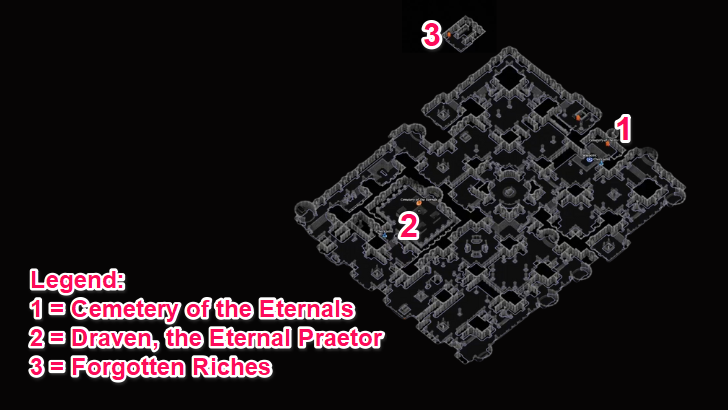 In the Cemetery of the Eternals, travel to the Mausoleum of the Praetor and enter it. Find and defeat Draven, the Eternal Praetor to collect a Memorial Key Piece. |
| 4 | 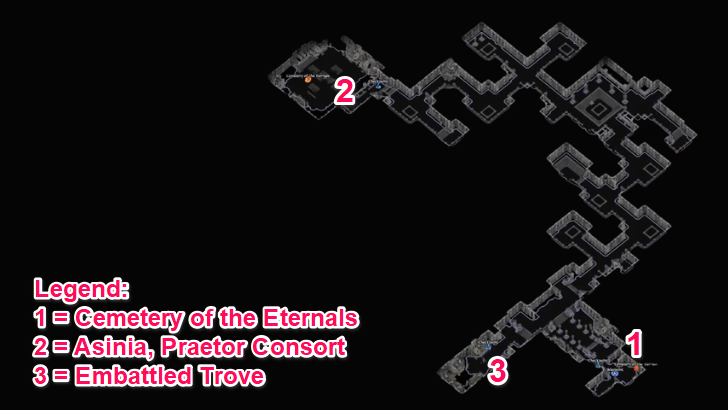 In the Cemetery of the Eternals, travel to the Tomb of the Consort. Inside, find and defeat Asinia, Praetor Consort to collect a Memorial Key Piece. |
| 5 |  Open the Graveyard's Memorial Gate Open the Graveyard's Memorial GateReturn to Lachlann. Open the Memorial Gate beside him and accompany Lachlann inside. |
| 6 |  Defeat Lachlann of Endless Lament Defeat Lachlann of Endless LamentComplete the quest by defeating Lachlann of Endless Lament and collecting Count Lachlann's Ring. |
Sorrow Among Stones Quest Walkthrough
Optional Loot: Embattled Trove
Upon entering the Tomb of the Consort, the path splits into two. One of these paths will lead to a checkpoint, where a strong enemy is guarding a chest. This chest contains additional loot for you to obtain.
Optional Loot: Forgotten Riches
You can find an Forgotten Riches within the Mausoleum of the Praetor. You will find a switch in one of the corners of the area. Activating it will bring you to a room full of gold.
The Trail of Corruption
| Objectives | |
|---|---|
| 1 | 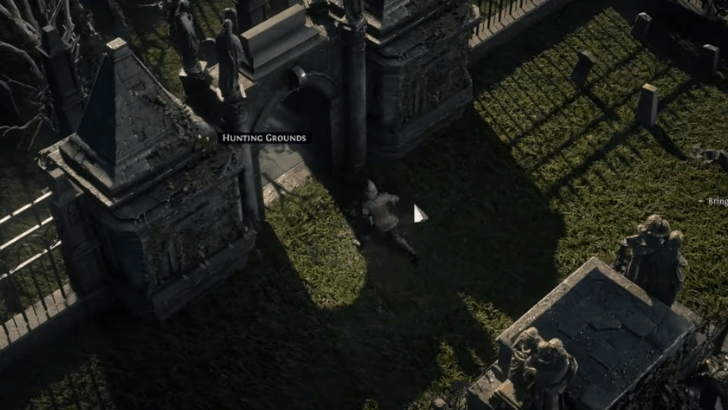 Unlock the Entrance to the Hunting Grounds
After defeating Lachlann of Endless Lament, the entrance to the Hunting Grounds, found at the far side of where you defeat Lachlann, will open. |
| 2 | 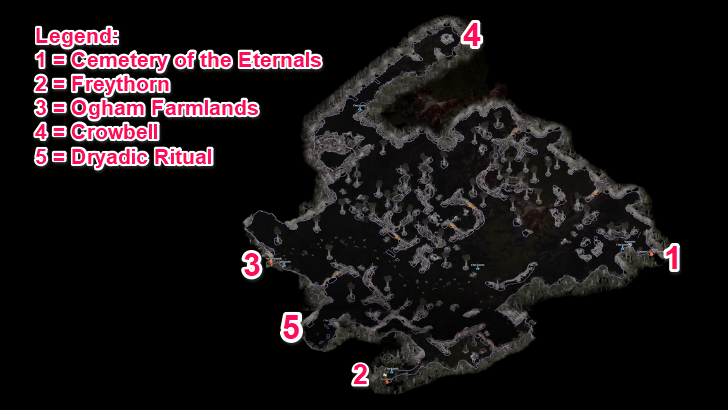 From the Hunting Grounds, look for the entrance to Ogham Farmlands, found on the opposite side of the Hunting Grounds entrance. |
| 3 | 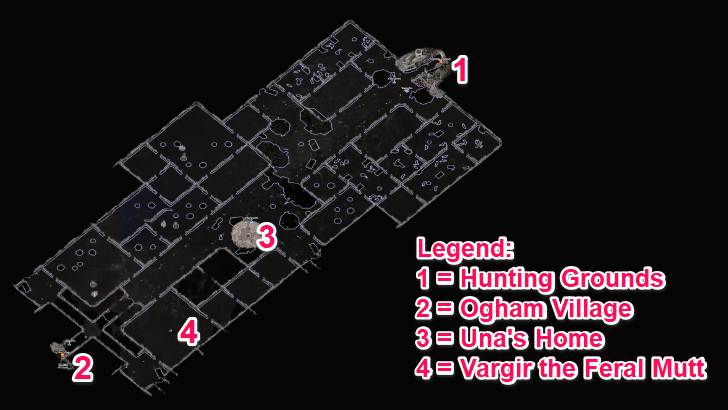 Travel to Ogham Village by going through Ogham Farmlands, found on the other side of the area. |
| 4 |  Defeat The Executioner, found at the opposite end of Ogham Village. Once you defeat The Executioner, you may proceed to the executioner platform to free Leitis. |
| 5 | 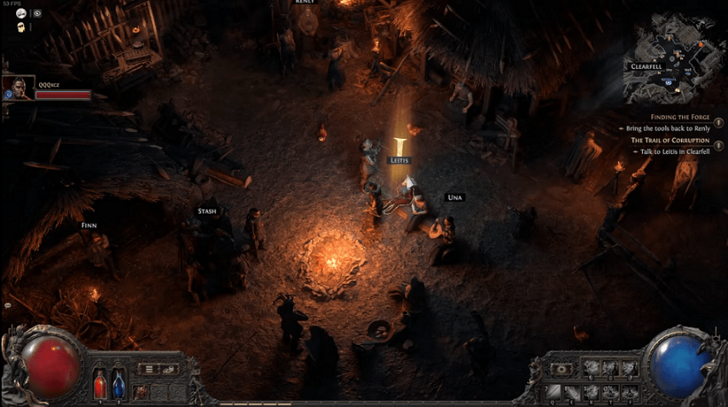 Return to Clearfell Encampment Return to Clearfell EncampmentComplete the quest by traveling back to Clearfell Encampment and talking to Leitis once again. |
The Trail of Corruption Quest Walkthrough
Optional Boss: The Crowbell
The Crowbell is an optional boss found in the Hunting Grounds. It can be found near a checkpoint leading down a linear path in one of the corners of the map.
Optional Loot: Dryadic Ritual
You can find a Dryadic Ritual within the Hunting Grounds. It can be found near a checkpoint, where you must defeat a few enemies for the additional loot to drop.
Optional Quest: Ominous Altars
| Objectives | |
|---|---|
| 1 |  Speak to Finn Speak to Finn in Clearfell Encampment to unlock the quest Ominous Altars. |
| 2 | 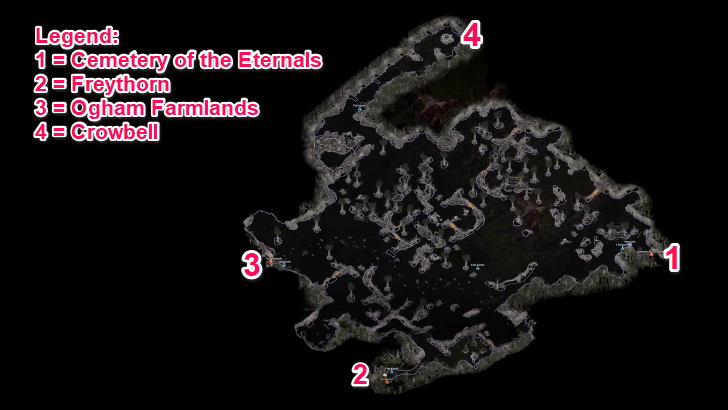 Go to Hunting Grounds and Look for the Entrance to Frethorn
Once inside Hunting Grounds, look for the entrance to Freythorn in one of the corners of the map. |
| 3 | 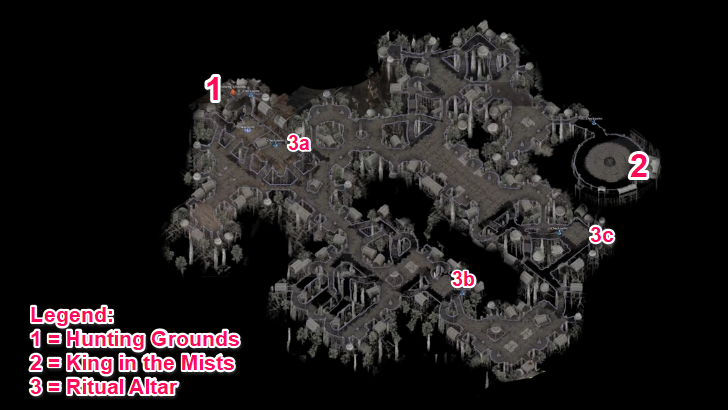 Within Freythorn, activate three Ritual Altars found within the area. Upon finishing three Ritual Altars, you may interact with the final Ritual Alter found in a circular arena to fight The King in the Mists. |
| 4 |  Talk to Finn for Your Reward Complete the quest by talking to Finn right after defeating The King in the Mists. |
Ominous Altars Quest Walkthrough
Optional Quest: The Lost Lute
| Objectives | |
|---|---|
| 1 | 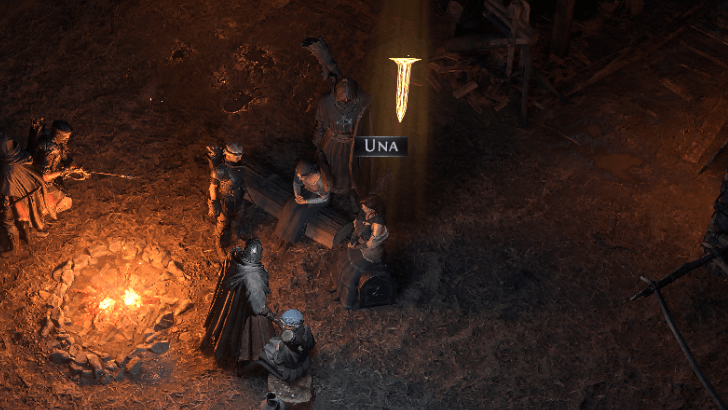 Speak to Una
In Clearfell Encampment, speak to Una to unlock the quest The Lost Lute. |
| 2 | Somewhere in the middle of Ogham Farmlands, you will find a structure called Una's Home near a checkpoint. Upon entering Una's Home, you will find a box called Una's Lute Box with Una's Lute inside. |
| 3 | 
Return Una's Lute to Her Complete the quest by returning to Clearfell Encampment and talking to Una. |
The Lost Lute Quest Walkthrough
Optional Boss: Vargir the Feral Mutt
Vargir the Feral Mutt is an optional boss found in the Ogham Farmlands. It can be found in the Crop Circle near the opposite side of the map from the Hunting Grounds entrance. The enemies will attack from all sides, so careful not to get surrounded!
Vargir the Feral Mutt Boss Guide
Optional Quest: Finding the Forge
| Objectives | |
|---|---|
| 1 |  Speak to Renly
Speak to Renly in Clearfell Encampment to unlock the quest Finding the Forge. |
| 2 | Once inside Ogham Village, look for a structure called Renly's Workshop, near a checkpoint within the area. Inside, you will find Renly's Tools. |
| 3 | Bring the Tools Back to Renly Return to Clearfell Encampment and talk to Renly to unlock the Salvage Bench. |
Finding the Forge Quest Walkthrough
The Mad Wolf of Ogham
| Objectives | |
|---|---|
| 1 | 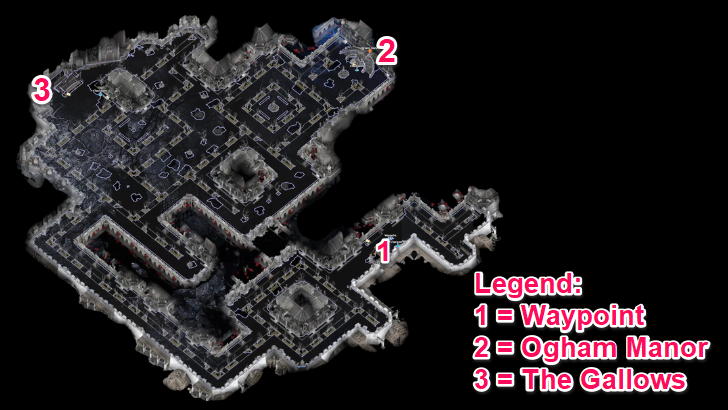 Travel to The Manor Ramparts from Ogham Village. Look for the entrance to Ogham Manor. The Manor can be found at the Courtyard, on the opposite end of the area. |
| 2 | 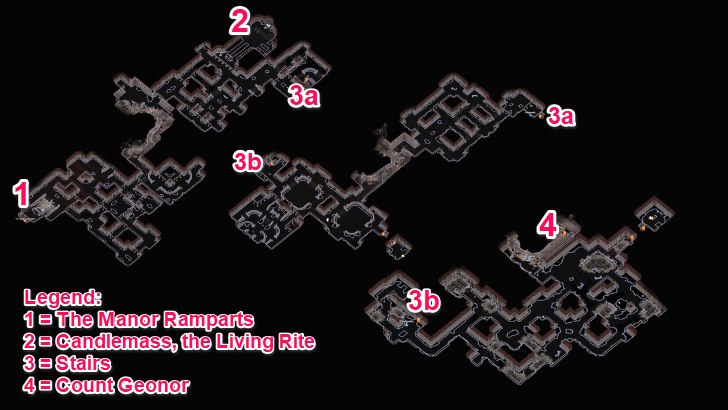 The Ogham Manor comprises three floors. Look for sets of stairs found on opposite ends of each floor to progress through the area. Defeat Count Geonor in the Arena, found in the third and final floor. |
| 3 | 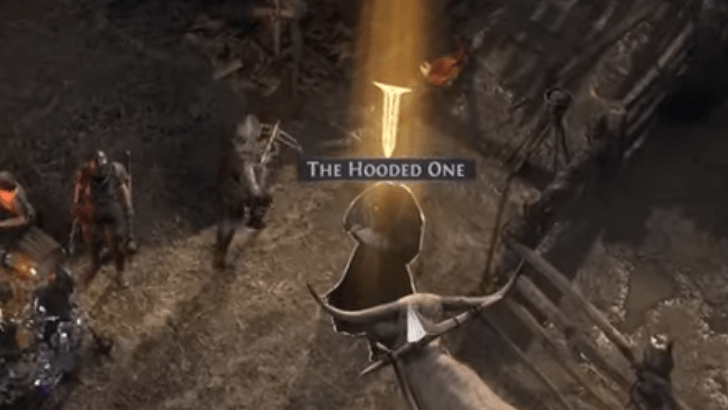 Speak to the Hooded One and Travel East Speak to the Hooded One and Travel EastComplete the quest by traveling back to Clearfell Encampment and talking to The Hooded One. This marks the end of Act 1, and will start a cutscene that starts Act 2. |
The Mad Wolf of Ogham Quest Walkthrough
Optional Loot: The Gallows
You can find The Gallows within The Manor Ramparts. It can be found on one side of the map along the way to Ogham Manor. Cutting the rope in The Gallows gives you an Uncut Support Gem.
Optional Boss: Candlemass, the Living Rite
Candlemass, the Living Rite is an optional boss found in Ogham Manor. It can be found in the first floor of the area, opposite of where the stairs are. Defeating this boss grants you additional permanent Fire Resistance, so it can be very helpful dealing with stronger enemies!.
Candlemass, the Living Rite Boss Guide
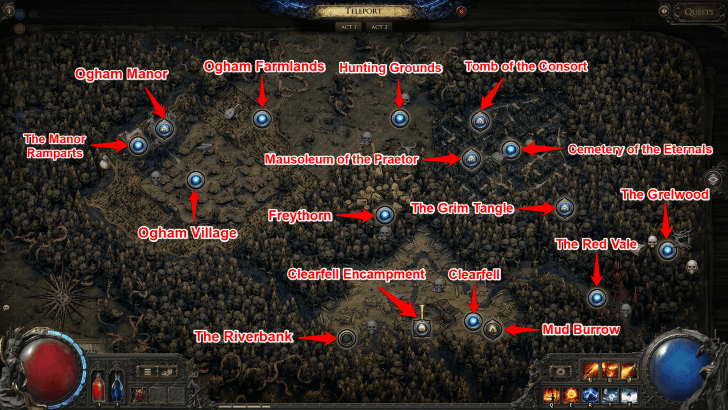
List of All Locations in Act 1
All Locations in Act 1
Act 1 Boss Guide
The Bloated Miller
| The Bloated Miller | |
|---|---|
 |
|
| Boss Type | Main |
| Damage Types | Physical |
| Resistances | None |
| Weaknesses | None |
| Rewards | Mercy for the Miller main quest completion |
While the Bloated Miller's attacks are simple and slow, it's most devastating attack is the unblockable vertical slash. Be prepared to dodge sideways when the boss glows red to prepare this attack.
The Brambleghast
| The Brambleghast | |
|---|---|
 |
|
| Boss Type | Optional |
| Damage Types | Physical, Chaos |
| Resistances | Physical, Cold |
| Weaknesses | Fire |
| Rewards | Uncut Skill Gem Level 2 |
During the fight, The Brambleghast will summon vine tentacles that will automatically slam itself against the player. These tentacles can be destroyed to give yourself some extra freedom of movement during the fight.
The Rust King
| The Rust King | |
|---|---|
 |
|
| Boss Type | Main |
| Damage Types | Physical |
| Resistances | Fire, Physical |
| Weaknesses | Lightning |
| Rewards | Rune Skull Cap (Secrets in the Dark quest item) |
The Rust King will often ignite his weapons and lunch them at you in various ways. Check each of its motion to see which directions the weapons will fly to avoid them.
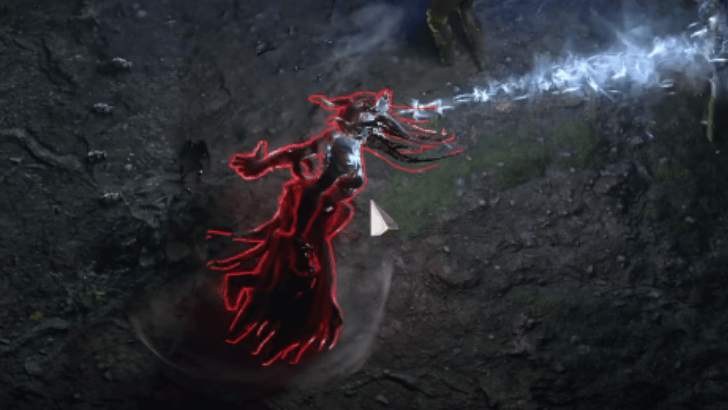
Draven, the Eternal Praetor
| Draven, the Eternal Praetor | |
|---|---|
 |
|
| Boss Type | Main |
| Damage Types | Physical |
| Resistances | Physical, Fire |
| Weaknesses | None |
| Rewards | Draven's Memorial Key Piece (Sorrow Among Stones) |
Draven's Revenant will often invoke curse sigils that will cover a huge area of the field. Be sure to roll away from these areas immediately as they'll quickly explode for huge damage.
Draven, the Eternal Praetor Boss Guide
Lachlann of Endless Lament
| Lachlann of Endless Lament | |
|---|---|
 |
|
| Boss Type | Main |
| Damage Types | Physical |
| Resistances | Physical |
| Weaknesses | None |
| Rewards | Count Lachlann's Ring (The Mysterious Shade quest item) |
When fighting Lachlann, you can circle around the giant tombstone in the area to kite Lachlann. Just be wary of the chilled ground that the spirits leave when they attack and avoid these areas.
Lachlann of Endless Lament Boss Guide
The Executioner
| The Executioner | |
|---|---|
 |
|
| Boss Type | Main |
| Damage Types | Physical |
| Resistances | Fire |
| Weaknesses | None |
| Rewards | The Trail of Corruption main quest progression |
Keep your distance and be wary of the powerful AoE attacks that The Executioner can do in the later stages of the fight. These Area Attacks do not only deal devastating damage, but it also cannot be dodged by Dodge Rolling or the Evasion stat.
Count Geonor
| Count Geonor | |
|---|---|
 |
|
| Boss Type | Main |
| Damage Types | Physical, Cold |
| Resistances | Cold |
| Weaknesses | None |
| Rewards | The Mad Wolf of Ogham main quest completion |
Geonor's most overlooked attack is when he summons multiples pillars of light which explodes dealing heavy cold damage and inflicting Chill, or even Freeze. Dodging this attack opens you up to the next set of beams and attacking during this moment can be risky.
Asinia, Praetor Consort
| Asinia, Praetor Consort | |
|---|---|
 |
|
| Boss Type | Main |
| Damage Types | Physical, Fire |
| Resistances | Physical, Cold |
| Weaknesses | None |
| Rewards | Sorrow Among Stones main quest progression |
The Bone Spears follow up attack that Asinia does after the Bone Cage usually deals a lethal amount of damage. To avoid this attack, attack the Bone Cage as it's summoned to break it and escape.
Asinia, Praetor Consort Boss Guide
The Rotten Druid
| The Rotten Druid | |
|---|---|
 |
|
| Boss Type | Optional |
| Damage Types | Physical, Chaos |
| Resistances | None |
| Weaknesses | None |
| Rewards | Uncut Support Gem |
Be extra careful to not be in the middle of the boss area where the the Spores are. This small area not only has Spore Clouds that deal Chaos Damage and Slow you, but the Spore itself also explode when you get close.
Act 1 Rewards
Quest Rewards
| Reaching Clearfell | ・Uncut Skill Gem |
|---|---|
| Secrets in the Dark | ・Unlocks Next Quest |
| The Mysterious Shade | ・Unlocks Next Quest |
| Sorrow Among Stones | ・Count Lachlann's Ring
・Uncut Support Gem |
| The Trail of Corruption | ・Uncut Skill Gem |
| The Mad Wolf of Ogham | ・Unlocks Next Quest |
Path of Exile 2 Related Guides

List of All Acts
| Act 1 | Act 2 |
| Act 3 | Act 4 |
All Points of Interest
Comment
Author

Complete Act 1 Walkthrough
Please participate in our site
improvement survey
04/2026
improvement survey
04/2026
Would you assist in
improving Game8's site?
improving Game8's site?

×
We are listening to our users' valuable opinions and discussing how to act on them.
The information collected through this survey will be used for the purpose of improving our services. In addition, the information will only be disclosed a part of a statistic in a format that will not allow identification of personal information.
Begin Survey
Not Now
×
Please rate each item regarding Game8.co's Advertisements.
Amount of Ads
Very Dissatisfied
Somewhat Dissatisfied
Fine
Somewhat Satisfied
Highly Satisfied
Placement of Ads
Timing of Ad Display
Ad Loading Speed
Safeness of Ads
Content of Ads
×
Please rate each item regarding Game8.co's Quality of Articles.
Amount of information
Very Dissatisfied
Somewhat Dissatisfied
Fine
Somewhat Satisfied
Highly Satisfied
Frequency of updates
Speed of new information
Accuracy of articles
Understandibility of articles
Readability of sentences
×
Please rate each item regarding Game8.co's Usability of the Site.
Ease of finding information
Very Dissatisfied
Somewhat Dissatisfied
Fine
Somewhat Satisfied
Highly Satisfied
Loading Speed
Use of Color
Font Size
Visibility of Images
Easy to Understand Layout
×
Please rate each item regarding Game8.co's Message Boards, Comments.
Ease of Writing
Very Dissatisfied
Somewhat Dissatisfied
Fine
Somewhat Satisfied
Highly Satisfied
Readability
Ease in Finding Information
Comment Quality
Comment Quantity
Admin Response
×
Please rate each item regarding Game8.co's Site's new design.
Please rate our site's new design
Very Dissatisfied
Somewhat Dissatisfied
Fine
Somewhat Satisfied
Highly Satisfied
Do you think that the website's design change makes the site easier to use?
Has the new design made it easier for you to find information on the site?
Has the new design improved the overall visual appeal of the site?
How would you rate your overall satisfaction with the new design of the site?
×
How likely are you to recommend Game8 to someone you know?
Very Unlikely
0
1
2
3
4
5
6
7
8
9
10
Very Likely
If you have other opinions regarding potential improvement to the website, please share them with us. We would appreciate your honest opinion.
Note: This is a free response section, so you can proceed without entering anything.
Note: Please be sure not to enter any kind of personal information into your response.
Note: Please be sure not to enter any kind of personal information into your response.
×
Thank You
×
Thank you for participating in our survey! Your answers will help us to improve the quality of our website and services.
We hope you continue to make use of Game8.
We hope you continue to make use of Game8.
Close
Rankings
- We could not find the message board you were looking for.

Gaming News


![Forza Horizon 6 Review [Preview] | Beautiful Roads With a Whole Lot of Oversteer](https://img.game8.co/4460981/a7254c24945c43fbdf6ad9bea52b5ce9.png/thumb)
Popular Games

Genshin Impact Walkthrough & Guides Wiki
Crimson Desert Walkthrough & Guides Wiki
Umamusume: Pretty Derby Walkthrough & Guides Wiki
Honkai: Star Rail Walkthrough & Guides Wiki
Monster Hunter Stories 3: Twisted Reflection Walkthrough & Guides Wiki
Wuthering Waves Walkthrough & Guides Wiki
The Seven Deadly Sins: Origin Walkthrough & Guides Wiki
Pokemon TCG Pocket (PTCGP) Strategies & Guides Wiki
Pokemon Pokopia Walkthrough & Guides Wiki
Zenless Zone Zero Walkthrough & Guides Wiki


Recommended Games
Monster Hunter World Walkthrough & Guides Wiki
Fire Emblem Heroes (FEH) Walkthrough & Guides Wiki
Pokemon Brilliant Diamond and Shining Pearl (BDSP) Walkthrough & Guides Wiki
Super Smash Bros. Ultimate Walkthrough & Guides Wiki
Diablo 4: Vessel of Hatred Walkthrough & Guides Wiki
Cyberpunk 2077: Ultimate Edition Walkthrough & Guides Wiki
Yu-Gi-Oh! Master Duel Walkthrough & Guides Wiki
Elden Ring Shadow of the Erdtree Walkthrough & Guides Wiki
The Legend of Zelda: Tears of the Kingdom Walkthrough & Guides Wiki
Persona 3 Reload Walkthrough & Guides Wiki


All rights reserved
© 2010 - 2024 Grinding Gear Games
The copyrights of videos of games used in our content and other intellectual property rights belong to the provider of the game.
The contents we provide on this site were created personally by members of the Game8 editorial department.
We refuse the right to reuse or repost content taken without our permission such as data or images to other sites.