This survey will take about 1 minute.
Your answers will help us to improve our website.
Path of Exile 2 (PoE 2)
Complete Act 3 Walkthrough
Latest: 0.5.0 Release Date
☆ Fate of the Vaal ▶︎ The Last of the Druids
┗ Bonded Mods | 0.4 Mystery Box
★ Druid: Class Overview | Builds
☆ NEW: Disciple of Varashta Ascendancy!
★ Best Class | Best Builds | Leveling Builds

This is a walkthrough for Act 3 in Path of Exile 3. Read on for a guide to finishing Act 3, how to beat the Act 3 bosses, and their rewards here!
| ◀ Previous Act | Next Act ▶ |
|---|---|
| Act 2 Walkthrough | Act 4 Walkthrough |
 Attention! Attention! |
Note that maps in the game are randomly generated, and the sample layouts on this page are meant to serve as a general guide. |
|---|
List of Contents
Act 3 Legacy of the Vaal Walkthrough
| Act 3 Main Quests | |
|---|---|
| 1 | Legacy of the Vaal ┗ Boss Battle: Xyclucian, the Chimera ┗ Boss Battle: Zicoatl, Warden of the Core ┗ Boss Battle: Queen of Filth ┗ Boss Battle: Ketzuli, High Priest of the Sun ┗ Boss Battle: Viper Napuatzi ┗ Boss Battle: Doryani |
Sandswept Marsh
| Objectives | |
|---|---|
| 1 |  Talk to Sekhema Asala
After defeating Jamanra, the Abomination, talk to Sekhema Asala back in The Ardura Caravan and choose the dialogue option "Pursuing the Beast". This marks the end of Act 2 and will start a cutscene that marks the beginning of Act 3. You will automatically teleported to Sandswept Marsh after the cutscene. |
| 2 |  Talk to The Hooded One
You will automatically be teleported to Sandswept Marsh after the cutscene and will also unlock the quest Legacy of the Vaal. Talk to The Hooded One. |
| 3 |  Within Sandswept Marsh, look for the entrance to the Ziggurat Encampment on the opposite side of the area. |
Optional Boss: Rootdredge
Rootdredge is an optional boss found at Sandswept Marsh that drops a Level 9 Uncut Skill Gem when defeated. The area splits into two, with one path leading to this boss.
Optional Loot: Hanging Tree
Within Sandswept Marsh, the Hanging Tree can be found in one of the two paths that the area splits into. It is found opposite of Rootdredge.
Optional Loot: Orok Campfire
Within Sandswept Marsh, you may encounter an Orok Campfire along the way to Ziggurat Encampment. Several enemies guard a chest containing additional loot, including a Lesser Jeweller's Orb.
Ziggurat Encampment
| Objectives | |
|---|---|
| 4 |  Talk to the Treasure Hunters Talk to the Treasure HuntersOnce inside Ziggurat Encampment, talk to Alva, Oswald, and The Hooded One. |
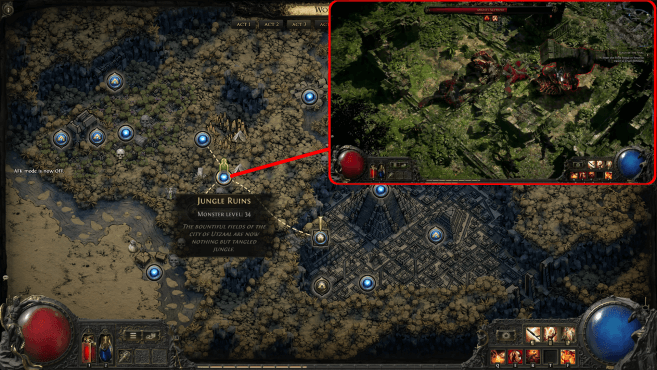
| 5 |  Travel to the Jungle Ruins Travel to the Jungle RuinsFrom the Ziggurat Encampment, proceed to the Jungle Ruins entrance on the northwest side of the encampment. |
Jungle Ruins
| Objectives | |
|---|---|
| 6 | 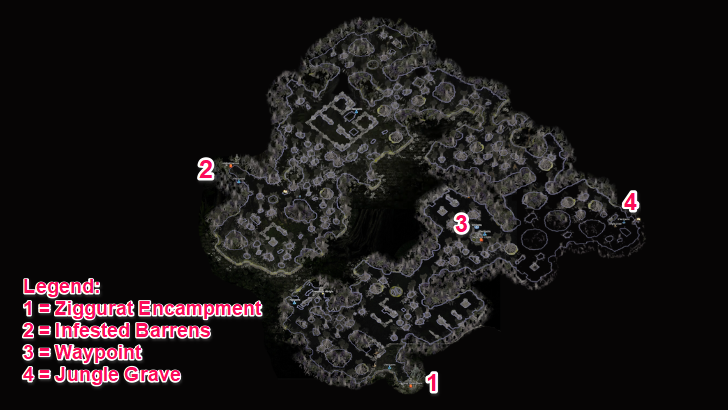 Explore the Jungle Ruins and look for the entrance to the Infested Barrens on the other end of the map from where you entered. |
Optional Boss: Mighty Silverfist
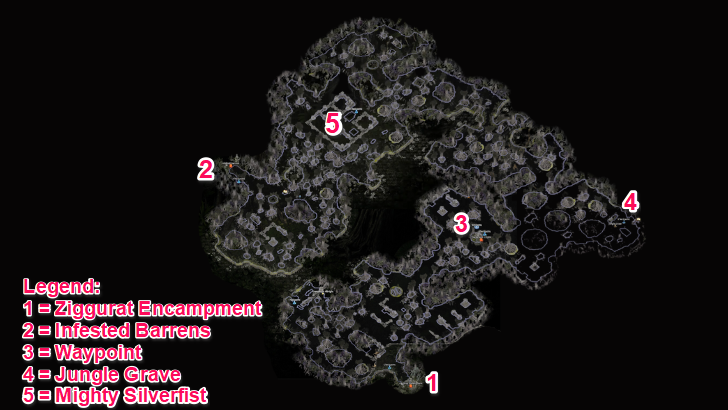
Mighty Silverfist is an optional boss found at Jungle Ruins that drops a Book of Specialisation when defeated. The area itself is vast, so keep an eye out for checkpoints and Temple Ruins.
Optional Quest: The Slithering Dead
| Objectives | |
|---|---|
| 1 | Within Jungle Ruins, the entrance to The Venom Crypts can be found near the area's waypoint. |
| 2 |  Once inside The Venom Crypts, explore the area and look for the Den of the Serpent Priestess near a checkpoint. |
| 3 |  Interact with the Corpse
Once inside the Den of the Serpent Priestess, interact with the Corpse, shown with green text. |
| 4 |  Take the Corpse-Snake Venom
Upon interacting with the Corpse, a Corpse-Snake Venom will drop. It is an item with green text you can pick up. |
| 5 |  Talk to Servi and Choose a Venom Draught
Once you have the Corpse-Snake Venom, complete the quest by returning to Ziggurat Encampment and talking to Servi. She will then ask you to choose between one out of three Venom Draughts as a reward. |
The Slithering Dead Quest Walkthrough
Optional Loot: Troubled Camps

Within Jungle Ruins, you may encounter a Troubled Camp in one of the corners of the area. You will see a checkpoint nearby, with chests full of additional loot inside the camp.
Infested Barrens
| Objectives | |
|---|---|
| 7 |  Within Infested Barrens, look for a Canal Mechanism near the area's waypoint. The waypoint and Canal Mechanism can be found near the entrance to The Matlan Waterways. |
| 8 |  Summon Alva Summon AlvaSummon Alva and talk to her. Return to Ziggurat Encampment and talk to Servi. |
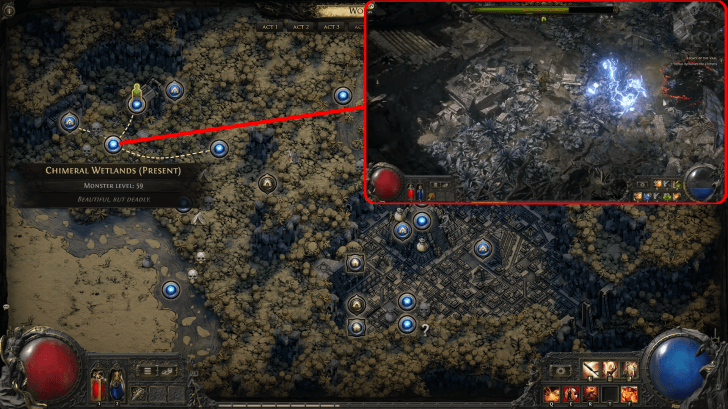
| 9 | From Infested Barrens, look for the entrance to the Chimeral Wetlands. Chimeral Wetlands can be found in one of the corners of the area. |
Optional Quest: Tribal Vengeance
| Objectives | |
|---|---|
| 1 | Within Infested Barrens, look for the entrance to The Azak Bog. It can be found in a relatively isolated corner of the area, with a long, narrow path leading to it. |
| 2 | 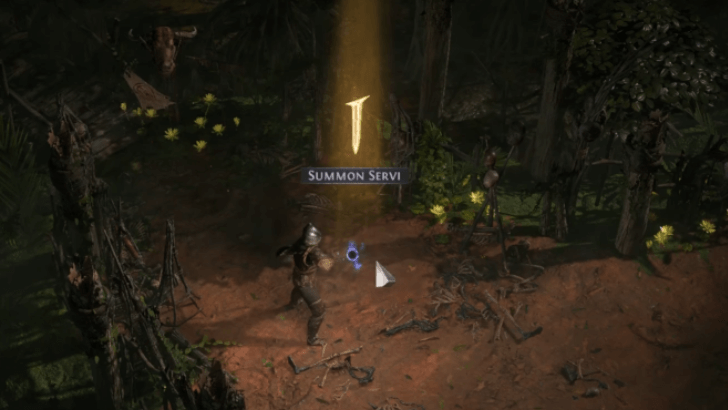 Summon Servi
Upon entering The Azak Bog, you must summon Servi nearby the area's waypoint and talk to her. |
| 3 | 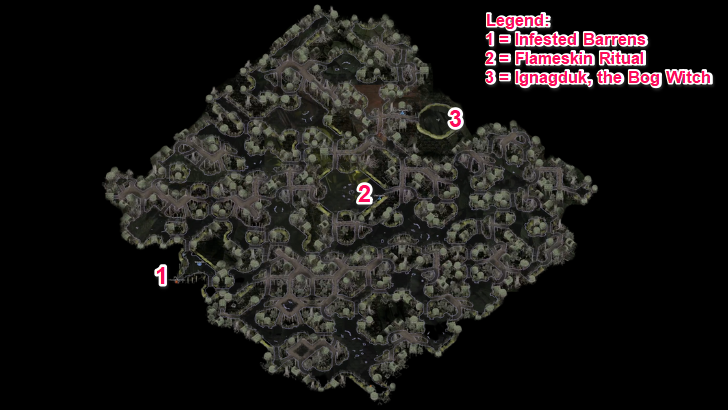 Within The Azak Bog, look for the Flameskin Ritual and interact with all the torches there. This ritual buffs Ignagduk, the Bog Witch, so taking it out before facing the boss will make the fight easier. |
| 4 | Ignagduk, the Bog Witch can be found in an open area on the opposite side of the map. This boss attacks you with various AOE spells of different elements. |
| 5 |  Pick Up Ignagduk's Ghastly Spear
After defeating Ignagduk, the Bog Witch, you can pick up Ignagduk's Ghastly Spear. It is an item with green text that you can pick up. |
| 6 |
Return to Town and Talk to Servi Once you obtain Ignagduk's Ghastly Spear, return to Ziggurat Encampment and talk to Servi. The quest is completed after talking to Servi. |
Tribal Vengeance Quest Walkthrough
Chimeral Wetlands
| Objectives | |
|---|---|
| 10 | 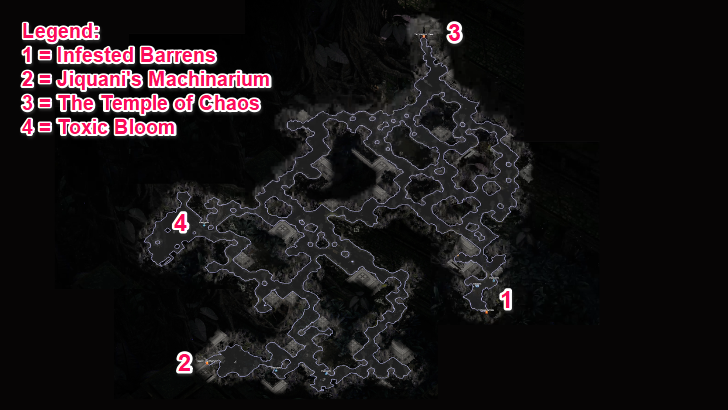 Once inside the Chimeral Wetlands, defeat Xyclucian, the Chimera at the Deadly Nest section of the area, near Jiquani's Machinarium. This boss perches on top of pillars during the fight, so try to destroy these while the boss is on them. Destroying these pillars on time gives you a bigger window to attack! |
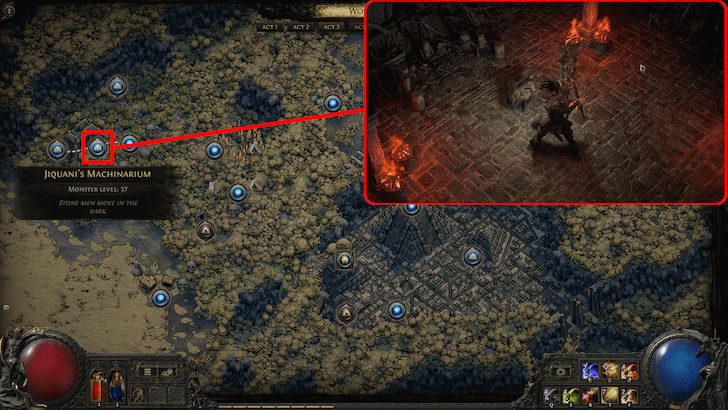
| 11 | 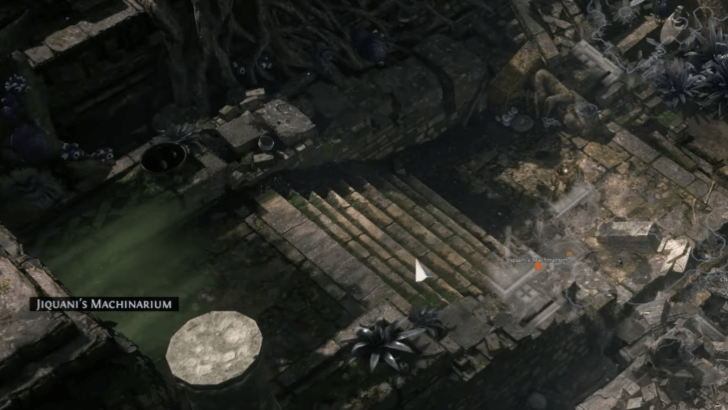 Enter Jiquani's Machinarium
Once you defeat Xyclucian, the Chimera, the entrance to Jiquani's Machinarium will be unlocked. |
Optional Loot: Toxic Bloom
Within Chimeral Wetlands, you may encounter the Toxic Bloom. In the center of the area is a boss you may defeat for additional loot.
Jiquani's Machinarium
| Objectives | |
|---|---|
| 12 |  Summon Alva in Jiquani's Machinarium Summon Alva in Jiquani's MachinariumUpon entering Jiquani's Machinarium, summon Alva in front of the Stone Altar. |
| 13 |  Look for a Small Soul Core and place it back on the Stone Altar to unlock the entrance to Jiquani's Sanctum. Defeat Stone Sentinels after interacting witht the Altar. |
Optional Boss: Blackjaw, the Remnant
Blackjaw, the Remnant is an optional boss found at Jiquani's Machinarium. The boss can be found along to the way to Jiquani's Sanctum. Defeating Blackjaw also grants you permanent +10% Fire Resistance.
Blackjaw, the Remnant Boss Guide
Jiquani's Sanctum
| Objectives | |
|---|---|
| 14 |  Enter Jiquani's Sanctum and summon Alva at the Grand Soul Core Nexus. |
| 15 |  Look for two Medium Soul Cores found around Jiquani's Sanctum. They appear as green exclamation marks on the minimap, so watch out for them! |
| 16 | 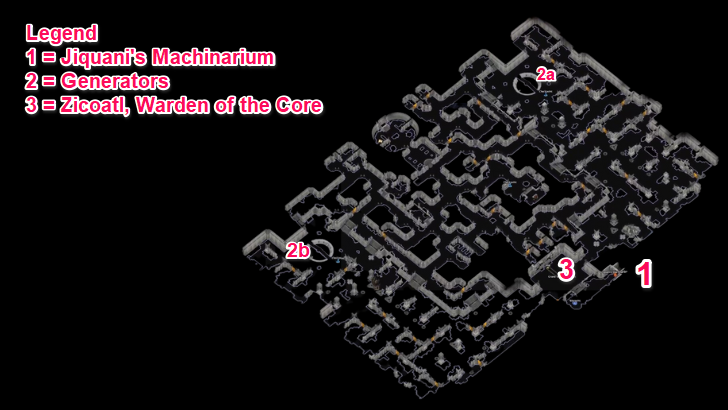 Within Jiquani's Sanctum, place the two Medium Soul Cores into the two generators found within the area. |
| 17 | 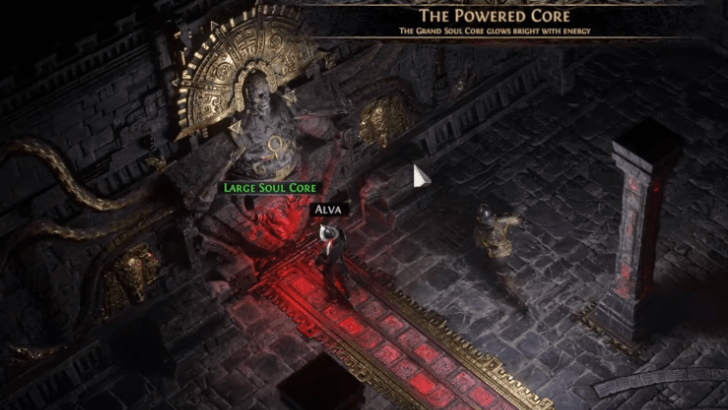 Return to Alva
Return to Alva and interact with the Large Soul Core, where you will fight Zicoatl, Warden of the Core. |
| 18 |  Defeat Zicoatl, Warden of the Core Defeat Zicoatl, Warden of the CoreUpon interacting with the Soul Core, Zicoatl, Warden of the Core will come to life and start attacking you. This boss uses mostly AoE Lightning attacks and a few Physical attacks. Though the attacks have large hitboxes, they also have long animations that give you ample time to dodge or position yourself safely. Collect the Large Soul Core upon defeating it. |
Infested Barrens
| Objectives | |
|---|---|
| 19 | Place the Large Soul Core on the Stone Altar in the Infested Barrens. The Stone Altar is found near Infested Barren's waypoint. |
| 20 | From Infested Barrens, look for the entrance to The Matlan Waterways, found near the Stone Altar and the area's waypoint. |
The Matlan Waterways
| Objectives | |
|---|---|
| 21 | 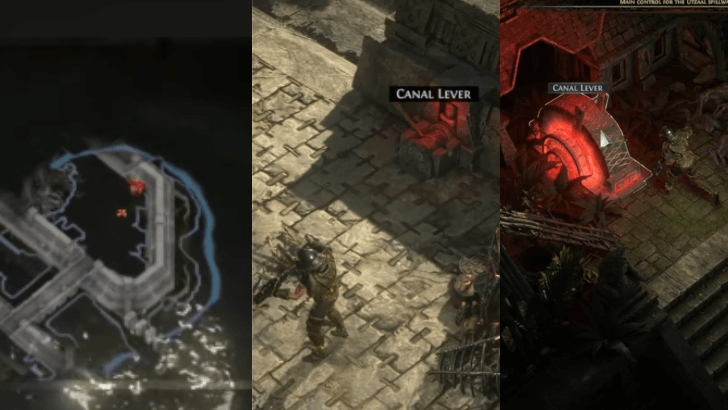 Upon entering The Matlan Waterways, look for Control Levers and activate them to drain water in certain sections. This will allow you to progress through the area. |
| 22 |  In The Matlan Waterways, Control Levers must be activated to reach the opposite end of the map. The Final Control Lever can be found at the end. Activating this will trigger a short animation and drain the water around Ziggurat Encampment. |
Optional Boss: Narag of the Vile Word

Narag of the Vile Word is an optional boss found at The Matlan Waterways. Narag's Hut can be found near a checkpoint somewhere to the side of the map.
Ziggurat Encampment
| Objectives | |
|---|---|
| 23 |  Teleport or create a portal to Ziggurat Encampment after draining the Waterway. The area behind the encampment's well will have been drained of water, revealing a long flight of stairs. |
| 24 | 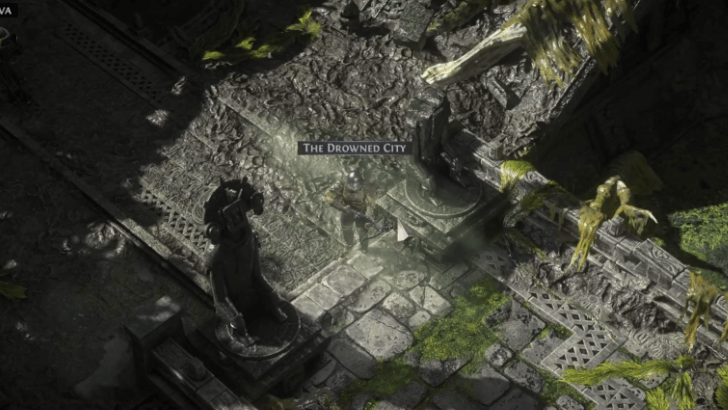 Enter The Drowned City Enter The Drowned CityTalk to Alva and enter The Drowned City, located at the bottom of Ziggurat Encampment. |
The Drowned City
| Objectives | |
|---|---|
| 25 |  Make your way through The Drowned City. The area is divided into two main sections. One corner of the second main section leads to The Molten Vault and the other leads to the Apex of Filth. |
Optional Quest: Treasures of Utzaal
| Objectives | |
|---|---|
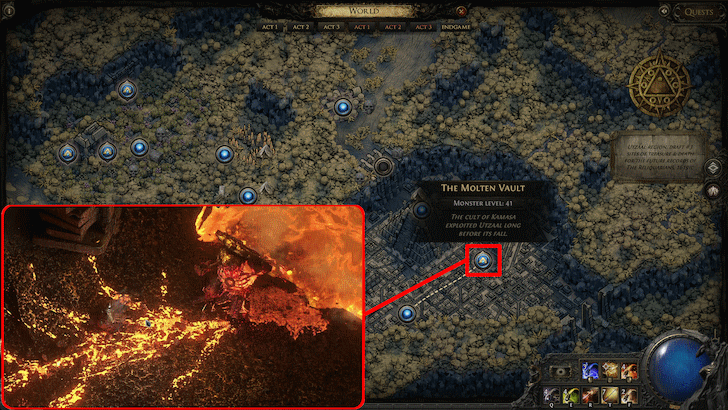
| 1 | Within The Drowned City, look for the entrance to The Molten Vault. It can be found in one of the corners of the opposite side of the map. |
| 2 |  Summon and Talk to Oswald
Summon Oswald in front of The Molten Vault entrance and talk to him. |
| 3 |  Once inside The Molten Vault, you must look for The Aureaduct within the area. You will cross what looks like a dam of molten lava, with Mektul, the Forgemaster nearby. |
| 4 |  Find and Defeat Ignagduk, the Bog Witch
Activate the Sluice Gate Lever and go to the Arena entrance, both nearby a checkpoint. This will lead you to Mektul, the Forgemaster. |
| 5 | 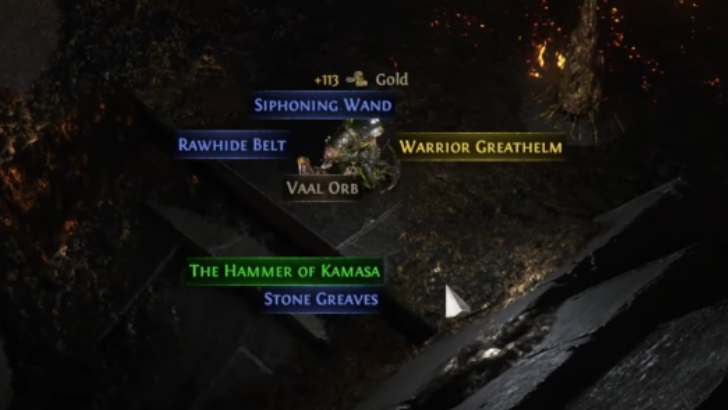 Pick Up The Hammer of Kamasa
Once you defeat Mektul, the Forgemaster, he will drop The Hammer of Kamasa. It is an item with green text that you can pick up. |
| 6 |  Return to Ziggurat Encampment
Once you have The Hammer of Kamasa, return to Ziggurat Encampment and talk to Oswald. You complete the quest after talking to Oswald. |
Treasures of Utzaal Quest Walkthrough
Apex of Filth
| Objectives | |
|---|---|
| 26 |  Once in the Apex of Filth, look for the Queen of Filth somewhere in the center of the area and defeat her. Collect the Temple Door Idol she drops upon defeat and return to Alva. |
Optional Quest: Mushrooms Quest
| Objectives | |
|---|---|
| 1 | From The Drowned City, look for the entrance to Apex of Filth. |
| 2 |  Obtain a Red, Blue, and Green Mushroom
The Mushrooms Quest in Act 3 starts when you pick up a Blue Mushroom, Red Mushroom, or Green Mushroom. It is a hidden quest that does not show up in the quest log. These mushrooms are randomly dropped by enemies found in the Apex of Filth. |
| 3 | Once inside the Apex of Filth, look for the Cauldron Keeper somewhere on the opposite side of the area's entance. |
| 4 | 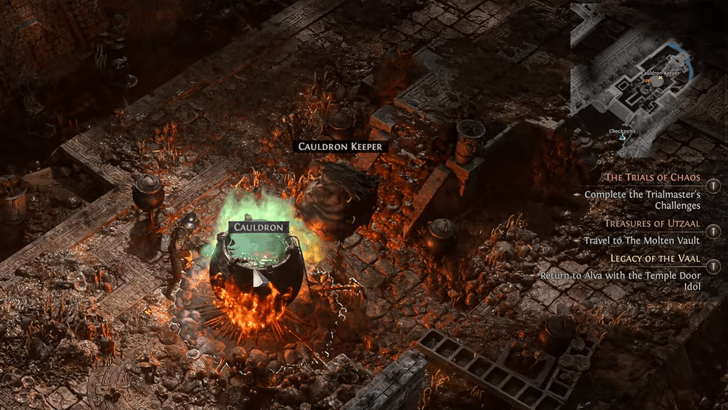 Click on the Cauldron to offer all three mushrooms. You will receive an Ultimate Life Flask and an Ultimate Mana Flask as a reward. |
Ziggurat Encampment
| Objectives | |
|---|---|
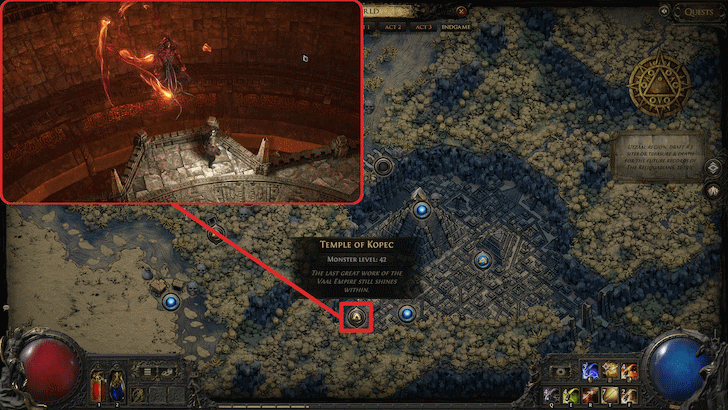
| 27 | 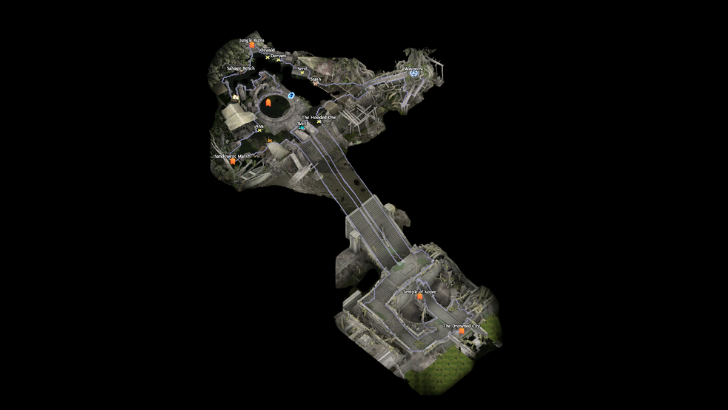 Return to Ziggurat Encampment and go back to Alva. Use the Temple Door Idol on the door opposite to the entrance to The Drowned City. This will unlock the entrance to the Temple of Kopec. |
Temple of Kopec
| Objectives | |
|---|---|
| 28 |  Enter the Temple of Kopec and defeat Ketzuli, High Priest of the Sun at the Altar of the Sun section of the area. The area is set up like a triangle, with stairs leading to another floor. Ketzuli and the Altar of the Sun is found at the third and final floor. |
| 29 |  Enter the Gateway to Utzaal Enter the Gateway to UtzaalAfter defeating Ketzuli, summon Alva and ride the elevator to Ziggurat Encampment. A Gateway will open in the middle of the encampment. Enter the Gateway to travel to the past. |
Utzaal
| Objectives | |
|---|---|
| 30 |  Enter Utzaal
Once you travel to the past version of Ziggurat Encampment, go down the long flight of stairs on the southeast part of the area to enter Utzaal. |
| 31 |  Explore Utzaal and look for the Legion Blockade. Defeat Viper Napuatzi and several Viper Legionnaires after defeating her. Utzaal is divided into two main sections, connected by the Legion Blockade. Proceed to Aggorat after. |
Optional Loot: Peculiar Fortunes

Within Utzaal, you may encounter a Peculiar Fortunes in several corners of the area. Several checkpoints in the area that are nearby entrances that lead to rooms full of additional loot.
Aggorat
| Objectives | |
|---|---|
| 32 | 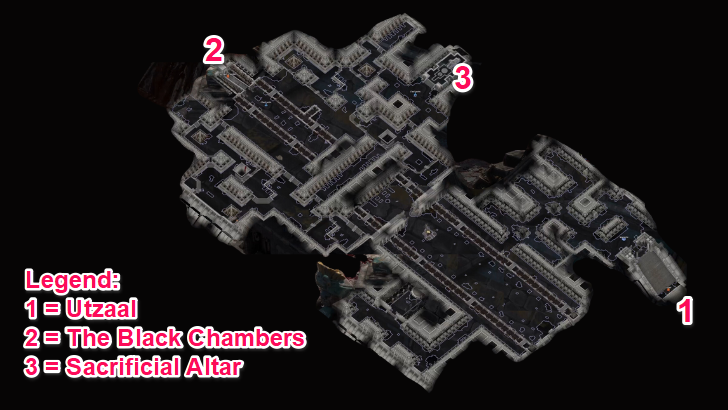 Within Aggorat, look for the entrance to The Black Chambers on the other side of the area. |
Optional Loot: Sacrificial Heart
| Step | Objective |
|---|---|
| 1 |  Pick up the Sacrificial Heart that drops randomly within Utzaal. |
| 2 | Proceed to the Sacrificial Dais in Aggorat. |
| 3 | Pick up the Sacrificial Dagger. |
| 4 | Place the Sacrificial Heart. |
| 5 | Stab the Sacrificial Heart. You will receive two Weapon Set Passive Skill Points upon completing this quest. |
Sacrificial Heart Location and How to Use
The Black Chambers
| Objectives | |
|---|---|
| 33 |  Look for Doryani
Go through The Black Chambers to reach Doryani on the other side of the area. |
| 34 |  Defeat Doryani Defeat DoryaniIn The Black Chambers, go to The Testing Pit and defeat Doryani and Doryani's Triumph. This boss attacks mainly with its two claws, either with big melee swings or AoE projectile attacks. |
Ziggurat Encampment
| Objectives | |
|---|---|
| 35 | 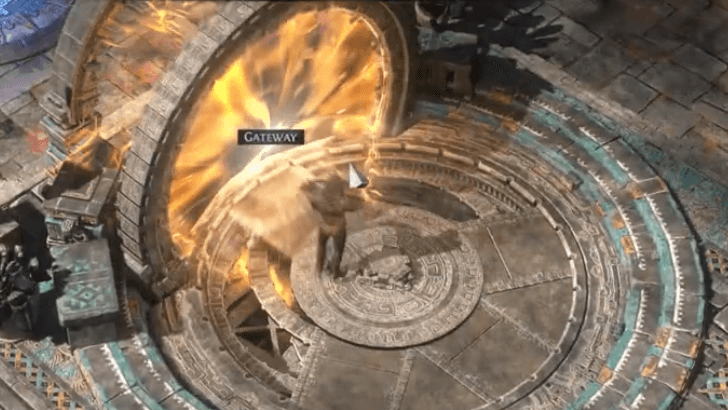 Enter the Gateway in Ziggurat Encampment Enter the Gateway in Ziggurat EncampmentAfter being teleported back to Ziggurat Encampment, enter the Gateway to complete the quest Legacy of the Vaal and start Act 1 on Cruel Difficulty. |
Legacy of the Vaal Quest Walkthrough
List of All Locations in Act 3
All Locations in Act 3
Act 3 Boss Guide
Mighty Silverfist
| Mighty Silverfist | |
|---|---|
 |
|
| Boss Type | Optional |
| Damage Types | Physical |
| Resistances | Physical |
| Weaknesses | None |
| Rewards | Book of Specialization - Grants two Weapon Set Passive Skill Points;Cruel: Book of Specialization - Grants two Weapon Set Passive Skill Points |
Mighty Silverfist's attacks deal a lot of Physical damage that some builds may not have the damage reduction required to survive. Fortunately, it has a fairly simple moveset of swings and slams which you can react to and dodge accordingly. Check out the next section of the guide for a list of its moves.
Blackjaw, the Remnant
| Blackjaw, the Remnant | |
|---|---|
 |
|
| Boss Type | Main |
| Damage Types | Physical, Fire |
| Resistances | Physical, Fire |
| Weaknesses | Cold |
| Rewards | The Flame Core - Grants +10% to Fire Resistance |
Black Jaw's hits are heavy but mostly lands infront of it so dodge rolling behind it will allow you to offset the majority of its damage.
Blackjaw, the Remnant Boss Guide
Zicoatl, Warden of the Core
| Zicoatl, Warden of the Core | |
|---|---|
 |
|
| Boss Type | Main |
| Damage Types | Physical, Lightning |
| Resistances | Physical, Cold, Fire |
| Weaknesses | Lightning |
| Rewards | Large Soul Core (Legacy of the Vaal quest item) |
Zicoatl has a lot of telegraphed laser attacks that you can Dodge Roll or reposition to dodge. The red triangle wave, however, is a bit deceptively hard to assess where to reposition to avoid damage. Always remember to stay in front of the triangle's vertices or points to stay out of trouble!
Zicoatl, Warden of the Core Boss Guide
Rootdredge
| Rootdredge | |
|---|---|
 |
|
| Boss Type | Optional |
| Damage Types | Physical, Fire |
| Resistances | Physical, Cold |
| Weaknesses | Fire |
| Rewards | Uncut Skill Gem Level 9 |
The fight is straightforward and involves dealing with zombie minions and a few spells. Watch out for its homing green projectiles and corpse explosion skill, however, as they can hit multiple times in quick succession and kill you in an instant. Always stay alert for the green glowing effects to avoid taking heavy damage.
Xyclucian, the Chimera
| Xyclucian, the Chimera | |
|---|---|
 |
|
| Boss Type | Main |
| Damage Types | Physical, Fire, Cold, Lightning, Chaos |
| Resistances | Fire, Cold, Lightning |
| Weaknesses | None |
| Rewards | Chimeral Inscribed Ultimatum (Unlocks Trial of Chaos);Legacy of the Vaal main quest progression |
At the early stages of the fight, Xyclucian will stand on top of towers around the arena and will fire different projectiles at you. You can attack the towers they're on to destroy them and stun Xyclycian for a while to deal some good damage.
Xyclucian, the Chimera Boss Guide
Ignagduk, the Bog Witch
| Ignagduk, the Bog Witch | |
|---|---|
 |
|
| Boss Type | Optional |
| Damage Types | Physical, Fire |
| Resistances | Fire |
| Weaknesses | Cold |
| Rewards | Gemrot Skull - Grants +30 Maximum Spirit; Ignagduk's Ghastly Spear (Tribal Vengeance quest item) |
Lighting all the effigies in the Flameskin Ritual within Azak Bog activates the Ignagduk's Harvest buff, offering +25% Fire Resistance and increased Item Rarity while in the area. This buff is crucial for withstanding Ignagduk's high-damage Fire DoT spells.
Ignagduk, the Bog Witch Boss Guide
Mektul, the Forgemaster
| Mektul, the Forgemaster | |
|---|---|
 |
|
| Boss Type | Optional |
| Damage Types | Physical, Fire |
| Resistances | Physical, Fire |
| Weaknesses | Cold |
| Rewards | The Hammer of Kamasa (Treasures of Utzaal quest item) |
While Mektul has a few dangerous attacks, the real challenge in this fight is the time limit. If you take too long, molten gold will flood the arena, dealing heavy Fire Damage every second. Adjust and optimize your build to ensure you defeat Mektul before the arena is overwhelmed!
Mektul, the Forgemaster Boss Guide
Queen of Filth
| Queen of Filth | |
|---|---|
 |
|
| Boss Type | Main |
| Damage Types | Physical, Chaos |
| Resistances | Physical |
| Weaknesses | None |
| Rewards | Temple Door Icon (Legacy of the Vaal quest item) |
The Queen of Filth fight features many on ground effects that both damage and debilitates your character. Always watch out for the orange spores that explode when you walk on top of them and the Caustic Ground that deals Chaos damage. There are also Curses that Slows you, decreases your Armor, and one that decreases the damage you deal.
Ketzuli, High Priest of the Sun
| Ketzuli, High Priest of the Sun | |
|---|---|
 |
|
| Boss Type | Main |
| Damage Types | Physical, Fire |
| Resistances | Fire |
| Weaknesses | Cold |
| Rewards | Legacy of the Vaal main quest progression |
Among Ketzuli's attacks, the laser beam applying the Gamma Ray debuff is the hardest to counter. Without sufficient Fire Resistance, it can rapidly deplete your Life. To evade it effectively, stay close to Ketzuli so you can circle around him faster than the beam can track you.
Ketzuli, High Priest of the Sun Boss Guide
Viper Napuatzi
| Viper Napuatzi | |
|---|---|
 |
|
| Boss Type | Main |
| Damage Types | Physical, Chaos, Fire |
| Resistances | Physical, Fire, Cold, Lightning |
| Weaknesses | None |
| Rewards | Legacy of the Vaal main quest progression |
Beside's the amount of Poison damage Viper can deal, the phase where her legion thrust their spears can be a challenge. The most consistent way to dodge all these attacks is to Dodge Roll on rhythm regardless of when you're about to get hit or not. This way, you don't have to worry whether to Dodge Roll or not.
Doryani
| Doryani | |
|---|---|
 |
|
| Boss Type | Main |
| Damage Types | Physical, Fire, Cold, Lightning |
| Resistances | Fire, Lightning |
| Weaknesses | None |
| Rewards | Legacy of the Vaal main quest progression |
The second, more challenging phase pits you against Doryani's Triumph, which uses powerful slam and laser attacks. Staying close and to its side gives you better options to Dodge Roll when it begins its attacks. Dodge toward its back to avoid frontal beams and slams, move to its front during the laser spin, and roll away during large AoE slams to stay safe.
Act 3 Rewards
Quest Rewards
| Legacy of the Vaal | Unlocks Cruel Difficulty |
|---|
Path of Exile 2 Related Guides

List of All Acts
| Act 1 | Act 2 |
| Act 3 | Act 4 |
All Points of Interest
Comment
Author

Complete Act 3 Walkthrough
Please participate in our site
improvement survey
04/2026
improvement survey
04/2026
Would you assist in
improving Game8's site?
improving Game8's site?

×
We are listening to our users' valuable opinions and discussing how to act on them.
The information collected through this survey will be used for the purpose of improving our services. In addition, the information will only be disclosed a part of a statistic in a format that will not allow identification of personal information.
Begin Survey
Not Now
×
Please rate each item regarding Game8.co's Advertisements.
Amount of Ads
Very Dissatisfied
Somewhat Dissatisfied
Fine
Somewhat Satisfied
Highly Satisfied
Placement of Ads
Timing of Ad Display
Ad Loading Speed
Safeness of Ads
Content of Ads
×
Please rate each item regarding Game8.co's Quality of Articles.
Amount of information
Very Dissatisfied
Somewhat Dissatisfied
Fine
Somewhat Satisfied
Highly Satisfied
Frequency of updates
Speed of new information
Accuracy of articles
Understandibility of articles
Readability of sentences
×
Please rate each item regarding Game8.co's Usability of the Site.
Ease of finding information
Very Dissatisfied
Somewhat Dissatisfied
Fine
Somewhat Satisfied
Highly Satisfied
Loading Speed
Use of Color
Font Size
Visibility of Images
Easy to Understand Layout
×
Please rate each item regarding Game8.co's Message Boards, Comments.
Ease of Writing
Very Dissatisfied
Somewhat Dissatisfied
Fine
Somewhat Satisfied
Highly Satisfied
Readability
Ease in Finding Information
Comment Quality
Comment Quantity
Admin Response
×
Please rate each item regarding Game8.co's Site's new design.
Please rate our site's new design
Very Dissatisfied
Somewhat Dissatisfied
Fine
Somewhat Satisfied
Highly Satisfied
Do you think that the website's design change makes the site easier to use?
Has the new design made it easier for you to find information on the site?
Has the new design improved the overall visual appeal of the site?
How would you rate your overall satisfaction with the new design of the site?
×
How likely are you to recommend Game8 to someone you know?
Very Unlikely
0
1
2
3
4
5
6
7
8
9
10
Very Likely
If you have other opinions regarding potential improvement to the website, please share them with us. We would appreciate your honest opinion.
Note: This is a free response section, so you can proceed without entering anything.
Note: Please be sure not to enter any kind of personal information into your response.
Note: Please be sure not to enter any kind of personal information into your response.
×
Thank You
×
Thank you for participating in our survey! Your answers will help us to improve the quality of our website and services.
We hope you continue to make use of Game8.
We hope you continue to make use of Game8.
Close
Rankings
- We could not find the message board you were looking for.

Gaming News


![Forza Horizon 6 Review [Preview] | Beautiful Roads With a Whole Lot of Oversteer](https://img.game8.co/4460981/a7254c24945c43fbdf6ad9bea52b5ce9.png/thumb)
Popular Games

Genshin Impact Walkthrough & Guides Wiki
Crimson Desert Walkthrough & Guides Wiki
Umamusume: Pretty Derby Walkthrough & Guides Wiki
Honkai: Star Rail Walkthrough & Guides Wiki
Monster Hunter Stories 3: Twisted Reflection Walkthrough & Guides Wiki
Wuthering Waves Walkthrough & Guides Wiki
The Seven Deadly Sins: Origin Walkthrough & Guides Wiki
Pokemon TCG Pocket (PTCGP) Strategies & Guides Wiki
Pokemon Pokopia Walkthrough & Guides Wiki
Zenless Zone Zero Walkthrough & Guides Wiki


Recommended Games
Monster Hunter World Walkthrough & Guides Wiki
Fire Emblem Heroes (FEH) Walkthrough & Guides Wiki
Pokemon Brilliant Diamond and Shining Pearl (BDSP) Walkthrough & Guides Wiki
Super Smash Bros. Ultimate Walkthrough & Guides Wiki
Diablo 4: Vessel of Hatred Walkthrough & Guides Wiki
Cyberpunk 2077: Ultimate Edition Walkthrough & Guides Wiki
Yu-Gi-Oh! Master Duel Walkthrough & Guides Wiki
Elden Ring Shadow of the Erdtree Walkthrough & Guides Wiki
The Legend of Zelda: Tears of the Kingdom Walkthrough & Guides Wiki
Persona 3 Reload Walkthrough & Guides Wiki


All rights reserved
© 2010 - 2024 Grinding Gear Games
The copyrights of videos of games used in our content and other intellectual property rights belong to the provider of the game.
The contents we provide on this site were created personally by members of the Game8 editorial department.
We refuse the right to reuse or repost content taken without our permission such as data or images to other sites.