This survey will take about 1 minute.
Your answers will help us to improve our website.
Wuthering Waves (WuWa)
Galbrena Best Builds and Teams
★ Version 3.1 → Phase 2 Pull Strategy
┣ Luuk Herssen: Builds, Asc. Materials, Sig. Weapon
┣ Rerun: Gabrena Build, Asc. Materials, Sig. Weapon
┣ Mansion Event Guide | Bartending Recipes
┗ Tapes of Last Words | Soliskin | 3.1 Hidden Trophies
★ Exclusives: Tier List Maker | State of the Meta
Galbrena is a playable 5-star Fusion Pistol character in Wuthering Waves (WuWa). Check out this guide for the best Galbrena build, Galbrena best teams, echoes, kit (skills), skill priority, and voice actor here!
| Galbrena Character Guides | |
|---|---|
|
|
|
List of Contents
Galbrena Character Overview
Galbrena Information
| Resonator Information | ||
|---|---|---|
 Galbrena Galbrena |
||
| Rarity | ★★★★★ | |
| Element | ||
| Weapon | ||
| How to Get | Limited Convene | |
| Voice Actor (EN) | Devora Wilde | |
Galbrena Rankings
| Overall | Role | Endgame |
|---|---|---|
|
|
Main DPS:
|
ToA:
WhiWa:
|
| The endgame tier placement considers the buffs present in both endgame modes. This will get updated periodically as buffs change. | ||
Are you Pulling for Galbrena?
Galbrena Stats
| Lv. 1 | Lv. 90 | |
|---|---|---|
| HP | 824 | 10300 |
| ATK | 37 | 462 |
| DEF | 91 | 1112 |
| Energy Regen | 100% | - |
| Crit. Rate | 5% | - |
| Crit. DMG | 150% | - |
Stat calculations does not include the Attribute Bonuses from Galbrena's Forte.
How Strong is Galbrena?
| Strengths | |||
|---|---|---|---|
|
• Straightforward DPS character that surprisingly fits a lot of teams. • Strong multiple self-buffs in her kit with some caveats. Some of them require Echo Skill activation from other Resonators. • Split scaling with Echo Skill DMG and Heavy Attack DMG. She can be built for either one, though her Echo Skill DMG is more prevalent in her kit. • She has a powerful Dodge Counter, making combo breaks less punishing for most players. |
|||
| Weaknesses | |||
|
• Severe gap in weapon performance. There are no F2P-friendly options that provide Echo Skill or Heavy Attack DMG for her. • Scales off Echo Skill DMG, which is still pretty niche and cannot be received from Echo substats. |
Galbrena is a strong 5-star Fusion DPS that utilizes Echo Skill DMG and Heavy Attack DMG to defeat enemies. She is straightforward to use and performs well as a DPS unit. She has multiple self-buffs in her kit that make her damage outputs be at the top level.
Her main downside is her severe lack of weapon options, as there are no Pistols that fully utilize her damage scalings apart from her signature weapon. That said, she can still be on par with other meta teams despite this shortcoming and can fit in multiple teams because of her split scaling.
Lux & Umbra (Galbrena Weapon) Stats
Galbrena Build Guide
Fusion Echo Skill DPS Build
| Best Weapon | ||
|---|---|---|
| Alt. Weapons | ||
| Sonata Effect |
3-pc |
2-pc |
| Cost Pattern | 3 4 3 1 1 | |
| Main Echo |
|
|
Galbrena Best Echo Stats
| Echo Main Stats Priority | ||
|---|---|---|
| 4 COST | 3 COST | 1 COST |
| Crit Rate or Crit DMG | Fusion DMG | ATK% |
| Echo Substats Tuning Priority | ||
|
1. CRIT Rate ★★★ 2. CRIT DMG ★★★ 3. Heavy Attack DMG Bonus ★★ 4. Energy Regen ★★ 5. ATK% ★★ 6. Flat ATK ★ | ||
Flamewing's Shadow is Galbrena's best-in-slot Echo set, as her scaling is based on Fusion DMG and Echo Skill DMG. She is built as a standard DPS with Crit. Rate and Crit. DMG as the main priority, followed by ATK% and Heavy Attack DMG. Lastly, aim for around 120% Energy Regen to comfortably apply her combos per rotation.
Aim for 75:250 Crit Ratio on Galbrena
| Crit. Rate | 70-80% |
|---|---|
| Crit. DMG | >250% |
| ATK | 2100+ |
A 75:250 Crit Ratio is ideal on Galbrena to have a more consistent damage output in her rotations. As her passive stats give her Crit. DMG, we suggest getting a Crit. Rate 4-COST to achieve these stats. That said, we recommend you prioritize meeting the Crit. Rate requirement over Crit. DMG when building her.
Galbrena Best Echo Sets
Optimal Main Echo
| Main Echo | Explanation |
|---|---|
|
|
・Best and only option for Galbrena with the Flamewing's Shadow and Flaming Clawprint sets. ・Gives both Fusion DMG and Echo Skill DMG Bonus that she heavily scales off of. ・A summon-type Echo that deals decent Fusion DMG. ・You can also use 2-pc Molten Rift instead of Flaming Clawprint for her secondary Sonata Effect bonus. |
|
|
・Secondary choice for Galbrena in the Molten Rift set. ・Gives a passive 12% Fusion DMG bonus which she benefits from. ・A downside to this Echo is the Resonance Skill DMG bonus, which is practically useless on her. ・Transform-type Echo that deals decent Fusion DMG, but takes up time during her combos. |
|
|
・Significantly inferior to the Nightmare variant because of its activation requirement to get its buffs. ・Galbrena will be able to utilize the Fusion DMG Bonus, but doesn't benefit from the Basic Attack DMG increase. ・Long combo takes too much time. |
Galbrena Best Sonata Effects
| Echo Set | Rating |
|---|---|
|
(3-pc) (2-pc) |
★★★ - Best Galbrena primarily scales off Echo Skill DMG and Heavy Attack DMG, which is the main selling point of Flamewing's Shadow. This set with Corrosaurus maximizes Galbrena's potential, so you should collect Echoes under this set from the Nightmare Nests or Flaming Clawprint when you can! Recommended Main Echo: |
|
(5-pc) |
★★☆ - 2nd Best Molten Rift is the second best option for Galbrena due to its easy-to-activate Fusion DMG buffs. This set is farmable very early on and is useful throughout all stages of the game. That said, you can replace the 5-pc bonus for the 3-pc bonus of Flamewing's Shadow when you get to the area. Recommended Main Echo: |
|
(3-pc) (2-pc) |
★☆☆ - 3rd Best Law of Harmony is decent for Galbrena, but is harder to maximize on her due to its short uptime. The set is better suited for a sub-DPS, since she can benefit from the global Echo Skill DMG buff it gives. That said, if you only have this as an option, she will utilize the bonus to some extent. Recommended Main Echo: |
List of All Echoes and Sonata Effects
Galbrena Best Weapons
Best Weapons for Galbrena Ranked
| Weapon | Skill | |
|---|---|---|
| 1 |
|
To Fire She Returns ATK is increased by 12%. Upon dealing Echo Skill DMG, gain 24% Heavy Attack DMG Amplification for 6s. Upon dealing Heavy Attack DMG, gain 24% Echo Skill DMG Amplification for 6s. DMG Amplification on each attack is capped at 24%. While both effects are active, dealing damage ignores 8% of the target's DEF. |
| 2 |
|
Silent Eulogy Increases ATK by 12%. Every time Intro Skill or Resonance Liberation is cast, Resonance Skill DMG Bonus increases by 48% for 5s. |
| 3 |
|
Stormy Resolution Increases Energy Regen by 12.8%. When Outro Skill is cast, increases the incoming Resonator's ATK by 10%, stacking up to 1 time(s). This effect lasts for 14s. |
| 4 |
|
Oath of Tide Hunters Dealing Basic Attack or Heavy Attack DMG increases ATK by 2.2% and grants 2.2% Heavy Attack DMG Bonus for 7s, stacking up to 4 times. This effect can be triggered every 1s. |
| 5 |
|
Intergalactic Gaze Casting the Resonance Skill grants 6 Resonance Energy and increases ATK by 10% lasting for 16s. This effect can be triggered once every 20s. |
| 6 |
|
Ever-Changing When the Resonator dashes or dodges, increases ATK by 4%, stacking up to 3 time(s). This effect lasts for 8s. |
| 7 |
|
Omniscient When the Resonator takes no damage, increases ATK by 6% every 5s, stacking up to 2 time(s). This effect lasts for 8s. When the Resonator takes damage, loses 1 stacks and heals them by 5% of Max HP. |
Galbrena Best Weapon Explained
Galbrena's weapon options can be considered as one of her main downsides, as there is a significant disparity between her Signature Weapon, Lux & Umbra, and other alternative options. The Last Dance's skill is practically useless but is justified with its unmatched stats. For her third option, Static Mist's skill has decent value to her, given its ER and ATK buffs.
As for 4-star options, Galbrena can make use of the Battlepass weapon, Solar Flame, due to its skill effect, but will suffer from its significantly lower stats. Lastly, Relativistic Jet is worth considering for its ATK buffs.
Galbrena Best Teams
Galbrena Echo Skill Team
| Character / Role | Echo Set |
|---|---|
|
(Main DPS) |
|
|
(Sub-DPS) |
|
|
(Support) |
|
| Character | Explanation |
|---|---|
| | Sub-DPS Replacement for Shorekeeper Lupa provides a lot of Fusion-related buffs that she can funnel into Galbrena. You'll essentiall trade off sustain for more damage with this build. |
Galbrena's best team is with Qiuyuan and Shorekeeper. Qiuyuan is the sole unit to provide Echo Skill DMG buffs to other Resonators, and his kit fits this team perfectly. Meanwhile, Shorekeeper is the best support in the game for her insane healing and damage buffs via her Stellarealm.
You want to funnel most of the buffs from Shorekeeper and Qiuyuan into Galbrena who thrives in being the on-field DPS.
General Rotation
| 1 | Initiate combat with Shorekeeper and use her combos to build up her Resonance and Concerto gauges. Once available, activate Stellarealm and Echo Skill before switching to Qiuyuan when Concerto is full. |
|---|---|
| 2 | Have Qiuyuan enter via his Intro, then follow it up with two Basic Attacks to fill his Forte. Then, cast Echo Skill and Liberation. |
| 3 | Next, hold his Heavy Attack button to perform a 3-step attack string that consumes his Forte for enhanced damage. Lastly, cast his Resonance Skill and switch out to Galbrena via Outro. |
| 4 | As Galbrena, cast Echo Skill and deal 6 Basic Attacks to fill her Sinflame. Then, cast Resonance Skill and enter Demon Hypostatsis. |
| 5 | In this state, cast Liberation to increase her skills' DMG multipliers on top of dealing damage. Continue this combo with 7 Basic Attacks to consume her Forte energy. |
| 6 | Once Forte is depleted and Concerto full, switch back to Shorekeeper to detonate Stellarealm. |
| 7 | Repeat until no enemies are left on the field. |
Galbrena Fusion Team
| Character / Role | Echo Set |
|---|---|
|
(Main DPS) |
|
|
(Sub-DPS) |
|
|
(Sub-DPS) |
|
| Note: If Brant can't meet the 250% ER requirement of Tidebreaking Courage, have him use Molten Rift instead. | |
| Character | Explanation |
|---|---|
| | Sub-DPS Replacement Changli can be used as a replacement for Brant due to her fast rotations and good damage output. However, she lacks the sustain Brant provides, making combat more challenging overall. |
| | Sub-DPS Replacement Mortefi can be used to replace Brant. He provides good Heavy Attack DMG Amplification with his Outro, as well as Coordinated Attacks with his Liberation. |
| | Support Replacement Shorekeeper can be swapped in for Brant, as she gives excellent sustain and general damage buffs to the entire team. |
One of Galbrena's strongest teams is the Mono Fusion team with Brant and Lupa, though you could replace Brant with Changli with slightly worse performance. Lupa has one of the highest buffing capabilities for Fusion-centric teams, and Galbrena makes use of that throughout her kit.
Since Fusion DMG buffs all of her abilities regardless of their scaling, she will perform well as long as you can balance it out with getting Heavy Attack DMG and ATK from other sources. As for Brant, he is ideally your source of sustain in this team as he gives decent healing and pretty strong shields for his short rotations.
General Rotation
| 1 | Initiate combat with Lupa's two Resonance Skill casts, then perform her Liberation to activate Pack Hunt and Glory. |
|---|---|
| 2 | Follow up with Foebreaker and build up her Wolflame stacks. Once full, convert it to Wolfaith with her Mid-air and Heavy Attacks. Lastly, use her Echo Skill for Galbrena's Afterflame and Resonance Skill, then switch to Brant with her Outro. |
| 3 | As Brant enters the field, immediately activate his Liberation. Then, build up his Forte gauge with mid-air attacks and use his enhanced Resonance Skill, Returned from Ashes once available. Lastly, make sure to activate his Echo Skill for Galbrena's Afterflame stacks, then switch to Galbrena mid-animation. |
| 4 | Once Galbrena is on-field, cast her Echo Skill to generate Afterflame. Follow this up with 6 Basic Attacks to fill her Sinflame, then cast Resonance Skill to enter Demon Hypostasis. |
| 5 | During Demon Hypostasis, cast her Liberation to deal massive damage and increase her skills' DMG multipliers. Continue this combo with 7 Basic Attacks to consume her Forte energy. |
| 6 | When her Forte Circuit is depleted and Concerto filled, switch back to Lupa to end the rotation. |
| 7 | Repeat until all enemies are defeated. |
Galbrena Heavy Attack Team
| Character / Role | Echo Set |
|---|---|
|
(Main DPS) |
|
|
(Sub-DPS) |
|
|
(Support) |
|
| Character | Explanation |
|---|---|
| | Sub-DPS Replacement Mortefi is a slight downgrade to Iuno, but still has good value as a sub-DPS with his coordinated attacks and Heavy Attack DMG amplification. |
| | Sub-DPS Replacement Phrolova can be added as a secondary DPS, replacing Iuno in the team. She provides Heavy Attack DMG amplification on top of dealing off-field damage with her Liberation. |
Galbrena can be used in a hypercarry team focused on providing her Crit and DMG buffs. Iuno, as a sub-DPS, provides huge Heavy Attack DMG amplification and can deal good damage on her own.
As for the third slot, the best option for supports is Shorekeeper with her team-wide general DMG buffs and healing, though you can replace her with other healers like Verina and Baizhi.
General Rotation
| 1 | Start the fight with Shorekeeper and go through her combos to generate Resonance and Concerto Energy. Once available, use her Liberation to activate Stellarealm and switch to Iuno with her Outro. Make sure to cast her Echo Skill before exiting the field to generate Afterflame for Galbrena. |
|---|---|
| 2 | As Iuno, immediately use her Resonance Skill after her Intro to activate the Lunar Cycle. Then, jump to enter the New Moon state. |
| 3 | During New Moon state, quickly cast Liberation to generate Forte energy. Continue this with three Basic Attacks and two instances of her Resonance Skill to consume her Forte for increased damage. |
| 4 | Once Iuno's Outro is available, quickly perform Echo Skill for Afterflame stacks, then switch to Galbrena to amplify her Heavy Attack DMG. |
| 5 | With Galbrena on-field, cast Echo Skill shortly after her Intro and continue with six Basic Attacks. Once her Forte is full, cast her enhanced Resonance Skill to enter the Demon Hypostasis state. |
| 6 | After entering the state, perform her Liberation to deal damage and increase her skills' DMG multipliers. Then, follow this up with seven Basic Attacks. |
| 7 | Once her Forte is consumed and Concerto filled, switch back to Shorekeeper to detonate Stellarealm. |
| 8 | Repeat until all enemies are defeated. |
How to Play Galbrena
| Galbrena Gameplay Guide |
|---|
|
|
Galbrena Gameplay Loop Summary
Footage is sped up to 1.5 times the normal speed and is primarily meant to show her gameplay and rotations.
| ① | Have Galbrena enter combat with her Intro to start building up Sinflame. Cast her Echo Skill to gain Afterflame and continue generating Sinflame with Basic Attacks. |
|---|---|
| ② | Once her Sinflame (Forte) stacks reach 100, cast Resonance Skill to enter Demon Hypostasis. |
| ③ | During Demon Hypostasis, immediately cast Resonance Liberation to deal huge Fusion Echo Skill DMG and increase her DMG multipliers. |
| ④ | Perform 7 Basic Attacks after her Resonance Liberation to do two Basic Attack strings. |
| ⑤ | This will deplete her Purging Flame. Afterwards, exit the field with her Outro. |
| Note | Before initiating combat with Galbrena, make sure that other Resonators have activated their Echo Skills so Galbrena benefits from Afterflame's buffs. |
Build Up Sinflame with Attacks

| Full Sinflame Combo | |
|---|---|
| Intro → Res. Skill → BA x3 | |
| Sinflame Stack Skills | During Threshold state • Basic Attack • Heavy Attack - Volley of Death • Mid-air Attack - Ashfall Barrage • Resonance Skill - Encroach • Intro Skill - Hellflare Overload |
Sinflame is one of three stacks that Galbrena utilizes with her Forte Circuit. This stacks up to 100 points and is required for her to enter Demon Hypostasis. You can build this up with her Normal Attacks, Resonance Skill, and Intro Skill.
Cast Unique Skills to Use Her Combo Buffing Mechanic
| Combo Rank | DMG Amplification |
|---|---|
| S | 20% |
| A | 15% |
| B | 10% |
| C | 5% |
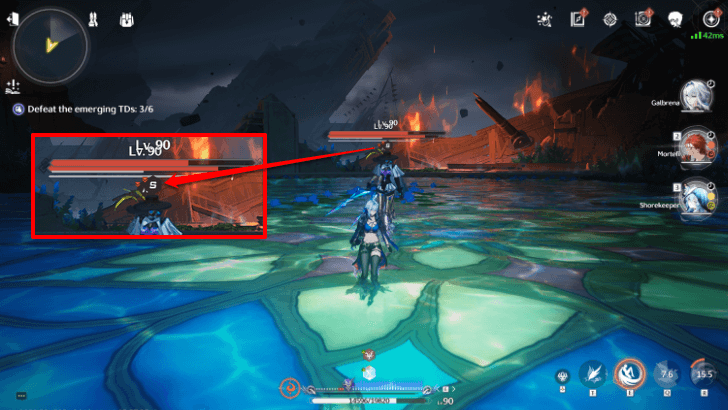
Galbrena's Inherent Skill has a unique mechanic, Fated End, that amplifies all of her skills' DMG when she uses different skills in succession. Each skill can generate 1 stack of Fated End every 5 seconds, up to a maximum of 4 stacks for 20% DMG amplification.
You can see this below the enemies' HP bars shown in letters according to the number of stacks. This applies to both bosses and regular enemies, so she essentially deals more damage as fights take longer.
Enter Demon Hypostasis with Resonance Skill
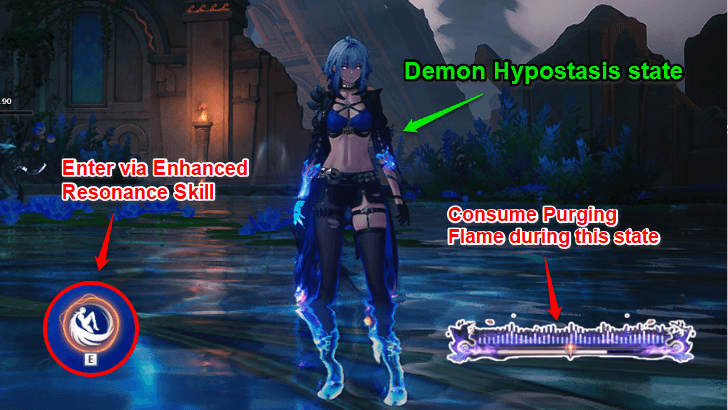
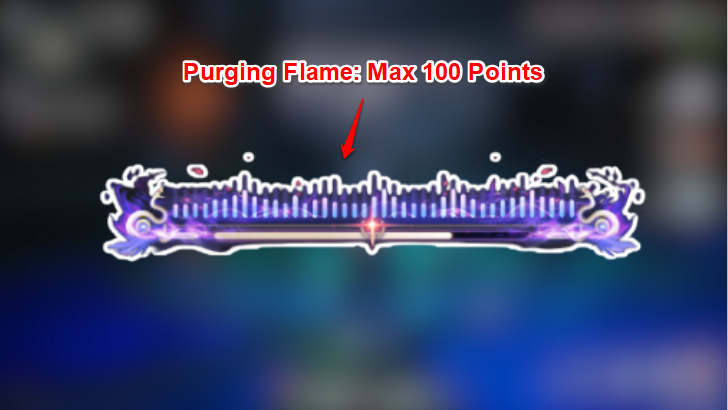
Galbrena enters the Demon Hypostasis state through her Resonance Skill, Ascent of Malice. This is only available when you get her Sinflame stacks to 100. Once you enter the state, her Sinflame gets converted into Purging Flame, which is her Forte gauge that gets consumed by her transformed skills.
Use Her Transformed Skills in Demon Hypostasis
| Transformed Skills |
|---|
|
• Basic Attack - Seraphic Execution • Heavy Attack - Flamewing Verdict • Mid-air Attack - Hellsent Barrage • Dodge Counter - Purgatory Scourge • Resonance Skill - Ravage The DMG multipliers are different from Galbrena's Normal Attacks and scale with her Forte Circuit instead. Their multipliers are further enhanced by 85% when casting Resonance Liberation. |
During Demon Hypostasis, Galbrena's Resonance Skill and Normal Attacks are enhanced. These transformed skills consume Purging Flame, which is her Forte gauge during this state. Once depleted, she returns back to the Threshold state.
Before depleting her Purging Flame, cast Resonance Liberation to increase the DMG multipliers of these skills.
Deal Massive Damage with Resonance Liberation
Galbrena's Resonance Liberation is one of her strongest damaging skills in her kit. Furthermore, it increases the DMG multipliers of all her transformed skills during Demon Hypostasis.
Use this after entering Demon Hypostasis to immediately benefit from its effects.
Execute Enemies with Her Outro
| Outro Skill DMG Multiplier | 79.5%*3+556.5% ATK |
|---|
Galbrena's Outro Skill has a high DMG multiplier, so we suggest using it when possible to deal even more damage during team rotations.
Generate Afterflame from Team's Echo Skills
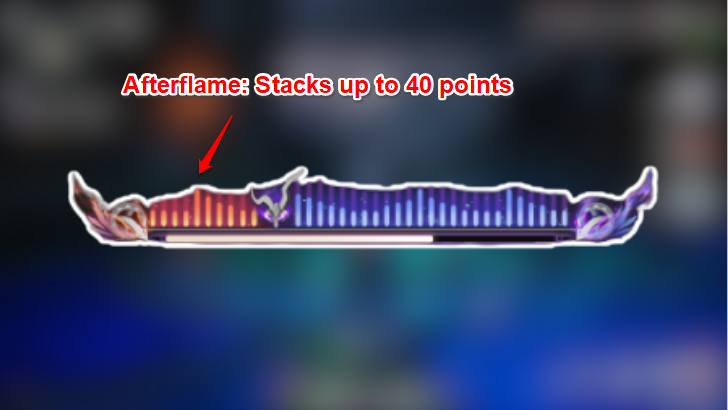
| Echo Skill Stacks | 8 Afterflame Points |
|---|
Afterflame is the last of Galbrena's stacking mechanics. It is mainly received from her teammates whenever they cast an Echo Skill on the field. This stacks up to 40 points, which can be received from 5 Echo Skill casts.
Each point of Afterflame gives a 1.5% DMG increase for all of her transformed skills during Demon Hypostasis, amounting to a maximum of 60% when achieved.
Galbrena Recommended Combos
Galbrena Full Combo
| Combo |
|---|
| Intro → Echo Skill → BA x6 → Res. Skill → Res. Lib → BA x7 → Outro |
This combo maximizes Galbrena's two Forte Gauges, Sinflame and Purging Flame, as well as her Fated End mechanic that lets her deal more damage upon using different skills in her kit. As for her Afterflame buffs, it's mostly received from her teammates' Echo Skill casts, so make sure to use them when they're on the field!
After entering with Intro, activate Echo Skill for more Afterflame. Then, fill her Forte with Basic Attacks. Once full, Demon Hypostasis state will be available via her Enhanced Skill. Follow this up with her Liberation, dealing huge Echo Skill DMG, as well as increasing her normal skills' DMG multipliers. Lastly, finish with 7 Basic Attacks to consume Purging Flame before switching out of combat.
Galbrena Materials: Ascension and Forte
Galbrena Ascension Materials
Character Ascension Materials
| How to Get | Materials |
|---|---|
| Normal Enemies | |
| World Boss | |
| Overworld Material |
|
| Currency |
|
Forte Materials
| How to Get | Materials |
|---|---|
| Normal Enemies | |
| Forgery Challenge | |
| Weekly Boss | |
| Currency |
|
Galbrena Ascension Materials and Farming Guide
Ascension Materials Per Rank
| Character Ascension Materials | |
|---|---|
| Rank 1 20 ➔ 40 |
|
| Rank 2 40 ➔ 50 |
|
| Rank 3 50 ➔ 60 |
|
| Rank 4 60 ➔ 70 |
|
| Rank 5 70 ➔ 80 |
|
| Rank 6 80 ➔ 90 |
|
Total Forte Materials
| Total Forte Materials | |
|---|---|
| Main Nodes (Total) Lv. 1 ➔ 10 |
|
| Stat Bonus 1 (Total) |
|
| Stat Bonus 2 (Total) |
|
| Inherent Skill 1 |
|
| Inherent Skill 2 |
|
| Level Upgrade | Upgrade Materials |
|---|---|
| 1 ➔ 2 | |
| 2 ➔ 3 | |
| 3 ➔ 4 | |
| 4 ➔ 5 | |
| 5 ➔ 6 | |
| 6 ➔ 7 | |
| 7 ➔ 8 | |
| 8 ➔ 9 | |
| 9 ➔ 10 | |
Galbrena Skill Priority and Forte List
Forte Tree Priority
| Skill | Priority | Explanation |
|---|---|---|
| Normal Attack | ★★★☆☆ | While not Galbrena's primary source of damage, she will be using her Normal Attacks quite often in between rotations. Upgrade this when you have the resources, but prioritize her Forte and Liberation skills first. |
| Resonance Skill | ★★☆☆☆ | Her Resonance Skill is nothing too amazing and doesn't provide much damage. You can upgrade this after her other abilities. |
| Forte Circuit | ★★★★★ | Galbrena's Forte Circuit is where most of her damage comes from. Her transformed abilities scale off this skill, so you should prioritize this first. |
| Resonance Liberation | ★★★★☆ | Her Liberation is the secondary damage source in her kit and will be essential in her rotations. Prioritize this when possible, second only to her Forte Circuit. |
| Intro Skill | ★☆☆☆☆ | Her Intro Skill doesn't provide much damage when upgraded and is primarily used for her rotations. You can upgrade this last, if at all. |
The majority of Galbrena's damage comes from her Forte Circuit and Resonance Liberation skills. Her transformed skills scale off her Forte Circuit, while Resonance Liberation has high multipliers on its own. Aim to max their levels first, and upgrade their other skills along the way.
Normal Attack
| NATK | SKILL | FORTE | INHE |
| LIBE | INTRO | OUTRO | TUNE |
| Slayer's Trigger |
|---|
|
Perform up to 4 consecutive attacks, dealing Fusion DMG. Basic Attack Stage 1 to 3 DMG are considered as Heavy Attack DMG, and Basic Attack Stage 4 DMG as Echo Skill DMG. Press Normal Attack right after performing Basic Attack Stage 4 to perform Basic Attack Stage 2. Heavy Attack - Volley of Death: Consume STA to attack the target and perform up to 3 consecutive attacks, dealing Fusion DMG. Stage 3 DMG is considered as Echo Skill DMG. Press Normal Attack right after performing Heavy Attack - Volley of Death Stage 1 to perform Basic Attack Stage 2. Press Normal Attack right after performing Heavy Attack - Volley of Death Stage 2 or 3 to perform Basic Attack Stage 3. Mid-air Attack - Ashfall Barrage: While in mid-air, press Normal Attack to consume STA to perform a Plunging Attack, dealing Fusion DMG, considered as Heavy Attack DMG. While in mid-air, hold Normal Attack to continuously consume STA to launch a barrage of shots at targets below, dealing Fusion DMG, considered as Heavy Attack DMG. If Galbrena does not land when interrupted during the barrage, she cannot immediately cast this skill again. Release Normal Attack during the barrage to cast Plunging Attack. Press Normal Attack right after casting Plunging Attack to cast Basic Attack Stage 3. Dodge Counter - Blood for Blood: Press Normal Attack right after a successful Dodge to attack the target, dealing Fusion DMG, considered as Heavy Attack DMG. Press Normal Attack right after casting this skill to cast Basic Attack Stage 4. Attribute Bonuses: 1. Crit. DMG +2.40% 2. Crit. DMG +5.60% |
| Skill Detail | Effect (Lvl 1) |
|---|---|
| Basic Attack Stage 1 DMG | 29.77% |
| Basic Attack Stage 2 DMG | 13.23%+13.23%+39.69% |
| Basic Attack Stage 3 DMG | 14.39%+14.39%+21.58%+21.58% |
| Basic Attack Stage 4 DMG | 89.46% |
| Dodge Counter - Blood for Blood DMG | 20.65%+20.65%+30.97%+30.97% |
| Mid-air Attack - Ashfall Barrage Plunging Attack DMG | 72.00% |
| Mid-air Attack - Ashfall Barrage Sustained Fire DMG | 13.50% |
| Heavy Attack - Volley of Death Stage 1 DMG | 26.81%+26.81% |
| Heavy Attack - Volley of Death Stage 2 DMG | 17.40%*2 |
| Heavy Attack - Volley of Death Stage 3 DMG | 8.44%*3+59.05% |
| Mid-air Attack - Ashfall Barrage Sustained Fire STA Cost (Per Sec) | 20 |
| Mid-air Attack - Ashfall Barrage STA Cost | 30 |
| Heavy Attack - Volley of Death Stage 1 STA Cost | 10 |
| Heavy Attack - Volley of Death Stage 2 STA Cost | 10 |
| Heavy Attack - Volley of Death Stage 3 STA Cost | 10 |
Resonance Skill
| NATK | SKILL | FORTE | INHE |
| LIBE | INTRO | OUTRO | TUNE |
| Edge Transcended |
|---|
|
Resonance Skill - Encroach: Dash forward and leap into the air. Flip backward upon hitting the target, dealing Fusion DMG, considered Heavy Attack DMG. Resonance Skill - Ascent of Malice: Upon reaching 100 points of Sinflame, Resonance Skill is replaced with Resonance Skill - Ascent of Malice. Slash at enemies with her wings, dealing Fusion DMG, considered Heavy Attack DMG. Upon casting this skill: - Galbrena enters Demon Hypostasis. - Sinflame is converted into an equivalent amount of Purging Flame. - Can be followed by Basic Attack - Seraphic Execution Stage 2. Attribute Bonuses: 1. ATK +1.80% 2. ATK +4.20% |
| Skill Detail | Effect (Lvl 1) |
|---|---|
| Resonance Skill - Encroach DMG | 5.40%+12.60% |
| Resonance Skill - Ascent of Malice DMG | 25.94%+25.94% |
| Resonance Skill - Ascent of Malice Concerto Regen | 10 |
| Resonance Skill - Encroach Cooldown | 5s |
| Resonance Skill - Ascent of Malice Cooldown | 13s |
Forte Circuit
| NATK | SKILL | FORTE | INHE |
| LIBE | INTRO | OUTRO | TUNE |
| Beyond Threshold |
|---|
|
Threshold State: By default, Galbrena is in Threshold State, and in this state, she accumulates Afterflame and Sinflame. Demon Hypostasis: While in Demon Hypostasis, Basic Attack, Heavy Attack - Volley of Death, Mid-air Attack - Ashfall Barrage, Dodge Counter - Blood for Blood, and Resonance Skill - Encroach are replaced with Basic Attack - Seraphic Execution, Heavy Attack - Flamewing Verdict, Mid-air Attack - Hellsent Barrage, Dodge Counter - Purgatory Scourge, and Resonance Skill - Ravage, which consume Purging Flame on hit. While in Demon Hypostasis, every point of Afterflame increases the DMG of Basic Attack - Seraphic Execution, Heavy Attack - Flamewing Verdict, Mid-air Attack - Hellsent Barrage, Resonance Skill - Ravage, and Dodge Counter - Purgatory Scourge by 1.5%, up to 60%, which is removed upon exiting Demon Hypostasis. When Purging Flame depletes or after staying in Demon Hypostasis for over 50s, Demon Hypostasis ends automatically. Basic Attack - Seraphic Execution: Perform up to 5 consecutive attacks, dealing Fusion DMG. Consume Purging Flame on hit. Stage 1 to 3 DMG are considered Heavy Attack DMG, and Stage 4 and 5 DMG Echo Skill DMG. Press Normal Attack after casting Basic Attack - Seraphic Execution Stage 5 to cast Basic Attack - Seraphic Execution Stage 3. Heavy Attack - Flamewing Verdict: Consume STA to attack the target and perform up to 3 consecutive attacks, dealing Fusion DMG. Consume Purging Flame on hit. Stage 3 DMG is Echo Skill DMG. Press Normal Attack after casting Heavy Attack - Flamewing Verdict Stage 1 to cast Basic Attack - Seraphic Execution Stage 2. Press Normal Attack after casting Heavy Attack - Flamewing Verdict Stage 2 and 3 to cast Basic Attack - Seraphic Execution Stage 3. Mid-air Attack - Hellsent Barrage: While in mid-air, press Normal Attack to consume STA to perform aerial attacks, dealing Fusion DMG, considered Heavy Attack DMG. Consume Purging Flame on hit. While in mid-air hold Normal Attack to continuously consume STA to launch a barrage of shots at targets, dealing Fusion DMG, considered Heavy Attack DMG. Consume Purging Flame on hit. If Galbrena does not land when interrupted during the barrage, she cannot immediately cast this skill again. Release Normal Attack during the barrage to cast Plunging Attack. Press Normal Attack after the Plunging Attack to cast Basic Attack - Seraphic Execution Stage 3. Dodge Counter - Purgatory Scourge: Press Normal Attack right after a successful Dodge to attack the target, dealing Fusion DMG, considered Heavy Attack DMG. Press Normal Attack right after casting this skill to cast Basic Attack - Seraphic Execution Stage 4. Resonance Skill - Ravage: Dash forward and leap into the air. Flip backward upon hitting the target, dealing Fusion DMG, considered Heavy Attack DMG. Consume Purging Flame on hit. Resonance Skill - Ravage and Resonance Skill - Encroach share a cooldown. Hellstride: Press Dodge on the ground while casting Galbrena's own skills to cast Hellstride to deal a fixed amount of Fusion DMG, considered Basic Attack DMG that does not bear any effect from DMG buffs. Hellstride can trigger successful Dodges. Hellstride cannot be cast consecutively. Casting this skill does not reset the attack cycles within a short period of time. Burning Drive: Casting Intro Skill, Hellstride, Normal Attack - Seraphic Execution Basic Attack Stage 4, Resonance Skill - Encroach, Resonance Skill - Ascent of Malice, and Resonance Skill - Ravage increases Galbrena's resistance to interruptions and ATK by 20% for 4s. Afterflame: Galbrena can hold up to 40 points of Afterflame. While in Threshold State, Galbrena recovers 8 points of Afterflame when Resonators in the nearby team cast Echo Skill. Echoes with the same name can only trigger this effect once. This effect resets when Galbrena exits Demon Hypostasis. All Afterflame is removed upon exiting Demon Hypostasis. Sinflame: Galbrena can hold up to 100 points of Sinflame. While in Threshold State, hitting an enemy with Basic Attack, Heavy Attack - Volley of Death, Mid-air Attack - Ashfall Barrage, Resonance Skill - Encroach, and Intro Skill - Hellflare Overload recovers Sinflame. |
| Skill Detail | Effect (Lvl 1) |
|---|---|
| Hellstride DMG | 666 |
| Basic Attack - Seraphic Execution Stage 1 DMG | 29.67% |
| Basic Attack - Seraphic Execution Stage 2 DMG | 14.00%+14.00%+42.00% |
| Basic Attack - Seraphic Execution Stage 3 DMG | 12.23%*3+85.61% |
| Basic Attack - Seraphic Execution Stage 4 DMG | 9.13%*3+63.89% |
| Basic Attack - Seraphic Execution Stage 5 DMG | 33.84%+78.96% |
| Heavy Attack - Flamewing Verdict Stage 1 DMG | 29.79%+29.79% |
| Heavy Attack - Flamewing Verdict Stage 2 DMG | 19.29%*2 |
| Heavy Attack - Flamewing Verdict Stage 3 DMG | 8.90%*3+62.26% |
| Dodge Counter - Purgatory Scourge | 16.15%*3+113.03% |
| Heavy Attack - Flamewing Verdict Stage 1 STA Cost | 10 |
| Heavy Attack - Flamewing Verdict Stage 2 STA Cost | 10 |
| Heavy Attack - Flamewing Verdict Stage 3 STA Cost | 10 |
| Hellstride STA Cost | 20 |
| Mid-air Attack - Hellsent Barrage Plunging Attack DMG | 80.00% |
| Mid-air Attack - Hellsent Barrage Sustained Fire DMG | 15.00% |
| Mid-air Attack - Hellsent Barrage Sustained Fire STA Cost (Per Sec) | 20 |
| Mid-air Attack - Hellsent Barrage STA Cost | 30 |
| Resonance Skill - Ravage DMG | 5.40%+12.60% |
| Resonance Skill - Ravage Cooldown | 5s |
Inherent Skills
| NATK | SKILL | FORTE | INHE |
| LIBE | INTRO | OUTRO | TUNE |
| Inherent Skill 1: Oathbound Hunt |
|---|
|
1 stack of Fated End is inflicted on the target when the following skills hit: Intro Skill, Basic Attack, Basic Attack - Seraphic Execution, Dodge Counter, Heavy Attack - Volley of Death, Heavy Attack - Flamewing Verdict, Mid-air Attack, Hellstride, Resonance Skill - Encroach, Resonance Skill - Ascent of Malice, Resonance Skill - Ravage and Resonance Liberation, up to 4 stacks. Each stack Amplifies the DMG directly dealt by Galbrena's Normal Attack, Resonance Skill, Forte Circuit, Resonance Liberation, Intro Skill, and Outro Skill by 5% for 5.5s. The same type of skill can trigger this effect on the same target once every 5s. Resonance Skill - Encroach and Resonance Skill - Ravage are considered the same type of skill. |
| Inherent Skill 2: Sin Feaster |
|---|
| Casting Basic Attack Stage 4, Basic Attack - Seraphic Execution Stage 5, Heavy Attack - Volley of Death Stage 3, and Heavy Attack - Flamewing Verdict Stage 3 recovers 10 points of STA. |
Resonance Liberation
| NATK | SKILL | FORTE | INHE |
| LIBE | INTRO | OUTRO | TUNE |
| Hellfire Absolution |
|---|
|
Attack the target and deal Fusion DMG, considered Echo Skill DMG. Gain 85% DMG Multiplier increase for Basic Attack - Seraphic Execution, Heavy Attack - Flamewing Verdict, Mid-air Attack - Hellsent Barrage, and Dodge Counter Purgatory Scourge for 14s while in Demon Hypostasis. Press Normal Attack after casting Resonance Liberation to cast Basic Attack Stage 2. While in Demon Hypostasis, cast Basic Attack - Seraphic Execution Stage 2 instead. Can be cast in mid-air close to the ground. Attribute Bonuses: 1. ATK +1.80% 2. ATK +4.20% |
| Skill Detail | Effect (Lvl 1) |
|---|---|
| Resonance Liberation - Hellfire Absolution DMG | 55.79%+45.64%*11 |
| Resonance Liberation - Hellfire Absolution Resonance Energy Cost | 125 |
| Resonance Liberation - Hellfire Absolution Concerto Regen | 20 |
| Resonance Liberation - Hellfire Absolution Cooldown | 25s |
Intro Skill
| NATK | SKILL | FORTE | INHE |
| LIBE | INTRO | OUTRO | TUNE |
| Hellflare Overload |
|---|
|
Attack the target and deal Fusion DMG. Hold Normal Attack after casting this skill to cast Heavy Attack - Volley of Death Stage 2. While in Demon Hypostasis, cast Heavy Attack - Flamewing Verdict Stage 2 instead. Press Normal Attack right after casting this skill to perform Basic Attack Stage 2, which is replaced with Basic Attack - Seraphic Execution Stage 2 if Galbrena is in Demon Hypostasis. Attribute Bonuses: 1. Crit. DMG +2.40% 2. Crit. DMG +5.60% |
| Skill Detail | Effect (Lvl 1) |
|---|---|
| Intro Skill - Hellflare Overload DMG | 47.34% |
| Intro Skill - Hellflare Overload Concerto Regen | 10 |
Outro Skill
| NATK | SKILL | FORTE | INHE |
| LIBE | INTRO | OUTRO | TUNE |
| Ashen Pursuit |
|---|
| Attack the target, dealing Fusion DMG equal to 79.5%*3+556.5% of Galbrena's ATK. |
Tune Break
| NATK | SKILL | FORTE | INHE |
| LIBE | INTRO | OUTRO | TUNE |
| Tune Break: Pistols |
|---|
| When the target's Off-Tune Level is full, the Resonator may cast Tune Break on the target. |
Galbrena Resonance Chain
Recommended Sequence Nodes
| Why We Recommend It | |
|---|---|
| S1 | ★★★☆☆ - Good Galbrena's S1 is nice to have due to the Crit DMG increase it provides on top of the interruption immunity for some of her skills. That said, her weapon provides more value if you don't have it yet, so we suggest getting that first. |
| S2 | ★★★★☆ - Great S2 is a sizeable jump in her Burning Drive passive, providing her with a 70% ATK bonus on top of her other buffs. This lets you have the flexibility to build her other stats better, while seeing a good damage increase overall. This is a good stopping point for most players. |
| S3 | ★★★☆☆ - Good Galbrena's S3 is a good and steady upgrade to her damage potential, as it increases the damage she deals with her Liberation. This is one of her primary damage sources, so you'll see a pretty noticeable increase in her performance during combat. |
| S4 | ★★★★☆ - Great This sequence node is a great upgrade for Galbrena and her team, regardless of which comp you're playing on. With its minimal activation requirement, your entire team is essentially getting an all-Attribute DMG buff. This also increases her value as a Resonator, being able to be even more flexible in team making. |
| S5 | ★★☆☆☆ - Okay Her S5 is nothing too groundbreaking and is more of a steady damage increase. Her Resonance Skills are not really her primary damaging abilities, so this is more of just improving her weaknesses than really upgrading her. Aim to get S6 when you're at this point. |
| S6 | ★★★★★ - Amazing S6 is her biggest upgrade, changing Galbrena's kit significantly with her Forte skill being replaced with an upgraded version. She gains DMG multiplier increases to her primary damage sources, making it a high-priority sequence chain. Furthermore, it provides more Fusion DMG amplification, improving her damage overall. |
All Sequence Node Effects
| S1 | Heart of Defiance Ever Ablaze When casting Resonance Skill - Ascent of Malice, each point of Afterflame additionally grants 2% Crit. DMG to Basic Attack - Seraphic Execution, Heavy Attack - Flamewing Verdict, Mid-air Attack - Hellsent Barrage, Resonance Skill - Ravage, and Dodge Counter - Purgatory Scourge, up to 80%. This effect is removed upon exiting Demon Hypostasis. While in Demon Hypostasis, Basic Attack - Seraphic Execution Stage 5, Heavy Attack - Flamewing Verdict Stage 3, and Mid-air Attack - Hellsent Barrage are immune to interruption. |
|---|---|
| S2 | Hellbound Dive of Fire and Abyss Burning Drive grants 350% more ATK Bonus. |
| S3 | Hunter's Blood Oath Rekindled Resonance Liberation DMG Multiplier is increased by 130%. |
| S4 | Carry Forth This Fading Spark When Resonators in the team cast Echo Skill, all Resonators in the team gain 20% all-Attribute DMG Bonus for 20s. |
| S5 | Though Light Fades, Torment Consumes The DMG Multipliers of Resonance Skill - Encroach, Resonance Skill - Ascent of Malice, and Resonance Skill - Ravage are increased by 150%. |
| S6 | I Remain Who I Am, Eternal My Flame Demon Hypostasis becomes Eternal Hypostasis. Eternal Hypostasis retains all effects of Demon Hypostasis. Additionally, Eternal Hypostasis lasts, the DMG Multipliers of Basic Attack - Seraphic Execution, Heavy Attack - Flamewing Verdict, Mid-air Attack - Hellsent Barrage, and Dodge Counter - Purgatory Scourge are additionally increased by 60%. When casting Resonance Skill - Ascent of Malice, for every 1 point of Afterflame consumed, Galbrena's Basic Attack - Seraphic Execution, Heavy Attack - Flamewing Verdict, Mid-air Attack - Hellsent Barrage, Resonance Skill - Ravage, and Dodge Counter - Purgatory Scourge gain 0.875% Fusion DMG Amplification, up to 35%, which is removed upon exiting Eternal Hypostasis. |
How to Get Galbrena
Currently Featured in a Limited Banner
| Limited Banner | |
|---|---|
 From Ashes |
|
| Availability |
|---|
| Version 3.1 - Phase 2 February 26, 2026 - March 18, 2026 (Asia) |
You can get Galbrena by pulling in the Character Event Convene called From Ashes which is available in Version 3.1 from February 26, 2026 to March 18, 2026 (UTC-5).
Galbrena Voice Actor and Lore
Galbrena Voice Actors
| Galbrena Voice Actor List | |
|---|---|
| EN | Devora Wilde |
| JP | Umeka Shouji |
| CN | Zhang Wenjie |
| KR | Lee Da Seul |
Galbrena In-Game Lore
| Gender | Female |
|---|---|
| Birthplace | Rinascita |
| Affiliation | Black Shores |
| Basic Info | Galbrena, Fiend of Ever-burning Flame, Discord Slayer... She has been to hell and back, through countless battles, deepest darkness, and much more. She hunts, going from one hunting ground to another, and will never stop hunting. |
Wuthering Waves Related Guides

| List of All Characters | List of Character Builds |
| All Character Ascension Materials | All Wing and Glider Skins |
Characters by Rarity
| Resonator Rarity | |
|---|---|
 5-Star Characters 5-Star Characters |
 4-Star Characters 4-Star Characters |
Characters by Element
| Resonator Elements | ||
|---|---|---|
Characters by Weapon
| Characters by Weapon | |||||
|---|---|---|---|---|---|
Other Lists of Characters
| Other Resonator Lists | ||
|---|---|---|
| Female Characters | Male Characters | |
| Voice Actors | Free Characters | |
| Healers | Factions | |
| Upcoming Characters | ||
All Playable Characters
Upcoming Characters
| Upcoming Characters | ||
|---|---|---|
|
|
|
|
Comment
56  Anonymous 16 days
i wish she worked well with carlotta as a joke bcos shadowheart/lae'zel (their VAs) but maybe this works in their favor since they hate each other in that game LOL
Author

Galbrena Best Builds and Teams
Please participate in our site
improvement survey
03/2026
improvement survey
03/2026
Would you assist in
improving Game8's site?
improving Game8's site?

×
We are listening to our users' valuable opinions and discussing how to act on them.
The information collected through this survey will be used for the purpose of improving our services. In addition, the information will only be disclosed a part of a statistic in a format that will not allow identification of personal information.
Begin Survey
Not Now
×
Please rate each item regarding Game8.co's Advertisements.
Amount of Ads
Very Dissatisfied
Somewhat Dissatisfied
Fine
Somewhat Satisfied
Highly Satisfied
Placement of Ads
Timing of Ad Display
Ad Loading Speed
Safeness of Ads
Content of Ads
×
Please rate each item regarding Game8.co's Quality of Articles.
Amount of information
Very Dissatisfied
Somewhat Dissatisfied
Fine
Somewhat Satisfied
Highly Satisfied
Frequency of updates
Speed of new information
Accuracy of articles
Understandibility of articles
Readability of sentences
×
Please rate each item regarding Game8.co's Usability of the Site.
Ease of finding information
Very Dissatisfied
Somewhat Dissatisfied
Fine
Somewhat Satisfied
Highly Satisfied
Loading Speed
Use of Color
Font Size
Visibility of Images
Easy to Understand Layout
×
Please rate each item regarding Game8.co's Message Boards, Comments.
Ease of Writing
Very Dissatisfied
Somewhat Dissatisfied
Fine
Somewhat Satisfied
Highly Satisfied
Readability
Ease in Finding Information
Comment Quality
Comment Quantity
Admin Response
×
Please rate each item regarding Game8.co's Site's new design.
Please rate our site's new design
Very Dissatisfied
Somewhat Dissatisfied
Fine
Somewhat Satisfied
Highly Satisfied
Do you think that the website's design change makes the site easier to use?
Has the new design made it easier for you to find information on the site?
Has the new design improved the overall visual appeal of the site?
How would you rate your overall satisfaction with the new design of the site?
×
How likely are you to recommend Game8 to someone you know?
Very Unlikely
0
1
2
3
4
5
6
7
8
9
10
Very Likely
If you have other opinions regarding potential improvement to the website, please share them with us. We would appreciate your honest opinion.
Note: This is a free response section, so you can proceed without entering anything.
Note: Please be sure not to enter any kind of personal information into your response.
Note: Please be sure not to enter any kind of personal information into your response.
×
Thank You
×
Thank you for participating in our survey! Your answers will help us to improve the quality of our website and services.
We hope you continue to make use of Game8.
We hope you continue to make use of Game8.
Close
Premium Articles

Rankings
Gaming News


![Slay the Spire 2 Review [Early Access] | Still the Deckbuilder to Beat](https://img.game8.co/4433115/44e19e1fb0b4755466b9e516ec7ffb1e.png/thumb)

![Resident Evil Village Review [Switch 2] | Almost Flawless Port](https://img.game8.co/4432790/e1859f64830960ce4248d898f8cd38d9.jpeg/thumb)
Popular Games

Genshin Impact Walkthrough & Guides Wiki
Honkai: Star Rail Walkthrough & Guides Wiki
Umamusume: Pretty Derby Walkthrough & Guides Wiki
Pokemon Pokopia Walkthrough & Guides Wiki
Resident Evil Requiem (RE9) Walkthrough & Guides Wiki
Monster Hunter Wilds Walkthrough & Guides Wiki
Wuthering Waves Walkthrough & Guides Wiki
Arknights: Endfield Walkthrough & Guides Wiki
Pokemon FireRed and LeafGreen (FRLG) Walkthrough & Guides Wiki
Pokemon TCG Pocket (PTCGP) Strategies & Guides Wiki


Recommended Games
Fire Emblem Heroes (FEH) Walkthrough & Guides Wiki
Diablo 4: Vessel of Hatred Walkthrough & Guides Wiki
Yu-Gi-Oh! Master Duel Walkthrough & Guides Wiki
Super Smash Bros. Ultimate Walkthrough & Guides Wiki
Pokemon Brilliant Diamond and Shining Pearl (BDSP) Walkthrough & Guides Wiki
Elden Ring Shadow of the Erdtree Walkthrough & Guides Wiki
Monster Hunter World Walkthrough & Guides Wiki
The Legend of Zelda: Tears of the Kingdom Walkthrough & Guides Wiki
Persona 3 Reload Walkthrough & Guides Wiki
Cyberpunk 2077: Ultimate Edition Walkthrough & Guides Wiki


All rights reserved
Copyright© 2024-2025 Kuro Games. All Rights Reserved.
The copyrights of videos of games used in our content and other intellectual property rights belong to the provider of the game.
The contents we provide on this site were created personally by members of the Game8 editorial department.
We refuse the right to reuse or repost content taken without our permission such as data or images to other sites.
Y’all really gotta update her page to include Photon Homogenizer cuz to say she still doesn’t have good f2p weapon options is ridiculous